如何:旋轉色彩
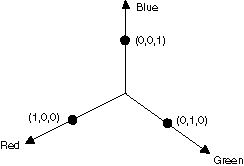
四維色彩空間中的旋轉很難視覺化。 我們可以藉由同意將其中一個色彩元件固定在一起,讓您更輕鬆地將旋轉視覺化。 假設我們同意將 Alpha 元件固定在 1(完全不透明)。 然後,我們可以以紅色、綠色和藍色座標軸視覺化立體色彩空間,如下圖所示。

色彩可以視為 3D 空間中的點。 例如,空格中的點 (1, 0, 0) 代表紅色,而空格中的點 (0, 1, 0) 代表綠色。
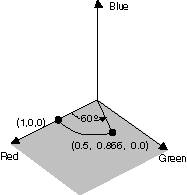
下圖顯示透過紅色-綠色平面 60 度的角度旋轉色彩 (1, 0, 0) 的意義。 在與紅綠平面平行的平面中旋轉可視為與藍色軸的旋轉。

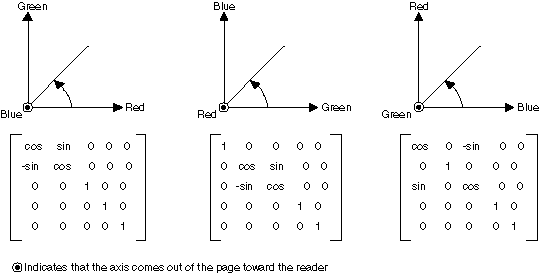
下圖顯示如何初始化色彩矩陣,以針對三個座標軸的每個軸執行旋轉(紅色、綠色、藍色):

範例
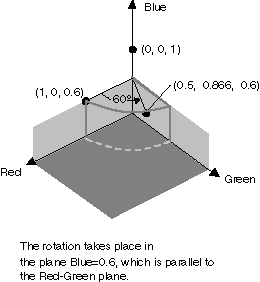
下列範例會採用所有一種色彩 (1, 0, 0.6) 的影像,並套用 60 度旋轉的藍色軸。 旋轉的角度會在與紅綠平面平行的平面中掃出。
下圖顯示左側的原始影像,以及右邊的色彩旋轉影像:

下圖顯示下列程式碼中執行的色彩旋轉視覺效果:

private void RotateColors(PaintEventArgs e)
{
    Bitmap image = new Bitmap("RotationInput.bmp");
    ImageAttributes imageAttributes = new ImageAttributes();
    int width = image.Width;
    int height = image.Height;
    float degrees = 60f;
    double r = degrees * System.Math.PI / 180; // degrees to radians

    float[][] colorMatrixElements = {
        new float[] {(float)System.Math.Cos(r),  (float)System.Math.Sin(r),  0,  0, 0},
        new float[] {(float)-System.Math.Sin(r),  (float)-System.Math.Cos(r),  0,  0, 0},
        new float[] {0,  0,  2,  0, 0},
        new float[] {0,  0,  0,  1, 0},
        new float[] {0, 0, 0, 0, 1}};

    ColorMatrix colorMatrix = new ColorMatrix(colorMatrixElements);

    imageAttributes.SetColorMatrix(
       colorMatrix,
       ColorMatrixFlag.Default,
       ColorAdjustType.Bitmap);

    e.Graphics.DrawImage(image, 10, 10, width, height);

    e.Graphics.DrawImage(
       image,
       new Rectangle(150, 10, width, height),  // destination rectangle
        0, 0,        // upper-left corner of source rectangle
        width,       // width of source rectangle
        height,      // height of source rectangle
        GraphicsUnit.Pixel,
       imageAttributes);
}
Private Sub RotateColors(ByVal e As PaintEventArgs)
    Dim image As Bitmap = New Bitmap("RotationInput.bmp")
    Dim imageAttributes As New ImageAttributes()
    Dim width As Integer = image.Width
    Dim height As Integer = image.Height
    Dim degrees As Single = 60.0F
    Dim r As Double = degrees * System.Math.PI / 180 ' degrees to radians
    Dim colorMatrixElements As Single()() = { _
       New Single() {CSng(System.Math.Cos(r)), _
                     CSng(System.Math.Sin(r)), 0, 0, 0}, _
       New Single() {CSng(-System.Math.Sin(r)), _
                     CSng(-System.Math.Cos(r)), 0, 0, 0}, _
       New Single() {0, 0, 2, 0, 0}, _
       New Single() {0, 0, 0, 1, 0}, _
       New Single() {0, 0, 0, 0, 1}}

    Dim colorMatrix As New ColorMatrix(colorMatrixElements)

    imageAttributes.SetColorMatrix( _
       colorMatrix, _
       ColorMatrixFlag.Default, _
       ColorAdjustType.Bitmap)

    e.Graphics.DrawImage(image, 10, 10, width, height)

    ' Pass in the destination rectangle (2nd argument), the upper-left corner
    ' (3rd and 4th arguments), width (5th argument),  and height (6th
    ' argument) of the source rectangle.
    e.Graphics.DrawImage( _
       image, _
       New Rectangle(150, 10, width, height), _
       0, 0, _
       width, _
       height, _
       GraphicsUnit.Pixel, _
       imageAttributes)
End Sub
編譯程式碼
上述範例是為了搭配 Windows Form 使用而設計,且其需要 PaintEventArgse,這是 Paint 事件處理常式的參數。 將 取代 RotationInput.bmp 為系統上有效的映射檔名稱和路徑。
另請參閱
意見反應
即將登場:在 2024 年,我們將逐步淘汰 GitHub 問題作為內容的意見反應機制,並將它取代為新的意見反應系統。 如需詳細資訊,請參閱:https://aka.ms/ContentUserFeedback。
提交並檢視相關的意見反應
