快顯功能表放置行為
Popup 控制項會以在應用程式上浮動的個別視窗來顯示內容。 您可使用 PlacementTarget、Placement、PlacementRectangle、HorizontalOffset 與 VerticalOffset 屬性來指定相對於控制項、滑鼠或畫面的 Popup 位置。 這些屬性可共同作業,以提供在指定 Popup位置時的彈性。
注意
ToolTip 與 ContextMenu 類別也會定義這五個屬性,並以同樣的方式運作。
設定快顯位置
Popup 的位置可相對於 UIElement 或整個畫面。 下列範例建立四個相對於 UIElement 的 Popup 控制項—此情況為影像。 所有 Popup 控制項都有設為 image1 的 PlacementTarget 屬性,但每個 Popup的位置屬性都有不同值。
<Canvas Width="200" Height="150">
  <Image Name="image1"
         Canvas.Left="75"
         Source="Water_lilies.jpg" Height="200" Width="200"/>
  <Popup IsOpen="True" PlacementTarget="{Binding ElementName=image1}"
         Placement="Bottom">
    <TextBlock FontSize="14" Background="LightGreen">Placement=Bottom</TextBlock>

  </Popup>
  <Popup IsOpen="True" PlacementTarget="{Binding ElementName=image1}"
         Placement="Top">
    <TextBlock FontSize="14" Background="LightGreen">Placement=Top</TextBlock>

  </Popup>
  <Popup IsOpen="True" PlacementTarget="{Binding ElementName=image1}"
         Placement="Left">
    <TextBlock FontSize="14" Background="LightGreen">Placement=Left</TextBlock>

  </Popup>
  <Popup IsOpen="True" PlacementTarget="{Binding ElementName=image1}"
         Placement="Right">
    <TextBlock FontSize="14" Background="LightGreen">Placement=Right</TextBlock>

  </Popup>
</Canvas>
下圖顯示影像與 Popup 控制項
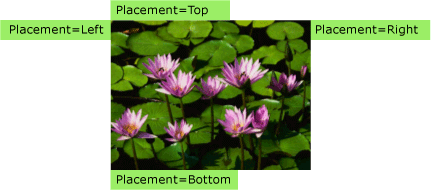
此簡單範例示範如何使用 PlacementRectangle、HorizontalOffset 與 VerticalOffset 屬性來設定 PlacementTarget 與 Placement 屬性,以讓您可更充分地控制 Popup 的位置。
![注意]視與手部相關的 Windows 設定而定,當顯示在頂端或底部時,快顯可能會靠左或靠右對齊。 上一個影像示範右手對齊方式,這會將快顯放在左側。
詞彙定義︰快顯剖析
下列字詞有助於了解 PlacementTarget、Placement、PlacementRectangle、HorizontalOffset 與 VerticalOffset 屬性,彼此與 Popup 關聯的程度為何:
目標物件
目標區域
目標原點
快顯對齊點
這些字詞可供方便地參考的 Popup各方面,以及與其建立關聯的控制項。
目標物件
「目標物件」為與 Popup 建立關聯的元素。 如果已設定 PlacementTarget 屬性,其即會指定目標物件。 如果未設定 PlacementTarget,且 Popup 具有父系,則父系為目標物件。 如果沒有 PlacementTarget 值且無父系,則沒有目標物件,且 Popup 的位置相對於畫面。
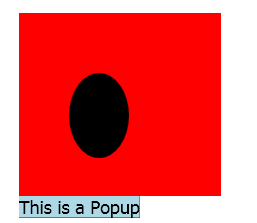
下列範例會建立 Popup,其為 Canvas 的子系。 該範例不會設定 Popup 上的 PlacementTarget 屬性。 Placement 的預設值為 PlacementMode.Bottom,所以 Popup 會出現在 Canvas 下方。
<Canvas Margin="5" Background="Red" Width="200" Height="150" >

  <Ellipse Canvas.Top="60" Canvas.Left="50"
           Height="85" Width="60"
           Fill="Black"/>

  <Popup IsOpen="True" >
    <TextBlock Background="LightBlue" FontSize="18">This is a Popup</TextBlock>
  </Popup>
</Canvas>
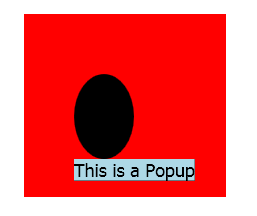
下列範例會建立 Canvas 其子系的 Popup,但 PlacementTarget 這次設為 ellipse1,所以快顯會出現在 Ellipse 下方。
<Canvas Margin="5" Background="Red" Width="200" Height="150" >

  <Ellipse Name="ellipse1"
           Canvas.Top="60" Canvas.Left="50"
           Height="85" Width="60"
           Fill="Black"/>

  <Popup IsOpen="True" PlacementTarget="{Binding ElementName=ellipse1}">
    <TextBlock Background="LightBlue" FontSize="18">This is a Popup</TextBlock>
  </Popup>
</Canvas>
注意
針對 ToolTip,Placement 的預設值為 Mouse。 針對 ContextMenu,Placement 的預設值為 MousePoint。 稍後在<屬性如何一起運作>中會說明這些值。
目標區域
目標區域為畫面上相對於 Popup 的區域。 在前一個範例中,Popup 對齊目標物件的繫結,但在某些情況下,即使 Popup 有目標物件,Popup 還是對齊其他的繫結。 如果已設定 PlacementRectangle 屬性,則目標區域不同於目標物件的繫結。
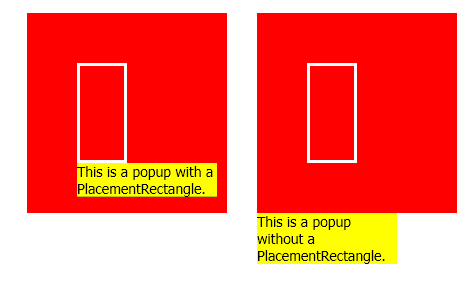
下列範例建立兩個 Canvas 物件,每一個都包含 Rectangle 與 Popup。 在這兩種狀況下,Popup 的目標物件為 Canvas。 第一個 Canvas 的 Popup 已設定 PlacementRectangle,且其 X、Y、Width 與 Height 屬性分別設為 50、50、50 與 100。 第二個 Canvas 的 Popup 未設定 PlacementRectangle。 結果,第一個 Popup 的位置在 PlacementRectangle 下方,而第二個 Popup 的位置在 Canvas 下方。 每個 Canvas 也包含 Rectangle,其 第一個 Popup具有與 PlacementRectangle 相同的繫結。 請注意,PlacementRectangle 不會在應用程式中建立可見項目;該範例會建立 Rectangle 以代表 PlacementRectangle。
<StackPanel Orientation="Horizontal" Margin="50,50,0,0">

  <Canvas Width="200" Height="200" Background="Red">
    <Rectangle Canvas.Top="50" Canvas.Left="50"
               Width="50" Height="100"
               Stroke="White" StrokeThickness="3"/>
    <Popup IsOpen="True" PlacementRectangle="50,50,50,100">
      <TextBlock FontSize="14" Background="Yellow"
                 Width="140" TextWrapping="Wrap">
        This is a popup with a PlacementRectangle.
      </TextBlock>
    </Popup>
  </Canvas>

  <Canvas Width="200" Height="200" Background="Red" Margin="30,0,0,0">
    <Rectangle Canvas.Top="50" Canvas.Left="50"
               Width="50" Height="100"
               Stroke="White" StrokeThickness="3"/>
    <Popup IsOpen="True">
      <TextBlock FontSize="14" Background="Yellow"
                 Width="140" TextWrapping="Wrap">
        This is a popup without a PlacementRectangle.
      </TextBlock>
    </Popup>
  </Canvas>

</StackPanel>
下圖顯示上述範例的結果。
目標原點和快顯對齊點
「目標原點」和「快顯對齊點」分別是目標區域和快顯上的參考點,用來進行定位。 您可使用 HorizontalOffset 和 VerticalOffset 屬性以位移目標區域的快顯。 HorizontalOffset 與 VerticalOffset 相對於目標來源與快顯對齊點。 Placement 屬性值決定目標來源與快顯對齊點的位置。
下列範例建立 Popup 並將 HorizontalOffset 與 VerticalOffset 屬性設為 20。 Placement 屬性設為 Bottom (預設),所以目標來源位於目標區域的左下角,且快顯對齊點位於 Popup 的左上角。
<Canvas Width="200" Height="200" Background="Yellow" Margin="20">
  <Popup IsOpen="True" Placement="Bottom"
         HorizontalOffset="20" VerticalOffset="20">
    <TextBlock FontSize="14" Background="#42F3FD">
      This is a popup.
    </TextBlock>
  </Popup>
</Canvas>
下圖顯示上述範例的結果。

屬性如何一起運作
PlacementTarget、PlacementRectangle 與 Placement 的值需要一起考慮,以找出正確目標區域、目標來源與快顯對齊點。 例如,如果 Placement 的值為 Mouse,除了沒有目標物件之外,還會忽略 PlacementRectangle,且目標區域為滑鼠指標的繫結。 另一方面,如果 Placement 為 Bottom,則 PlacementTarget 或父系決定目標物件;且 PlacementRectangle 會決定目標區域。
下表描述目標物件、目標區域、目標來源與快顯對齊點,並指出每個 PlacementMode 列舉值是否使用 PlacementTarget 和 PlacementRectangle。
下圖顯示每個 PlacementMode 值的 Popup、目標區域、目標來源與快顯對齊點。 在每張圖中,目標區域為黃色且 Popup 為藍色。
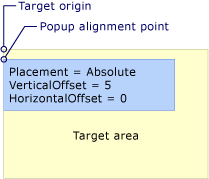
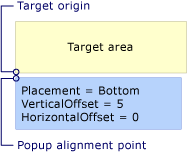


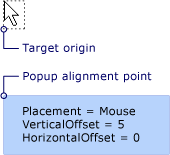
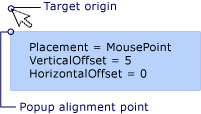


當快顯遇到畫面邊緣時
為了安全起見,畫面邊緣無法隱藏 Popup。 當 Popup 遇到畫面邊緣時,即會發生下列三種情況的其中一種:
快顯本身會重新對齊將遮蔽 Popup 的畫面邊緣。
快顯會使用不同的快顯對齊點。
快顯會使用不同的目標原點和快顯對齊點。
本節稍後會進一步說明這些選項。
當遇到畫面邊緣時,Popup 的行為取決於 Placement 屬性的值,以及快顯遇到的畫面邊緣。 下表摘述 Popup 遇到每個 PlacementMode 值其畫面邊緣時的行為。
| PlacementMode | 上邊緣 | 下邊緣 | 左邊緣 | 右邊緣 |
|---|---|---|---|---|
| Absolute | 對齊上邊緣。 | 對齊下邊緣。 | 對齊左邊緣。 | 對齊右邊緣。 |
| AbsolutePoint | 對齊上邊緣。 | 快顯對齊點變更至 Popup 的左下角。 | 對齊左邊緣。 | 快顯對齊點變更至 Popup 的右上角。 |
| Bottom | 對齊上邊緣。 | 目標來源變更至目標區域的左上角,且快顯對齊點變更至 Popup 的左下角。 | 對齊左邊緣。 | 對齊右邊緣。 |
| Center | 對齊上邊緣。 | 對齊下邊緣。 | 對齊左邊緣。 | 對齊右邊緣。 |
| Left | 對齊上邊緣。 | 對齊下邊緣。 | 目標來源變更至目標區域的右上角,且快顯對齊點變更至 Popup 的左上角。 | 對齊右邊緣。 |
| Mouse | 對齊上邊緣。 | 目標來源變更至目標區域的左上角 (滑鼠指標的繫結),且快顯對齊點變更至 Popup 的左下角。 | 對齊左邊緣。 | 對齊右邊緣。 |
| MousePoint | 對齊上邊緣。 | 快顯對齊點變更至 Popup 的左下角。 | 對齊左邊緣。 | 快顯對齊點會變更至快顯的右上角。 |
| Relative | 對齊上邊緣。 | 對齊下邊緣。 | 對齊左邊緣。 | 對齊右邊緣。 |
| RelativePoint | 對齊上邊緣。 | 快顯對齊點變更至 Popup 的左下角。 | 對齊左邊緣。 | 快顯對齊點會變更至快顯的右上角。 |
| Right | 對齊上邊緣。 | 對齊下邊緣。 | 對齊左邊緣。 | 目標來源變更至目標區域的左上角,且快顯對齊點變更至 Popup 的右上角。 |
| Top | 目標來源變更至目標區域的左下角,且快顯對齊點變更至 Popup 的左上角。 實際上,這與 Placement 為 Bottom 時相同。 | 對齊下邊緣。 | 對齊左邊緣。 | 對齊右邊緣。 |
對齊畫面邊緣
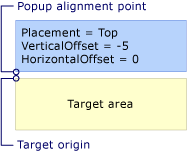
Popup 本身可重新置放以對齊畫面邊緣,這樣畫面上即可看到整個 Popup。 當發生此情況時,目標來源與快顯對齊點之間距離可能會不同於 HorizontalOffset 和 VerticalOffset 的值。 當 Placement 為 Absolute、Center 或 Relative 時,Popup 本身會對齊每個畫面邊緣。 例如,假設 Popup 將 Placement 設為 Relative 且 VerticalOffset 設為 100。 如果畫面下邊緣隱藏全部或部分 Popup,則 Popup 本身會沿著畫面下邊緣重新置放,且目標來源與快顯對齊點之間的垂直距離少於 100。 下圖示範這種情況。
變更快顯對齊點
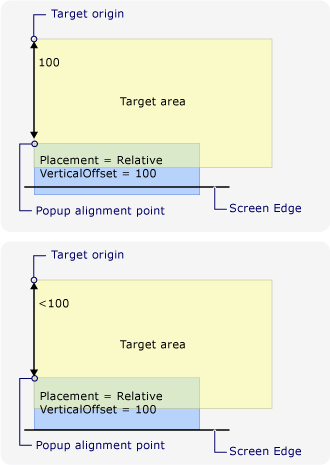
如果 Placement 為 AbsolutePoint、RelativePoint 或 MousePoint,則當快顯遇到畫面下邊緣或右邊緣時,快顯對齊點即會產生變化。
下圖示範當畫面下邊緣隱藏全部或部分 Popup 時,則快顯對齊點位於 Popup 的左下角。
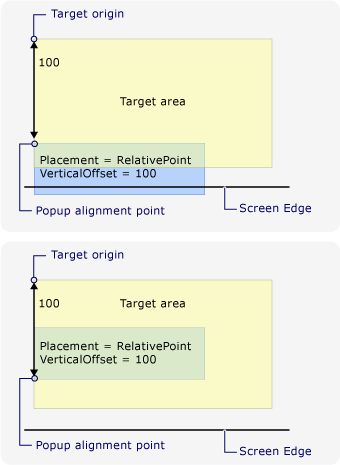
下圖示範當畫面右邊緣隱藏 Popup 時,則快顯對齊點位於 Popup 的右上角。
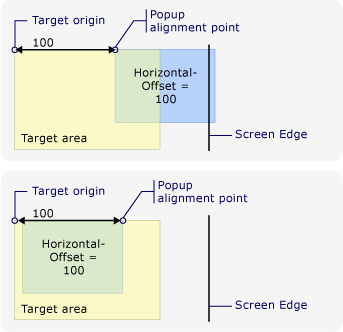
如果 Popup 遇到畫面下邊緣與右邊緣時,則快顯對齊點位於 Popup 的右下角。
變更目標原點和快顯對齊點
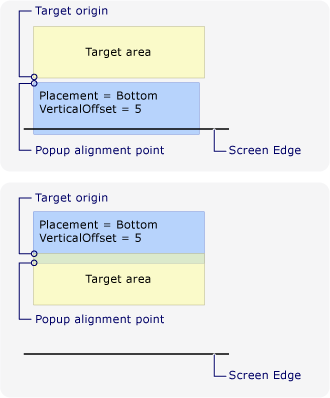
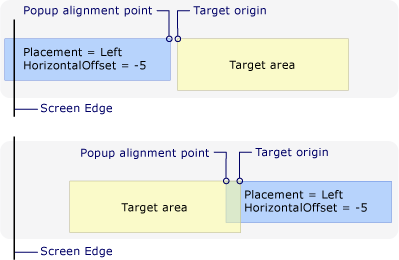
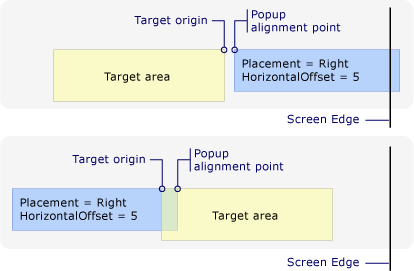
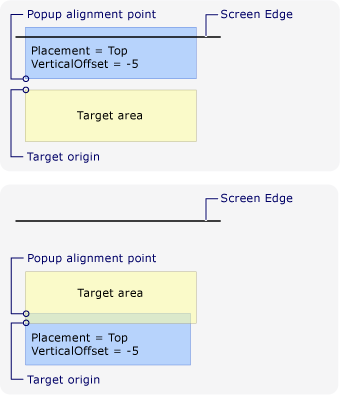
當 Placement 為 Bottom、Left、Mouse、Right 或 Top 時,如果遇到特定的畫面邊緣,目標來源與快顯對齊點即會產生變化。 造成位置產生變化的畫面邊緣取決於 PlacementMode 值。
下圖示範當 Placement 為 Bottom 且 Popup 遇到畫面下邊緣時,則目標來源位於目標區域的右上角,且快顯對齊點位於 Popup 的左下角。
下圖示範當 Placement 為 Left 且 Popup 遇到畫面下邊緣時,則目標來源位於目標區域的上角,且快顯對齊點位於 Popup 的左上角。
下圖示範當 Placement 為 Right 且 Popup 遇到畫面下邊緣時,則目標來源位於目標區域的左上角,且快顯對齊點位於 Popup 的右上角。
下圖示範當 Placement 為 Top 且 Popup 遇到畫面下邊緣時,則目標來源位於目標區域的左下角,且快顯對齊點位於 Popup 的左角。
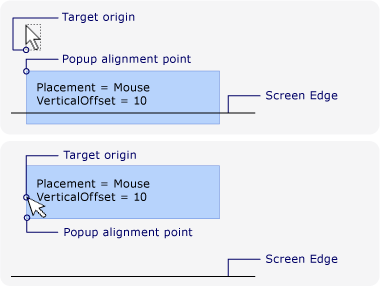
下圖示範當 Placement 為 Mouse 且 Popup 遇到畫面下邊緣時,則目標來源位於目標區域 (滑鼠指標範圍) 的左上角,且快顯對齊點位於 Popup 的左下角。
自訂快顯位置
您可透過將 Placement 屬性設為 Custom,以自訂目標來源與快顯對齊點。 然後定義 CustomPopupPlacementCallback 委派,其傳回一組 Popup可能的放置點與主軸 (以偏好順序)。 顯示已選取 Popup 最大部分的點。 如果畫面邊緣隱藏 Popup,則會自動調整 Popup 的位置。 如需範例,請參閱指定自訂快顯位置。
另請參閱
意見反應
即將登場:在 2024 年,我們將逐步淘汰 GitHub 問題作為內容的意見反應機制,並將它取代為新的意見反應系統。 如需詳細資訊,請參閱:https://aka.ms/ContentUserFeedback。
提交並檢視相關的意見反應
