使用純色和漸層繪製的概觀
本主題描述如何使用 SolidColorBrush 、 LinearGradientBrush 和 RadialGradientBrush 物件來繪製純色、線性漸層和星形漸層。
使用純色繪製區域
任何平臺中最常見的作業之一,就是使用實心 Color 繪製區域。 若要完成這項工作,Windows Presentation Foundation (WPF) 會提供 類別 SolidColorBrush 。 下列各節說明使用 SolidColorBrush 繪製的不同方式。
在 "XAML" 中使用 SolidColorBrush
若要在 XAML 中使用純色繪製區域,請使用下列其中一個選項。
依據名稱選取預先定義的單色筆刷。 例如,您可以將按鈕的 Background 設定為 「Red」 或 「MediumBlue」。 如需其他預先定義純色筆刷的清單,請參閱 類別的 Brushes 靜態屬性。 以下是一個範例。
<!-- This button's background is painted with a red SolidColorBrush,
     described using a named color. -->
<Button Background="Red">A Button</Button>
選擇 32 位元色板的其中一個色彩,方法是指定紅色、綠色及藍色的量來混合成單一純色。 指定 32 位元色板中其中一個色彩的格式為 "#rrggbb",其中 rr 是指定紅色相對量的兩位數十六進位數字、gg 指定綠色的量,而 bb 則指定藍色的量。 此外,色彩可以指定為 "#aarrggbb",其中 aa 指定色彩的 alpha 值 (也就是透明度)。 這個方法可以讓您建立部分透明的色彩。 在下列範例中, BackgroundButton 的 會設定為使用十六進位標記法完全不透明的紅色。
<!-- This button's background is painted with a red SolidColorBrush,
     described using hexadecimal notation. -->
<Button Background="#FFFF0000">A Button</Button>
使用屬性標記語法來描述 SolidColorBrush 。 這個語法比較複雜,但是可以讓您指定額外設定,例如筆刷的不透明度。 在下列範例中, Background 兩 Button 個元素的屬性會設定為完全不透明紅色。 第一個筆刷的色彩是用預先定義的色彩名稱來描述。 第二個筆刷的色彩則是用十六進位標記法來描述。
<!-- Both of these buttons' backgrounds are painted with red
     SolidColorBrush objects, described using object element
     syntax. -->
<Button>A Button

  <Button.Background>
    <SolidColorBrush Color="Red" />
  </Button.Background>
</Button>

<Button>A Button

  <Button.Background>
    <SolidColorBrush Color="#FFFF0000" />
  </Button.Background>
</Button>
在程式碼中使用 SolidColorBrush 繪製
若要在程式碼中使用純色繪製區域,請使用下列其中一個選項。
使用 類別所提供的 Brushes 其中一個預先定義的筆刷。 在下列範例中, Background 的 Button 設定為 Red 。
Button myButton = new Button();
myButton.Content = "A Button";
myButton.Background = Brushes.Red;
使用 Color 結構建立 SolidColorBrush 並設定其 Color 屬性。 您可以使用 類別中的 Colors 預先定義色彩,或使用靜態 FromArgb 方法建立 Color 。
下列範例示範如何使用預先定義的色彩來設定 Color 的 SolidColorBrush 屬性。
Button myButton = new Button();
myButton.Content = "A Button";

SolidColorBrush mySolidColorBrush = new SolidColorBrush();
mySolidColorBrush.Color = Colors.Red;
myButton.Background = mySolidColorBrush;
靜態 FromArgb 可讓您指定色彩的 Alpha、紅色、綠色和藍色值。 這些值的範圍通常都是 0-255。 例如,Alpha 值為 0 時表示色彩是完全透明的,而值為 255 時表示色彩是完全不透明的。 同樣地,紅色值為 0 時表示色彩中沒有紅色,而值為 255 時表示色彩中具有最大量的紅色。 在下列範例中,筆刷色彩是透過指定 Alpha、紅色、綠色及藍色值來加以描述。
Button myButton = new Button();
myButton.Content = "A Button";

SolidColorBrush mySolidColorBrush = new SolidColorBrush();
mySolidColorBrush.Color =
    Color.FromArgb(
        255, // Specifies the transparency of the color.
        255, // Specifies the amount of red.
        0, // specifies the amount of green.
        0); // Specifies the amount of blue.

myButton.Background = mySolidColorBrush;
如需指定色彩的其他方式,請參閱 Color 參考主題。
使用漸層繪製區域
漸層筆刷會使用多種色彩繪製區域,這些色彩會沿著某個軸逐漸相互融合。 您可以使用它們來建立光影效果,讓控制項有立體的感覺。 您也可以使用它們來模擬玻璃、金屬、水和其他平滑表面。 WPF 提供兩種類型的漸層筆刷: LinearGradientBrush 和 RadialGradientBrush 。
線形漸層
會 LinearGradientBrush 繪製沿著線條 、漸層軸 定義漸層的區域。 您可以使用 物件,指定漸層色彩及其沿著漸層軸 GradientStop 的位置。 您也可以修改漸層軸,這可讓您建立水平和垂直漸層,以及反轉漸層方向。 漸層軸會在下一節中說明。 預設會建立對角線的漸層。
下列範例顯示能建立由四個色彩組成之線形漸層的程式碼。
<!-- This rectangle is painted with a diagonal linear gradient. -->
<Rectangle Width="200" Height="100">
  <Rectangle.Fill>
    <LinearGradientBrush StartPoint="0,0" EndPoint="1,1">
      <GradientStop Color="Yellow" Offset="0.0" />
      <GradientStop Color="Red" Offset="0.25" />
      <GradientStop Color="Blue" Offset="0.75" />
      <GradientStop Color="LimeGreen" Offset="1.0" />
    </LinearGradientBrush>
  </Rectangle.Fill>
</Rectangle>
Rectangle diagonalFillRectangle = new Rectangle();
diagonalFillRectangle.Width = 200;
diagonalFillRectangle.Height = 100;

// Create a diagonal linear gradient with four stops.
LinearGradientBrush myLinearGradientBrush =
    new LinearGradientBrush();
myLinearGradientBrush.StartPoint = new Point(0,0);
myLinearGradientBrush.EndPoint = new Point(1,1);
myLinearGradientBrush.GradientStops.Add(
    new GradientStop(Colors.Yellow, 0.0));
myLinearGradientBrush.GradientStops.Add(
    new GradientStop(Colors.Red, 0.25));
myLinearGradientBrush.GradientStops.Add(
    new GradientStop(Colors.Blue, 0.75));
myLinearGradientBrush.GradientStops.Add(
    new GradientStop(Colors.LimeGreen, 1.0));

// Use the brush to paint the rectangle.
diagonalFillRectangle.Fill = myLinearGradientBrush;
這個程式碼會產生下列漸層:

注意
本主題中的漸層範例會使用預設座標系統來設定起點和終點。 預設座標系統是相對於週框方塊:0 表示週框方塊的 0%,而 1 表示週框方塊的 100%。 您可以將 屬性設定為 值 Absolute , MappingMode 以變更此座標系統。 絕對座標系統不會相對於週框方塊。 值會直接在本機空間中解譯。
GradientStop是漸層筆刷的基本建置組塊。 漸層停駐點會在 ColorOffset 沿著漸層軸指定 。
漸層停駐點的 Color 屬性會指定漸層停駐點的色彩。 您可以使用預先定義的色彩或 Colors 指定 ScRGB 或 ARGB 值來設定色彩。 在 XAML 中,您也可以使用十六進位標記法來描述色彩。 如需詳細資訊,請參閱 Color 結構。
漸層停駐點的 Offset 屬性會指定漸層停駐點色彩在漸層軸上的位置。 位移是 Double 範圍從 0 到 1 的 。 漸層停駐點的位移值越接近 0,色彩就越接近漸層起始點。 漸層的位移值越接近 1,色彩就越接近漸層結束點。
在漸層停駐點之間每個點的色彩,都是以線性插補成由兩個連結漸層停駐點所指定的色彩結合。 下圖將上一個範例中的漸層停駐點醒目提示。 圓圈標記出漸層停駐點的位置,虛線則表示漸層軸。
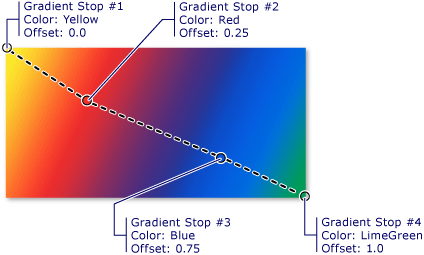
第一個漸層停駐點在位移 0.0 處指定黃色的色彩。 第二個漸層停駐點在位移 0.25 處指定紅色的色彩。 沿著漸層軸從左移到右時,這兩個停駐點之間的點會逐漸從黃色變成紅色。 第三個漸層停駐點在位移 0.75 處指定藍色的色彩。 第二個和第三個漸層停駐點之間的點會逐漸從紅色變成藍色。 第四個漸層停駐點在位移 1.0 處指定淡黃綠色的色彩。 第三個和第四個漸層停駐點之間的點會逐漸從藍色變成淡黃綠色。
漸層軸
如同之前所說明的,線性漸層筆刷的漸層停駐點會落在沿著線條 (漸層軸) 的位置上。 您可以使用筆刷的 StartPoint 和 屬性來變更線條的方向和 EndPoint 大小。 藉由操作筆刷的 StartPoint 和 EndPoint ,您可以建立水準和垂直漸層、反轉漸層方向、壓縮漸層散佈等等。
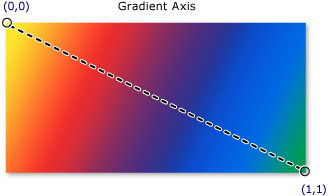
根據預設,線性漸層筆刷的 StartPoint 和 EndPoint 相對於要繪製的區域。 點 (0,0) 表示要繪製之區域的左上角,而 (1,1) 則表示要繪製之區域的右下角。 的預設值 StartPointLinearGradientBrush 為 (0,0),而其預設值為 (1,1),其會 EndPoint 建立從左上角開始的對角漸層,並延伸至繪製區域的右下角。 下圖顯示具有預設 StartPoint 和 EndPoint 之線性漸層筆刷的漸層軸。
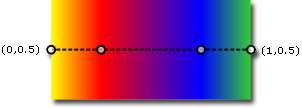
下列範例示範如何藉由指定筆刷的 StartPoint 和 EndPoint 來建立水準漸層。 請注意,漸層停駐點與先前的範例相同;只要變更 StartPoint 和 EndPoint ,漸層已從對角線變更為水準。
<!-- This rectangle is painted with a horizontal linear gradient. -->
<Rectangle Width="200" Height="100">
  <Rectangle.Fill>
    <LinearGradientBrush StartPoint="0,0.5" EndPoint="1,0.5">
      <GradientStop Color="Yellow" Offset="0.0" />
      <GradientStop Color="Red" Offset="0.25" />
      <GradientStop Color="Blue" Offset="0.75" />
      <GradientStop Color="LimeGreen" Offset="1.0" />
    </LinearGradientBrush>
  </Rectangle.Fill>
</Rectangle>
Rectangle horizontalFillRectangle = new Rectangle();
horizontalFillRectangle.Width = 200;
horizontalFillRectangle.Height = 100;

// Create a horizontal linear gradient with four stops.
LinearGradientBrush myHorizontalGradient =
    new LinearGradientBrush();
myHorizontalGradient.StartPoint = new Point(0,0.5);
myHorizontalGradient.EndPoint = new Point(1,0.5);
myHorizontalGradient.GradientStops.Add(
    new GradientStop(Colors.Yellow, 0.0));
myHorizontalGradient.GradientStops.Add(
    new GradientStop(Colors.Red, 0.25));
myHorizontalGradient.GradientStops.Add(
    new GradientStop(Colors.Blue, 0.75));
myHorizontalGradient.GradientStops.Add(
    new GradientStop(Colors.LimeGreen, 1.0));

// Use the brush to paint the rectangle.
horizontalFillRectangle.Fill = myHorizontalGradient;
下圖顯示建立的漸層。 漸層軸以虛線標示,而漸層停駐點則以圓圈標示。
下一個範例顯示如何建立垂直漸層。
<!-- This rectangle is painted with a vertical gradient. -->
<Rectangle Width="200" Height="100">
  <Rectangle.Fill>
    <LinearGradientBrush StartPoint="0.5,0" EndPoint="0.5,1">
      <GradientStop Color="Yellow" Offset="0.0" />
      <GradientStop Color="Red" Offset="0.25" />
      <GradientStop Color="Blue" Offset="0.75" />
      <GradientStop Color="LimeGreen" Offset="1.0" />
    </LinearGradientBrush>
  </Rectangle.Fill>
</Rectangle>
Rectangle verticalFillRectangle = new Rectangle();
verticalFillRectangle.Width = 200;
verticalFillRectangle.Height = 100;

// Create a vertical linear gradient with four stops.
LinearGradientBrush myVerticalGradient =
    new LinearGradientBrush();
myVerticalGradient.StartPoint = new Point(0.5,0);
myVerticalGradient.EndPoint = new Point(0.5,1);
myVerticalGradient.GradientStops.Add(
    new GradientStop(Colors.Yellow, 0.0));
myVerticalGradient.GradientStops.Add(
    new GradientStop(Colors.Red, 0.25));
myVerticalGradient.GradientStops.Add(
    new GradientStop(Colors.Blue, 0.75));
myVerticalGradient.GradientStops.Add(
    new GradientStop(Colors.LimeGreen, 1.0));

// Use the brush to paint the rectangle.
verticalFillRectangle.Fill = myVerticalGradient;
下圖顯示建立的漸層。 漸層軸以虛線標示,而漸層停駐點則以圓圈標示。

放射狀漸層
LinearGradientBrush和 一樣,繪製 RadialGradientBrush 區域與沿著座標軸混合的色彩。 前述範例顯示線性漸層筆刷的軸是條直線。 放射狀漸層筆刷的軸則是由圓圈定義,其色彩會從其原點向外「放射」。
在下列範例中,會使用放射狀漸層筆刷來繪製矩形的內部。
<!-- This rectangle is painted with a diagonal linear gradient. -->
<Rectangle Width="200" Height="100">
  <Rectangle.Fill>
    <RadialGradientBrush
      GradientOrigin="0.5,0.5" Center="0.5,0.5"
      RadiusX="0.5" RadiusY="0.5">
      <GradientStop Color="Yellow" Offset="0" />
      <GradientStop Color="Red" Offset="0.25" />
      <GradientStop Color="Blue" Offset="0.75" />
      <GradientStop Color="LimeGreen" Offset="1" />
    </RadialGradientBrush>
  </Rectangle.Fill>
</Rectangle>
RadialGradientBrush myRadialGradientBrush = new RadialGradientBrush();
myRadialGradientBrush.GradientOrigin = new Point(0.5,0.5);
myRadialGradientBrush.Center = new Point(0.5,0.5);
myRadialGradientBrush.RadiusX = 0.5;
myRadialGradientBrush.RadiusY = 0.5;
myRadialGradientBrush.GradientStops.Add(
    new GradientStop(Colors.Yellow, 0.0));
myRadialGradientBrush.GradientStops.Add(
    new GradientStop(Colors.Red, 0.25));
myRadialGradientBrush.GradientStops.Add(
    new GradientStop(Colors.Blue, 0.75));
myRadialGradientBrush.GradientStops.Add(
    new GradientStop(Colors.LimeGreen, 1.0));

Rectangle myRectangle = new Rectangle();
myRectangle.Width = 200;
myRectangle.Height = 100;
myRectangle.Fill = myRadialGradientBrush;
下圖顯示在上一個範例中建立的漸層。 其中已將筆刷的漸層停駐點醒目提示。 請注意,雖然結果不同,但是這個範例中的漸層停駐點與先前線性漸層筆刷範例中的漸層停駐點是相同的。
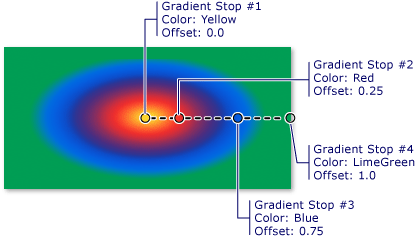
GradientOrigin指定星形漸層筆刷漸層軸的起點。 漸層軸會從漸層原點放射至漸層圓圈。 筆刷的漸層圓形是由其 Center 、 RadiusX 和 RadiusY 屬性所定義。
下圖顯示具有不同 、、 CenterRadiusX 和 RadiusY 設定的數個 GradientOrigin 星形漸層。
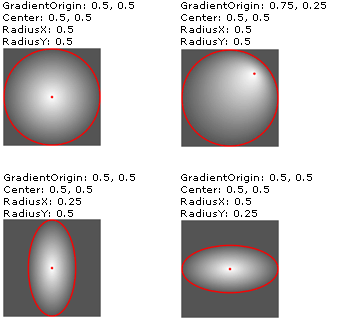 具有不同 GradientOrigin、Center、RadiusX 和 RadiusY 設定的 RadialGradientBrushes。
指定透明或部分透明的漸層停駐點
由於漸層停駐點不提供不透明度屬性,因此您必須在標記中使用 ARGB 十六進位標記法指定色彩的 Alpha 色板,或使用 Color.FromScRgb 方法來建立透明或部分透明的漸層停駐點。 下列各節說明如何在 XAML 和程式碼中建立部分透明的漸層停駐點。
在 "XAML" 中指定色彩不透明度
在 XAML 中,您可以使用 ARGB 十六進位標記法來指定個別色彩的不透明度。 ARGB 十六進位標記法使用下列語法:
#aarrggbb
上一行中的 aa 代表用來指定色彩不透明度的兩位數十六進位值。 rr、gg 和 bb 分別代表用來指定色彩中紅色、綠色及藍色量的兩位數十六進位值。 每個十六進位位數的值可以是 0-9 或 A-F。 0 是最小的值,F 是最大的值。 Alpha 值為 00 時會指定完全透明的色彩,而 Alpha 值為 FF 時則會建立完全不透明的色彩。 在下列範例中,會使用十六進位 ARGB 標記法來指定兩種色彩。 第一個為部分透明 (具有 x20 的 Alpha 值),而第二個則是完全不透明。
<Rectangle Width="100" Height="100">
  <Rectangle.Fill>
    <LinearGradientBrush StartPoint="0,0">

      <!-- This gradient stop is partially transparent. -->
      <GradientStop Color="#200000FF" Offset="0.0" />

      <!-- This gradient stop is fully opaque. -->
      <GradientStop Color="#FF0000FF" Offset="1.0" />
    </LinearGradientBrush>
  </Rectangle.Fill>
</Rectangle>
在程式碼中指定色彩不透明度
使用程式碼時,靜態 FromArgb 方法可讓您在建立色彩時指定 Alpha 值。 方法接受 類型為 的四個 Byte 參數。 第一個參數會指定色彩的 Alpha 色板,其他三個參數則會指定色彩的紅色、綠色及藍色值。 每個值都應介於 0 到 255 之間 (含 0 和 255)。 Alpha 值為 0 時會指定色彩為完全透明,而 Alpha 值為 255 時則指定色彩為完全不透明。 在下列範例中,方法 FromArgb 可用來產生兩種色彩。 第一個色彩為部分透明 (具有 32 的 Alpha 值),而第二個色彩則是完全不透明。
LinearGradientBrush myLinearGradientBrush = new LinearGradientBrush();

// This gradient stop is partially transparent.
myLinearGradientBrush.GradientStops.Add(
    new GradientStop(Color.FromArgb(32, 0, 0, 255), 0.0));

// This gradient stop is fully opaque.
myLinearGradientBrush.GradientStops.Add(
    new GradientStop(Color.FromArgb(255, 0, 0, 255), 1.0));

Rectangle myRectangle = new Rectangle();
myRectangle.Width = 100;
myRectangle.Height = 100;
myRectangle.Fill = myLinearGradientBrush;
或者,您可以使用 FromScRgb 方法,這可讓您使用 ScRGB 值來建立色彩。
使用影像、繪圖、視覺效果及圖樣繪製
ImageBrush、 DrawingBrush 和 VisualBrush 類別可讓您使用影像、繪圖或視覺效果繪製區域。 如需使用影像、繪圖及圖樣繪製的相關資訊,請參閱使用影像、繪圖和視覺效果繪製。
另請參閱
意見反應
即將登場:在 2024 年,我們將逐步淘汰 GitHub 問題作為內容的意見反應機制,並將它取代為新的意見反應系統。 如需詳細資訊,請參閱:https://aka.ms/ContentUserFeedback。
提交並檢視相關的意見反應
