在 Windows、Linux 和 macOS 電腦上使用 .NET IoT 程式庫
.NET IoT 程式庫通常用於開發 Raspberry Pi 和其他 IoT 裝置的程式碼。 不過,您也可以使用它們來開發 Windows、Linux 和 macOS 電腦的程式碼,並使用 USB 至序列配接器,例如 FTDI FT232H。 本文說明如何使用 .NET IoT 程式庫與連線到 FT232H 配接器的裝置通訊。
提示
本文使用 FTDI FT232H 配接器,但您可以使用 .NET IoT 程式庫所支援的任何 USB 至序列配接器,例如 FT2232H、FT4232H 和 FT4222。 如需詳細資訊,請檢查支援的裝置繫結清單。
必要條件
請確定已為 USB 至序列配接器安裝 D2XX 驅動程式,這些驅動程式可在 FTDI 網站上找到。
注意
當您插入配接器時,Windows 裝置可能會自動安裝驅動程式。 檢查裝置管理員是否有名為 USB 序列轉換器的裝置 (列於通用序列匯流排控制器之下)。 裝置的驅動程式提供者應該是 FTDI。
列出可用的裝置
您必須先識別連線的 USB 至序列配接器,才能建立 GPIO、I2C 或 SPI 裝置。 下列程式碼會列出連線的 FTDI 裝置:
using Iot.Device.FtCommon;

var devices = FtCommon.GetDevices();
Console.WriteLine($"{devices.Count} available device(s)");
foreach (var device in devices)
{
    Console.WriteLine($"  {device.Description}");
    Console.WriteLine($"    Flags: {device.Flags}");
    Console.WriteLine($"    Id: {device.Id}");
    Console.WriteLine($"    LocId: {device.LocId}");
    Console.WriteLine($"    Serial number: {device.SerialNumber}");
    Console.WriteLine($"    Type: {device.Type}");
}

if (devices.Count == 0)
{
    Console.WriteLine("No device connected");
    return;
}
在上述程式碼中,FtCommon.GetDevices() 方法會傳回所有連線 FTDI 裝置的清單。
使用 GPIO 裝置
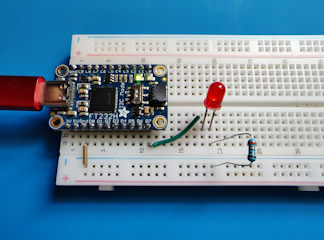
以下是閃爍 LED教學課程的硬體實作,該課程使用 FTDI FT232H 配接器來控制 LED:
在上圖中,LED 線路與原始教學課程非常類似。 唯一的差別在於 LED 連線至 FT232H 配接器上的 PIN D7,而不是 Raspberry Pi 上的 PIN 18。
本教學課程的程式碼也類似於原始教學課程:
using System.Device.Gpio;
using Iot.Device.Ft232H;
using Iot.Device.FtCommon;

Console.WriteLine("Blinking LED. Press Ctrl+C to end.");

Ft232HDevice ft232h = new Ft232HDevice(FtCommon.GetDevices()[0]);
GpioController controller = ft232h.CreateGpioController();

int pin = Ft232HDevice.GetPinNumberFromString("D7");
controller.OpenPin(pin, PinMode.Output);
bool ledOn = true;
while (true)
{
    controller.Write(pin, ledOn ? PinValue.High : PinValue.Low);
    Thread.Sleep(1000);
    ledOn = !ledOn;
}
在上述程式碼中:
- 透過將
FtCommon.GetDevices()傳回的第一個裝置 ID 傳遞至建構函式來建立執行個體Ft232HDevice。 - 名為控制器的
GpioController執行個體是藉由在Ft232HDevice上呼叫CreateGpioController()來建立。 此GpioController執行個體會執行與原始教學課程中GpioController執行個體相同的函式。 - 透過在
Ft232HDevice執行個體上呼叫GetPinNumberFromString(),並傳入英數字元 PIN 名稱 D7以擷取 PIN 的整數值。 - 其餘的程式碼與原始教學課程相同。
使用 I2C 裝置
針對 I2C 通訊,FT232H 配接器上的 D0 和 D1 PIN 會分別用於 SDL 和 SCA 線路。 FT232H 配接器上的 I2C 選取器開關必須設定為 [開啟]。
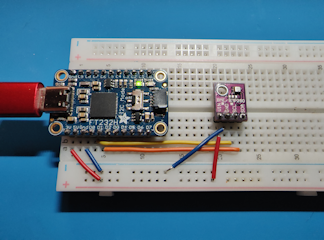
以下是從感應器讀取環境條件教學課程的硬體實作,該課程使用 FTDI FT232H 配接器從 BME280 感應器讀取溫度、濕度和對稱壓力:
在上圖中:
- FT232H 配接器上的 D0 和 D1 PIN 會分別連線至 BME280 擴充面板上的 SDL 和 SCA PIN。
- BME280 擴充面板上的 I2C 選取器開關會設定為 [開啟]。
using System.Device.I2c;
using Iot.Device.Bmxx80;
using Iot.Device.Bmxx80.PowerMode;
using Iot.Device.Ft232H;
using Iot.Device.FtCommon;

Ft232HDevice ft232h = new Ft232HDevice(FtCommon.GetDevices()[0]);
I2cConnectionSettings i2cSettings = new I2cConnectionSettings(0, Bme280.SecondaryI2cAddress);

using I2cDevice i2cDevice = ft232h.CreateI2cDevice(i2cSettings);
using Bme280 bme280 = new Bme280(i2cDevice);

int measurementTime = bme280.GetMeasurementDuration();

while (true)
{
    Console.Clear();

    bme280.SetPowerMode(Bmx280PowerMode.Forced);
    Thread.Sleep(measurementTime);

    bme280.TryReadTemperature(out var tempValue);
    bme280.TryReadPressure(out var preValue);
    bme280.TryReadHumidity(out var humValue);
    bme280.TryReadAltitude(out var altValue);

    Console.WriteLine($"Temperature: {tempValue.DegreesCelsius:0.#}\u00B0C");
    Console.WriteLine($"Pressure: {preValue.Hectopascals:#.##} hPa");
    Console.WriteLine($"Relative humidity: {humValue.Percent:#.##}%");
    Console.WriteLine($"Estimated altitude: {altValue.Meters:#} m");

    Thread.Sleep(1000);
}
在上述程式碼中:
- 透過將
FtCommon.GetDevices()傳回的第一個裝置 ID 傳遞至建構函式來建立執行個體Ft232HDevice。 I2cDevice執行個體是透過在Ft232HDevice執行個體上呼叫CreateI2cDevice()來建立。 此I2cDevice執行個體會執行與原始教學課程中I2cDevice執行個體相同的函式。- 其餘的程式碼與原始教學課程相同。
使用 SPI 裝置
針對 SPI 通訊,FT232H 配接器上的 D0、D1、D2 和 D3 PIN 分別用於 SCK、MOSI、MISO 和 CS 線路。 FT232H 配接器上的 I2C 選取器開關必須設定為 [關閉]。
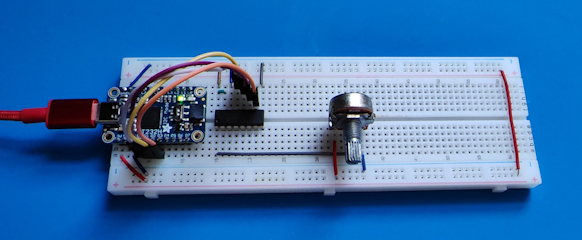
以下是從類比到數位轉換器讀取值教學課程的硬體實作,該課程使用 FTDI FT232H 配接器從 MCP3008 ADC 讀取值:
在上圖中:
- FT232H 配接器上的 D0、D1、D2 和 D3 PIN 分別連線至 MCP3008 上的 CLK、DIN、DOUT 和 CS/SHDN PIN。
- MCP3008 擴充面板上的 I2C 選取器開關會設定為 [關閉]。
using System.Device.Gpio;
using System.Device.Spi;
using Iot.Device.Adc;
using Iot.Device.Ft232H;
using Iot.Device.FtCommon;

var devices = FtCommon.GetDevices();
var ft232h = new Ft232HDevice(devices[0]);
var hardwareSpiSettings = new SpiConnectionSettings(0, 3) { ClockFrequency = 1_000_000, DataBitLength = 8, ChipSelectLineActiveState = PinValue.Low };
using SpiDevice spi = ft232h.CreateSpiDevice(hardwareSpiSettings);
using var mcp = new Mcp3008(spi);
while (true)
{
    Console.Clear();
    double value = mcp.Read(0);
    Console.WriteLine($"{value}");
    Console.WriteLine($"{Math.Round(value/10.23, 1)}%");
    Thread.Sleep(500);
}
在上述程式碼中:
- 透過將
FtCommon.GetDevices()傳回的第一個裝置 ID 傳遞至建構函式來建立執行個體Ft232HDevice。 SpiDevice執行個體是透過在Ft232HDevice執行個體上呼叫CreateSpiDevice()來建立。 此SpiDevice執行個體會執行與原始教學課程中SpiDevice執行個體相同的函式。- 其餘的程式碼與原始教學課程相同。
取得程式碼
本教學課程的程式碼可在 GitHub 上取得。
意見反應
即將登場:在 2024 年,我們將逐步淘汰 GitHub 問題作為內容的意見反應機制,並將它取代為新的意見反應系統。 如需詳細資訊,請參閱:https://aka.ms/ContentUserFeedback。
提交並檢視相關的意見反應


