使用 WinForms 的資料繫結
本逐步解說示範如何將 POCO 類型系結至「主要詳細資料」表單中的視窗表單 (WinForms) 控制項。 應用程式會使用 Entity Framework 將來自資料庫的資料填入物件、追蹤變更,並將資料保存到資料庫。
此模型會定義兩種參與一對多關聯性的類型:Category (principal\master) 和 Product (dependent\detail)。 然後,Visual Studio 工具會用來將模型中定義的類型系結至 WinForms 控制項。 WinForms 資料系結架構可讓您在相關物件之間巡覽:在主要檢視中選取資料列會導致詳細資料檢視以對應的子資料更新。
本逐步解說中的螢幕擷取畫面和程式代碼清單取自 Visual Studio 2013,但您可以使用 Visual Studio 2012 或 Visual Studio 2010 完成本逐步解說。
必要條件
您必須安裝 Visual Studio 2013、Visual Studio 2012 或 Visual Studio 2010,才能完成本逐步解說。
如果您使用 Visual Studio 2010,您也必須安裝 NuGet。 如需詳細資訊,請參閱 安裝 NuGet 。
建立應用程式
- 開啟 Visual Studio
- 檔案 - > 新增 - > 專案...。
- 在左窗格中選取 [Windows ],並在 右窗格中選取 [Windows Forms][應用程式 ]
- 輸入 WinFormswithEFSample 作為名稱
- 選取確定
安裝 Entity Framework NuGet 套件
- 在方案總管中,以滑鼠右鍵按一下 WinFormswithEFSample 專案
- 選取 [ 管理 NuGet 套件...
- 在 [管理 NuGet 套件] 對話方塊中,選取 [ 線上 ] 索引標籤,然後選擇 EntityFramework 套件
- 按一下 [安裝]
注意
除了 EntityFramework 元件之外,也會新增 System.ComponentModel.DataAnnotations 的參考。 如果專案具有 System.Data.Entity 的參考,則會在安裝 EntityFramework 套件時移除該專案。 System.Data.Entity 元件不再用於 Entity Framework 6 應用程式。
實作集合的 IListSource
集合屬性必須實作 IListSource 介面,才能在使用 Windows Forms 時啟用具有排序的雙向資料系結。 為了這樣做,我們將擴充 ObservableCollection 以新增 IListSource 功能。
- 將 ObservableListSource 類別新增至專案:
- 以滑鼠右鍵按一下專案名稱
- 選取 [新增 - > 新增專案]
- 選取 [類別 ],然後輸入 ObservableListSource 以取得類別名稱
- 以下列程式碼取代預設產生的程式碼:
這個類別可啟用雙向資料系結和排序。 類別衍生自 ObservableCollection < T > ,並新增 IListSource 的明確實作。 IListSource 的 GetList() 方法會實作,以傳回與 ObservableCollection 保持同步的 IBindingList 實作。 ToBindingList 所產生的 IBindingList 實作支援排序。 ToBindingList 擴充方法定義于 EntityFramework 元件中。
    using System.Collections;
    using System.Collections.Generic;
    using System.Collections.ObjectModel;
    using System.ComponentModel;
    using System.Diagnostics.CodeAnalysis;
    using System.Data.Entity;

    namespace WinFormswithEFSample
    {
        public class ObservableListSource<T> : ObservableCollection<T>, IListSource
            where T : class
        {
            private IBindingList _bindingList;

            bool IListSource.ContainsListCollection { get { return false; } }

            IList IListSource.GetList()
            {
                return _bindingList ?? (_bindingList = this.ToBindingList());
            }
        }
    }
定義模型
在本逐步解說中,您可以選擇使用 Code First 或 EF Designer 來實作模型。 完成下列兩個區段的其中一個。
選項 1:先使用程式碼定義模型
本節說明如何使用 Code First 建立模型及其相關聯的資料庫。 如果您寧願使用 Database First 從資料庫反向工程模型,請跳至下一節 ( 選項 2:使用 Database First 定義模型)
使用 Code First 開發時,您通常會從撰寫定義概念(領域)模型的 .NET Framework 類別開始。
- 將新的 Product 類別新增至專案
- 以下列程式碼取代預設產生的程式碼:
    using System;
    using System.Collections.Generic;
    using System.Linq;
    using System.Text;
    using System.Threading.Tasks;

    namespace WinFormswithEFSample
    {
        public class Product
        {
            public int ProductId { get; set; }
            public string Name { get; set; }

            public int CategoryId { get; set; }
            public virtual Category Category { get; set; }
        }
    }
- 將 Category 類別新增至專案。
- 以下列程式碼取代預設產生的程式碼:
    using System;
    using System.Collections.Generic;
    using System.Linq;
    using System.Text;
    using System.Threading.Tasks;

    namespace WinFormswithEFSample
    {
        public class Category
        {
            private readonly ObservableListSource<Product> _products =
                    new ObservableListSource<Product>();

            public int CategoryId { get; set; }
            public string Name { get; set; }
            public virtual ObservableListSource<Product> Products { get { return _products; } }
        }
    }
除了定義實體之外,您還需要定義衍生自 DbCoNtext 的類別,並公開 DbSet < TEntity > 屬性。 DbSet 屬性可讓內容知道您想要包含在模型中的類型。 DbCoNtext 和 DbSet 類型定義于 EntityFramework 元件中。
DbCoNtext 衍生型別的實例會在運行時間管理實體物件,其中包括將來自資料庫的資料填入物件、變更追蹤,以及將資料保存至資料庫。
- 將新的 ProductCoNtext 類別新增至專案。
- 以下列程式碼取代預設產生的程式碼:
    using System;
    using System.Collections.Generic;
    using System.Data.Entity;
    using System.Linq;
    using System.Text;

    namespace WinFormswithEFSample
    {
        public class ProductContext : DbContext
        {
            public DbSet<Category> Categories { get; set; }
            public DbSet<Product> Products { get; set; }
        }
    }
編譯專案。
選項 2:使用 Database First 定義模型
本節說明如何使用 Database First,從使用 EF 設計工具從資料庫反向工程模型。 如果您已完成上一節( 選項 1:使用 Code First 定義模型), 請略過本節並直接移至 延遲載入 區段。
建立現有的資料庫
一般而言,當您將目標設為現有的資料庫時,就會建立它,但在本逐步解說中,我們需要建立資料庫才能存取。
隨 Visual Studio 一起安裝的資料庫伺服器會根據您安裝的 Visual Studio 版本而有所不同:
- 如果您使用 Visual Studio 2010,您將建立 SQL Express 資料庫。
- 如果您使用 Visual Studio 2012,您將建立 LocalDB 資料庫。
讓我們繼續產生資料庫。
檢視 - > 伺服器總管
以滑鼠右鍵按一下 [資料連線 - > 新增連線...
如果您尚未從 [伺服器總管] 連線到資料庫,則必須先選取 [Microsoft SQL Server] 作為資料來源

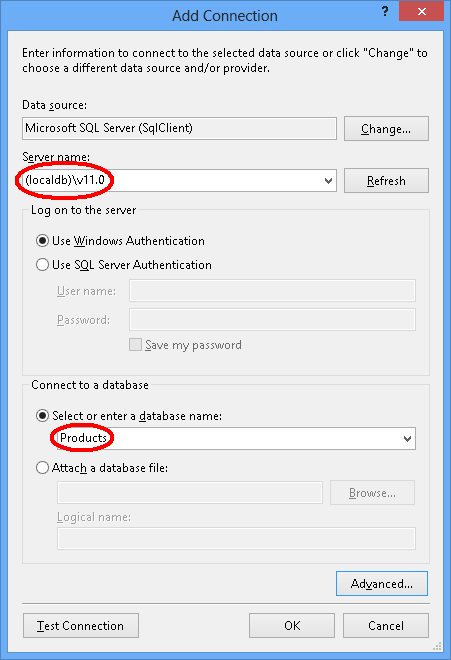
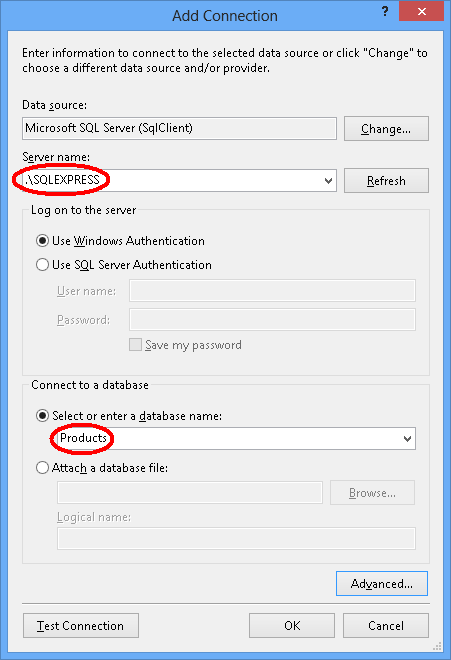
視您已安裝的本機DB 或 SQL Express 而定,連線至 LocalDB 或 SQL Express,然後輸入 產品 做為資料庫名稱
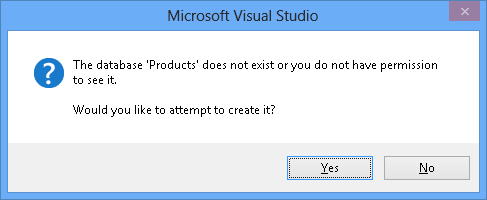
選取 [ 確定 ],系統會詢問您是否要建立新的資料庫,選取 [ 是]
新的資料庫現在會出現在 [伺服器總管] 中,以滑鼠右鍵按一下它,然後選取 [ 新增查詢]
將下列 SQL 複製到新的查詢,然後以滑鼠右鍵按一下查詢,然後選取 [ 執行]
    CREATE TABLE [dbo].[Categories] (
        [CategoryId] [int] NOT NULL IDENTITY,
        [Name] [nvarchar](max),
        CONSTRAINT [PK_dbo.Categories] PRIMARY KEY ([CategoryId])
    )

    CREATE TABLE [dbo].[Products] (
        [ProductId] [int] NOT NULL IDENTITY,
        [Name] [nvarchar](max),
        [CategoryId] [int] NOT NULL,
        CONSTRAINT [PK_dbo.Products] PRIMARY KEY ([ProductId])
    )

    CREATE INDEX [IX_CategoryId] ON [dbo].[Products]([CategoryId])

    ALTER TABLE [dbo].[Products] ADD CONSTRAINT [FK_dbo.Products_dbo.Categories_CategoryId] FOREIGN KEY ([CategoryId]) REFERENCES [dbo].[Categories] ([CategoryId]) ON DELETE CASCADE
反向工程師模型
我們將使用包含在 Visual Studio 中的 Entity Framework Designer 來建立模型。
專案 - > 新增專案...
從左側功能表中選取 [資料 ],然後 ADO.NET 實體資料模型
輸入 ProductModel 作為名稱,然後按一下 [ 確定]
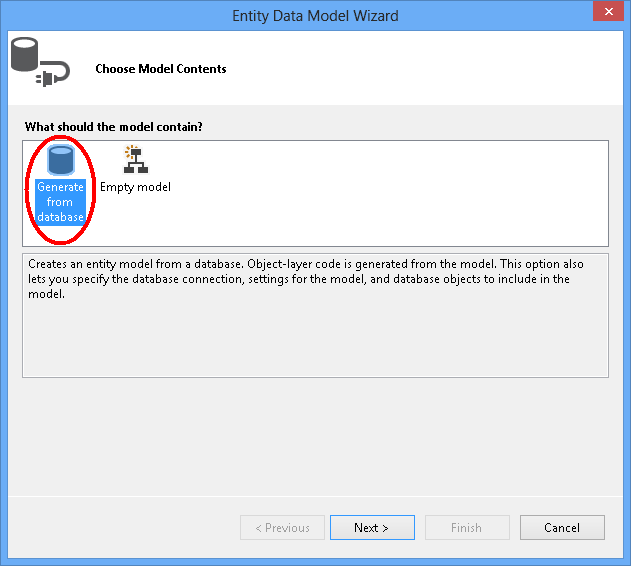
這會啟動 實體資料模型精靈
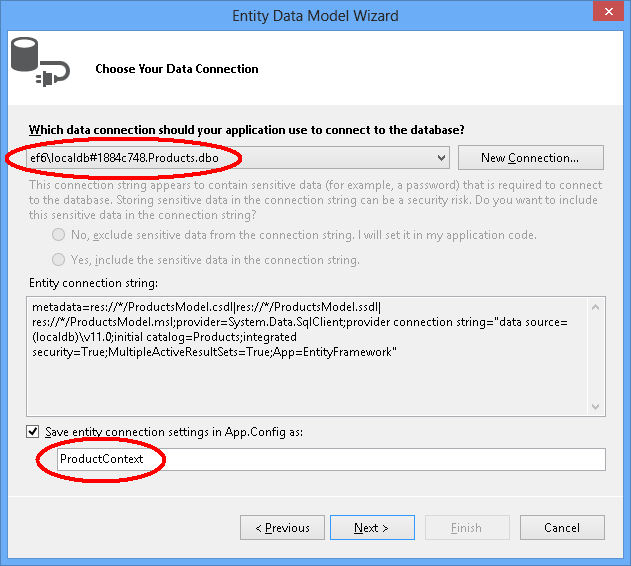
選取 [從資料庫 產生],然後按 [ 下一步]
選取您在第一節中建立之資料庫的連線,輸入 ProductCoNtext 作為連接字串的名稱,然後按 [下一步]
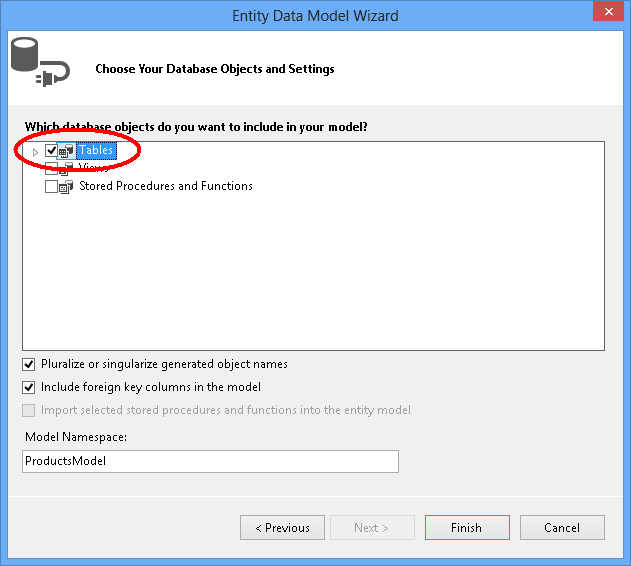
按一下 [資料表] 旁的核取方塊以匯入所有資料表,然後按一下 [完成]
一旦反向工程師程式完成,新的模型就會新增至您的專案,並開啟以供您在 Entity Framework Designer 中檢視。 App.config 檔案也已新增至您的專案,其中包含資料庫的連線詳細資料。
Visual Studio 2010 中的其他步驟
如果您在 Visual Studio 2010 中工作,則必須更新 EF 設計工具以使用 EF6 程式碼產生。
- 以滑鼠右鍵按一下 EF Designer 中模型的空白位置,然後選取 [ 新增程式碼產生專案...
- 從左側功能表中選取 [線上範本 ],然後搜尋 DbCoNtext
- 選取適用于 C# 的 EF 6.x DbCoNtext 產生器,輸入 ProductsModel 作為名稱, 然後按一下 [新增]
更新資料系結的程式碼產生
EF 會使用 T4 範本從模型產生程式碼。 隨附于 Visual Studio 或從 Visual Studio 資源庫下載的範本適用于一般用途。 這表示從這些範本產生的實體具有簡單的 ICollection < T > 屬性。 不過,執行資料系結時,最好有實作 IListSource 的集合屬性。 這就是為什麼我們建立上述 ObservableListSource 類別的原因,我們現在將修改範本以使用這個類別。
開啟方案總管 並尋找 ProductModel.edmx 檔案
尋找將巢狀在 ProductModel.edmx 檔案底下的 ProductModel.tt 檔案
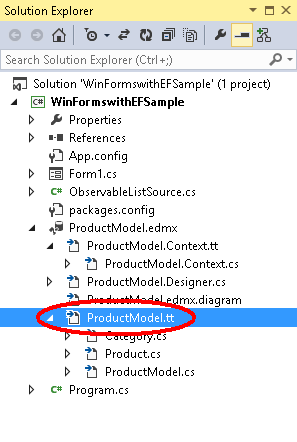
按兩下 ProductModel.tt 檔案,在 Visual Studio 編輯器中開啟它
尋找並將 「 ICollection 」 的兩個出現專案取代為 「 ObservableListSource 」。 這些位於大約 296 和 484 行。
尋找並將第一個出現的 「 HashSet 」 取代為 「 ObservableListSource 」。 此專案位於大約第 50 行。 請勿 取代程式碼稍後找到的第二個 HashSet。
儲存 ProductModel.tt 檔案。 這應該會導致重新產生實體的程式碼。 如果程式碼未自動重新產生,請以滑鼠右鍵按一下 ProductModel.tt,然後選擇 [執行自訂工具]。
如果您現在開啟 Category.cs 檔案(其巢狀于 ProductModel.tt 底下),您應該會看到 Products 集合的類型為 ObservableListSource < Product > 。
編譯專案。
消極式載入
Product 類別上的 Products 屬性和 Product 類別上的 Category 屬性是導覽屬性。 在 Entity Framework 中,導覽屬性提供一種方式來巡覽兩個實體類型之間的關聯性。
EF 可讓您在第一次存取導覽屬性時,自動從資料庫載入相關實體。 使用這種類型的載入(稱為延遲載入),請注意,當您第一次存取每個導覽屬性時,如果內容不在內容中,就會對資料庫執行個別查詢。
使用 POCO 實體類型時,EF 會在執行時間期間建立衍生 Proxy 類型的實例,然後覆寫類別中的虛擬屬性以新增載入攔截,以達成延遲載入。 若要取得相關物件的延遲載入,您必須將導覽屬性 getter 宣告為 公用 和 虛擬 ( 在 Visual Basic 中可 覆寫),而且類別不得 密封( Visual Basic 中不可 覆 寫)。 使用 Database First 導覽屬性時,會自動設為虛擬,以啟用延遲載入。 在 [程式碼優先] 區段中,我們選擇將導覽屬性設為虛擬,原因相同
將物件系結至控制項
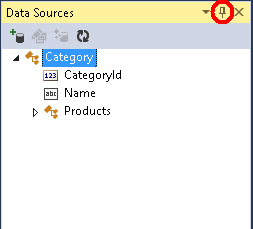
新增模型中定義為此 WinForms 應用程式的資料來源的類別。
從主功能表中,選取 [專案 - > 新增資料來源... ](在 Visual Studio 2010 中,您需要選取 [資料 - > 新增資料來源... ]
在 [選擇資料來源類型] 視窗中,選取 [物件 ],然後按 [下一步]
在 [選取資料物件] 對話方塊中,展開 WinFormswithEFSample 兩次,然後選取 [類別] 不需要選取產品資料來源,因為我們會透過 Category 資料來源上的 Product 屬性取得它。
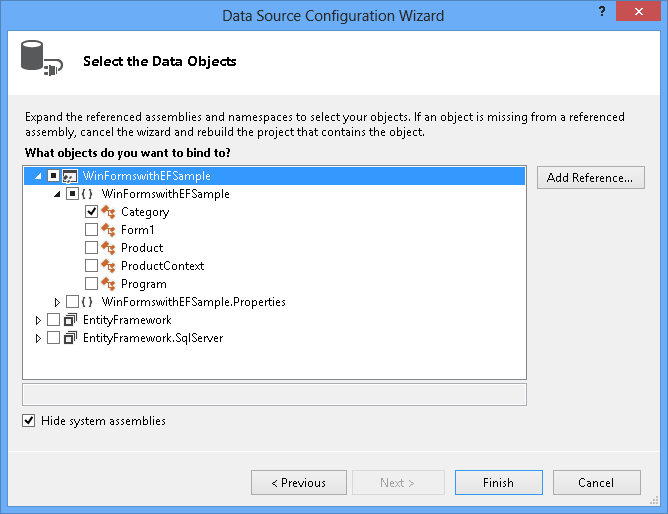
按一下 [ 完成]。 如果 [資料來源] 視窗未顯示,請選取 [檢視 - > 其他 Windows- > 資料來源]
按下釘選圖示,讓 [資料來源] 視窗不會自動隱藏。 如果視窗已經可見,您可能需要按 [重新整理] 按鈕。
在方案總管中,按兩下 Form1.cs 檔案,以在設計工具中開啟主要表單。
選取 [ 類別 ] 資料來源,然後將它拖曳到表單上。 根據預設,新的 DataGridView ( categoryDataGridView ) 和導覽工具列控制項會新增至設計工具。 這些控制項也會系結至 BindingSource ( categoryBindingSource ) 和 Binding Navigator ( categoryBindingNavigator ) 元件。
編輯 categoryDataGridView 上的 資料行。 我們想要將 CategoryId 資料行設定 為唯讀。 在儲存資料之後,資料庫會產生 CategoryId 屬性的值 。
- 以滑鼠右鍵按一下 DataGridView 控制項,然後選取 [編輯資料行...
- 選取 CategoryId 資料行,並將 ReadOnly 設定為 True
- 按 [確定]
從 [類別目錄] 資料來源底下選取 [產品],然後將它拖曳到表單上。 productDataGridView 和 productBindingSource 會新增至表單。
編輯 productDataGridView 上的資料行。 我們想要隱藏 CategoryId 和 Category 資料行,並將 ProductId 設定為唯讀。 在儲存資料之後,資料庫會產生 ProductId 屬性的值。
- 以滑鼠右鍵按一下 DataGridView 控制項,然後選取 [ 編輯資料行... ]。
- 選取 ProductId 資料行,並將 ReadOnly 設定 為 True 。
- 選取 CategoryId 資料行,然後按 [ 移除] 按鈕。 使用 Category 資料行執行相同的動作。
- 按 [確定]。
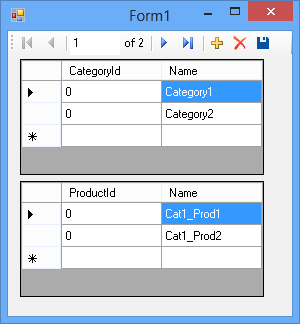
到目前為止,我們已將 DataGridView 控制項與設計工具中的 BindingSource 元件建立關聯。 在下一節中,我們會將程式碼新增至程式碼後置,以將 categoryBindingSource.DataSource 設定為 DbCoNtext 目前追蹤的實體集合。 當我們從類別下拖放產品時,WinForms 會負責將 productsBindingSource.DataSource 屬性設定為 categoryBindingSource,並將 productsBindingSource.DataMember 屬性設定為 Products。 由於此系結,只有屬於目前選取類別的產品才會顯示在 productDataGridView 中。
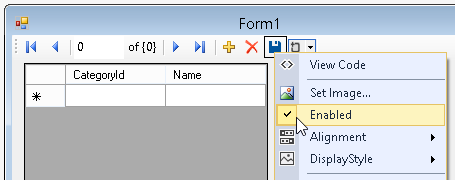
按一下滑鼠右鍵並選取 [已啟用 ],以啟用流覽工具列上的 [儲存 ] 按鈕。
按兩下按鈕以新增儲存按鈕的事件處理常式。 這會新增事件處理常式,並將您帶到表單的程式碼後置。 下一節中將會新增categoryBindingNavigatorSaveItem_Click 事件處理常式的程式碼 。
新增處理資料互動的程式碼
我們現在會新增程式碼,以使用 ProductCoNtext 來執行資料存取。 更新主表單視窗的程式碼,如下所示。
程式碼會宣告 ProductCoNtext 長時間執行的實例。 ProductCoNtext 物件可用來查詢及儲存資料至資料庫。 接著會從覆寫的 OnClosing 方法呼叫 ProductCoNtext 實例上的 Dispose() 方法。 程式碼批註提供程式碼功能的詳細資料。
    using System;
    using System.Collections.Generic;
    using System.ComponentModel;
    using System.Data;
    using System.Drawing;
    using System.Linq;
    using System.Text;
    using System.Threading.Tasks;
    using System.Windows.Forms;
    using System.Data.Entity;

    namespace WinFormswithEFSample
    {
        public partial class Form1 : Form
        {
            ProductContext _context;
            public Form1()
            {
                InitializeComponent();
            }

            protected override void OnLoad(EventArgs e)
            {
                base.OnLoad(e);
                _context = new ProductContext();

                // Call the Load method to get the data for the given DbSet
                // from the database.
                // The data is materialized as entities. The entities are managed by
                // the DbContext instance.
                _context.Categories.Load();

                // Bind the categoryBindingSource.DataSource to
                // all the Unchanged, Modified and Added Category objects that
                // are currently tracked by the DbContext.
                // Note that we need to call ToBindingList() on the
                // ObservableCollection<TEntity> returned by
                // the DbSet.Local property to get the BindingList<T>
                // in order to facilitate two-way binding in WinForms.
                this.categoryBindingSource.DataSource =
                    _context.Categories.Local.ToBindingList();
            }

            private void categoryBindingNavigatorSaveItem_Click(object sender, EventArgs e)
            {
                this.Validate();

                // Currently, the Entity Framework doesn’t mark the entities
                // that are removed from a navigation property (in our example the Products)
                // as deleted in the context.
                // The following code uses LINQ to Objects against the Local collection
                // to find all products and marks any that do not have
                // a Category reference as deleted.
                // The ToList call is required because otherwise
                // the collection will be modified
                // by the Remove call while it is being enumerated.
                // In most other situations you can do LINQ to Objects directly
                // against the Local property without using ToList first.
                foreach (var product in _context.Products.Local.ToList())
                {
                    if (product.Category == null)
                    {
                        _context.Products.Remove(product);
                    }
                }

                // Save the changes to the database.
                this._context.SaveChanges();

                // Refresh the controls to show the values
                // that were generated by the database.
                this.categoryDataGridView.Refresh();
                this.productsDataGridView.Refresh();
            }

            protected override void OnClosing(CancelEventArgs e)
            {
                base.OnClosing(e);
                this._context.Dispose();
            }
        }
    }
測試 Windows Forms 應用程式
編譯並執行應用程式,您可以測試功能。
儲存存放區產生的金鑰之後,畫面上會顯示。
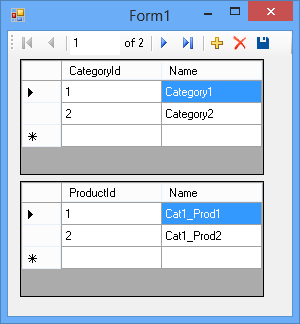
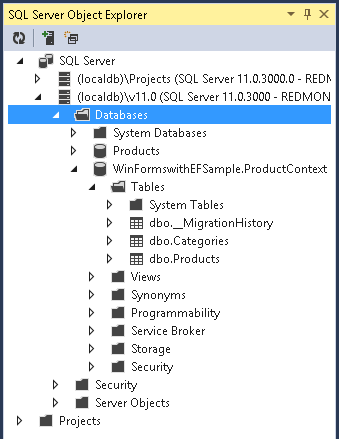
如果您使用 Code First,您也會看到 已為您建立 WinFormswithEFSample.ProductCoNtext 資料庫。
意見反應
即將登場:在 2024 年,我們將逐步淘汰 GitHub 問題作為內容的意見反應機制,並將它取代為新的意見反應系統。 如需詳細資訊,請參閱:https://aka.ms/ContentUserFeedback。
提交並檢視相關的意見反應