練習 - 將參數和輸出加入至您的 Azure Resource Manager 範本
在本練習中,您將會新增參數,以便在部署期間定義 Azure 儲存體帳戶名稱。 接著,您要新增參數來定義允許使用的儲存體帳戶 SKU,並定義要將哪一個用於此部署。 您也要新增可稍後在部署程序中使用的輸出,以便增加 Azure Resource Manager 範本 (ARM 範本) 的實用性。
建立 ARM 範本的參數
在這裡,您要新增可以在執行階段設定的參數,讓您的 ARM 範本更具彈性。 建立 storageName 值的參數。
在 Visual Studio Code 的 azuredeploy.json 檔案中,將您的游標放在 parameters 屬性的大括弧內。 其看起來如下:
"parameters":{},選取 Enter,然後輸入 par。 您會看到相關程式碼片段的清單。 選擇 new-parameter,將泛型參數新增至範本。 畫面顯示為這樣:
 "parameters": {
    "parameter1": {
    "type": "string",
    "metadata": {
        "description": "description"
    }
  }
},
將參數從 parameter1 變更為 storageName,並將類型保留為字串。 新增 minLength 值為 3 和 maxLength 值為 24。 新增 Azure 儲存體資源名稱的描述值。
parameter 區塊看起來應該像這樣:
"parameters": {
  "storageName": {
    "type": "string",
    "minLength": 3,
    "maxLength": 24,
    "metadata": {
      "description": "The name of the Azure storage resource"
    }
  }
},
在
name和displayName值中,使用resources區塊中的新參數。 整個檔案看起來會像這樣:{ "$schema": "https://schema.management.azure.com/schemas/2019-04-01/deploymentTemplate.json#", "contentVersion": "1.0.0.0", "parameters": { "storageName": { "type": "string", "minLength": 3, "maxLength": 24, "metadata": { "description": "The name of the Azure storage resource" } } }, "functions": [], "variables": {}, "resources": [ { "name": "[parameters('storageName')]", "type": "Microsoft.Storage/storageAccounts", "apiVersion": "2019-06-01", "tags": { "displayName": "[parameters('storageName')]" }, "location": "[resourceGroup().location]", "kind": "StorageV2", "sku": { "name": "Standard_LRS", "tier": "Standard" } } ], "outputs": {} }儲存檔案。
部署參數化的 ARM 範本
在這裡,您要變更部署的名稱,以便更清楚地反映此部署的用途,並填入新參數的值。
在終端機中執行下列 Azure CLI 命令。 此程式碼片段是您先前使用的相同程式碼,但部署的名稱已變更。 填入 storageName 參數的唯一名稱。 請記住,此名稱在整個 Azure 中必須是唯一的。 您可以使用您在上一個單位中建立的唯一名稱。 在該情況下,Azure 將會更新資源,而不是建立新的資源。
templateFile="azuredeploy.json"
today=$(date +"%d-%b-%Y")
DeploymentName="addnameparameter-"$today

az deployment group create \
  --name $DeploymentName \
  --template-file $templateFile \
  --parameters storageName={your-unique-name}
在終端機中執行下列 Azure PowerShell 命令。 此程式碼片段是您先前使用的相同程式碼,但部署的名稱已變更。 填入 storageName 參數的唯一名稱。 請記住,此名稱在整個 Azure 中必須是唯一的。 您可以使用您在上一個單位中建立的唯一名稱。 在該情況下,Azure 將會更新資源,而不是建立新的資源。
$templateFile="azuredeploy.json"
$today=Get-Date -Format "MM-dd-yyyy"
$deploymentName="addnameparameter-"+"$today"
New-AzResourceGroupDeployment `
  -Name $deploymentName `
  -TemplateFile $templateFile `
  -storageName {your-unique-name}
檢查您的部署
部署完成時,請在瀏覽器中返回 Azure 入口網站。 移至您的資源群組,並看到現在有 3 個成功部署。 選取此連結。
請注意,全部三個部署都在清單中。
如先前所述,探索 addnameparameter 部署。
加入另一個參數以限制允許的值
在這裡,您要使用參數來限制參數所允許的值。
將游標放在
storageName參數的右大括弧後面。 新增逗號,然後選取 Enter。接著再次輸入 par,然後選取 [新增參數]。
將新的泛型參數變更為以下內容:
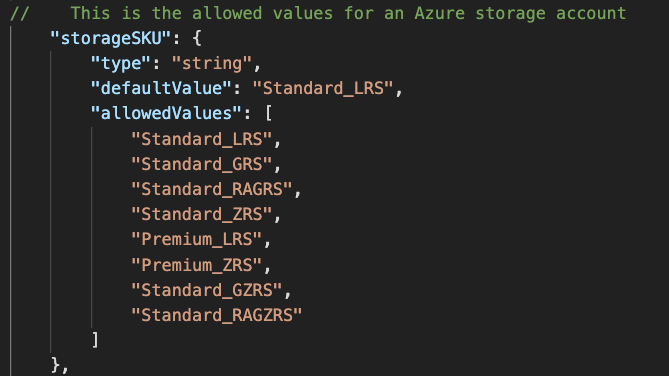
"storageSKU": {
   "type": "string",
   "defaultValue": "Standard_LRS",
   "allowedValues": [
     "Standard_LRS",
     "Standard_GRS",
     "Standard_RAGRS",
     "Standard_ZRS",
     "Premium_LRS",
     "Premium_ZRS",
     "Standard_GZRS",
     "Standard_RAGZRS"
   ]
 }
在這裡,您將會列出此參數允許的值。 如果範本是以不允許的值執行,部署將會失敗。
在此參數中加入註解。
ARM 範本支援
//和/* */註解。更新資源以使用
storageSKU參數。 利用 Visual Studio Code 中的 IntelliSense,讓此步驟變得更容易。"sku": { "name": "[parameters('storageSKU')]" }整個檔案看起來會像這樣:
{
  "$schema": "https://schema.management.azure.com/schemas/2019-04-01/deploymentTemplate.json#",
  "contentVersion": "1.0.0.0",
  "parameters": {
    "storageName": {
      "type": "string",
      "minLength": 3,
      "maxLength": 24,
      "metadata": {
        "description": "The name of the Azure storage resource"
      }
    },
    "storageSKU": {
      "type": "string",
      "defaultValue": "Standard_LRS",
      "allowedValues": [
        "Standard_LRS",
        "Standard_GRS",
        "Standard_RAGRS",
        "Standard_ZRS",
        "Premium_LRS",
        "Premium_ZRS",
        "Standard_GZRS",
        "Standard_RAGZRS"
      ]
    }
  },
  "functions": [],
  "variables": {},
  "resources": [
    {
      "name": "[parameters('storageName')]",
      "type": "Microsoft.Storage/storageAccounts",
      "apiVersion": "2019-06-01",
      "tags": {
        "displayName": "[parameters('storageName')]"
      },
      "location": "[resourceGroup().location]",
      "kind": "StorageV2",
      "sku": {
        "name": "[parameters('storageSKU')]",
        "tier": "Standard"
      }
    }
  ],
  "outputs": {}
}
儲存檔案。
部署 ARM 範本
在這裡,您將使用允許清單中的 storageSKU 參數來成功部署。 然後,您將嘗試使用不在允許清單中的 storageSKU 參數來部署範本。 第二個部署將會如預期般失敗。
執行下列命令以部署範本。 填入
storageName參數的唯一名稱。 請記住,此名稱在整個 Azure 中必須是唯一的。 您可以使用您在上一節中建立的唯一名稱。 在該情況下,Azure 將會更新資源,而不是建立新的資源。templateFile="azuredeploy.json" today=$(date +"%d-%b-%Y") DeploymentName="addSkuParameter-"$today az deployment group create \ --name $DeploymentName \ --template-file $templateFile \ --parameters storageSKU=Standard_GRS storageName={your-unique-name}允許此部署完成。 此部署會如預期般成功。 允許的值會讓您範本的使用者無法傳入不適用於資源的參數值。 讓我們來看一下,當您提供無效 SKU 時,會發生什麼狀況。
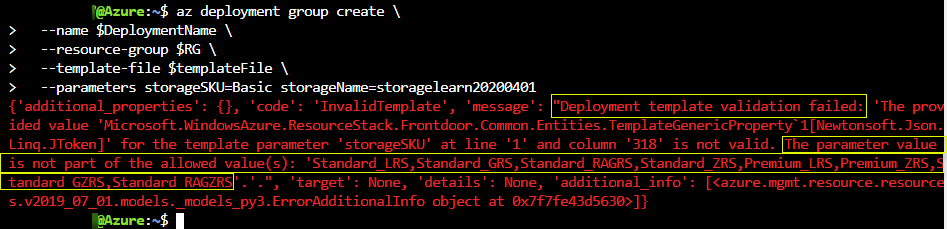
執行下列命令,以使用不允許的參數部署範本。 在這裡,您已將
storageSKU參數變更為 Basic。 填入storageName參數的唯一名稱。 請記住,此名稱在整個 Azure 中必須是唯一的。 您可以使用您在上一節中建立的唯一名稱。 在該情況下,Azure 將會更新資源,而不是建立新的資源。templateFile="azuredeploy.json" today=$(date +"%d-%b-%Y") DeploymentName="addSkuParameter-"$today az deployment group create \ --name $DeploymentName \ --template-file $templateFile \ --parameters storageSKU=Basic storageName={your-unique-name}此部署將會失敗。 請留意錯誤。
執行下列命令以部署範本。 填入
storageName參數的唯一名稱。 請記住,此名稱在整個 Azure 中必須是唯一的。 您可以使用您在上一節中建立的唯一名稱。 在該情況下,Azure 將會更新資源,而不是建立新的資源。$today=Get-Date -Format "MM-dd-yyyy" $deploymentName="addSkuParameter-"+"$today" New-AzResourceGroupDeployment ` -Name $deploymentName ` -TemplateFile $templateFile ` -storageName {your-unique-name} ` -storageSKU Standard_GRS允許此部署完成。 此部署會如預期般成功。 允許的值會讓您範本的使用者無法傳入不適用於資源的參數值。 讓我們來看一下,當您提供無效 SKU 時,會發生什麼狀況。
執行下列命令,以使用不允許的參數部署範本。 在這裡,您已將
storageSKU參數變更為 Basic。 填入storageName參數的唯一名稱。 請記住,此名稱在整個 Azure 中必須是唯一的。 您可以使用您在上一節中建立的唯一名稱。 在該情況下,Azure 將會更新資源,而不是建立新的資源。$today=Get-Date -Format "MM-dd-yyyy" $deploymentName="addSkuParameter-"+"$today" New-AzResourceGroupDeployment ` -Name $deploymentName ` -TemplateFile $templateFile ` -storageName {your-unique-name} ` -storageSKU Basic此部署將會失敗。 請留意錯誤。
將輸出加入至 ARM 範本
在這裡,您要新增至 ARM 範本的 outputs 區段,以輸出儲存體帳戶資源的端點。
在 Visual Studio Code 的 azuredeploy.json 檔案中,將您的游標放在
"outputs":{},輸出屬性的大括弧內。按 Enter 鍵,然後輸入 out。您會看到相關片段的清單。 選取 [新增輸出]。 其會將泛型輸出新增至範本。 其看起來將會像下面這樣:
"outputs": {
  "output1": {
    "type": "string",
    "value": "value"
  }
將 "output1" 變更為 "storageEndpoint",然後將
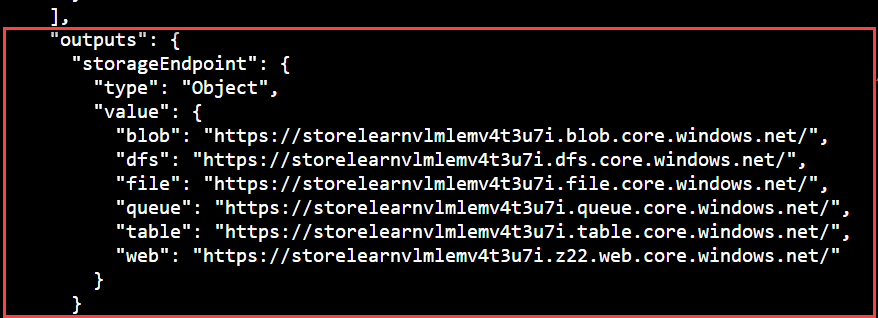
type的值變更為 "object"。 將value的值變更為 "[reference(parameters('storageName')).primaryEndpoints]"。 這是我們在上一個單元中所描述的運算式,可取得端點資料。 因為我們將「物件」指定為類型,所以會以 JSON 格式傳回物件。"outputs": { "storageEndpoint": { "type": "object", "value": "[reference(parameters('storageName')).primaryEndpoints]" }儲存檔案。
使用輸出部署 ARM 範本
在這裡,您要部署範本,並看到端點輸出為 JSON。 您必須填入 storageName 參數的唯一名稱。 請記住,此名稱在整個 Azure 中必須是唯一的。 您可以使用您在上一節中建立的唯一名稱。 在該情況下,Azure 將會更新資源,而不是建立新的資源。
執行下列命令以部署範本。 請務必以您唯一的字串取代 {your-unique-name}。
templateFile="azuredeploy.json"
today=$(date +"%d-%b-%Y")
DeploymentName="addoutputs-"$today

az deployment group create \
  --name $DeploymentName \
  --template-file $templateFile \
  --parameters storageSKU=Standard_LRS storageName={your-unique-name}
請留意輸出。
執行下列命令以部署範本。 請務必以您唯一的字串取代 {your-unique-name}。
$today=Get-Date -Format "MM-dd-yyyy"
$deploymentName="addOutputs-"+"$today"
New-AzResourceGroupDeployment `
  -Name $deploymentName `
  -TemplateFile $templateFile `
  -storageName {your-unique-name} `
  -storageSKU Standard_LRS
請留意輸出。
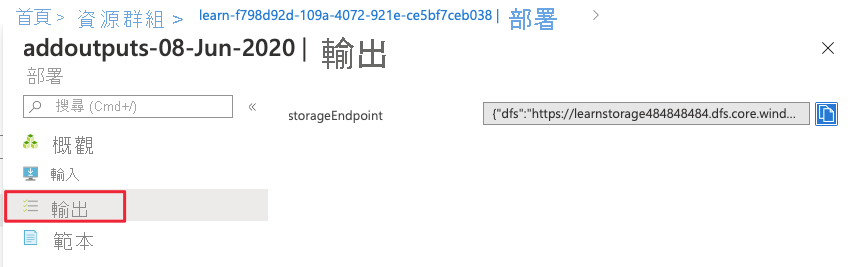
檢查您的輸出部署
在 Azure 入口網站中,前往您的 addOutputs 部署。 您也可以在該處找到您的輸出。