教學課程:搭配 SQL Server 使用 Azure Blob 儲存體
適用於:![]() SQL Server 2016 (13.x) 和更新版本
SQL Server 2016 (13.x) 和更新版本
本教學課程協助您了解如何在 SQL Server 2016 和更新版本中針對資料檔案和備份使用 Azure Blob 儲存體。
Azure Blob 儲存體的 SQL Server 整合支援一開始是 SQL Server 2012 Service Pack 1 CU2 增強功能,並且已使用 SQL Server 2014 和 SQL Server 2016 進一步加強。 如需功能概觀以及使用此功能的優點,請參閱 Microsoft Azure 中的 SQL Server 資料檔案。
本教學課程會在多個章節中示範如何在 Azure Blob 儲存體中使用 SQL Server 資料檔案。 每個章節都著重在特定工作,並且應該依序完成章節。 首先,您將學習如何使用預存存取原則和共用存取簽章在 Blob 儲存體中建立新的容器。 然後,您將學習如何建立 SQL Server 認證,以便整合 SQL Server 與 Azure Blob 儲存體。 接下來,您會將資料庫備份至 Blob 儲存體,並將它還原至 Azure 虛擬機器。 您接著將使用 SQL Server 檔案快照集交易記錄備份還原至某個時間點和新的資料庫。 最後,本教學課程將示範如何使用中繼資料系統預存程序和函數,協助您了解和使用檔案快照集備份。
必要條件
若要完成本教學課程,您必須熟悉 SQL Server 備份與還原概念以及 T-SQL 語法。
若要使用本教學課程,您需要 Azure 儲存體帳戶、SQL Server Management Studio (SSMS)、存取 SQL Server 內部部署執行個體的權限、存取執行 SQL Server 2016 或更新版本之 Azure 虛擬機器 (VM) 的權限,以及 AdventureWorks2022 資料庫。 此外,用來發出 BACKUP 或 RESTORE 命令的帳戶,應該位於擁有 ALTER ANY CREDENTIAL 權限的 db_backupoperator 資料庫角色中。
- 取得免費 Azure 帳戶。
- 建立 Azure 儲存體帳戶。
- 安裝 SQL Server 2017 Developer Edition。
- 佈建執行 SQL Server 的 Azure VM
- 安裝 SQL Server Management Studio。
- 下載 AdventureWorks 範例資料庫。
- 將使用者帳戶指派給 db_backupoperator 的角色,並授與 ALTER ANY CREDENTIAL 權限。
重要
SQL Server 不支援 Azure Data Lake Storage,請確定本教學課程所使用的儲存體帳戶上未啟用階層命名空間。
1 - 建立預存存取原則和共用存取儲存體
在本節中,您將使用 Azure PowerShell 指令碼,在 Azure Blob 儲存體容器上建立使用預存存取原則的共用存取簽章。
注意
此指令碼是使用 Azure PowerShell 5.0.10586 所撰寫。
共用存取簽章是一個 URI,會將有限的存取權限授與容器、Blob、佇列或資料表。 預存存取原則可對伺服器端的共用存取簽章提供一層額外的控制,包括撤銷、逾期或延伸存取權。 使用這項新的增強功能時,您需要在容器上建立具有最低讀取、寫入和列出權限的原則。
您可以使用 Azure PowerShell、Azure 儲存體 SDK、Azure REST API 或協力廠商公用程式,建立預存存取原則和共用存取簽章。 本教學課程示範如何使用 Azure PowerShell 指令碼來完成這項工作。 此指令碼會使用資源管理員部署模型,並建立下列新的資源
- 資源群組
- 儲存體帳戶
- Azure Blob 儲存體容器
- SAS 原則
此指令碼一開始會宣告一些變數,來指定上述資源的名稱,以及下列必要輸入值的名稱:
- 用來命名其他資源物件的前置名稱
- 訂閱名稱
- 資料中心位置
此指令碼最後會產生適當的 CREATE CREDENTIAL 陳述式,您將在 2 - 使用共用存取簽章建立 SQL Server 認證中使用此陳述式。 系統會為您將此陳述式複製到剪貼簿,並輸出到主控台以供檢視。
若要在容器上建立原則並產生共用存取簽章 (SAS),請遵循下列步驟執行:
開啟 Window PowerShell 或 Windows PowerShell ISE (請參閱上述的版本需求)。
編輯並執行下面的指令碼:
# Define global variables for the script
$prefixName = '<a prefix name>'  # used as the prefix for the name for various objects
$subscriptionID = '<your subscription ID>'   # the ID  of subscription name you will use
$locationName = '<a data center location>'  # the data center region you will use
$storageAccountName= $prefixName + 'storage' # the storage account name you will create or use
$containerName= $prefixName + 'container'  # the storage container name to which you will attach the SAS policy with its SAS token
$policyName = $prefixName + 'policy' # the name of the SAS policy

# Set a variable for the name of the resource group you will create or use
$resourceGroupName=$prefixName + 'rg'

# Add an authenticated Azure account for use in the session
Connect-AzAccount

# Set the tenant, subscription and environment for use in the rest of
Set-AzContext -SubscriptionId $subscriptionID

# Create a new resource group - comment out this line to use an existing resource group
New-AzResourceGroup -Name $resourceGroupName -Location $locationName

# Create a new Azure Resource Manager storage account - comment out this line to use an existing Azure Resource Manager storage account
New-AzStorageAccount -Name $storageAccountName -ResourceGroupName $resourceGroupName -Type Standard_RAGRS -Location $locationName

# Get the access keys for the Azure Resource Manager storage account
$accountKeys = Get-AzStorageAccountKey -ResourceGroupName $resourceGroupName -Name $storageAccountName

# Create a new storage account context using an Azure Resource Manager storage account
$storageContext = New-AzStorageContext -StorageAccountName $storageAccountName -StorageAccountKey $accountKeys[0].Value

# Creates a new container in Blob Storage
$container = New-AzStorageContainer -Context $storageContext -Name $containerName

# Sets up a Stored Access Policy and a Shared Access Signature for the new container
$policy = New-AzStorageContainerStoredAccessPolicy -Container $containerName -Policy $policyName -Context $storageContext -StartTime $(Get-Date).ToUniversalTime().AddMinutes(-5) -ExpiryTime $(Get-Date).ToUniversalTime().AddYears(10) -Permission rwld

# Gets the Shared Access Signature for the policy
$sas = New-AzStorageContainerSASToken -name $containerName -Policy $policyName -Context $storageContext
Write-Host 'Shared Access Signature= '$($sas.Substring(1))''

# Sets the variables for the new container you just created
$container = Get-AzStorageContainer -Context $storageContext -Name $containerName
$cbc = $container.CloudBlobContainer

# Outputs the Transact SQL to the clipboard and to the screen to create the credential using the Shared Access Signature
Write-Host 'Credential T-SQL'
$tSql = "CREATE CREDENTIAL [{0}] WITH IDENTITY='Shared Access Signature', SECRET='{1}'" -f $cbc.Uri,$sas.Substring(1)
$tSql | clip
Write-Host $tSql

# Once you're done with the tutorial, remove the resource group to clean up the resources.
# Remove-AzResourceGroup -Name $resourceGroupName
指令碼完成之後,會將 CREATE CREDENTIAL 陳述式放在剪貼簿中以供下一節使用。
2 - 使用共用存取簽章建立 SQL Server 認證
在本節中,您將建立用來儲存安全性資訊的認證,這些資訊可供 SQL Server 用來寫入及讀取您在先前步驟中所建立的 Azure Blob 儲存體容器內容。
SQL Server 認證是用來儲存連接到 SQL Server 外部資源所需之驗證資訊的物件。 認證會儲存 Azure Blob 儲存體容器的 URI 路徑,以及該容器的共用存取簽章金鑰值。
若要建立 SQL Server 認證,請依照下列步驟進行:
啟動 SSMS。
開啟新的查詢視窗,並連線到內部部署環境中資料引擎的 SQL Server 執行個體。
在新的查詢視窗中,貼上第 1 節的共用存取簽章及 CREATE CREDENTIAL 陳述式,然後執行該指令碼。
指令碼看起來類似下列程式碼。
/* Example:
USE master
CREATE CREDENTIAL [https://msfttutorial.blob.core.windows.net/containername]
WITH IDENTITY='SHARED ACCESS SIGNATURE'
, SECRET = 'sharedaccesssignature'
GO */

USE master
CREATE CREDENTIAL [https://<mystorageaccountname>.blob.core.windows.net/<mystorageaccountcontainername>]
  -- this name must match the container path, start with https and must not contain a forward slash at the end
WITH IDENTITY='SHARED ACCESS SIGNATURE'
  -- this is a mandatory string and should not be changed
 , SECRET = 'sharedaccesssignature'
   -- this is the shared access signature key that you obtained in section 1.
GO
若要查看所有可用的認證,您可以在已連接到執行個體的查詢視窗中執行下列陳述式:
SELECT * from sys.credentials開啟新的查詢視窗,並連線到您 Azure 虛擬機器中資料庫引擎的 SQL Server 執行個體。
在新的查詢視窗中,貼上第 1 節的共用存取簽章及 CREATE CREDENTIAL 陳述式,然後執行該指令碼。
如果您想要讓任何其他 SQL Server 執行個體擁有容器的存取權,請重複步驟 5 和 6。
3 - 資料庫備份至 URL
在本節中,您會將 SQL Server 2016 執行個體中的 AdventureWorks2022 資料庫,備份到您在第 1 節建立的 Azure 容器。
注意
如果您想要將 SQL Server 2012 (11.x) SP1 CU2+ 資料庫或 SQL Server 2014 (12.x) 資料庫備份至此容器,您可使用這裡記載的已淘汰語法,利用 WITH CREDENTIAL 語法備份至 URL。
若要將資料庫備份至 Blob 儲存體,請遵循下列步驟:
啟動 SSMS。
開啟新的查詢視窗,並連線到您 Azure 虛擬機器中的 SQL Server 執行個體。
將下列 Transact-SQL 指令碼複製並貼入 [查詢] 視窗中。 適當地修改儲存體帳戶名稱以及您在第 1 節中所指定容器的 URL,然後執行此指令碼。
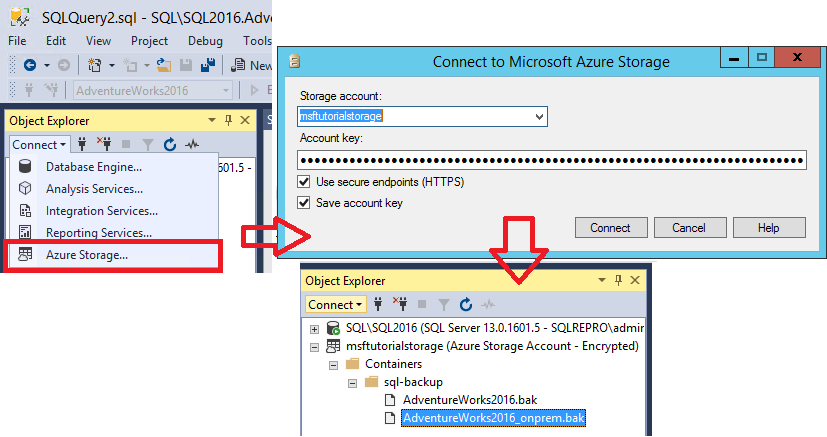
-- To permit log backups, before the full database backup, modify the database to use the full recovery model.
USE master;
ALTER DATABASE AdventureWorks2022
   SET RECOVERY FULL;

-- Back up the full AdventureWorks2022 database to the container that you created in section 1
BACKUP DATABASE AdventureWorks2022
   TO URL = 'https://<mystorageaccountname>.blob.core.windows.net/<mystorageaccountcontainername>/AdventureWorks2022_onprem.bak'
開啟物件總管,並使用您的儲存體帳戶和帳戶金鑰連接到 Azure 儲存體。
- 依序展開 [容器] 及您在第 1 節中建立的容器,然後確認上述步驟 3 中的備份出現在此容器中。
4 - 從 URL 將資料庫還原至虛擬機器
在本節中,您會將 AdventureWorks2022 資料庫還原至 Azure 虛擬機器中的 SQL Server 執行個體。
注意
為了簡化本教學課程,我們將使用與資料庫備份時所用的相同資料和記錄檔容器。 在生產環境中,您可能會使用多個容器,通常也可能會使用多個資料檔案。 您也可以考慮將備份等量分割到多個 Blob,以提升備份大型資料庫時的備份效能。
若要將 AdventureWorks2022 資料庫從 Azure Blob 儲存體還原至 Azure 虛擬機器中的 SQL Server 2016 執行個體,請遵循下列步驟:
啟動 SSMS。
開啟新的查詢視窗,並連線到您 Azure 虛擬機器中資料庫引擎的 SQL Server 執行個體。
將下列 Transact-SQL 指令碼複製並貼入 [查詢] 視窗中。 適當地修改儲存體帳戶名稱以及您在第 1 節中所指定容器的 URL,然後執行此指令碼。
-- Restore AdventureWorks2022 from URL to SQL Server instance using Azure Blob Storage for database files
RESTORE DATABASE AdventureWorks2022
   FROM URL = 'https://<mystorageaccountname>.blob.core.windows.net/<mystorageaccountcontainername>/AdventureWorks2022_onprem.bak'
   WITH
      MOVE 'AdventureWorks2022_data' to 'https://<mystorageaccountname>.blob.core.windows.net/<mystorageaccountcontainername>/AdventureWorks2022_Data.mdf'
     ,MOVE 'AdventureWorks2022_log' to 'https://<mystorageaccountname>.blob.core.windows.net/<mystorageaccountcontainername>/AdventureWorks2022_Log.ldf'
--, REPLACE
開啟物件總管,並連接到您的 Azure SQL Server 執行個體。
在 [物件總管] 中,展開 [資料庫] 節點,並確認
AdventureWorks2022資料庫已還原 (必要時請重新整理節點)- 以滑鼠右鍵按一下 AdventureWorks2022,然後選取 [屬性]。
- 選取 [檔案],並確認兩個資料庫檔案的路徑是指向 Azure Blob 儲存體容器中 Blob 的 URL (完成時請選取 [取消])。
] database on the Azure VM.](media/tutorial-use-azure-blob-storage-service-with-sql-server-2016/adventureworks-on-azure-vm.png?view=sql-server-ver15)
在物件總管中,連接到 Azure 儲存體。
- 依序展開 [容器] 和您在第 1 節中建立的容器,然後確認上述步驟 3 中的
AdventureWorks2022_Data.mdf和AdventureWorks2022_Log.ldf,連同第 3 節中的備份檔案一起出現在此容器中 (必要時請重新整理節點)。
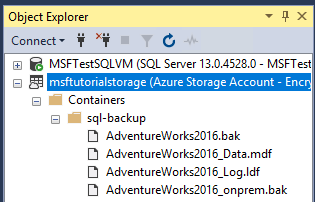
- 依序展開 [容器] 和您在第 1 節中建立的容器,然後確認上述步驟 3 中的
5 - 使用檔案快照集備份來備份資料庫
在本節中,您將使用檔案快照集備份,在 Azure 虛擬機器中備份 AdventureWorks2022 資料庫,以透過 Azure 快照集執行幾乎即時的備份。 如需檔案快照集備份的詳細資訊,請參閱 Azure 中資料庫檔案的檔案快照集備份
若要使用快照集檔案備份來備份 AdventureWorks2022 資料庫,請遵循下列步驟:
啟動 SSMS。
開啟新的查詢視窗,並連線到您 Azure 虛擬機器中資料庫引擎的 SQL Server 執行個體。
將下列 Transact-SQL 指令碼複製並貼入查詢視窗中,然後執行此指令碼 (不要關閉此查詢視窗 - 您將在步驟 5 中再次執行此指令碼)。 此系統預存程序可讓您檢視組成指定資料庫之每個檔案的現有檔案快照集備份。 您會發現此資料庫沒有任何檔案快照集備份。
-- Verify that no file snapshot backups exist
SELECT * FROM sys.fn_db_backup_file_snapshots ('AdventureWorks2022');
將下列 Transact-SQL 指令碼複製並貼入 [查詢] 視窗中。 適當地修改儲存體帳戶名稱以及您在第 1 節中所指定容器的 URL,然後執行此指令碼。 注意此備份速度有多快。
-- Backup the AdventureWorks2022 database with FILE_SNAPSHOT
BACKUP DATABASE AdventureWorks2022
   TO URL = 'https://<mystorageaccountname>.blob.core.windows.net/<mystorageaccountcontainername>/AdventureWorks2022_Azure.bak'
   WITH FILE_SNAPSHOT;
確認步驟 4 中的指令碼順利執行之後,請再次執行下列指令碼。 請注意,步驟 4 中的檔案快照集備份作業會產生資料和記錄檔的檔案快照集。
-- Verify that two file-snapshot backups exist
SELECT * FROM sys.fn_db_backup_file_snapshots ('AdventureWorks2022');
在 [物件總管] 中,於您 Azure 虛擬機器的 SQL Server 執行個體中,展開 [資料庫] 節點,並確認
AdventureWorks2022資料庫已還原至此執行個體 (必要時請重新整理節點)。在物件總管中,連接到 Azure 儲存體。
依序展開 [容器] 及您在第 1 節中建立的容器,然後確認上述步驟 4 中的
AdventureWorks2022_Azure.bak,與第 3 節中的備份檔案及第 4 節中的資料庫檔案一起出現在此容器中 (必要時請重新整理節點)。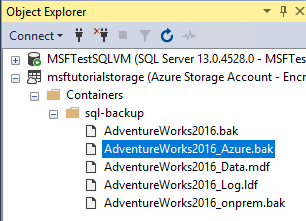
6 - 使用檔案快照集備份來產生活動和備份記錄
在本節中,您將使用檔案快照集備份,在 AdventureWorks2022 資料庫中產生活動並定期建立交易記錄備份。 如需如何使用檔案快照集備份的詳細資訊,請參閱 Azure 中資料庫檔案的檔案快照集備份。
若要使用檔案快照集備份,在 AdventureWorks2022 資料庫中產生活動並定期建立交易記錄備份,請遵循下列步驟:
啟動 SSMS。
開啟兩個新的查詢視窗,並將這兩個視窗都連接到 Azure 虛擬機器中資料庫引擎的 SQL Server 執行個體。
將下列 Transact-SQL 指令碼複製並貼入其中一個查詢視窗中,然後執行此指令碼。 請注意,在我們新增步驟 4 的新資料列之前,
Production.Location資料表有 14 個資料列。-- Verify row count at start SELECT COUNT (*) from AdventureWorks2022.Production.Location;將下列兩個 Transact-SQL 指令碼複製並分別貼入這兩個查詢視窗中。 適當地修改儲存體帳戶名稱以及您在第 1 節中所指定容器的 URL,然後分別在這兩個查詢視窗中同時執行這些指令碼。 這些指令碼需要大約七分鐘時間才能完成。
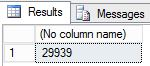
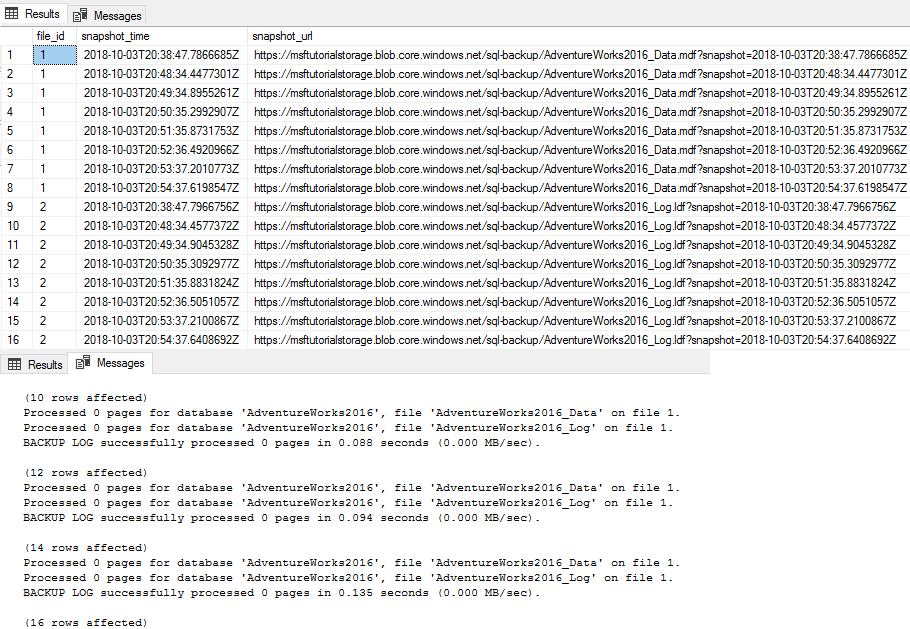
-- Insert 30,000 new rows into the Production.Location table in the AdventureWorks2022 database in batches of 75
DECLARE @count INT=1, @inner INT;
WHILE @count < 400
   BEGIN
      BEGIN TRAN;
         SET @inner =1;
            WHILE @inner <= 75
               BEGIN;
                  INSERT INTO AdventureWorks2022.Production.Location
                     (Name, CostRate, Availability, ModifiedDate)
                        VALUES (NEWID(), .5, 5.2, GETDATE());
                  SET @inner = @inner + 1;
               END;
      COMMIT;
   WAITFOR DELAY '00:00:01';
   SET @count = @count + 1;
   END;
SELECT COUNT (*) from AdventureWorks2022.Production.Location;
--take 7 transaction log backups with FILE_SNAPSHOT, one per minute, and include the row count and the execution time in the backup file name DECLARE @count INT=1, @device NVARCHAR(120), @numrows INT; WHILE @count <= 7 BEGIN SET @numrows = (SELECT COUNT (*) FROM AdventureWorks2022.Production.Location); SET @device = 'https://<mystorageaccountname>.blob.core.windows.net/<mystorageaccountcontainername>/tutorial-' + CONVERT (varchar(10),@numrows) + '-' + FORMAT(GETDATE(), 'yyyyMMddHHmmss') + '.bak'; BACKUP LOG AdventureWorks2022 TO URL = @device WITH FILE_SNAPSHOT; SELECT * from sys.fn_db_backup_file_snapshots ('AdventureWorks2022'); WAITFOR DELAY '00:1:00'; SET @count = @count + 1; END;檢閱第一個指令碼的輸出,並注意現在最後的資料列計數是 29,939。
檢閱第二個指令碼的輸出,並注意,每次 BACKUP LOG 陳述式執行時,系統都會建立兩個新的檔案快照集:一個記錄檔檔案快照集和一個資料檔檔案快照集,因此每一個資料庫檔案總共會有兩個檔案快照集。 第二個指令碼完成之後,請注意,現在共有 16 個檔案快照集,每一個資料庫檔案總共有 8 個:一個來自 BACKUP DATABASE 陳述式而另一個是每次執行 BACKUP LOG 陳述式時產生。
在物件總管中,連接到 Azure 儲存體。
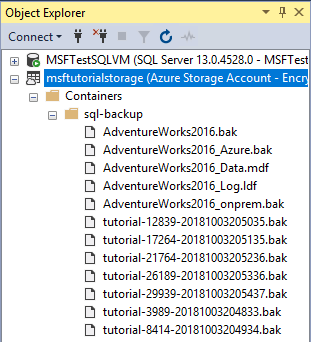
展開 [容器],並展開您在第 1 節所建立的容器,並確認其中顯示七個新備份記錄檔與先前章節的資料檔案 (您可視需要重新整理)。
7 - 將資料庫還原至某個時間點
在本節中,您會將 AdventureWorks2022 資料庫還原至兩個交易記錄備份之間的某個時間點。
使用傳統備份時,為了完成時間點還原,您必須使用完整資料庫備份 (可能是差異備份),以及您想要還原的時間點之前及剛好超過此時間點的所有交易記錄檔。 使用檔案快照集備份時,您只需要兩個相鄰的記錄備份檔案,這兩個檔案會提供您想要還原的時間點之前時間範圍的目標張貼內容。 您只需要兩個記錄檔案快照集備份組,因為每個記錄備份都會建立每個資料庫檔案的檔案快照集 (每個資料檔案和記錄檔)。
若要將資料庫從檔案快照集備份組還原至指定的時間點,請遵循下列步驟:
啟動 SSMS。
開啟新的查詢視窗,並連線到您 Azure 虛擬機器中資料庫引擎的 SQL Server 執行個體。
將下列 Transact-SQL 指令碼複製並貼入查詢視窗中,然後執行此指令碼。 確認
Production.Location資料表有 29,939 個資料列,再將它還原至步驟 4 中有較少資料列的時間點。-- Verify row count at start SELECT COUNT (*) from AdventureWorks2022.Production.Location
將下列 Transact-SQL 指令碼複製並貼入 [查詢] 視窗中。 選取兩個相鄰的記錄備份檔案,並將檔案名稱轉換成此指令碼所需的日期和時間。 適當地修改儲存體帳戶名稱以及您在第 1 節中所指定容器的 URL,提供第一個和第二個備份檔案名稱,提供 "June 26, 2018 01:48 PM" 格式的 STOPAT 時間,然後執行此指令碼。 此指令碼需要幾分鐘才能完成
-- restore and recover to a point in time between the times of two transaction log backups, and then verify the row count
ALTER DATABASE AdventureWorks2022 SET SINGLE_USER WITH ROLLBACK IMMEDIATE;
RESTORE DATABASE AdventureWorks2022
   FROM URL = 'https://<mystorageaccountname>.blob.core.windows.net/<mystorageaccountcontainername>/<firstbackupfile>.bak'
   WITH NORECOVERY,REPLACE;
RESTORE LOG AdventureWorks2022
   FROM URL = 'https://<mystorageaccountname>.blob.core.windows.net/<mystorageaccountcontainername>/<secondbackupfile>.bak'
   WITH RECOVERY, STOPAT = 'June 26, 2018 01:48 PM';
ALTER DATABASE AdventureWorks2022 set multi_user;
-- get new count
SELECT COUNT (*) FROM AdventureWorks2022.Production.Location ;
檢閱輸出。 請注意,還原後的資料列計數為 18,389,也就是介於記錄備份 5 和 6 之間的資料列計數 (您的資料列計數會有所不同)。

8 - 從記錄備份還原為新的資料庫
在本節中,您會從檔案快照集交易記錄備份,將 AdventureWorks2022 資料庫還原為新的資料庫。
在此情況下,您會基於商務分析和報告在不同的虛擬機器上執行還原至 SQL Server 執行個體。 還原至不同虛擬機器上的不同執行個體,會基於此目的,將工作負載卸載至專用虛擬機器並進行大小調整,方法是從交易式系統中移除其資源需求。
使用檔案快照集備份從交易記錄備份進行還原十分地快速,而且比使用傳統串流備份還要快。 運用傳統串流備份,您必須使用完整資料庫備份 (可能是差異備份),以及部分或所有交易記錄備份 (或新的完整資料庫備份)。 不過,使用檔案快照集記錄備份,您只需要最新的記錄備份 (或任何其他記錄備份,或任兩個相鄰記錄備份以將時間點還原至兩個記錄備份時間之間的時間點)。 若要更為清楚,您只需要一個記錄檔案快照集備份組,因為每個檔案快照集記錄備份都會建立每個資料庫檔案的檔案快照集 (每個資料檔案和記錄檔)。
若要使用檔案快照集備份從交易記錄備份將資料庫還原到新的資料庫,請執行下列步驟︰
啟動 SSMS。
開啟新的查詢視窗,並連接到 Azure 虛擬機器中資料庫引擎的 SQL Server 執行個體。
注意
如果這是與您之前用於先前章節不同的 Azure 虛擬機器,請確定您遵循 2 - 使用共用存取簽章建立 SQL Server 認證中的步驟進行。 若您想要還原到不同容器,請遵循 1 - 建立預存存取原則和共用存取儲存體中的步驟。
將下列 Transact-SQL 指令碼複製並貼入 [查詢] 視窗中。 選取您想要使用的記錄備份檔案。 適當地修改儲存體帳戶名稱以及您在第 1 節中所指定容器的 URL,並提供記錄備份檔案名稱,然後執行此指令碼。
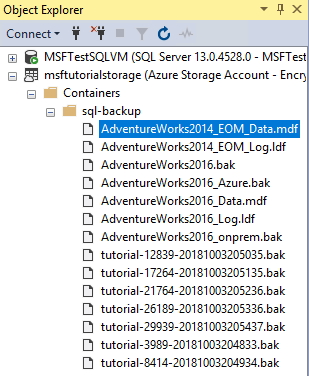
-- restore as a new database from a transaction log backup file
RESTORE DATABASE AdventureWorks2022_EOM
    FROM URL = 'https://<mystorageaccountname>.blob.core.windows.net/<mystorageaccountcontainername>/<logbackupfile.bak>'
    WITH MOVE 'AdventureWorks2022_data' to 'https://<mystorageaccountname>.blob.core.windows.net/<mystorageaccountcontainername>/AdventureWorks2022_EOM_Data.mdf'
   , MOVE 'AdventureWorks2022_log' to 'https://<mystorageaccountname>.blob.core.windows.net/<mystorageaccountcontainername>/AdventureWorks2022_EOM_Log.ldf'
   , RECOVERY
--, REPLACE
請檢閱輸出,確認還原成功。
在物件總管中,連接到 Azure 儲存體。
展開 [容器],並展開您在第 1 節所建立的容器 (必要時,請重新整理),然後確認新資料和記錄檔出現在容器以及先前章節的 Blob 中。
9 - 管理備份組和檔案快照集備份
在本節中,您將會使用 sp_delete_backup (Transact-SQL) 系統預存程序來刪除備份組。 這個系統預存程序會刪除備份檔案以及與這個備份組相關聯的每個資料庫檔案上的檔案快照集。
注意
如果您只是刪除 Azure Blob 儲存體容器中的備份檔案來嘗試刪除備份組,則只會刪除備份檔案本身,相關聯的檔案快照集將會予以保留。 如果您發現自己處於這種情況,請使用 sys.fn_db_backup_file_snapshots (Transact-SQL) 系統函數來識別孤立檔案快照集 URL,以及使用 sp_delete_backup_file_snapshot (Transact-SQL) 系統預存程序來刪除每個孤立檔案快照集。 如需詳細資訊,請參閱 Azure 中資料庫檔案的檔案快照集備份。
若要刪除檔案快照集備份組,請遵循下列步驟:
啟動 SSMS。
開啟新的查詢視窗,並連接到您的 Azure 虛擬機器中資料庫引擎的 SQL Server 執行個體 (或具有這個容器之讀取和寫入權限的任何 SQL Server 執行個體)。
將下列 Transact-SQL 指令碼複製並貼入 [查詢] 視窗中。 選取您想要刪除的記錄備份與其相關聯的檔案快照集。 適當地修改儲存體帳戶名稱以及您在第 1 節中所指定容器的 URL,並提供記錄備份檔案名稱,然後執行此指令碼。
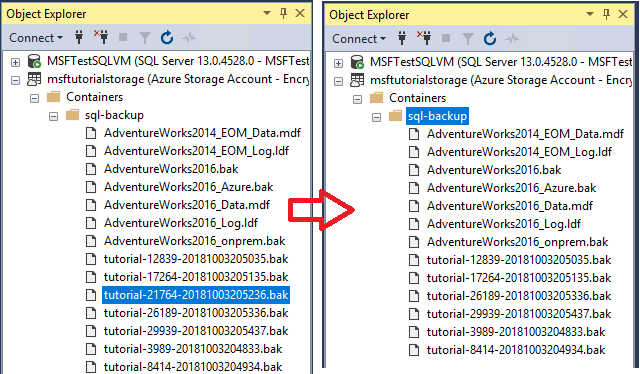
sys.sp_delete_backup 'https://<mystorageaccountname>.blob.core.windows.net/<mystorageaccountcontainername>/tutorial-21764-20181003205236.bak';在物件總管中,連接到 Azure 儲存體。
依序展開 [容器] 以及您在第 1 節中建立的容器,然後確認步驟 3 中所使用的備份檔案不再出現於這個容器中 (必要時,請重新整理節點)。
將下列 Transact-SQL 指令碼複製並貼入查詢視窗中,然後執行此指令碼,確認已刪除兩個檔案快照集。
-- verify that two file snapshots have been removed
SELECT * from sys.fn_db_backup_file_snapshots ('AdventureWorks2022');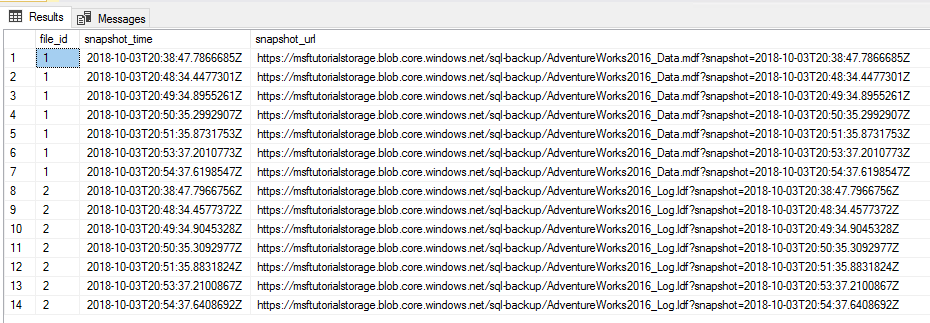
10 - 移除資源
當您完成本教學課程後,若要節省資源,請務必刪除在本教學課程中建立的資源群組。
若要刪除資源群組,請執行下列 PowerShell 程式碼:
# Define global variables for the script
$prefixName = '<prefix name>'  # should be the same as the beginning of the tutorial

# Set a variable for the name of the resource group you will create or use
$resourceGroupName=$prefixName + 'rg'

# Adds an authenticated Azure account for use in the session
Connect-AzAccount

# Set the tenant, subscription and environment for use in the rest of
Set-AzContext -SubscriptionId $subscriptionID

# Remove the resource group
Remove-AzResourceGroup -Name $resourceGroupName
下一步
- Microsoft Azure 中的 SQL Server 資料檔案
- Azure 中資料庫檔案的檔案快照集備份
- SQL Server 備份至 URL
- 共用存取簽章,第 1 部分:了解 SAS 模型
- 建立容器
- Set Container ACL (設定容器 ACL)
- 取得容器 ACL
- 認證 (Database Engine)
- CREATE CREDENTIAL (Transact-SQL)
- sys.credentials (Transact-SQL)
- sp_delete_backup (Transact-SQL)
- sys.fn_db_backup_file_snapshots (Transact-SQL)
- sp_delete_backup_file_snapshot (Transact-SQL)
- Azure 中資料庫檔案的檔案快照集備份
意見反應
即將登場:在 2024 年,我們將逐步淘汰 GitHub 問題作為內容的意見反應機制,並將它取代為新的意見反應系統。 如需詳細資訊,請參閱:https://aka.ms/ContentUserFeedback。
提交並檢視相關的意見反應