建立 Windows Hello 登入應用程式
以下是本主題的第 1 部分,完整逐步說明如何建立 Windows 10 和 Windows 11 UWP (通用 Windows 平台) 應用程式,該應用程式使用 Windows Hello 來取代傳統使用者名稱和密碼驗證系統。 該應用程式使用使用者名稱進行登入,並為每個帳戶建立一個 Hello Key。 這些帳戶將受到設定 Windows Hello 時,在 Windows 設定中設定的 PIN 保護。
本逐步解說分成兩個部分:建置應用程式和連線後端服務。 讀完本文後,請繼續閱讀第 2 部分:Windows Hello 登入服務。
在開始之前,請先閱讀 Windows Hello 概觀,以大致了解 Windows Hello 的運作方式。
開始使用
若要建置此專案,您需要具備 C# 和 XAML 經驗。 您還需要在 Windows 10 或 Windows 11 電腦上使用 Visual Studio 2015 (Community Edition 或更新版本) 或更新版的 Visual Studio。 雖然 Visual Studio 2015 是最低必要版本,但建議您使用最新版本的 Visual Studio,以獲得最新的開發人員和安全性更新。
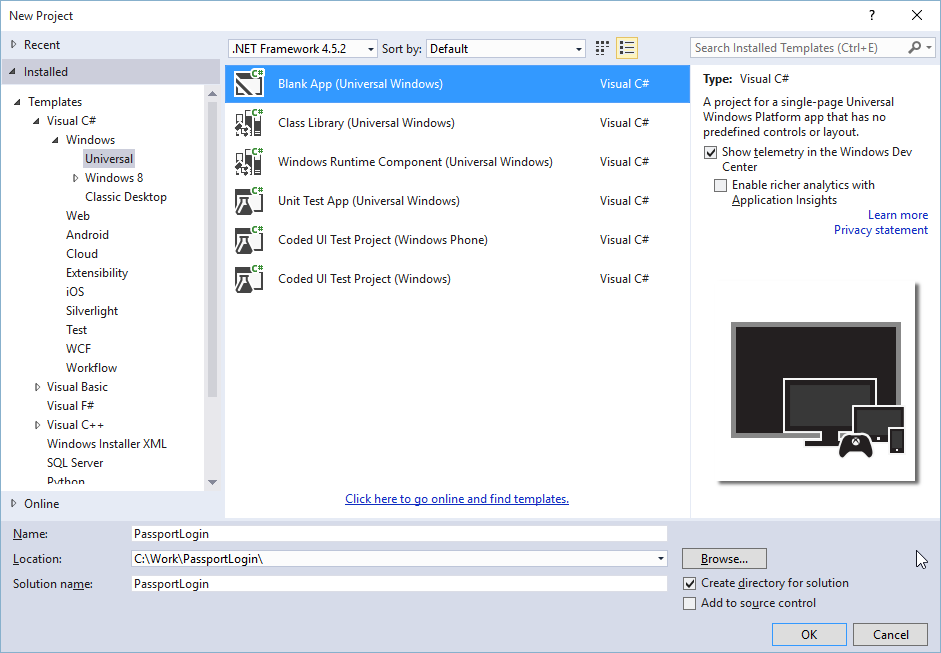
- 開啟 Visual Studio,然後選取檔案>新增>專案。
- 這會開啟「新專案」視窗。 瀏覽至「範本>Visual C#」。
- 選擇空白應用程式 (通用 Windows),並將您的應用程式命名為「PassportLogin」。
- 建置並執行新的應用程式 (F5),您應該會看到畫面上顯示的空白視窗。 關閉應用程式。
練習 1:使用 Microsoft Passport 登入
在本練習中,您將瞭解如何檢查電腦上是否安裝了 Windows Hello,以及如何使用 Windows Hello 登入帳戶。
在新專案中,在解決方案中建立一個名為「Views」的新資料夾。 此資料夾將包含本範例中將瀏覽到的頁面。 以滑鼠右鍵按一下方案總管的專案,選取 [新增>新資料夾],然後將該資料夾重新命名為「Views」。

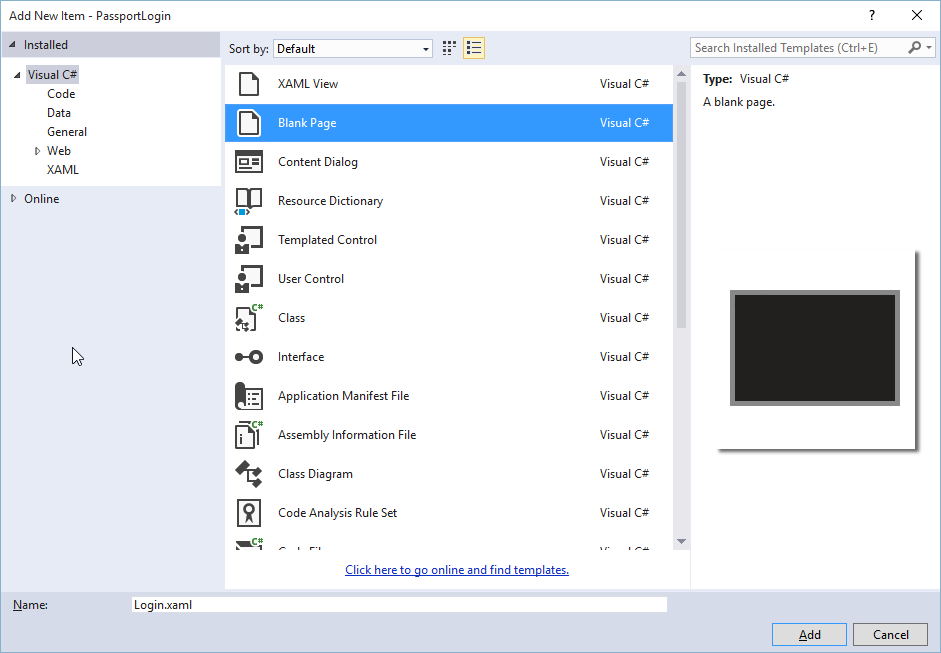
以滑鼠右鍵按一下「Views」資料夾,選取 [新增>新項目],然後選取 [空白頁面]。 將此頁面命名為「Login.xaml」。
若要定義新登入頁面的使用者介面,請新增以下 XAML。 此 XAML 會定義 StackPanel 來對齊下列子項:
- 將包含標題的 TextBlock。
- 錯誤訊息的 TextBlock。
- 用於輸入使用者名稱的 TextBox。
- 用於瀏覽至註冊頁面的按鈕。
- 要包含 Windows Hello 狀態的 TextBlock。
- TextBlock 說明「登入」頁面,因為沒有任何後端或已設定的使用者。
<Grid Background="{ThemeResource ApplicationPageBackgroundThemeBrush}">
  <StackPanel Orientation="Vertical">
    <TextBlock Text="Login" FontSize="36" Margin="4" TextAlignment="Center"/>
    <TextBlock x:Name="ErrorMessage" Text="" FontSize="20" Margin="4" Foreground="Red" TextAlignment="Center"/>
    <TextBlock Text="Enter your username below" Margin="0,0,0,20"
               TextWrapping="Wrap" Width="300"
               TextAlignment="Center" VerticalAlignment="Center" FontSize="16"/>
    <TextBox x:Name="UsernameTextBox" Margin="4" Width="250"/>
    <Button x:Name="PassportSignInButton" Content="Login" Background="DodgerBlue" Foreground="White"
        Click="PassportSignInButton_Click" Width="80" HorizontalAlignment="Center" Margin="0,20"/>
    <TextBlock Text="Don't have an account?"
                TextAlignment="Center" VerticalAlignment="Center" FontSize="16"/>
    <TextBlock x:Name="RegisterButtonTextBlock" Text="Register now"
               PointerPressed="RegisterButtonTextBlock_OnPointerPressed"
               Foreground="DodgerBlue"
               TextAlignment="Center" VerticalAlignment="Center" FontSize="16"/>
    <Border x:Name="PassportStatus" Background="#22B14C"
               Margin="0,20" Height="100" >
      <TextBlock x:Name="PassportStatusText" Text="Microsoft Passport is ready to use!"
             Margin="4" TextAlignment="Center" VerticalAlignment="Center" FontSize="20"/>
    </Border>
    <TextBlock x:Name="LoginExplaination" FontSize="24" TextAlignment="Center" TextWrapping="Wrap"
        Text="Please Note: To demonstrate a login, validation will only occur using the default username 'sampleUsername'"/>
  </StackPanel>
</Grid>
需要將一些方法新增至程式碼後置,才能建立解決方案。 按 F7 或使用「方案總管」來取得 Login.xaml.cs。 新增以下兩個事件方法來處理登入和註冊事件。 目前,這些方法會將 ErrorMessage.Text 設定為空字串。
namespace PassportLogin.Views
{
    public sealed partial class Login : Page
    {
        public Login()
        {
            this.InitializeComponent();
        }

        private void PassportSignInButton_Click(object sender, RoutedEventArgs e)
        {
            ErrorMessage.Text = "";
        }
        private void RegisterButtonTextBlock_OnPointerPressed(object sender, PointerRoutedEventArgs e)
        {
            ErrorMessage.Text = "";
        }
    }
}
為了轉譯登入頁面,請編輯 MainPage 程式碼以在載入 MainPage 時,瀏覽至登入頁面。 開啟 MainPage.xaml.cs 檔案。 在方案總管中,按兩下 MainPage.xaml.cs。 如果找不到此項目,請按一下 MainPage.xaml 旁邊的小箭頭,以顯示程式碼後置。 建立載入的事件處理常式方法,該方法將瀏覽到登入頁面。 您必須新增對 Views 命名空間的參考。
using PassportLogin.Views;

namespace PassportLogin
{
    public sealed partial class MainPage : Page
    {
        public MainPage()
        {
            this.InitializeComponent();
            Loaded += MainPage_Loaded;
        }

        private void MainPage_Loaded(object sender, RoutedEventArgs e)
        {
            Frame.Navigate(typeof(Login));
        }
    }
}
在登入頁面中,您需要處理 OnNavigedTo 事件,以確認 Windows Hello 在此電腦上是否可用。 在 Login.xaml.cs 中實作以下內容。 您會發現 MicrosoftPassportHelper 物件標記了一個錯誤。 這是因為我們尚未實作它。
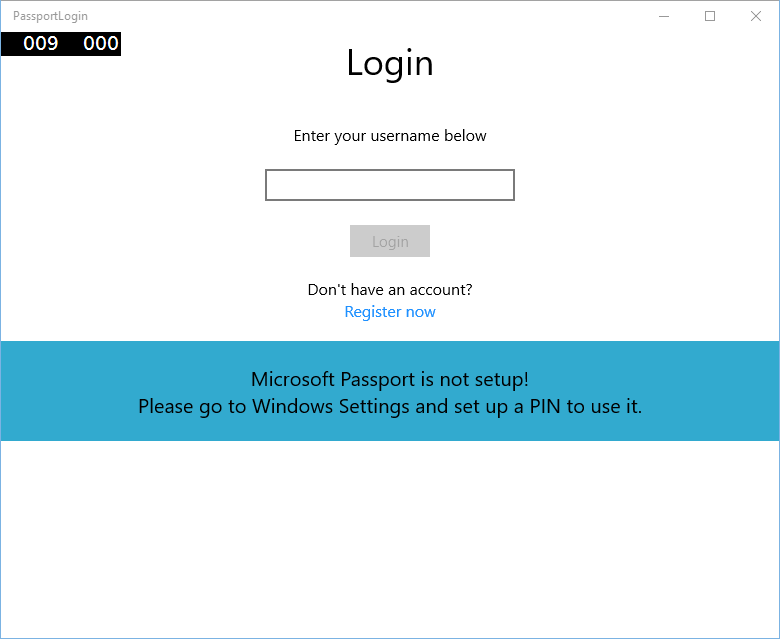
public sealed partial class Login : Page
{
    public Login()
    {
        this.InitializeComponent();
    }

    protected override async void OnNavigatedTo(NavigationEventArgs e)
    {
        // Check Microsoft Passport is setup and available on this machine
        if (await MicrosoftPassportHelper.MicrosoftPassportAvailableCheckAsync())
        {
        }
        else
        {
            // Microsoft Passport is not setup so inform the user
            PassportStatus.Background = new SolidColorBrush(Windows.UI.Color.FromArgb(255, 50, 170, 207));
            PassportStatusText.Text = "Microsoft Passport is not setup!\n" +
                "Please go to Windows Settings and set up a PIN to use it.";
            PassportSignInButton.IsEnabled = false;
        }
    }
}
若要建立 MicrosoftPassportHelper 類別,請以滑鼠右鍵按一下解決方案 PassportLogin (Universal Windows),然後按一下 [新增>新資料夾]。 將此資料夾命名為 Utils。
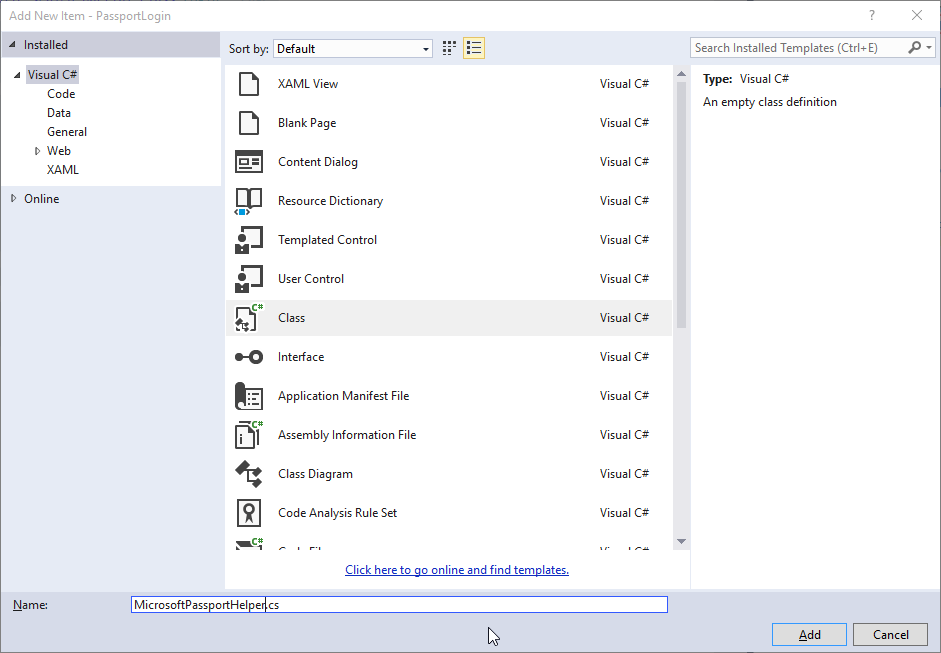
以滑鼠右鍵按一下 Utils 資料夾,然後按一下 [新增>類別]。 將此類別命名為 「MicrosoftPassportHelper.cs」。
將 MicrosoftPassportHelper 的類別定義變更為公用靜態,然後新增下列方法,以通知使用者是否準備好使用 Windows Hello。 您必須新增必要的命名空間。
using System;
using System.Diagnostics;
using System.Threading.Tasks;
using Windows.Security.Credentials;

namespace PassportLogin.Utils
{
    public static class MicrosoftPassportHelper
    {
        /// <summary>
        /// Checks to see if Passport is ready to be used.
        ///
        /// Passport has dependencies on:
        ///     1. Having a connected Microsoft Account
        ///     2. Having a Windows PIN set up for that _account on the local machine
        /// </summary>
        public static async Task<bool> MicrosoftPassportAvailableCheckAsync()
        {
            bool keyCredentialAvailable = await KeyCredentialManager.IsSupportedAsync();
            if (keyCredentialAvailable == false)
            {
                // Key credential is not enabled yet as user
                // needs to connect to a Microsoft Account and select a PIN in the connecting flow.
                Debug.WriteLine("Microsoft Passport is not setup!\nPlease go to Windows Settings and set up a PIN to use it.");
                return false;
            }

            return true;
        }
    }
}
在 Login.xaml.cs 中新增 Utils 命名空間的參考。 這將解決 OnNavigatedTo 方法中的錯誤。
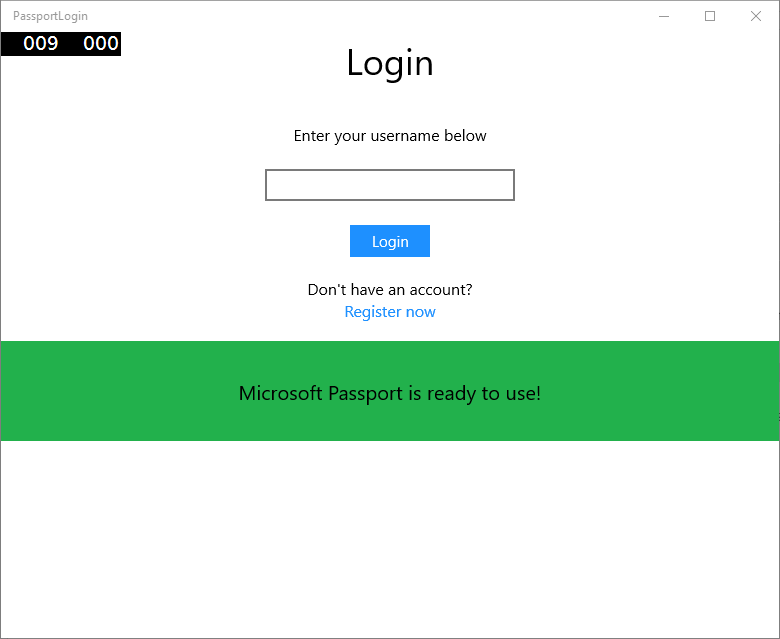
using PassportLogin.Utils;建置並執行應用程式 (F5)。 您將瀏覽至登入頁面,並且 Windows Hello 橫幅將指示您 Hello 是否已準備好使用。 您應該會看到綠色或藍色橫幅,表示電腦上的 Windows Hello 狀態。
接下來您需要建置登入邏輯。 建立一個名為「Models」的新資料夾。
在 Models 資料夾中,建立名為「Account.cs」的新類別。 此類別將作為您的帳戶模型。 由於這只是一個範例,因此它僅包含一個使用者名稱。 將類別定義變更為公用,並新增 Username 屬性。
namespace PassportLogin.Models
{
    public class Account
    {
        public string Username { get; set; }
    }
}
您將需要一種處理帳戶的方法。 對於此實際操作實驗室,由於沒有伺服器或資料庫,因此將在本機儲存和載入使用者清單。 以滑鼠右鍵按一下 Utils 資料夾,並新增一個名為「AccountHelper.cs」的新類別。 將類別定義變更為公用靜態。 AccountHelper 是靜態類別,其中包含儲存及載入本機帳戶清單的所有必要方法。 儲存和載入將透過 XmlSerializer 執行。 您還需要記住您儲存的檔案,以及儲存位置。
using System;
using System.Collections.Generic;
using System.IO;
using System.Text;
using System.Threading.Tasks;
using System.Xml.Serialization;
using Windows.Storage;
using PassportLogin.Models;

namespace PassportLogin.Utils
{
    public static class AccountHelper
    {
        // In the real world this would not be needed as there would be a server implemented that would host a user account database.
        // For this tutorial we will just be storing accounts locally.
        private const string USER_ACCOUNT_LIST_FILE_NAME = "accountlist.txt";
        private static string _accountListPath = Path.Combine(ApplicationData.Current.LocalFolder.Path, USER_ACCOUNT_LIST_FILE_NAME);
        public static List<Account> AccountList = new List<Account>();

        /// <summary>
        /// Create and save a useraccount list file. (Updating the old one)
        /// </summary>
        private static async void SaveAccountListAsync()
        {
            string accountsXml = SerializeAccountListToXml();

            if (File.Exists(_accountListPath))
            {
                StorageFile accountsFile = await StorageFile.GetFileFromPathAsync(_accountListPath);
                await FileIO.WriteTextAsync(accountsFile, accountsXml);
            }
            else
            {
                StorageFile accountsFile = await ApplicationData.Current.LocalFolder.CreateFileAsync(USER_ACCOUNT_LIST_FILE_NAME);
                await FileIO.WriteTextAsync(accountsFile, accountsXml);
            }
        }

        /// <summary>
        /// Gets the useraccount list file and deserializes it from XML to a list of useraccount objects.
        /// </summary>
        /// <returns>List of useraccount objects</returns>
        public static async Task<List<Account>> LoadAccountListAsync()
        {
            if (File.Exists(_accountListPath))
            {
                StorageFile accountsFile = await StorageFile.GetFileFromPathAsync(_accountListPath);

                string accountsXml = await FileIO.ReadTextAsync(accountsFile);
                DeserializeXmlToAccountList(accountsXml);
            }

            return AccountList;
        }

        /// <summary>
        /// Uses the local list of accounts and returns an XML formatted string representing the list
        /// </summary>
        /// <returns>XML formatted list of accounts</returns>
        public static string SerializeAccountListToXml()
        {
            XmlSerializer xmlizer = new XmlSerializer(typeof(List<Account>));
            StringWriter writer = new StringWriter();
            xmlizer.Serialize(writer, AccountList);

            return writer.ToString();
        }

        /// <summary>
        /// Takes an XML formatted string representing a list of accounts and returns a list object of accounts
        /// </summary>
        /// <param name="listAsXml">XML formatted list of accounts</param>
        /// <returns>List object of accounts</returns>
        public static List<Account> DeserializeXmlToAccountList(string listAsXml)
        {
            XmlSerializer xmlizer = new XmlSerializer(typeof(List<Account>));
            TextReader textreader = new StreamReader(new MemoryStream(Encoding.UTF8.GetBytes(listAsXml)));

            return AccountList = (xmlizer.Deserialize(textreader)) as List<Account>;
        }
    }
}
接下來,實作從本機帳戶清單中新增和移除帳戶的方式。 這些動作會分別儲存清單。 在本實際操作實驗室中,最後您需要執行驗證方法。 由於沒有驗證伺服器或用戶端資料庫,這將針對硬式編碼的單一使用者進行驗證。 這些方法應新增至 AccountHelper 類別。
public static Account AddAccount(string username)
        {
            // Create a new account with the username
            Account account = new Account() { Username = username };
            // Add it to the local list of accounts
            AccountList.Add(account);
            // SaveAccountList and return the account
            SaveAccountListAsync();
            return account;
        }

        public static void RemoveAccount(Account account)
        {
            // Remove the account from the accounts list
            AccountList.Remove(account);
            // Re save the updated list
            SaveAccountListAsync();
        }

        public static bool ValidateAccountCredentials(string username)
        {
            // In the real world, this method would call the server to authenticate that the account exists and is valid.
            // For this tutorial however we will just have a existing sample user that is just "sampleUsername"
            // If the username is null or does not match "sampleUsername" it will fail validation. In which case the user should register a new passport user

            if (string.IsNullOrEmpty(username))
            {
                return false;
            }

            if (!string.Equals(username, "sampleUsername"))
            {
                return false;
            }

            return true;
        }
您需要做的下一件事是處理使用者的登入要求。 在 Login.xaml.cs 建立新的私用變數,以保存目前的帳戶登入。 然後新增一個方法呼叫 SignInPassport。 這將使用 AccountHelper.ValidateAccountCredentials 方法來驗證帳戶認證。 如果輸入的使用者名稱與您在上一個步驟中設定的硬式編碼字串值相同,則此方法將傳回布林值。 此範例的硬式編碼值為「sampleUsername」。
using PassportLogin.Models;
using PassportLogin.Utils;
using System.Diagnostics;

namespace PassportLogin.Views
{
    public sealed partial class Login : Page
    {
        private Account _account;

        public Login()
        {
            this.InitializeComponent();
        }

        protected override async void OnNavigatedTo(NavigationEventArgs e)
        {
            // Check Microsoft Passport is setup and available on this machine
            if (await MicrosoftPassportHelper.MicrosoftPassportAvailableCheckAsync())
            {
            }
            else
            {
                // Microsoft Passport is not setup so inform the user
                PassportStatus.Background = new SolidColorBrush(Windows.UI.Color.FromArgb(255, 50, 170, 207));
                PassportStatusText.Text = "Microsoft Passport is not setup!\nPlease go to Windows Settings and set up a PIN to use it.";
                PassportSignInButton.IsEnabled = false;
            }
        }

        private void PassportSignInButton_Click(object sender, RoutedEventArgs e)
        {
            ErrorMessage.Text = "";
            SignInPassport();
        }

        private void RegisterButtonTextBlock_OnPointerPressed(object sender, PointerRoutedEventArgs e)
        {
            ErrorMessage.Text = "";
        }

        private async void SignInPassport()
        {
            if (AccountHelper.ValidateAccountCredentials(UsernameTextBox.Text))
            {
                // Create and add a new local account
                _account = AccountHelper.AddAccount(UsernameTextBox.Text);
                Debug.WriteLine("Successfully signed in with traditional credentials and created local account instance!");

                //if (await MicrosoftPassportHelper.CreatePassportKeyAsync(UsernameTextBox.Text))
                //{
                //    Debug.WriteLine("Successfully signed in with Microsoft Passport!");
                //}
            }
            else
            {
                ErrorMessage.Text = "Invalid Credentials";
            }
        }
    }
}
您可能已經發現參考 MicrosoftPassportHelper 中方法的註解程式碼。 在 MicrosoftPassportHelper.cs 中新增一個名為 CreatePassportKeyAsync 的新方法。 此方法會使用 KeyCredentialManager 中的 Windows Hello API。 呼叫 RequestCreateAsync 將建立特定 accountId 和本機的 Passport 金鑰。 如果您想在現實場景中實作此功能,請注意 switch 陳述式中的註解。
/// <summary>
/// Creates a Passport key on the machine using the _account id passed.
/// </summary>
/// <param name="accountId">The _account id associated with the _account that we are enrolling into Passport</param>
/// <returns>Boolean representing if creating the Passport key succeeded</returns>
public static async Task<bool> CreatePassportKeyAsync(string accountId)
{
    KeyCredentialRetrievalResult keyCreationResult = await KeyCredentialManager.RequestCreateAsync(accountId, KeyCredentialCreationOption.ReplaceExisting);

    switch (keyCreationResult.Status)
    {
        case KeyCredentialStatus.Success:
            Debug.WriteLine("Successfully made key");

            // In the real world authentication would take place on a server.
            // So every time a user migrates or creates a new Microsoft Passport account Passport details should be pushed to the server.
            // The details that would be pushed to the server include:
            // The public key, keyAttesation if available,
            // certificate chain for attestation endorsement key if available,
            // status code of key attestation result: keyAttestationIncluded or
            // keyAttestationCanBeRetrievedLater and keyAttestationRetryType
            // As this sample has no concept of a server it will be skipped for now
            // for information on how to do this refer to the second Passport sample

            //For this sample just return true
            return true;
        case KeyCredentialStatus.UserCanceled:
            Debug.WriteLine("User cancelled sign-in process.");
            break;
        case KeyCredentialStatus.NotFound:
            // User needs to setup Microsoft Passport
            Debug.WriteLine("Microsoft Passport is not setup!\nPlease go to Windows Settings and set up a PIN to use it.");
            break;
        default:
            break;
    }

    return false;
}
現在,您已建立 CreatePassportKeyAsync 方法,請返回 Login.xaml.cs 檔案並將 SignInPassport 方法內的程式碼取消註解。
private async void SignInPassport()
{
    if (AccountHelper.ValidateAccountCredentials(UsernameTextBox.Text))
    {
        //Create and add a new local account
        _account = AccountHelper.AddAccount(UsernameTextBox.Text);
        Debug.WriteLine("Successfully signed in with traditional credentials and created local account instance!");

        if (await MicrosoftPassportHelper.CreatePassportKeyAsync(UsernameTextBox.Text))
        {
            Debug.WriteLine("Successfully signed in with Microsoft Passport!");
        }
    }
    else
    {
        ErrorMessage.Text = "Invalid Credentials";
    }
}
建置並執行應用程式。 系統將帶您前往「登入」頁面。 輸入「sampleUsername」,然後按一下 [登入]。 系統將顯示 Windows Hello 提示,並要求您輸入 PIN。 正確輸入 PIN 後,CreatePassportKeyAsync 方法將能夠建立 Windows Hello 金鑰。 監視輸出視窗,以查看是否顯示指示成功的訊息。

練習 2:歡迎和使用者選取畫面
在本練習中,您將接續上一個練習。 當使用者成功登入後應該會前往歡迎頁面,他們可以在其中登出或刪除其帳戶。 由於 Windows Hello 會為每台電腦建立金鑰,因此可以建立使用者選取畫面,其中會顯示已在該電腦上登入的所有使用者。 然後,使用者可以選取其中一個帳戶,並直接進入歡迎畫面,而不需要重新輸入密碼,因為他們已經通過驗證,能夠存取電腦。
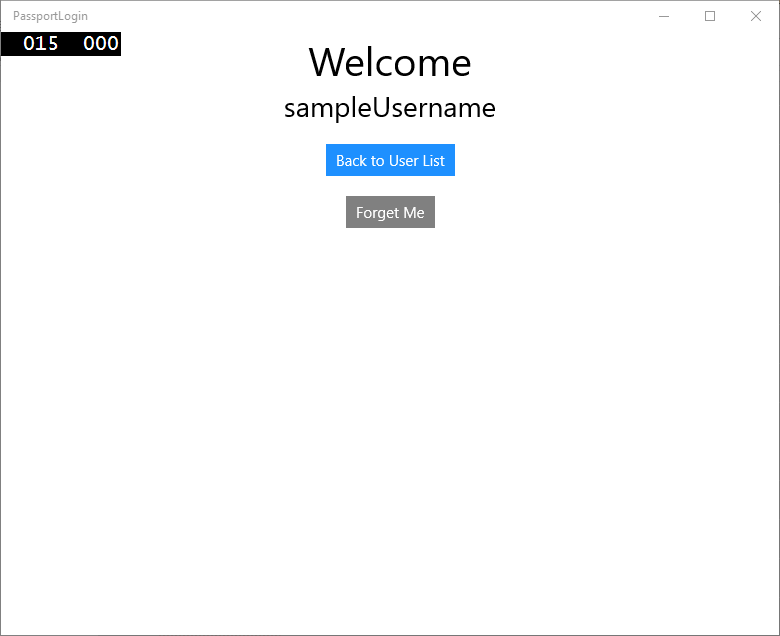
在 Views 資料夾中,新增一個名為「Welcome.xaml」的新空白頁面。 新增以下 XAML 以完成使用者介面。 這將顯示標題、登入的使用者名稱和兩個按鈕。 其中一個按鈕將瀏覽回使用者清單 (在稍後建立),另一個按鈕將處理忘記該使用者。
<Grid Background="{ThemeResource ApplicationPageBackgroundThemeBrush}">
  <StackPanel Orientation="Vertical">
    <TextBlock x:Name="Title" Text="Welcome" FontSize="40" TextAlignment="Center"/>
    <TextBlock x:Name="UserNameText" FontSize="28" TextAlignment="Center" Foreground="Black"/>

    <Button x:Name="BackToUserListButton" Content="Back to User List" Click="Button_Restart_Click"
            HorizontalAlignment="Center" Margin="0,20" Foreground="White" Background="DodgerBlue"/>

    <Button x:Name="ForgetButton" Content="Forget Me" Click="Button_Forget_User_Click"
            Foreground="White"
            Background="Gray"
            HorizontalAlignment="Center"/>
  </StackPanel>
</Grid>
在 Welcome.xaml.cs 程式碼隱藏檔案中,新增一個新的私有變數來儲存登入的帳戶。 您需要實作一個方法來覆寫 OnNavigateTo 事件,這將儲存傳遞到歡迎頁面的帳戶。 您還需要為 XAML 中定義的兩個按鈕實作點擊事件。 您將需要對 Models 和 Utils 資料夾的參考。
using PassportLogin.Models;
using PassportLogin.Utils;
using System.Diagnostics;

namespace PassportLogin.Views
{
    public sealed partial class Welcome : Page
    {
        private Account _activeAccount;

        public Welcome()
        {
            InitializeComponent();
        }

        protected override void OnNavigatedTo(NavigationEventArgs e)
        {
            _activeAccount = (Account)e.Parameter;
            if (_activeAccount != null)
            {
                UserNameText.Text = _activeAccount.Username;
            }
        }

        private void Button_Restart_Click(object sender, RoutedEventArgs e)
        {
        }

        private void Button_Forget_User_Click(object sender, RoutedEventArgs e)
        {
            // Remove it from Microsoft Passport
            // MicrosoftPassportHelper.RemovePassportAccountAsync(_activeAccount);

            // Remove it from the local accounts list and resave the updated list
            AccountHelper.RemoveAccount(_activeAccount);

            Debug.WriteLine("User " + _activeAccount.Username + " deleted.");
        }
    }
}
您可能已經發現忘記使用者點擊事件中註解掉了一行。 該帳戶正在從您的本機清單中移除,但目前無法從 Windows Hello 中移除。 您需要在 MicrosoftPassportHelper.cs 中實作一個新方法,以處理刪除 Windows Hello 使用者。 此方法將使用其他 Windows Hello API 來開啟和刪除帳戶。 在現實世界中,當您刪除帳戶時,伺服器或資料庫應該會收到通知,讓使用者資料庫維持有效狀態。 您將需要對 Models 資料夾的參考。
using PassportLogin.Models;

/// <summary>
/// Function to be called when user requests deleting their account.
/// Checks the KeyCredentialManager to see if there is a Passport for the current user
/// Then deletes the local key associated with the Passport.
/// </summary>
public static async void RemovePassportAccountAsync(Account account)
{
    // Open the account with Passport
    KeyCredentialRetrievalResult keyOpenResult = await KeyCredentialManager.OpenAsync(account.Username);

    if (keyOpenResult.Status == KeyCredentialStatus.Success)
    {
        // In the real world you would send key information to server to unregister
        //for example, RemovePassportAccountOnServer(account);
    }

    // Then delete the account from the machines list of Passport Accounts
    await KeyCredentialManager.DeleteAsync(account.Username);
}
回傳Welcome.xaml.cs,將呼叫 RemovePassportAccountAsync 的行取消註解。
private void Button_Forget_User_Click(object sender, RoutedEventArgs e)
{
    // Remove it from Microsoft Passport
    MicrosoftPassportHelper.RemovePassportAccountAsync(_activeAccount);

    // Remove it from the local accounts list and resave the updated list
    AccountHelper.RemoveAccount(_activeAccount);

    Debug.WriteLine("User " + _activeAccount.Username + " deleted.");
}
在 SignInPassport 方法 (Login.xaml.cs) 中,CreatePassportKeyAsync 成功後,它應該瀏覽到歡迎畫面並傳遞帳戶。
private async void SignInPassport()
{
    if (AccountHelper.ValidateAccountCredentials(UsernameTextBox.Text))
    {
        // Create and add a new local account
        _account = AccountHelper.AddAccount(UsernameTextBox.Text);
        Debug.WriteLine("Successfully signed in with traditional credentials and created local account instance!");

        if (await MicrosoftPassportHelper.CreatePassportKeyAsync(UsernameTextBox.Text))
        {
            Debug.WriteLine("Successfully signed in with Microsoft Passport!");
            Frame.Navigate(typeof(Welcome), _account);
        }
    }
    else
    {
        ErrorMessage.Text = "Invalid Credentials";
    }
}
建置並執行應用程式。 使用「sampleUsername」登入,並點擊 [登入]。 輸入您的 PIN 碼,如果成功,您應該會瀏覽到歡迎畫面。 嘗試點擊「忘記使用者」,並監視輸出視窗以查看使用者是否已刪除。 請注意,刪除使用者後,您仍會在歡迎頁面上。 您將需要建立一個應用程式可以瀏覽到的使用者選取頁面。
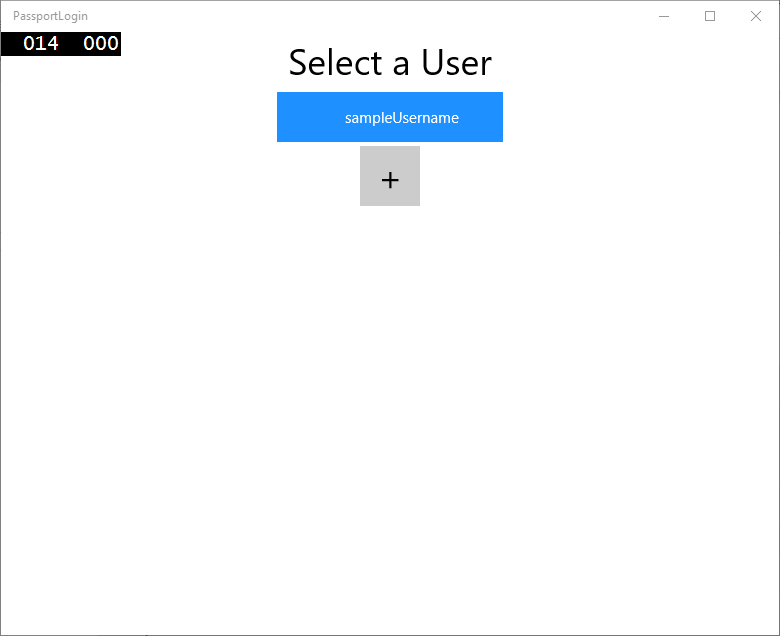
在 Views 資料夾中建立一個名為「UserSelection.xaml」的新空白頁面,並新增以下 XAML 定義使用者介面。 此頁面將包含一個顯示本機帳戶清單中所有使用者的 ListView,以及一個會瀏覽至登入頁面,以允許使用者新增另一個帳戶的按鈕。
<Grid Background="{ThemeResource ApplicationPageBackgroundThemeBrush}">
  <StackPanel Orientation="Vertical">
    <TextBlock x:Name="Title" Text="Select a User" FontSize="36" Margin="4" TextAlignment="Center" HorizontalAlignment="Center"/>

    <ListView x:Name="UserListView" Margin="4" MaxHeight="200" MinWidth="250" Width="250" HorizontalAlignment="Center">
      <ListView.ItemTemplate>
        <DataTemplate>
          <Grid Background="DodgerBlue" Height="50" Width="250" HorizontalAlignment="Stretch" VerticalAlignment="Stretch">
            <TextBlock Text="{Binding Username}" HorizontalAlignment="Center" TextAlignment="Center" VerticalAlignment="Center" Foreground="White"/>
          </Grid>
        </DataTemplate>
      </ListView.ItemTemplate>
    </ListView>

    <Button x:Name="AddUserButton" Content="+" FontSize="36" Width="60" Click="AddUserButton_Click" HorizontalAlignment="Center"/>
  </StackPanel>
</Grid>
在 UserSelection.xaml.cs 中實作載入的方法,如果本機清單中沒有帳戶,則該方法會瀏覽至登入頁面。 也為 ListView 實作 SelectionChanged 事件,為 Button 實作點擊事件。
using System.Diagnostics;
using PassportLogin.Models;
using PassportLogin.Utils;

namespace PassportLogin.Views
{
    public sealed partial class UserSelection : Page
    {
        public UserSelection()
        {
            InitializeComponent();
            Loaded += UserSelection_Loaded;
        }

        private void UserSelection_Loaded(object sender, RoutedEventArgs e)
        {
            if (AccountHelper.AccountList.Count == 0)
            {
                //If there are no accounts navigate to the LoginPage
                Frame.Navigate(typeof(Login));
            }


            UserListView.ItemsSource = AccountHelper.AccountList;
            UserListView.SelectionChanged += UserSelectionChanged;
        }

        /// <summary>
        /// Function called when an account is selected in the list of accounts
        /// Navigates to the Login page and passes the chosen account
        /// </summary>
        private void UserSelectionChanged(object sender, RoutedEventArgs e)
        {
            if (((ListView)sender).SelectedValue != null)
            {
                Account account = (Account)((ListView)sender).SelectedValue;
                if (account != null)
                {
                    Debug.WriteLine("Account " + account.Username + " selected!");
                }
                Frame.Navigate(typeof(Login), account);
            }
        }

        /// <summary>
        /// Function called when the "+" button is clicked to add a new user.
        /// Navigates to the Login page with nothing filled out
        /// </summary>
        private void AddUserButton_Click(object sender, RoutedEventArgs e)
        {
            Frame.Navigate(typeof(Login));
        }
    }
}
應用程式中有幾個地方您想要瀏覽至 UserSelection 頁面。 在 MainPage.xaml.cs 中,您應該瀏覽到 UserSelection 頁面而不是登入頁面。 當您處於 MainPage 中的已載入事件時,您需要載入帳戶清單,以便 UserSelection 頁面可以檢查是否有任何帳戶。 這需要將載入的方法更改為非同步,並新增對 Utils 資料夾的參考。
using PassportLogin.Utils;

private async void MainPage_Loaded(object sender, RoutedEventArgs e)
{
    // Load the local Accounts List before navigating to the UserSelection page
    await AccountHelper.LoadAccountListAsync();
    Frame.Navigate(typeof(UserSelection));
}
接下來,您需要從歡迎頁面瀏覽至 UserSelection 頁面。 在這兩個點擊事件中,您應該瀏覽回 UserSelection 頁面。
private void Button_Restart_Click(object sender, RoutedEventArgs e)
{
    Frame.Navigate(typeof(UserSelection));
}

private void Button_Forget_User_Click(object sender, RoutedEventArgs e)
{
    // Remove it from Microsoft Passport
    MicrosoftPassportHelper.RemovePassportAccountAsync(_activeAccount);

    // Remove it from the local accounts list and resave the updated list
    AccountHelper.RemoveAccount(_activeAccount);

    Debug.WriteLine("User " + _activeAccount.Username + " deleted.");

    // Navigate back to UserSelection page.
    Frame.Navigate(typeof(UserSelection));
}
在「登入」頁面中,您需要程式碼來登入從「使用者選擇」頁面清單中選擇的帳戶。 在 OnNavigateTo 事件中,儲存傳遞給瀏覽的帳戶。 首先新增一個新的私有變數,該變數將識別該帳戶是否為現有帳戶。 然後處理 OnNavigatedTo 事件。
namespace PassportLogin.Views
{
    public sealed partial class Login : Page
    {
        private Account _account;
        private bool _isExistingAccount;

        public Login()
        {
            InitializeComponent();
        }

        /// <summary>
        /// Function called when this frame is navigated to.
        /// Checks to see if Microsoft Passport is available and if an account was passed in.
        /// If an account was passed in set the "_isExistingAccount" flag to true and set the _account
        /// </summary>
        protected override async void OnNavigatedTo(NavigationEventArgs e)
        {
            // Check Microsoft Passport is setup and available on this machine
            if (await MicrosoftPassportHelper.MicrosoftPassportAvailableCheckAsync())
            {
                if (e.Parameter != null)
                {
                    _isExistingAccount = true;
                    // Set the account to the existing account being passed in
                    _account = (Account)e.Parameter;
                    UsernameTextBox.Text = _account.Username;
                    SignInPassport();
                }
            }
            else
            {
                // Microsoft Passport is not setup so inform the user
                PassportStatus.Background = new SolidColorBrush(Windows.UI.Color.FromArgb(255, 50, 170, 207));
                PassportStatusText.Text = "Microsoft Passport is not setup!\n" +
                    "Please go to Windows Settings and set up a PIN to use it.";
                PassportSignInButton.IsEnabled = false;
            }
        }
    }
}
必須更新 SignInPassport 方法,才能登入所選帳戶。 MicrosoftPassportHelper 將需要另一種方法來使用 Passport 開啟帳戶,因為該帳戶已經為其建立了 Passport 金鑰。 在 MicrosoftPassportHelper.cs 中實作新方法,以使用 Passport 登入現有使用者。 如需程式碼各部分的資訊,請參閱程式碼註釋。
/// <summary>
/// Attempts to sign a message using the Passport key on the system for the accountId passed.
/// </summary>
/// <returns>Boolean representing if creating the Passport authentication message succeeded</returns>
public static async Task<bool> GetPassportAuthenticationMessageAsync(Account account)
{
    KeyCredentialRetrievalResult openKeyResult = await KeyCredentialManager.OpenAsync(account.Username);
    // Calling OpenAsync will allow the user access to what is available in the app and will not require user credentials again.
    // If you wanted to force the user to sign in again you can use the following:
    // var consentResult = await Windows.Security.Credentials.UI.UserConsentVerifier.RequestVerificationAsync(account.Username);
    // This will ask for the either the password of the currently signed in Microsoft Account or the PIN used for Microsoft Passport.

    if (openKeyResult.Status == KeyCredentialStatus.Success)
    {
        // If OpenAsync has succeeded, the next thing to think about is whether the client application requires access to backend services.
        // If it does here you would Request a challenge from the Server. The client would sign this challenge and the server
        // would check the signed challenge. If it is correct it would allow the user access to the backend.
        // You would likely make a new method called RequestSignAsync to handle all this
        // for example, RequestSignAsync(openKeyResult);
        // Refer to the second Microsoft Passport sample for information on how to do this.

        // For this sample there is not concept of a server implemented so just return true.
        return true;
    }
    else if (openKeyResult.Status == KeyCredentialStatus.NotFound)
    {
        // If the _account is not found at this stage. It could be one of two errors.
        // 1. Microsoft Passport has been disabled
        // 2. Microsoft Passport has been disabled and re-enabled cause the Microsoft Passport Key to change.
        // Calling CreatePassportKey and passing through the account will attempt to replace the existing Microsoft Passport Key for that account.
        // If the error really is that Microsoft Passport is disabled then the CreatePassportKey method will output that error.
        if (await CreatePassportKeyAsync(account.Username))
        {
            // If the Passport Key was again successfully created, Microsoft Passport has just been reset.
            // Now that the Passport Key has been reset for the _account retry sign in.
            return await GetPassportAuthenticationMessageAsync(account);
        }
    }

    // Can't use Passport right now, try again later
    return false;
}
更新 Login.xaml.cs 中的 SignInPassport 方法,以處理現有帳戶。 這將使用 MicrosoftPassportHelper.cs 中的新方法。 如果成功,帳戶將會登入,且使用者將瀏覽到歡迎畫面。
private async void SignInPassport()
{
    if (_isExistingAccount)
    {
        if (await MicrosoftPassportHelper.GetPassportAuthenticationMessageAsync(_account))
        {
            Frame.Navigate(typeof(Welcome), _account);
        }
    }
    else if (AccountHelper.ValidateAccountCredentials(UsernameTextBox.Text))
    {
        //Create and add a new local account
        _account = AccountHelper.AddAccount(UsernameTextBox.Text);
        Debug.WriteLine("Successfully signed in with traditional credentials and created local account instance!");

        if (await MicrosoftPassportHelper.CreatePassportKeyAsync(UsernameTextBox.Text))
        {
            Debug.WriteLine("Successfully signed in with Microsoft Passport!");
            Frame.Navigate(typeof(Welcome), _account);
        }
    }
    else
    {
        ErrorMessage.Text = "Invalid Credentials";
    }
}
建置並執行應用程式。 使用「sampleUsername」登入。 輸入您的 PIN 碼,如果成功,您將瀏覽至歡迎畫面。 按一下返回使用者清單。 現在您應該會在清單中看到一個使用者。 點擊此 Passport 即可重新登入,而無需重新輸入任何密碼等。
練習 3:註冊新的 Windows Hello 使用者
在本練習中,您將建立新的頁面,以使用 Windows Hello 建立新的帳戶。 這與「登入」頁面的運作方式類似。 登入頁面是為要遷移到使用 Windows Hello 的現有使用者實作的。 PassportRegister 頁面將為新使用者建立 Windows Hello 註冊。
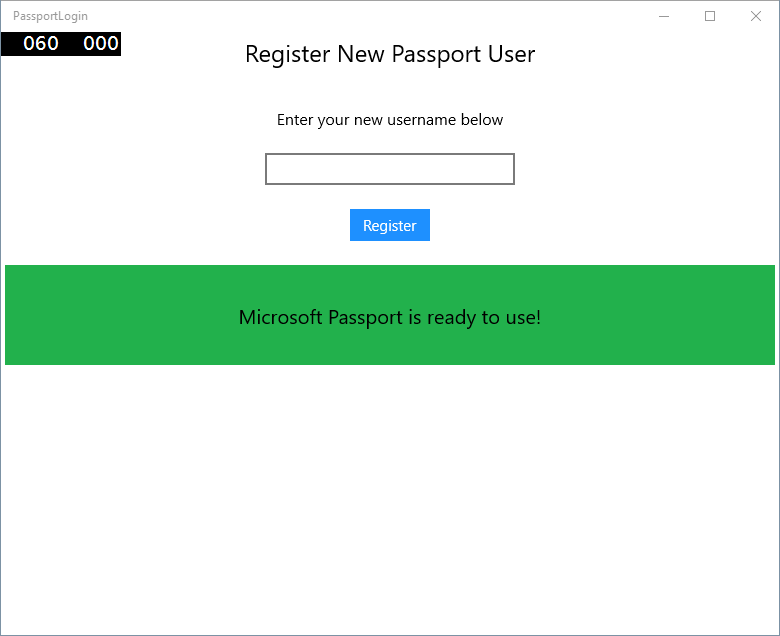
在 Views 資料夾中建立一個名為「PassportRegister.xaml」的新空白頁。 在 XAML 中新增以下內容,以設定使用者介面。 這裡的介面與「登入」頁面類似。
<Grid Background="{ThemeResource ApplicationPageBackgroundThemeBrush}">
  <StackPanel Orientation="Vertical">
    <TextBlock x:Name="Title" Text="Register New Passport User" FontSize="24" Margin="4" TextAlignment="Center"/>

    <TextBlock x:Name="ErrorMessage" Text="" FontSize="20" Margin="4" Foreground="Red" TextAlignment="Center"/>

    <TextBlock Text="Enter your new username below" Margin="0,0,0,20"
               TextWrapping="Wrap" Width="300"
               TextAlignment="Center" VerticalAlignment="Center" FontSize="16"/>

    <TextBox x:Name="UsernameTextBox" Margin="4" Width="250"/>

    <Button x:Name="PassportRegisterButton" Content="Register" Background="DodgerBlue" Foreground="White"
        Click="RegisterButton_Click_Async" Width="80" HorizontalAlignment="Center" Margin="0,20"/>

    <Border x:Name="PassportStatus" Background="#22B14C"
               Margin="4" Height="100">
      <TextBlock x:Name="PassportStatusText" Text="Microsoft Passport is ready to use!" FontSize="20"
             Margin="4" TextAlignment="Center" VerticalAlignment="Center"/>
    </Border>
  </StackPanel>
</Grid>
在 PassportRegister.xaml.cs 程式碼後置檔案中實作一個私有 Account 變數和註冊按鈕的點擊事件。 這將新增一個新的本機帳戶並建立 Passport 金鑰。
using PassportLogin.Models;
using PassportLogin.Utils;

namespace PassportLogin.Views
{
    public sealed partial class PassportRegister : Page
    {
        private Account _account;

        public PassportRegister()
        {
            InitializeComponent();
        }

        private async void RegisterButton_Click_Async(object sender, RoutedEventArgs e)
        {
            ErrorMessage.Text = "";

            //In the real world you would normally validate the entered credentials and information before
            //allowing a user to register a new account.
            //For this sample though we will skip that step and just register an account if username is not null.

            if (!string.IsNullOrEmpty(UsernameTextBox.Text))
            {
                //Register a new account
                _account = AccountHelper.AddAccount(UsernameTextBox.Text);
                //Register new account with Microsoft Passport
                await MicrosoftPassportHelper.CreatePassportKeyAsync(_account.Username);
                //Navigate to the Welcome Screen.
                Frame.Navigate(typeof(Welcome), _account);
            }
            else
            {
                ErrorMessage.Text = "Please enter a username";
            }
        }
    }
}
按一下註冊後,您需要從「登入」頁面瀏覽到此頁面。
private void RegisterButtonTextBlock_OnPointerPressed(object sender, PointerRoutedEventArgs e)
{
    ErrorMessage.Text = "";
    Frame.Navigate(typeof(PassportRegister));
}
建置並執行應用程式。 嘗試註冊一個新使用者。 然後返回使用者清單,並確認您是否可以選擇該使用者並登入。
在本實驗中,您已瞭解如何使用新的 Windows Hello API 對現有使用者進行驗證,並為新使用者建立帳戶所需的基本技能。 有了這些新知識,您就可以開始移除使用者記住應用程式密碼的需要,同時確信您的應用程式仍然受到使用者驗證的保護。 Windows 10 和 Windows 11 使用 Windows Hello 的新驗證技術來支援其生物辨識登入選項。
相關主題
意見反應
即將登場:在 2024 年,我們將逐步淘汰 GitHub 問題作為內容的意見反應機制,並將它取代為新的意見反應系統。 如需詳細資訊,請參閱:https://aka.ms/ContentUserFeedback。
提交並檢視相關的意見反應