複製並貼上 Xamarin.Mac
本文涵蓋使用貼上板來提供 Xamarin.Mac 應用程式中的複製和貼上。 它示範如何使用可在多個應用程式之間共用的標準數據類型,以及如何支援指定應用程式內的自定義數據。
概觀
在 Xamarin.Mac 應用程式中使用 C# 和 .NET 時,您可以存取在 中工作的 Objective-C 開發人員擁有的相同貼上板(複製和貼上)支援。
在本文中,我們將涵蓋在 Xamarin.Mac 應用程式中使用貼上板的兩個主要方式:
- 標準數據類型 - 由於貼上板作業通常會在兩個不相關的應用程式之間執行,因此應用程式都不知道另一個應用程式所支援的數據類型。 為了最大化共用的潛力,貼上板可以保存指定專案的多個表示法(使用一組標準通用數據類型),這可讓取用的應用程式挑選最適合其需求的版本。
- 自訂數據 - 若要支援在 Xamarin.Mac 中複製和貼上複雜數據,您可以定義由貼上板處理的自訂數據類型。 例如,可讓使用者複製和貼上由多個數據類型和點組成的複雜圖形的向量繪圖應用程式。
在本文中,我們將討論在 Xamarin.Mac 應用程式中使用貼上板的基本概念,以支援複製和貼上作業。 強烈建議您先完成 Hello,Mac 文章,特別是 Xcode 和 Interface Builder 和 Outlets 和 Actions 簡介小節,因為它涵蓋我們將在本文中使用的重要概念和技術。
您可能也想要查看 Xamarin.Mac Internals 檔的公開 C# 類別/方法Objective-C一節,它也會說明 Register 用來將 C# 類別連線至Objective-C物件和 UI 元素的 和 Export 屬性。
開始使用貼上板
貼上板提供標準化的機制,可在指定應用程式內或應用程式之間交換數據。 Xamarin.Mac 應用程式中貼上板的一般用途是處理複製和貼上作業,不過也支援一些其他作業(例如拖放和應用程式服務)。
為了快速離開地面,我們將從在 Xamarin.Mac 應用程式中使用貼上板的簡單實用簡介開始。 稍後,我們將提供貼上板運作方式和使用方法的深入說明。
在此範例中,我們將建立簡單的檔型應用程式,以管理包含影像檢視的視窗。 使用者將能夠複製和貼上應用程式中檔案之間的影像,以及從相同應用程式內的其他應用程式或多個視窗複製和貼上影像。
建立 Xamarin 專案
首先,我們將建立以 Xamarin.Mac 為基礎的新檔應用程式,我們將新增複製和貼上支援。
執行下列操作:
啟動 Visual Studio for Mac,然後按兩下 [ 新增專案...] 連結。
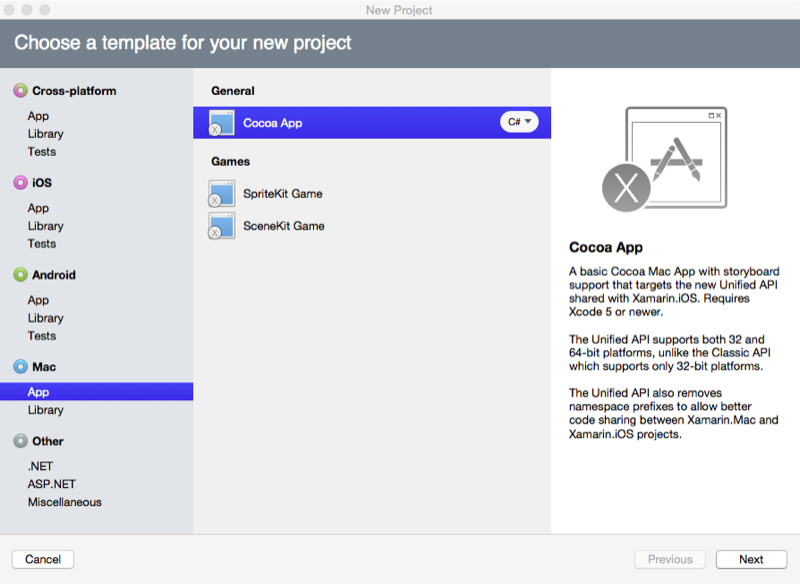
選取 [Mac>應用程式>Cocoa 應用程式],然後按下一 步: 按鈕:
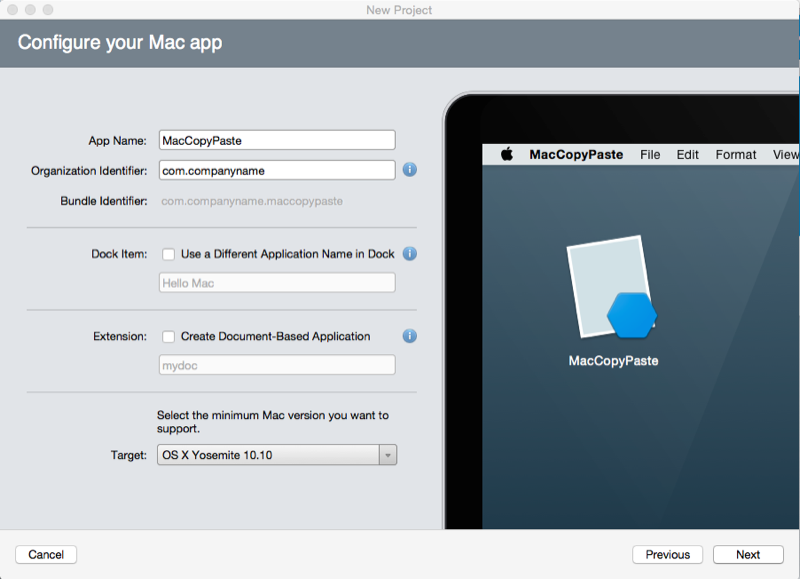
針對 [項目名稱] 輸入
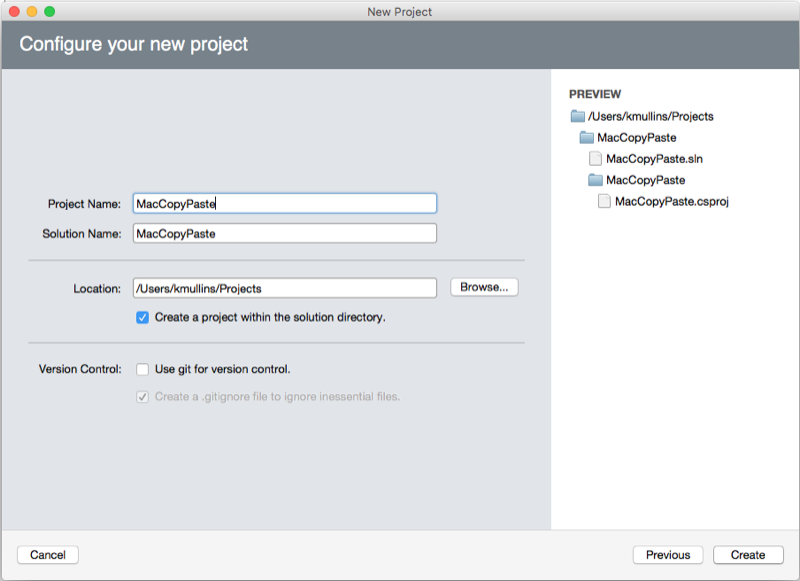
MacCopyPaste,並將其他所有專案保留為預設值。 依序按一下 [下一步:按兩下 [ 建立] 按鈕:
新增 NSDocument
接下來,我們將新增自定義 NSDocument 類別,做為應用程式使用者介面的背景記憶體。 它會包含單一影像檢視,並知道如何將影像從檢視複製到預設貼上板,以及如何從預設貼上板取得影像,並將其顯示在影像檢視中。
以滑鼠右鍵按兩下 Solution Pad 中的 Xamarin.Mac 專案,然後選取 [新增>檔案]。:
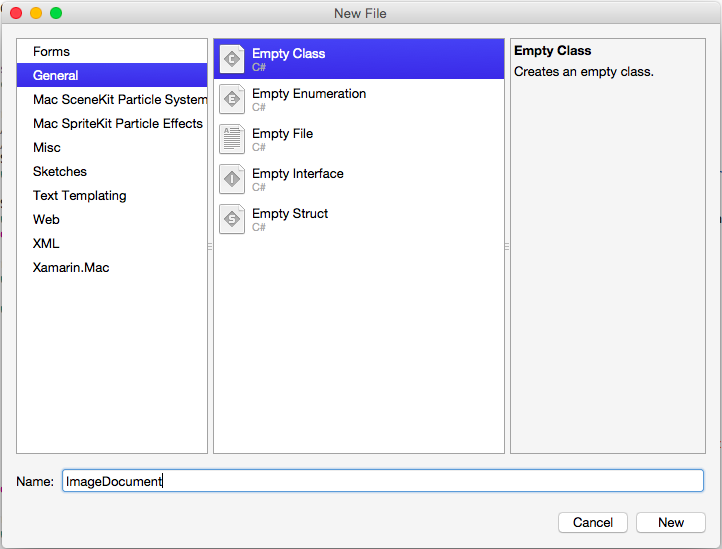
輸入 ImageDocument 作為 [名稱],然後按一下 [新增] 按鈕。 編輯ImageDocument.cs類別,使其看起來如下:
using System;
using AppKit;
using Foundation;
using ObjCRuntime;

namespace MacCopyPaste
{
    [Register("ImageDocument")]
    public class ImageDocument : NSDocument
    {
        #region Computed Properties
        public NSImageView ImageView {get; set;}

        public ImageInfo Info { get; set; } = new ImageInfo();

        public bool ImageAvailableOnPasteboard {
            get {
                // Initialize the pasteboard
                NSPasteboard pasteboard = NSPasteboard.GeneralPasteboard;
                Class [] classArray  = { new Class ("NSImage") };

                // Check to see if an image is on the pasteboard
                return pasteboard.CanReadObjectForClasses (classArray, null);
            }
        }
        #endregion

        #region Constructor
        public ImageDocument ()
        {
        }
        #endregion

        #region Public Methods
        [Export("CopyImage:")]
        public void CopyImage(NSObject sender) {

            // Grab the current image
            var image = ImageView.Image;

            // Anything to process?
            if (image != null) {
                // Get the standard pasteboard
                var pasteboard = NSPasteboard.GeneralPasteboard;

                // Empty the current contents
                pasteboard.ClearContents();

                // Add the current image to the pasteboard
                pasteboard.WriteObjects (new NSImage[] {image});

                // Save the custom data class to the pastebaord
                pasteboard.WriteObjects (new ImageInfo[] { Info });

                // Using a Pasteboard Item
                NSPasteboardItem item = new NSPasteboardItem();
                string[] writableTypes = {"public.text"};

                // Add a data provier to the item
                ImageInfoDataProvider dataProvider = new ImageInfoDataProvider (Info.Name, Info.ImageType);
                var ok = item.SetDataProviderForTypes (dataProvider, writableTypes);

                // Save to pasteboard
                if (ok) {
                    pasteboard.WriteObjects (new NSPasteboardItem[] { item });
                }
            }

        }

        [Export("PasteImage:")]
        public void PasteImage(NSObject sender) {

            // Initialize the pasteboard
            NSPasteboard pasteboard = NSPasteboard.GeneralPasteboard;
            Class [] classArray  = { new Class ("NSImage") };

            bool ok = pasteboard.CanReadObjectForClasses (classArray, null);
            if (ok) {
                // Read the image off of the pasteboard
                NSObject [] objectsToPaste = pasteboard.ReadObjectsForClasses (classArray, null);
                NSImage image = (NSImage)objectsToPaste[0];

                // Display the new image
                ImageView.Image = image;
            }

            Class [] classArray2 = { new Class ("ImageInfo") };
            ok = pasteboard.CanReadObjectForClasses (classArray2, null);
            if (ok) {
                // Read the image off of the pasteboard
                NSObject [] objectsToPaste = pasteboard.ReadObjectsForClasses (classArray2, null);
                ImageInfo info = (ImageInfo)objectsToPaste[0];

            }

        }
        #endregion
    }
}
讓我們來看看下面的一些程序代碼。
下列程式代碼提供屬性,以測試預設貼上板上是否有影像數據,如果影像可用, true 則會傳回其他 false:
public bool ImageAvailableOnPasteboard {
    get {
        // Initialize the pasteboard
        NSPasteboard pasteboard = NSPasteboard.GeneralPasteboard;
        Class [] classArray  = { new Class ("NSImage") };

        // Check to see if an image is on the pasteboard
        return pasteboard.CanReadObjectForClasses (classArray, null);
    }
}
下列程式代碼會將連結影像檢視中的影像複製到預設貼上簿:
[Export("CopyImage:")]
public void CopyImage(NSObject sender) {

    // Grab the current image
    var image = ImageView.Image;

    // Anything to process?
    if (image != null) {
        // Get the standard pasteboard
        var pasteboard = NSPasteboard.GeneralPasteboard;

        // Empty the current contents
        pasteboard.ClearContents();

        // Add the current image to the pasteboard
        pasteboard.WriteObjects (new NSImage[] {image});

        // Save the custom data class to the pastebaord
        pasteboard.WriteObjects (new ImageInfo[] { Info });

        // Using a Pasteboard Item
        NSPasteboardItem item = new NSPasteboardItem();
        string[] writableTypes = {"public.text"};

        // Add a data provider to the item
        ImageInfoDataProvider dataProvider = new ImageInfoDataProvider (Info.Name, Info.ImageType);
        var ok = item.SetDataProviderForTypes (dataProvider, writableTypes);

        // Save to pasteboard
        if (ok) {
            pasteboard.WriteObjects (new NSPasteboardItem[] { item });
        }
    }

}
下列程式代碼會從預設貼上板貼上影像,並將其顯示在附加的影像檢視中(如果貼上板包含有效的影像):
[Export("PasteImage:")]
public void PasteImage(NSObject sender) {

    // Initialize the pasteboard
    NSPasteboard pasteboard = NSPasteboard.GeneralPasteboard;
    Class [] classArray  = { new Class ("NSImage") };

    bool ok = pasteboard.CanReadObjectForClasses (classArray, null);
    if (ok) {
        // Read the image off of the pasteboard
        NSObject [] objectsToPaste = pasteboard.ReadObjectsForClasses (classArray, null);
        NSImage image = (NSImage)objectsToPaste[0];

        // Display the new image
        ImageView.Image = image;
    }

    Class [] classArray2 = { new Class ("ImageInfo") };
    ok = pasteboard.CanReadObjectForClasses (classArray2, null);
    if (ok) {
        // Read the image off of the pasteboard
        NSObject [] objectsToPaste = pasteboard.ReadObjectsForClasses (classArray2, null);
        ImageInfo info = (ImageInfo)objectsToPaste[0]
    }
}
在此檔中,我們將建立 Xamarin.Mac 應用程式的使用者介面。
建置使用者介面
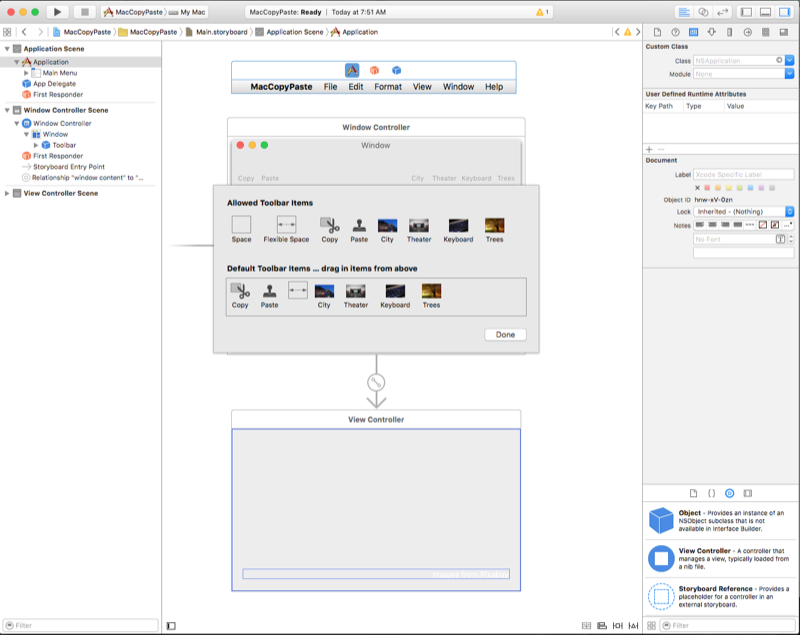
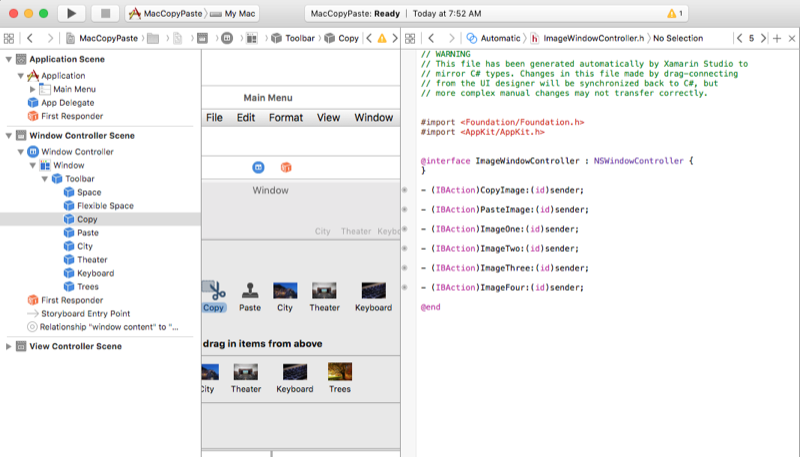
按兩下 Main.storyboard 檔案,以在 Xcode 中開啟它。 接下來,新增工具列和影像並加以設定,如下所示:
將複製並貼 上影像工具列專案 至工具列左側。 我們將使用這些快捷方式從 [編輯] 功能表複製和貼上。 接下來,將四個 影像工具列專案 新增至工具列右側。 我們將使用這些來填入影像,並填入一些預設影像。
如需使用工具列的詳細資訊,請參閱我們的 工具列 檔。
接下來,讓我們公開工具列專案和影像的下列輸出和動作:
如需使用出口和動作的詳細資訊,請參閱 Hello、Mac 檔的輸出和動作一節。
啟用使用者介面
透過 Xcode 中建立的使用者介面,以及透過輸出和動作公開的 UI 元素,我們需要新增程式代碼以啟用 UI。 按兩下 Solution Pad 中的ImageWindow.cs檔案,使其看起來如下所示:
using System;
using Foundation;
using AppKit;

namespace MacCopyPaste
{
    public partial class ImageWindow : NSWindow
    {
        #region Private Variables
        ImageDocument document;
        #endregion

        #region Computed Properties
        [Export ("Document")]
        public ImageDocument Document {
            get {
                return document;
            }
            set {
                WillChangeValue ("Document");
                document = value;
                DidChangeValue ("Document");
            }
        }

        public ViewController ImageViewController {
            get { return ContentViewController as ViewController; }
        }

        public NSImage Image {
            get {
                return ImageViewController.Image;
            }
            set {
                ImageViewController.Image = value;
            }
        }
        #endregion

        #region Constructor
        public ImageWindow (IntPtr handle) : base (handle)
        {
        }
        #endregion

        #region Override Methods
        public override void AwakeFromNib ()
        {
            base.AwakeFromNib ();

            // Create a new document instance
            Document = new ImageDocument ();

            // Attach to image view
            Document.ImageView = ImageViewController.ContentView;
        }
        #endregion

        #region Public Methods
        public void CopyImage (NSObject sender)
        {
            Document.CopyImage (sender);
        }

        public void PasteImage (NSObject sender)
        {
            Document.PasteImage (sender);
        }

        public void ImageOne (NSObject sender)
        {
            // Load image
            Image = NSImage.ImageNamed ("Image01.jpg");

            // Set image info
            Document.Info.Name = "city";
            Document.Info.ImageType = "jpg";
        }

        public void ImageTwo (NSObject sender)
        {
            // Load image
            Image = NSImage.ImageNamed ("Image02.jpg");

            // Set image info
            Document.Info.Name = "theater";
            Document.Info.ImageType = "jpg";
        }

        public void ImageThree (NSObject sender)
        {
            // Load image
            Image = NSImage.ImageNamed ("Image03.jpg");

            // Set image info
            Document.Info.Name = "keyboard";
            Document.Info.ImageType = "jpg";
        }

        public void ImageFour (NSObject sender)
        {
            // Load image
            Image = NSImage.ImageNamed ("Image04.jpg");

            // Set image info
            Document.Info.Name = "trees";
            Document.Info.ImageType = "jpg";
        }
        #endregion
    }
}
讓我們仔細看看下列程序代碼。
首先,我們會公開我們在上面建立的 ImageDocument 類別實例:
private ImageDocument _document;
...

[Export ("Document")]
public ImageDocument Document {
    get { return _document; }
    set {
        WillChangeValue ("Document");
        _document = value;
        DidChangeValue ("Document");
    }
}
藉由使用 Export、 WillChangeValue 和 DidChangeValue,我們已設定 Document 屬性,以允許 Xcode 中的索引鍵/值編碼和數據系結。
我們也會使用下列屬性,從我們在 Xcode 中新增至 UI 的影像公開 Image:
public ViewController ImageViewController {
    get { return ContentViewController as ViewController; }
}

public NSImage Image {
    get {
        return ImageViewController.Image;
    }
    set {
        ImageViewController.Image = value;
    }
}
載入並顯示主視窗時,我們會建立 類別 ImageDocument 的實例,並使用下列程式代碼將UI的影像附加至該實例:
public override void AwakeFromNib ()
{
    base.AwakeFromNib ();

    // Create a new document instance
    Document = new ImageDocument ();

    // Attach to image view
    Document.ImageView = ImageViewController.ContentView;
}
最後,為了回應使用者按下複製並貼上工具列專案,我們會呼叫 類別的 ImageDocument 實例來執行實際工作:
partial void CopyImage (NSObject sender) {
    Document.CopyImage(sender);
}

partial void PasteImage (Foundation.NSObject sender) {
    Document.PasteImage(sender);
}
啟用 [檔案] 和 [編輯] 選單
我們需要做的最後一件事是從 [檔案] 功能表啟用 [新增] 功能表項(若要建立主視窗的新實例),以及從 [編輯] 功能表啟用 [剪下]、[複製] 和 [貼上] 功能表項。
若要啟用 [ 新增 ] 功能表項,請編輯 AppDelegate.cs 檔案,並新增下列程序代碼:
public int UntitledWindowCount { get; set;} =1;
...

[Export ("newDocument:")]
void NewDocument (NSObject sender) {
    // Get new window
    var storyboard = NSStoryboard.FromName ("Main", null);
    var controller = storyboard.InstantiateControllerWithIdentifier ("MainWindow") as NSWindowController;

    // Display
    controller.ShowWindow(this);

    // Set the title
    controller.Window.Title = (++UntitledWindowCount == 1) ? "untitled" : string.Format ("untitled {0}", UntitledWindowCount);
}
如需詳細資訊,請參閱 Windows 檔的<使用多個 Windows>一節。
若要啟用 剪下、 複製 和 貼上 功能表項,請編輯 AppDelegate.cs 檔案並新增下列程式代碼:
[Export("copy:")]
void CopyImage (NSObject sender)
{
    // Get the main window
    var window = NSApplication.SharedApplication.KeyWindow as ImageWindow;

    // Anything to do?
    if (window == null)
        return;

    // Copy the image to the clipboard
    window.Document.CopyImage (sender);
}

[Export("cut:")]
void CutImage (NSObject sender)
{
    // Get the main window
    var window = NSApplication.SharedApplication.KeyWindow as ImageWindow;

    // Anything to do?
    if (window == null)
        return;

    // Copy the image to the clipboard
    window.Document.CopyImage (sender);

    // Clear the existing image
    window.Image = null;
}

[Export("paste:")]
void PasteImage (NSObject sender)
{
    // Get the main window
    var window = NSApplication.SharedApplication.KeyWindow as ImageWindow;

    // Anything to do?
    if (window == null)
        return;

    // Paste the image from the clipboard
    window.Document.PasteImage (sender);
}
針對每個功能表項,我們會取得目前、最上層、最上層的索引鍵視窗,並將其轉換成我們的 ImageWindow 類別:
var window = NSApplication.SharedApplication.KeyWindow as ImageWindow;
從該處,我們呼叫 ImageDocument 該視窗的類別實例來處理複製和貼上動作。 例如:
window.Document.CopyImage (sender);
如果默認貼上板或目前使用中視窗的影像數據良好,我們只想要 存取 [剪下]、 [複製 ] 和 [貼 上] 功能表項。
讓我們將 EditMenuDelegate.cs 檔案新增至 Xamarin.Mac 專案,使其看起來如下:
using System;
using AppKit;

namespace MacCopyPaste
{
    public class EditMenuDelegate : NSMenuDelegate
    {
        #region Override Methods
        public override void MenuWillHighlightItem (NSMenu menu, NSMenuItem item)
        {
        }

        public override void NeedsUpdate (NSMenu menu)
        {
            // Get list of menu items
            NSMenuItem[] Items = menu.ItemArray ();

            // Get the key window and determine if the required images are available
            var window = NSApplication.SharedApplication.KeyWindow as ImageWindow;
            var hasImage = (window != null) && (window.Image != null);
            var hasImageOnPasteboard = (window != null) && window.Document.ImageAvailableOnPasteboard;

            // Process every item in the menu
            foreach(NSMenuItem item in Items) {
                // Take action based on the menu title
                switch (item.Title) {
                case "Cut":
                case "Copy":
                case "Delete":
                    // Only enable if there is an image in the view
                    item.Enabled = hasImage;
                    break;
                case "Paste":
                    // Only enable if there is an image on the pasteboard
                    item.Enabled = hasImageOnPasteboard;
                    break;
                default:
                    // Only enable the item if it has a sub menu
                    item.Enabled = item.HasSubmenu;
                    break;
                }
            }
        }
        #endregion
    }
}
同樣地,我們會取得目前最上層的視窗,並使用其 ImageDocument 類別實例來查看所需的影像數據是否存在。 然後,我們會使用 MenuWillHighlightItem 方法來根據這個狀態來啟用或停用每個專案。
編輯AppDelegate.cs檔案,並讓 DidFinishLaunching 方法看起來如下所示:
public override void DidFinishLaunching (NSNotification notification)
{
    // Disable automatic item enabling on the Edit menu
    EditMenu.AutoEnablesItems = false;
    EditMenu.Delegate = new EditMenuDelegate ();
}
首先,我們會停用自動啟用和停用 [編輯] 功能表中的功能表項。 接下來,我們會附加我們在上面建立的 EditMenuDelegate 類別實例。
測試應用程式
備妥所有項目之後,我們即可測試應用程式。 建置並執行應用程式,並顯示主要介面:
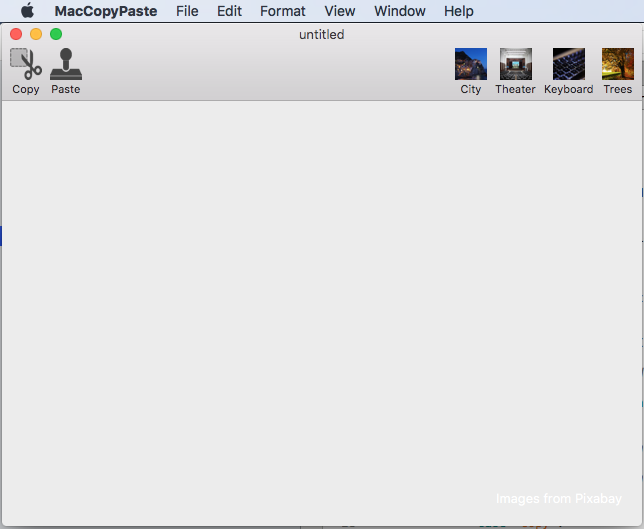
如果您開啟 [編輯] 功能表,請注意 [剪下]、 [複製 ] 和 [貼上 ] 已停用,因為影像中沒有影像,或預設的貼上板中沒有影像:
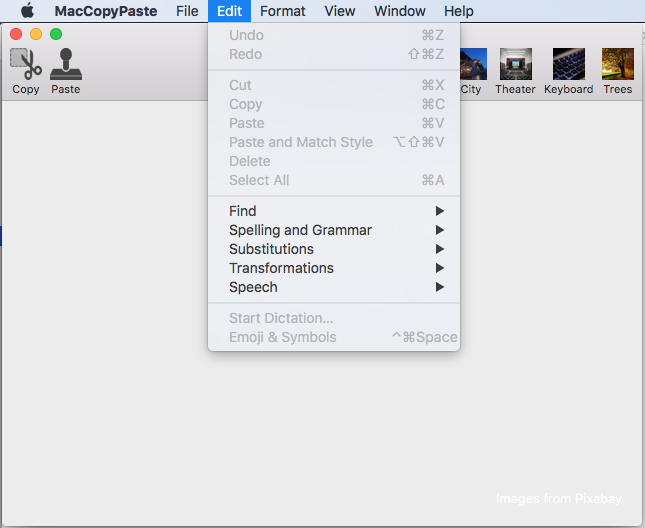
如果您將影像新增至影像並重新開啟 [編輯] 功能表,現在會啟用專案:
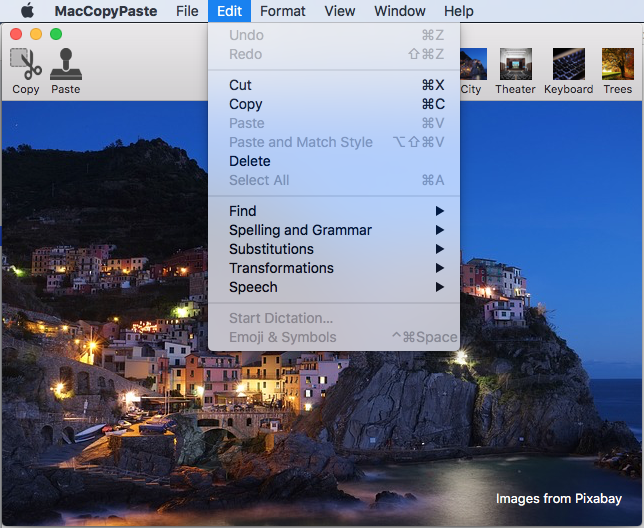
如果您複製映像並從檔案選單中選取 [新增 ],您可以將該影像貼到新的視窗中:

在下列各節中,我們將詳細探討在 Xamarin.Mac 應用程式中使用貼上板。
關於貼上板
在 macOS 中(先前稱為 OS X)中,貼上板 (NSPasteboard) 支援數個伺服器進程,例如複製與貼上、拖放和應用程式服務。 在下列各節中,我們將進一步了解數個主要貼上板概念。
什麼是貼上板?
類別 NSPasteboard 提供標準化的機制,可在應用程式或指定應用程式內交換資訊。 貼上板的主要功能是處理複製和貼上作業:
- 當使用者選取應用程式中的專案並使用 [剪下 ] 或 [複製 ] 選單項時,選取專案的一或多個表示法會放在貼上板上。
- 當使用者使用 [貼上] 功能表項 (在相同應用程式或不同應用程式內),可以處理的數據版本會從貼上 板複製並新增至應用程式。
較不明顯的貼上板使用包括尋找、拖曳、拖放,以及應用程式服務作業:
- 當使用者起始拖曳作業時,會將拖曳數據複製到貼上板。 如果拖曳作業以卸除至另一個應用程式結束,該應用程式會從貼上板複製數據。
- 針對翻譯服務,要翻譯的數據會由要求的應用程式複製到貼上板。 應用程式服務會從 pasteboard 擷取數據、執行翻譯,然後將數據貼回到貼上板上。
在最簡單的形式中,貼上板是用來移動指定應用程式內或應用程式之間的數據,以及存在於應用程式進程外部的特殊全域記憶體區域中。 雖然貼上板的概念很容易掌握,但需要考慮幾個更複雜的詳細數據。 以下將詳細說明這些內容。
具名貼上板
貼上板可以是公用或私人的,而且可用於應用程式內或多個應用程式之間的各種用途。 macOS 提供數個標準貼上板,每個貼上板都有特定的定義用法:
NSGeneralPboard- 剪下、複製和貼上作業的預設貼上板。NSRulerPboard- 支援尺規上的剪下、複製和貼上作業。NSFontPboard- 支援物件上的NSFont剪下、複製和貼上作業。NSFindPboard- 支援可共用搜尋文字的應用程式特定尋找面板。NSDragPboard- 支援 拖放 作業。
在大部分情況下,您將使用其中一個系統定義的貼上板。 但在某些情況下,您可能需要建立自己的貼上板。 在這些情況下,您可以使用 FromName (string name) 類別的 NSPasteboard 方法,建立具有指定名稱的自定義貼上板。
或者,您可以呼叫 CreateWithUniqueName 類別的 NSPasteboard 方法,以建立唯一命名的 pasteboard。
貼上板專案
應用程式寫入貼上板的每個數據片段都會 被視為 Pasteboard Item ,而貼上板可以同時保存多個專案。 如此一來,應用程式可以寫入複製至貼上板的多個版本數據(例如純文字和格式化文字),而擷取應用程式只能讀取它可處理的數據(例如純文字)。
數據表示法和統一類型識別碼
貼上板作業通常會發生在兩個(或更多)應用程式之間,這些應用程式彼此都不知道或每個應用程式可以處理的數據類型。 如上一節所述,為了最大化共用資訊的潛力,貼上板可以保存複製和貼上數據的多個表示法。
每個表示法都是透過統一類型標識碼(UTI)來識別,這只不過是可唯一識別所呈現日期類型的簡單字串(如需詳細資訊,請參閱 Apple 的 統一類型識別符概觀 檔)。
如果您要建立自定義數據類型(例如,向量繪圖應用程式中的繪圖物件),您可以建立自己的UTI,以在複製和貼上作業中唯一識別它。
當應用程式準備貼上從貼上板複製的數據時,它必須找到最適合其能力的表示法(如果有的話)。 這通常是最豐富的類型(例如文字處理應用程式的格式化文字),回溯到最簡單窗體,視需要提供 (簡單文本編輯器的純文本)。
承諾的數據
一般而言,您應該盡可能提供所複製資料的多個表示法,以最大化應用程式之間的共用。 不過,由於時間或記憶體限制,實際將每個數據類型寫入貼上板可能不切實際。
在此情況下,您可以將第一個數據表示放在貼上板上,而接收應用程式可以要求不同的表示法,這可以在貼上作業之前立即產生。
當您將初始專案放在貼上板上時,您會指定符合 介面的物件 NSPasteboardItemDataProvider 會提供一或多個其他表示法。 這些物件會視需要提供額外的表示法,如接收應用程式所要求。
變更計數
每個貼上板都會 維護每次宣告新擁有者時遞增的變更計數 。 應用程式可以藉由檢查變更計數的值,來判斷貼上板的內容自上次檢查之後是否已變更。
使用 類別ChangeCount的 NSPasteboard 和 ClearContents 方法,修改指定的貼上板變更計數。
將數據複製到貼上板
您可以先存取貼上板、清除任何現有的內容,以及寫入貼上板所需的許多數據表示法,以執行複製作業。
例如:
// Get the standard pasteboard
var pasteboard = NSPasteboard.GeneralPasteboard;

// Empty the current contents
pasteboard.ClearContents();

// Add the current image to the pasteboard
pasteboard.WriteObjects (new NSImage[] {image});
一般而言,您只會寫入一般貼上板,如上述範例所示。 您傳送至 WriteObjects 方法 的任何對象都必須 符合 INSPasteboardWriting 介面。 數個內建類別(例如 NSString、NSImage、、NSURLNSColor、 NSAttributedString和 NSPasteboardItem)會自動符合這個介面。
如果您要將自定義數據類別寫入貼上板,它必須符合 INSPasteboardWriting 介面,或包裝在 類別的 NSPasteboardItem 實例中(請參閱 下面的自定義數據類型 一節)。
從貼上板讀取數據
如上所述,若要最大化在應用程式之間共享數據的可能性,複製數據的多個表示法可能會寫入貼上板。 接收應用程式可以針對其功能選取最豐富的版本(如果有的話)。
簡單貼上作業
您可以使用 方法從貼上板 ReadObjectsForClasses 讀取數據。 其需要兩個參數:
- 您想要從貼上板讀取之型別的
NSObject陣列。 您應該先以最想要的數據類型來排序此專案,而其餘類型則以遞減喜好設定。 - 包含其他條件約束的字典(例如限制為特定 URL 內容類型),如果沒有進一步的條件約束,則為空白字典。
方法會傳回符合我們傳入之準則的項目陣列,因此最多包含所要求的相同數據類型數目。 也可能沒有要求的類型存在,而且會傳回空陣列。
例如,下列程式代碼會檢查一般 pasteboard 中是否存在 NSImage ,並在影像中顯示它是否正常:
[Export("PasteImage:")]
public void PasteImage(NSObject sender) {

    // Initialize the pasteboard
    NSPasteboard pasteboard = NSPasteboard.GeneralPasteboard;
    Class [] classArray  = { new Class ("NSImage") };

    bool ok = pasteboard.CanReadObjectForClasses (classArray, null);
    if (ok) {
        // Read the image off of the pasteboard
        NSObject [] objectsToPaste = pasteboard.ReadObjectsForClasses (classArray, null);
        NSImage image = (NSImage)objectsToPaste[0];

        // Display the new image
        ImageView.Image = image;
    }

    Class [] classArray2 = { new Class ("ImageInfo") };
    ok = pasteboard.CanReadObjectForClasses (classArray2, null);
    if (ok) {
        // Read the image off of the pasteboard
        NSObject [] objectsToPaste = pasteboard.ReadObjectsForClasses (classArray2, null);
        ImageInfo info = (ImageInfo)objectsToPaste[0];
            }
}
要求多個數據類型
根據所建立的 Xamarin.Mac 應用程式類型,它可以處理所貼上數據的多個表示法。 在此情況下,有兩種情況可從貼上板擷取數據:
- 對方法進行單一呼叫
ReadObjectsForClasses,並提供您想要的所有表示法陣列(依慣用的順序)。 - 每次對要求不同類型陣列的方法進行多次呼叫
ReadObjectsForClasses。
如需從貼上板擷取數據的詳細資訊,請參閱上面的簡單貼上作業一節。
檢查現有數據類型
有時候,您可能想要檢查貼上板是否包含指定的數據表示法,而不需要實際從貼上板讀取數據(例如只有在有效數據存在時才啟用 [貼 上] 功能表項)。
CanReadObjectForClasses呼叫 pasteboard 的 方法,以查看它是否包含指定的類型。
例如,下列程式代碼會判斷一般貼上板是否包含 NSImage 實例:
public bool ImageAvailableOnPasteboard {
    get {
        // Initialize the pasteboard
        NSPasteboard pasteboard = NSPasteboard.GeneralPasteboard;
        Class [] classArray  = { new Class ("NSImage") };

        // Check to see if an image is on the pasteboard
        return pasteboard.CanReadObjectForClasses (classArray, null);
    }
}
從貼上板讀取 URL
根據指定 Xamarin.Mac 應用程式的函式,可能需要從貼上板讀取 URL,但前提是它們符合一組指定的準則(例如指向特定數據類型的檔案或 URL)。 在此情況下,您可以使用 或 ReadObjectsForClasses 方法的第二個參數CanReadObjectForClasses來指定其他搜尋準則。
自訂資料型別
有時候,您需要從 Xamarin.Mac 應用程式將自己的自定義類型儲存到貼上板。 例如,可讓使用者複製和貼上繪圖物件的向量繪圖應用程式。
在此情況下,您必須設計數據自定義類別,使其繼承自 NSObject ,且符合幾個介面(INSCodingINSPasteboardWriting和 INSPasteboardReading)。 您可以選擇性地使用 NSPasteboardItem 封裝要複製或貼上的數據。
以下將詳細說明這兩個選項。
使用自定義類別
在本節中,我們將展開我們在本檔開頭建立的簡單範例應用程式,並新增自定義類別來追蹤我們在視窗之間複製和貼上之影像的相關信息。
將新的類別新增至專案,並將其呼叫 ImageInfo.cs。 編輯檔案,使其看起來如下:
using System;
using AppKit;
using Foundation;

namespace MacCopyPaste
{
    [Register("ImageInfo")]
    public class ImageInfo : NSObject, INSCoding, INSPasteboardWriting, INSPasteboardReading
    {
        #region Computed Properties
        [Export("name")]
        public string Name { get; set; }

        [Export("imageType")]
        public string ImageType { get; set; }
        #endregion

        #region Constructors
        [Export ("init")]
        public ImageInfo ()
        {
        }

        public ImageInfo (IntPtr p) : base (p)
        {
        }

        [Export ("initWithCoder:")]
        public ImageInfo(NSCoder decoder) {

            // Decode data
            NSString name = decoder.DecodeObject("name") as NSString;
            NSString type = decoder.DecodeObject("imageType") as NSString;

            // Save data
            Name = name.ToString();
            ImageType = type.ToString ();
        }
        #endregion

        #region Public Methods
        [Export ("encodeWithCoder:")]
        public void EncodeTo (NSCoder encoder) {

            // Encode data
            encoder.Encode(new NSString(Name),"name");
            encoder.Encode(new NSString(ImageType),"imageType");
        }

        [Export ("writableTypesForPasteboard:")]
        public virtual string[] GetWritableTypesForPasteboard (NSPasteboard pasteboard) {
            string[] writableTypes = {"com.xamarin.image-info", "public.text"};
            return writableTypes;
        }

        [Export ("pasteboardPropertyListForType:")]
        public virtual NSObject GetPasteboardPropertyListForType (string type) {

            // Take action based on the requested type
            switch (type) {
            case "com.xamarin.image-info":
                return NSKeyedArchiver.ArchivedDataWithRootObject(this);
            case "public.text":
                return new NSString(string.Format("{0}.{1}", Name, ImageType));
            }

            // Failure, return null
            return null;
        }

        [Export ("readableTypesForPasteboard:")]
        public static string[] GetReadableTypesForPasteboard (NSPasteboard pasteboard){
            string[] readableTypes = {"com.xamarin.image-info", "public.text"};
            return readableTypes;
        }

        [Export ("readingOptionsForType:pasteboard:")]
        public static NSPasteboardReadingOptions GetReadingOptionsForType (string type, NSPasteboard pasteboard) {

            // Take action based on the requested type
            switch (type) {
            case "com.xamarin.image-info":
                return NSPasteboardReadingOptions.AsKeyedArchive;
            case "public.text":
                return NSPasteboardReadingOptions.AsString;
            }

            // Default to property list
            return NSPasteboardReadingOptions.AsPropertyList;
        }

        [Export ("initWithPasteboardPropertyList:ofType:")]
        public NSObject InitWithPasteboardPropertyList (NSObject propertyList, string type) {

            // Take action based on the requested type
            switch (type) {
            case "com.xamarin.image-info":
                return new ImageInfo();
            case "public.text":
                return new ImageInfo();
            }

            // Failure, return null
            return null;
        }
        #endregion
    }
}
在下列各節中,我們將詳細探討此類別。
繼承和介面
在自定義數據類別可以寫入或讀取貼上板之前,它必須符合 INSPastebaordWriting 和 INSPasteboardReading 介面。 此外,它必須繼承自 NSObject ,也符合 INSCoding 介面:
[Register("ImageInfo")]
public class ImageInfo : NSObject, INSCoding, INSPasteboardWriting, INSPasteboardReading
...
類別也必須公開給 Objective-C 使用指示詞, Register 而且必須使用 公開任何必要的屬性或方法 Export。 例如:
[Export("name")]
public string Name { get; set; }

[Export("imageType")]
public string ImageType { get; set; }
我們正在公開此類別將包含的兩個數據欄位 - 影像的名稱及其類型 (jpg、png 等)。
如需詳細資訊,請參閱 Xamarin.Mac Internals 檔的公開 C# 類別/方法Objective-C一節,其中說明Register用來將 C# 類別連線至Objective-C物件和 UI 元素的 和 Export 屬性。
建構函式
自訂資料類別需要兩個建構函式(正確公開 Objective-C至 ),才能從貼上板讀取:
[Export ("init")]
public ImageInfo ()
{
}

[Export ("initWithCoder:")]
public ImageInfo(NSCoder decoder) {

    // Decode data
    NSString name = decoder.DecodeObject("name") as NSString;
    NSString type = decoder.DecodeObject("imageType") as NSString;

    // Save data
    Name = name.ToString();
    ImageType = type.ToString ();
}
首先,我們會在的預設Objective-C方法init下公開空的建構函式。
接下來,我們會公開 NSCoding 相容的建構函式,以在貼上導出的名稱 initWithCoder下貼上時,從貼上板建立物件的新實例。
此建構函式會採用 NSCoder (如寫入貼上板時所 NSKeyedArchiver 建立),擷取索引鍵/值配對的數據,並將它儲存至數據類別的屬性欄位。
寫入貼上板
藉由符合 INSPasteboardWriting 介面,我們需要公開兩種方法,並選擇性地公開第三個方法,以便將類別寫入貼上板。
首先,我們需要告訴貼上板可以寫入自定義類別的數據類型表示法:
[Export ("writableTypesForPasteboard:")]
public virtual string[] GetWritableTypesForPasteboard (NSPasteboard pasteboard) {
    string[] writableTypes = {"com.xamarin.image-info", "public.text"};
    return writableTypes;
}
每個表示法都是透過統一類型標識碼(UTI)來識別,這只不過是可唯一識別所呈現數據類型的簡單字串(如需詳細資訊,請參閱 Apple 的 統一類型識別符概觀 檔)。
針對自定義格式,我們會建立自己的UTI:“com.xamarin.image-info”(請注意,反向表示法就像應用程式標識符一樣)。 我們的類別也能夠將標準字串寫入貼上板 (public.text)。
接下來,我們需要以實際寫入貼上板的要求格式建立 物件:
[Export ("pasteboardPropertyListForType:")]
public virtual NSObject GetPasteboardPropertyListForType (string type) {

    // Take action based on the requested type
    switch (type) {
    case "com.xamarin.image-info":
        return NSKeyedArchiver.ArchivedDataWithRootObject(this);
    case "public.text":
        return new NSString(string.Format("{0}.{1}", Name, ImageType));
    }

    // Failure, return null
    return null;
}
public.text針對型別,我們會傳回簡單的格式化NSString物件。 針對自定義 com.xamarin.image-info 類型,我們會使用 NSKeyedArchiver 和 NSCoder 介面,將自定義數據類別編碼為索引鍵/值配對封存。 我們需要實作下列方法來實際處理編碼:
[Export ("encodeWithCoder:")]
public void EncodeTo (NSCoder encoder) {

    // Encode data
    encoder.Encode(new NSString(Name),"name");
    encoder.Encode(new NSString(ImageType),"imageType");
}
個別索引鍵/值組會寫入編碼器,並使用我們上面新增的第二個建構函式來譯碼。
或者,我們可以包含下列方法,以在將數據寫入貼上面板時定義任何選項:
[Export ("writingOptionsForType:pasteboard:"), CompilerGenerated]
public virtual NSPasteboardWritingOptions GetWritingOptionsForType (string type, NSPasteboard pasteboard) {
    return NSPasteboardWritingOptions.WritingPromised;
}
目前只有 WritingPromised 選項可供使用,而且當指定的類型只承諾且未實際寫入貼上板時,才應該使用。 如需詳細資訊,請參閱 上面的承諾數據 一節。
有了這些方法,下列程式代碼可用來將自定義類別寫入貼上板:
// Get the standard pasteboard
var pasteboard = NSPasteboard.GeneralPasteboard;

// Empty the current contents
pasteboard.ClearContents();

// Add info to the pasteboard
pasteboard.WriteObjects (new ImageInfo[] { Info });
從貼上板讀取
藉由符合 INSPasteboardReading 介面,我們需要公開三種方法,以便從貼上板讀取自定義數據類別。
首先,我們需要告訴貼上板哪些數據類型表示法,自定義類別可以從剪貼簿讀取:
[Export ("readableTypesForPasteboard:")]
public static string[] GetReadableTypesForPasteboard (NSPasteboard pasteboard){
    string[] readableTypes = {"com.xamarin.image-info", "public.text"};
    return readableTypes;
}
同樣地,這些會定義為簡單的UTIs,而且是上述撰寫至 Pasteboard 一節中所定義的相同類型。
接下來,我們需要告訴貼上板 如何使用 下列方法讀取每個UTI類型:
[Export ("readingOptionsForType:pasteboard:")]
public static NSPasteboardReadingOptions GetReadingOptionsForType (string type, NSPasteboard pasteboard) {

    // Take action based on the requested type
    switch (type) {
    case "com.xamarin.image-info":
        return NSPasteboardReadingOptions.AsKeyedArchive;
    case "public.text":
        return NSPasteboardReadingOptions.AsString;
    }

    // Default to property list
    return NSPasteboardReadingOptions.AsPropertyList;
}
com.xamarin.image-info針對型別,我們會告訴貼上板,藉由呼叫initWithCoder:我們新增至 類別的建構函式,將我們建立的索引鍵/值組譯碼至貼上板時所建立NSKeyedArchiver的索引鍵/值組。
最後,我們需要新增下列方法,以從貼上板讀取其他UTI數據表示法:
[Export ("initWithPasteboardPropertyList:ofType:")]
public NSObject InitWithPasteboardPropertyList (NSObject propertyList, string type) {

    // Take action based on the requested type
    switch (type) {
    case "public.text":
        return new ImageInfo();
    }

    // Failure, return null
    return null;
}
利用上述所有方法,可以使用下列程式代碼從貼上板讀取自定義數據類別:
// Initialize the pasteboard
NSPasteboard pasteboard = NSPasteboard.GeneralPasteboard;
var classArrayPtrs = new [] { Class.GetHandle (typeof(ImageInfo)) };
NSArray classArray = NSArray.FromIntPtrs (classArrayPtrs);

// NOTE: Sending messages directly to the base Objective-C API because of this defect:
// https://bugzilla.xamarin.com/show_bug.cgi?id=31760
// Check to see if image info is on the pasteboard
ok = bool_objc_msgSend_IntPtr_IntPtr (pasteboard.Handle, Selector.GetHandle ("canReadObjectForClasses:options:"), classArray.Handle, IntPtr.Zero);

if (ok) {
    // Read the image off of the pasteboard
    NSObject [] objectsToPaste = NSArray.ArrayFromHandle<Foundation.NSObject>(IntPtr_objc_msgSend_IntPtr_IntPtr (pasteboard.Handle, Selector.GetHandle ("readObjectsForClasses:options:"), classArray.Handle, IntPtr.Zero));
    ImageInfo info = (ImageInfo)objectsToPaste[0];
}
使用 NSPasteboardItem
有時候,您可能需要將自定義專案寫入貼上板,而不需要建立自定義類別,或您想要視需要以通用格式提供數據。 在這些情況下,您可以使用 NSPasteboardItem。
提供 NSPasteboardItem 對寫入貼上板的數據進行更細緻的控制,並專為暫時存取而設計-在寫入貼上板之後,應該處置它。
寫入數據
若要將自訂資料寫入至 NSPasteboardItem ,您必須提供自訂 NSPasteboardItemDataProvider。 將新的類別新增至專案,並將其呼叫 ImageInfoDataProvider.cs。 編輯檔案,使其看起來如下:
using System;
using AppKit;
using Foundation;

namespace MacCopyPaste
{
    [Register("ImageInfoDataProvider")]
    public class ImageInfoDataProvider : NSPasteboardItemDataProvider
    {
        #region Computed Properties
        public string Name { get; set;}
        public string ImageType { get; set;}
        #endregion

        #region Constructors
        [Export ("init")]
        public ImageInfoDataProvider ()
        {
        }

        public ImageInfoDataProvider (string name, string imageType)
        {
            // Initialize
            this.Name = name;
            this.ImageType = imageType;
        }

        protected ImageInfoDataProvider (NSObjectFlag t){
        }

        protected internal ImageInfoDataProvider (IntPtr handle){

        }
        #endregion

        #region Override Methods
        [Export ("pasteboardFinishedWithDataProvider:")]
        public override void FinishedWithDataProvider (NSPasteboard pasteboard)
        {

        }

        [Export ("pasteboard:item:provideDataForType:")]
        public override void ProvideDataForType (NSPasteboard pasteboard, NSPasteboardItem item, string type)
        {

            // Take action based on the type
            switch (type) {
            case "public.text":
                // Encode the data to string
                item.SetStringForType(string.Format("{0}.{1}", Name, ImageType),type);
                break;
            }

        }
        #endregion
    }
}
如同我們對自訂資料類別所做的,我們需要使用 Register 和 Export 指示詞將它公開至 Objective-C。 類別必須繼承自 NSPasteboardItemDataProvider ,而且必須實 FinishedWithDataProvider 作 和 ProvideDataForType 方法。
ProvideDataForType使用 方法提供將包裝在 中的數據NSPasteboardItem,如下所示:
[Export ("pasteboard:item:provideDataForType:")]
public override void ProvideDataForType (NSPasteboard pasteboard, NSPasteboardItem item, string type)
{

    // Take action based on the type
    switch (type) {
    case "public.text":
        // Encode the data to string
        item.SetStringForType(string.Format("{0}.{1}", Name, ImageType),type);
        break;
    }

}
在此情況下,我們會儲存有關影像的兩個部分資訊(Name 和 ImageType),並將這些資訊寫入簡單的字串 (public.text)。
輸入將資料寫入貼上板,請使用下列程式代碼:
// Get the standard pasteboard
var pasteboard = NSPasteboard.GeneralPasteboard;

// Using a Pasteboard Item
NSPasteboardItem item = new NSPasteboardItem();
string[] writableTypes = {"public.text"};

// Add a data provider to the item
ImageInfoDataProvider dataProvider = new ImageInfoDataProvider (Info.Name, Info.ImageType);
var ok = item.SetDataProviderForTypes (dataProvider, writableTypes);

// Save to pasteboard
if (ok) {
    pasteboard.WriteObjects (new NSPasteboardItem[] { item });
}
讀取資料
若要從貼上板讀取數據,請使用下列程式代碼:
// Initialize the pasteboard
NSPasteboard pasteboard = NSPasteboard.GeneralPasteboard;
Class [] classArray  = { new Class ("NSImage") };

bool ok = pasteboard.CanReadObjectForClasses (classArray, null);
if (ok) {
    // Read the image off of the pasteboard
    NSObject [] objectsToPaste = pasteboard.ReadObjectsForClasses (classArray, null);
    NSImage image = (NSImage)objectsToPaste[0];

    // Do something with data
    ...
}

Class [] classArray2 = { new Class ("ImageInfo") };
ok = pasteboard.CanReadObjectForClasses (classArray2, null);
if (ok) {
    // Read the image off of the pasteboard
    NSObject [] objectsToPaste = pasteboard.ReadObjectsForClasses (classArray2, null);

    // Do something with data
    ...
}
摘要
本文已詳細探討如何使用 Xamarin.Mac 應用程式中的貼上板,以支援複製和貼上作業。 首先,它引進了簡單的範例,讓您熟悉標準貼上板作業。 接下來,它會詳細查看貼上板,以及如何從中讀取和寫入數據。 最後,它探討如何使用自定義數據類型來支援在應用程式中複製和貼上複雜數據類型。

