Xamarin.Mac 中的對話框
在 Xamarin.Mac 應用程式中使用 C# 和 .NET 時,您可以存取開發人員在 和 Xcode 中Objective-C運作的相同對話框和模式 Windows。 由於 Xamarin.Mac 直接與 Xcode 整合,因此您可以使用 Xcode 的 Interface Builder 來建立和維護強制回應 Windows(或選擇性地直接在 C# 程式代碼中建立它們)。
對話框隨即出現,以回應使用者動作,通常提供使用者完成動作的方式。 對話框需要用戶回應,才能關閉。
Windows 可以處於無模式狀態(例如可以一次開啟多個檔的文字編輯器)或強制回應(例如,在應用程式可以繼續之前必須關閉的導出對話框)。

在本文中,我們將討論在 Xamarin.Mac 應用程式中使用對話框和強制回應 Windows 的基本概念。 強烈建議您先完成 Hello,Mac 文章,特別是 Xcode 和 Interface Builder 和 Outlets 和 Actions 簡介小節,因為它涵蓋我們將在本文中使用的重要概念和技術。
您可能也想要查看 Xamarin.Mac Internals 檔的公開 C# 類別/方法Objective-C一節,它也會說明 Register 用來將 C# 類別連接至Objective-C物件和 UI 元素的 和 Export 命令。
對話框簡介
對話框隨即出現,以回應使用者動作(例如儲存盤案),並提供讓使用者完成該動作的方式。 對話框需要用戶回應,才能關閉。
根據 Apple,有三種方式可以呈現對話:
- 文件強制回應 - 文件強制回應對話框可防止使用者在指定的檔內執行任何其他動作,直到關閉為止。
- 應用程式強制回應 - 應用程式強制 回應對話框可防止使用者與應用程式互動,直到關閉為止。
- 無 模式無模式對話框可讓使用者變更對話框中的設定,同時仍與文檔窗口互動。
強制回應視窗
任何標準 NSWindow 都可以當做自定義對話框使用,方法是以強制回應方式顯示:

檔強制回應對話框表
Sheet 是附加至指定文件視窗的強制回應對話方塊,可防止使用者與窗口互動,直到他們關閉對話框為止。 工作表會附加至其出現所在的視窗,而且一次只能開啟一張工作表供視窗使用。

喜好設定視窗
[喜好設定視窗] 是一個無模式對話方塊,其中包含使用者不常變更的應用程式設定。 喜好設定 Windows 通常包含一個工具列,可讓使用者在不同的設定群組之間切換:

開啟對話框
[開啟對話框] 可讓使用者以一致的方式在應用程式中尋找和開啟專案:
列印和頁面設定對話框
macOS 提供應用程式可顯示的標準列印和頁面設定對話框,讓用戶可以在所使用的每個應用程式中都有一致的列印體驗。
[列印對話框] 可以同時顯示為免費浮動對話框:

或者,它可以顯示為工作表:

[頁面設定對話框] 可以同時顯示為免費浮動對話框:

或者,它可以顯示為工作表:

儲存對話框
[儲存] 對話框可讓使用者以一致的方式將專案儲存在應用程式中。 [儲存對話框] 有兩種狀態: 最小 (也稱為 Collapsed):

以及 [展開] 狀態:

[ 最小 儲存] 對話框也可以顯示為工作表:

展開的儲存對話框也可以:

如需詳細資訊,請參閱 Apple OS X Human Interface Guidelines 的對話框一節
將強制回應視窗新增至專案
除了主文檔視窗之外,Xamarin.Mac 應用程式可能需要向用戶顯示其他類型的視窗,例如 [喜好設定] 或 [偵測器面板]。
若要新增視窗,請執行下列動作:
在 方案總管 中,開啟
Main.storyboard檔案以在 Xcode 的 Interface Builder 中編輯。將新的 檢視控制器 拖曳至設計介面:

在 Identity Inspector 中,輸入
CustomDialogController類別 名稱:
切換回 Visual Studio for Mac,允許它與 Xcode 同步並建立
CustomDialogController.h檔案。返回 Xcode 並設計您的介面:

從應用程式的 [主視窗] 建立強制回應 Segue 到新的檢視控制器,方法是從 UI 元素進行控件拖曳,以開啟對話框的視窗。 指派識別碼
ModalSegue:
連線任何 動作 與 輸出:

儲存變更並返回 Visual Studio for Mac 以與 Xcode 同步。


CustomDialogController.cs讓檔案看起來如下所示:
using System;
using Foundation;
using AppKit;

namespace MacDialog
{
    public partial class CustomDialogController : NSViewController
    {
        #region Private Variables
        private string _dialogTitle = "Title";
        private string _dialogDescription = "Description";
        private NSViewController _presentor;
        #endregion

        #region Computed Properties
        public string DialogTitle {
            get { return _dialogTitle; }
            set { _dialogTitle = value; }
        }

        public string DialogDescription {
            get { return _dialogDescription; }
            set { _dialogDescription = value; }
        }

        public NSViewController Presentor {
            get { return _presentor; }
            set { _presentor = value; }
        }
        #endregion

        #region Constructors
        public CustomDialogController (IntPtr handle) : base (handle)
        {
        }
        #endregion

        #region Override Methods
        public override void ViewWillAppear ()
        {
            base.ViewWillAppear ();

            // Set initial title and description
            Title.StringValue = DialogTitle;
            Description.StringValue = DialogDescription;
        }
        #endregion

        #region Private Methods
        private void CloseDialog() {
            Presentor.DismissViewController (this);
        }
        #endregion

        #region Custom Actions
        partial void AcceptDialog (Foundation.NSObject sender) {
            RaiseDialogAccepted();
            CloseDialog();
        }

        partial void CancelDialog (Foundation.NSObject sender) {
            RaiseDialogCanceled();
            CloseDialog();
        }
        #endregion

        #region Events
        public EventHandler DialogAccepted;

        internal void RaiseDialogAccepted() {
            if (this.DialogAccepted != null)
                this.DialogAccepted (this, EventArgs.Empty);
        }

        public EventHandler DialogCanceled;

        internal void RaiseDialogCanceled() {
            if (this.DialogCanceled != null)
                this.DialogCanceled (this, EventArgs.Empty);
        }
        #endregion
    }
}
此程式代碼會公開一些屬性來設定對話框的標題和描述,以及一些事件,以回應取消或接受的對話。
接下來,編輯 ViewController.cs 檔案、覆寫 PrepareForSegue 方法,並使其看起來如下:
public override void PrepareForSegue (NSStoryboardSegue segue, NSObject sender)
{
    base.PrepareForSegue (segue, sender);

    // Take action based on the segue name
    switch (segue.Identifier) {
    case "ModalSegue":
        var dialog = segue.DestinationController as CustomDialogController;
        dialog.DialogTitle = "MacDialog";
        dialog.DialogDescription = "This is a sample dialog.";
        dialog.DialogAccepted += (s, e) => {
            Console.WriteLine ("Dialog accepted");
            DismissViewController (dialog);
        };
        dialog.Presentor = this;
        break;
    }
}
此程式代碼會將我們在 Xcode 介面產生器中定義的 Segue 初始化為對話框,並設定標題和描述。 它也會處理使用者在對話框中所做的選擇。
我們可以執行應用程式並顯示自訂對話框:

如需在 Xamarin.Mac 應用程式中使用 Windows 的詳細資訊,請參閱使用 Windows 檔。
建立自定義工作表
Sheet 是附加至指定文件視窗的強制回應對話方塊,可防止使用者與窗口互動,直到他們關閉對話框為止。 工作表會附加至其出現所在的視窗,而且一次只能開啟一張工作表供視窗使用。
若要在 Xamarin.Mac 中建立自定義工作表,讓我們執行下列動作:
在 方案總管 中,開啟
Main.storyboard檔案以在 Xcode 的 Interface Builder 中編輯。將新的 檢視控制器 拖曳至設計介面:
設計您的使用者介面:

從主視窗建立 工作表 Segue 到新的檢視控制器:

在 Identity Inspector 中,將檢視控制器的 類別
SheetViewController命名為: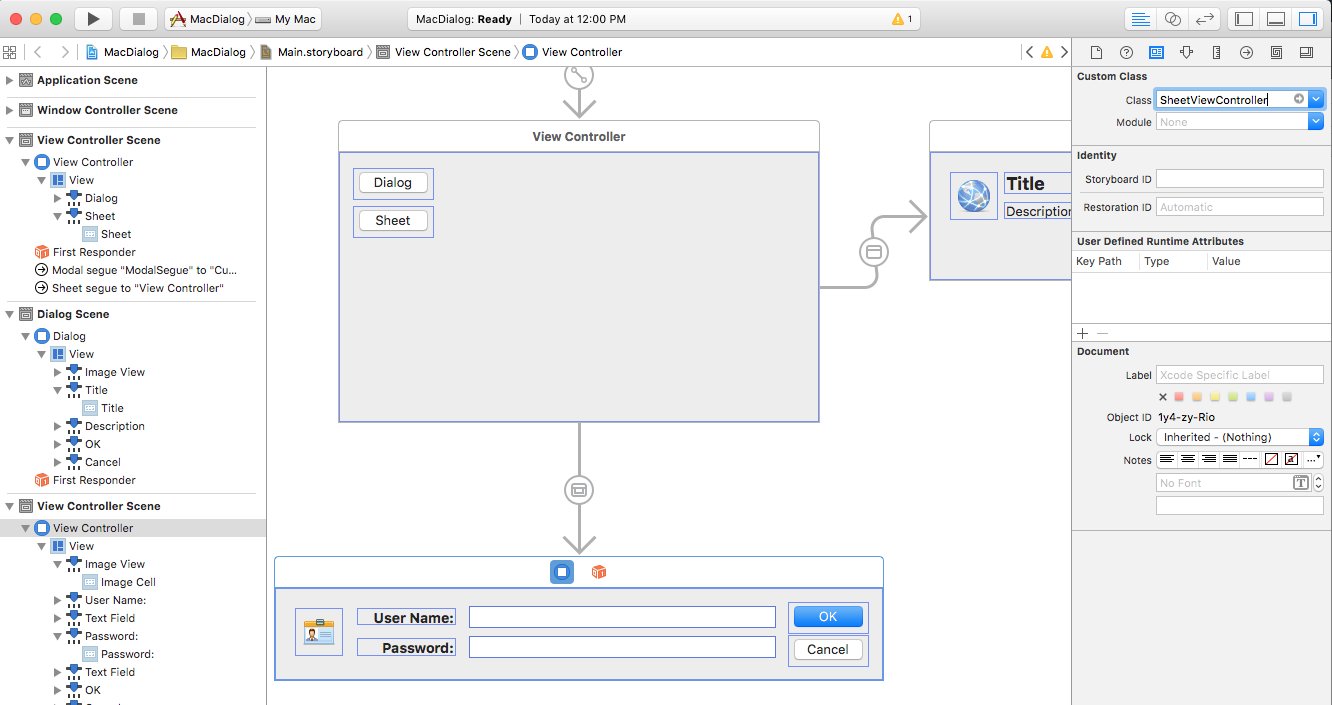
定義任何所需的 輸出 與 動作:

儲存變更並返回 Visual Studio for Mac 進行同步處理。


接下來,編輯 SheetViewController.cs 檔案,使其看起來如下:
using System;
using Foundation;
using AppKit;

namespace MacDialog
{
    public partial class SheetViewController : NSViewController
    {
        #region Private Variables
        private string _userName = "";
        private string _password = "";
        private NSViewController _presentor;
        #endregion

        #region Computed Properties
        public string UserName {
            get { return _userName; }
            set { _userName = value; }
        }

        public string Password {
            get { return _password;}
            set { _password = value;}
        }

        public NSViewController Presentor {
            get { return _presentor; }
            set { _presentor = value; }
        }
        #endregion

        #region Constructors
        public SheetViewController (IntPtr handle) : base (handle)
        {
        }
        #endregion

        #region Override Methods
        public override void ViewWillAppear ()
        {
            base.ViewWillAppear ();

            // Set initial values
            NameField.StringValue = UserName;
            PasswordField.StringValue = Password;

            // Wireup events
            NameField.Changed += (sender, e) => {
                UserName = NameField.StringValue;
            };
            PasswordField.Changed += (sender, e) => {
                Password = PasswordField.StringValue;
            };
        }
        #endregion

        #region Private Methods
        private void CloseSheet() {
            Presentor.DismissViewController (this);
        }
        #endregion

        #region Custom Actions
        partial void AcceptSheet (Foundation.NSObject sender) {
            RaiseSheetAccepted();
            CloseSheet();
        }

        partial void CancelSheet (Foundation.NSObject sender) {
            RaiseSheetCanceled();
            CloseSheet();
        }
        #endregion

        #region Events
        public EventHandler SheetAccepted;

        internal void RaiseSheetAccepted() {
            if (this.SheetAccepted != null)
                this.SheetAccepted (this, EventArgs.Empty);
        }

        public EventHandler SheetCanceled;

        internal void RaiseSheetCanceled() {
            if (this.SheetCanceled != null)
                this.SheetCanceled (this, EventArgs.Empty);
        }
        #endregion
    }
}
接下來,編輯檔案、編輯 ViewController.csPrepareForSegue 方法,使其看起來如下:
public override void PrepareForSegue (NSStoryboardSegue segue, NSObject sender)
{
    base.PrepareForSegue (segue, sender);

    // Take action based on the segue name
    switch (segue.Identifier) {
    case "ModalSegue":
        var dialog = segue.DestinationController as CustomDialogController;
        dialog.DialogTitle = "MacDialog";
        dialog.DialogDescription = "This is a sample dialog.";
        dialog.DialogAccepted += (s, e) => {
            Console.WriteLine ("Dialog accepted");
            DismissViewController (dialog);
        };
        dialog.Presentor = this;
        break;
    case "SheetSegue":
        var sheet = segue.DestinationController as SheetViewController;
        sheet.SheetAccepted += (s, e) => {
            Console.WriteLine ("User Name: {0} Password: {1}", sheet.UserName, sheet.Password);
        };
        sheet.Presentor = this;
        break;
    }
}
如果我們執行應用程式並開啟 Sheet,則會附加至視窗:
建立喜好設定對話框
在介面產生器中配置喜好設定檢視之前,我們需要新增自定義 Segue 類型來處理切換喜好設定。 將新類別新增至您的專案,並呼叫它 ReplaceViewSeque。 編輯 類別,使其看起來如下:
using System;
using AppKit;
using Foundation;

namespace MacWindows
{
    [Register("ReplaceViewSeque")]
    public class ReplaceViewSeque : NSStoryboardSegue
    {
        #region Constructors
        public ReplaceViewSeque() {

        }

        public ReplaceViewSeque (string identifier, NSObject sourceController, NSObject destinationController) : base(identifier,sourceController,destinationController) {

        }

        public ReplaceViewSeque (IntPtr handle) : base(handle) {
        }

        public ReplaceViewSeque (NSObjectFlag x) : base(x) {
        }
        #endregion

        #region Override Methods
        public override void Perform ()
        {
            // Cast the source and destination controllers
            var source = SourceController as NSViewController;
            var destination = DestinationController as NSViewController;

            // Is there a source?
            if (source == null) {
                // No, get the current key window
                var window = NSApplication.SharedApplication.KeyWindow;

                // Swap the controllers
                window.ContentViewController = destination;

                // Release memory
                window.ContentViewController?.RemoveFromParentViewController ();
            } else {
                // Swap the controllers
                source.View.Window.ContentViewController = destination;

                // Release memory
                source.RemoveFromParentViewController ();
            }

        }
        #endregion

    }

}
建立自定義 Segue 之後,我們可以在 Xcode 的 Interface Builder 中新增視窗來處理我們的喜好設定。
若要新增視窗,請執行下列動作:
在 方案總管 中,開啟
Main.storyboard檔案以在 Xcode 的 Interface Builder 中編輯。將新的 視窗控制器 拖曳至設計介面:

排列選單列設計工具附近的視窗:

建立附加檢視控制器的複本,因為喜好設定檢視中有索引卷標:

從連結庫拖曳新的工具列控制器:

然後將它放在 [設計介面] 的 [視窗] 上:

設定工具列的設計:

Control-Click and drag from each Toolbar Button to the Views you created above. 選取自訂 segue 型態:

選取新的 Segue,並將 [類別] 設定為
ReplaceViewSegue:
在 [設計介面] 的 [功能表欄設計工具 ] 中,從 [應用程式] 功能選單中選取 [喜好設定...],單擊控件並拖曳至 [喜好設定] 視窗以建立 [顯示 ] segue:

儲存變更並返回 Visual Studio for Mac 進行同步處理。


如果我們執行程式代碼,並從應用程式選單選取 [喜好設定...],則會顯示視窗:

如需使用 Windows 和工具列的詳細資訊,請參閱我們的 Windows 和 工具列 檔。
儲存和載入喜好設定
在典型的 macOS 應用程式中,當使用者變更任何應用程式的使用者喜好設定時,這些變更會自動儲存。 在 Xamarin.Mac 應用程式中處理此作業的最簡單方式,是建立單一類別來管理所有使用者的喜好設定,並全系統共用。
首先,將新的 AppPreferences 類別新增至專案,並從 繼承自 NSObject。 喜好設定的設計訴求是使用 數據系結和索引鍵/值編碼 ,這會使建立和維護喜好設定形式的程式更簡單。 由於喜好設定將包含少量的簡單數據類型,因此請使用內 NSUserDefaults 建來儲存和擷取值。
AppPreferences.cs編輯檔案,使其看起來如下:
using System;
using Foundation;
using AppKit;

namespace SourceWriter
{
    [Register("AppPreferences")]
    public class AppPreferences : NSObject
    {
        #region Computed Properties
        [Export("DefaultLanguage")]
        public int DefaultLanguage {
            get {
                var value = LoadInt ("DefaultLanguage", 0);
                return value;
            }
            set {
                WillChangeValue ("DefaultLanguage");
                SaveInt ("DefaultLanguage", value, true);
                DidChangeValue ("DefaultLanguage");
            }
        }

        [Export("SmartLinks")]
        public bool SmartLinks {
            get { return LoadBool ("SmartLinks", true); }
            set {
                WillChangeValue ("SmartLinks");
                SaveBool ("SmartLinks", value, true);
                DidChangeValue ("SmartLinks");
            }
        }

        // Define any other required user preferences in the same fashion
        ...

        [Export("EditorBackgroundColor")]
        public NSColor EditorBackgroundColor {
            get { return LoadColor("EditorBackgroundColor", NSColor.White); }
            set {
                WillChangeValue ("EditorBackgroundColor");
                SaveColor ("EditorBackgroundColor", value, true);
                DidChangeValue ("EditorBackgroundColor");
            }
        }
        #endregion

        #region Constructors
        public AppPreferences ()
        {
        }
        #endregion

        #region Public Methods
        public int LoadInt(string key, int defaultValue) {
            // Attempt to read int
            var number = NSUserDefaults.StandardUserDefaults.IntForKey(key);

            // Take action based on value
            if (number == null) {
                return defaultValue;
            } else {
                return (int)number;
            }
        }

        public void SaveInt(string key, int value, bool sync) {
            NSUserDefaults.StandardUserDefaults.SetInt(value, key);
            if (sync) NSUserDefaults.StandardUserDefaults.Synchronize ();
        }

        public bool LoadBool(string key, bool defaultValue) {
            // Attempt to read int
            var value = NSUserDefaults.StandardUserDefaults.BoolForKey(key);

            // Take action based on value
            if (value == null) {
                return defaultValue;
            } else {
                return value;
            }
        }

        public void SaveBool(string key, bool value, bool sync) {
            NSUserDefaults.StandardUserDefaults.SetBool(value, key);
            if (sync) NSUserDefaults.StandardUserDefaults.Synchronize ();
        }

        public string NSColorToHexString(NSColor color, bool withAlpha) {
            //Break color into pieces
            nfloat red=0, green=0, blue=0, alpha=0;
            color.GetRgba (out red, out green, out blue, out alpha);

            // Adjust to byte
            alpha *= 255;
            red *= 255;
            green *= 255;
            blue *= 255;

            //With the alpha value?
            if (withAlpha) {
                return String.Format ("#{0:X2}{1:X2}{2:X2}{3:X2}", (int)alpha, (int)red, (int)green, (int)blue);
            } else {
                return String.Format ("#{0:X2}{1:X2}{2:X2}", (int)red, (int)green, (int)blue);
            }
        }

        public NSColor NSColorFromHexString (string hexValue)
        {
            var colorString = hexValue.Replace ("#", "");
            float red, green, blue, alpha;

            // Convert color based on length
            switch (colorString.Length) {
            case 3 : // #RGB
                red = Convert.ToInt32(string.Format("{0}{0}", colorString.Substring(0, 1)), 16) / 255f;
                green = Convert.ToInt32(string.Format("{0}{0}", colorString.Substring(1, 1)), 16) / 255f;
                blue = Convert.ToInt32(string.Format("{0}{0}", colorString.Substring(2, 1)), 16) / 255f;
                return NSColor.FromRgba(red, green, blue, 1.0f);
            case 6 : // #RRGGBB
                red = Convert.ToInt32(colorString.Substring(0, 2), 16) / 255f;
                green = Convert.ToInt32(colorString.Substring(2, 2), 16) / 255f;
                blue = Convert.ToInt32(colorString.Substring(4, 2), 16) / 255f;
                return NSColor.FromRgba(red, green, blue, 1.0f);
            case 8 : // #AARRGGBB
                alpha = Convert.ToInt32(colorString.Substring(0, 2), 16) / 255f;
                red = Convert.ToInt32(colorString.Substring(2, 2), 16) / 255f;
                green = Convert.ToInt32(colorString.Substring(4, 2), 16) / 255f;
                blue = Convert.ToInt32(colorString.Substring(6, 2), 16) / 255f;
                return NSColor.FromRgba(red, green, blue, alpha);
            default :
                throw new ArgumentOutOfRangeException(string.Format("Invalid color value '{0}'. It should be a hex value of the form #RBG, #RRGGBB or #AARRGGBB", hexValue));
            }
        }

        public NSColor LoadColor(string key, NSColor defaultValue) {

            // Attempt to read color
            var hex = NSUserDefaults.StandardUserDefaults.StringForKey(key);

            // Take action based on value
            if (hex == null) {
                return defaultValue;
            } else {
                return NSColorFromHexString (hex);
            }
        }

        public void SaveColor(string key, NSColor color, bool sync) {
            // Save to default
            NSUserDefaults.StandardUserDefaults.SetString(NSColorToHexString(color,true), key);
            if (sync) NSUserDefaults.StandardUserDefaults.Synchronize ();
        }
        #endregion
    }
}
這個類別包含一些協助程式例程,例如 SaveInt、 LoadInt、 SaveColor、 LoadColor等,讓使用 NSUserDefaults 變得更容易。 此外,由於 NSUserDefaults 沒有內建的處理 NSColors方式,因此 NSColorToHexString 和 NSColorFromHexString 方法可用來將色彩轉換成 Web 型十六進位字串(#RRGGBBAA 其中 AA 是 Alpha 透明度),以便輕鬆儲存和擷取。
在 檔案中AppDelegate.cs,建立將用於全應用程式的 AppPreferences 物件的實例:
using AppKit;
using Foundation;
using System.IO;
using System;

namespace SourceWriter
{
    [Register ("AppDelegate")]
    public class AppDelegate : NSApplicationDelegate
    {
        #region Computed Properties
        public int NewWindowNumber { get; set;} = -1;

        public AppPreferences Preferences { get; set; } = new AppPreferences();
        #endregion

        #region Constructors
        public AppDelegate ()
        {
        }
        #endregion

        ...
將喜好設定與喜好設定檢視連接
接下來,將 [喜好設定] 類別連接到上方建立的 [喜好設定視窗] 和 [檢視] 上的 UI 元素。 在 [介面產生器] 中,選取 [喜好設定檢視控制器] 並切換至 [識別偵測器],建立控制器的自定義類別:

切換回 Visual Studio for Mac 以同步您的變更,並開啟新建立的類別進行編輯。 讓類別看起來如下:
using System;
using Foundation;
using AppKit;

namespace SourceWriter
{
    public partial class EditorPrefsController : NSViewController
    {
        #region Application Access
        public static AppDelegate App {
            get { return (AppDelegate)NSApplication.SharedApplication.Delegate; }
        }
        #endregion

        #region Computed Properties
        [Export("Preferences")]
        public AppPreferences Preferences {
            get { return App.Preferences; }
        }
        #endregion

        #region Constructors
        public EditorPrefsController (IntPtr handle) : base (handle)
        {
        }
        #endregion
    }
}
請注意,這個類別在這裡做了兩件事:首先,有協助程序 App 屬性可讓存取 AppDelegate 變得更容易。 其次,屬性 Preferences 會公開全域 AppPreferences 類別,以便與放置在這個檢視上的任何 UI 控件進行數據系結。
接下來,按兩下分鏡腳本檔案,在Interface Builder中重新開啟它(並查看上述所做的變更)。 將建置喜好設定介面所需的任何 UI 控件拖曳至 [檢視]。 針對每個控件,切換至系結偵測器,並系結至 AppPreference 類別的個別屬性:

針對所有面板(檢視控制器)和必要喜好設定屬性重複上述步驟。
將喜好設定變更套用至所有開啟的 Windows
如上所述,在典型的 macOS 應用程式中,當使用者對任何應用程式的使用者喜好設定進行變更時,這些變更會自動儲存,並套用至使用者可能在應用程式中開啟的任何視窗。
仔細規劃及設計您應用程式的喜好設定和視窗,可讓此程序順暢且透明地對終端用戶進行,而且撰寫工作最少。
對於將取用應用程式喜好設定的任何視窗,將下列 Helper 屬性新增至其內容檢視控制器,以便更輕鬆地存取 AppDelegate:
#region Application Access
public static AppDelegate App {
    get { return (AppDelegate)NSApplication.SharedApplication.Delegate; }
}
#endregion
接下來,新增 類別,以根據使用者的喜好設定來設定內容或行為:
public void ConfigureEditor() {

    // General Preferences
    TextEditor.AutomaticLinkDetectionEnabled = App.Preferences.SmartLinks;
    TextEditor.AutomaticQuoteSubstitutionEnabled = App.Preferences.SmartQuotes;
    ...

}
當您第一次開啟 Window 時,您必須呼叫組態方法,以確定它符合使用者的喜好設定:
public override void ViewDidLoad ()
{
    base.ViewDidLoad ();

    // Configure editor from user preferences
    ConfigureEditor ();
    ...
}
接下來,編輯檔案, AppDelegate.cs 並新增下列方法,將任何喜好設定變更套用至所有開啟的視窗:
public void UpdateWindowPreferences() {

    // Process all open windows
    for(int n=0; n<NSApplication.SharedApplication.Windows.Length; ++n) {
        var content = NSApplication.SharedApplication.Windows[n].ContentViewController as ViewController;
        if (content != null ) {
            // Reformat all text
            content.ConfigureEditor ();
        }
    }

}
接下來,將類別 PreferenceWindowDelegate 新增至專案,使其看起來如下:
using System;
using AppKit;
using System.IO;
using Foundation;

namespace SourceWriter
{
    public class PreferenceWindowDelegate : NSWindowDelegate
    {
        #region Application Access
        public static AppDelegate App {
            get { return (AppDelegate)NSApplication.SharedApplication.Delegate; }
        }
        #endregion

        #region Computed Properties
        public NSWindow Window { get; set;}
        #endregion

        #region constructors
        public PreferenceWindowDelegate (NSWindow window)
        {
            // Initialize
            this.Window = window;

        }
        #endregion

        #region Override Methods
        public override bool WindowShouldClose (Foundation.NSObject sender)
        {

            // Apply any changes to open windows
            App.UpdateWindowPreferences();

            return true;
        }
        #endregion
    }
}
當 [視窗] 喜好設定關閉時,這會導致所有開啟的 Windows 傳送任何喜好設定變更。
最後,編輯喜好設定視窗控制器,並新增上面建立的委派:
using System;
using Foundation;
using AppKit;

namespace SourceWriter
{
    public partial class PreferenceWindowController : NSWindowController
    {
        #region Constructors
        public PreferenceWindowController (IntPtr handle) : base (handle)
        {
        }
        #endregion

        #region Override Methods
        public override void WindowDidLoad ()
        {
            base.WindowDidLoad ();

            // Initialize
            Window.Delegate = new PreferenceWindowDelegate(Window);
            Toolbar.SelectedItemIdentifier = "General";
        }
        #endregion
    }
}
有了所有這些變更之後,如果使用者編輯應用程式的 [喜好設定] 並關閉 [喜好設定] 視窗,則會將變更套用至所有開啟的 Windows:

開啟對話框
[開啟對話框] 可讓使用者以一致的方式尋找及開啟應用程式中的專案。 若要在 Xamarin.Mac 應用程式中顯示開啟對話框,請使用下列程式代碼:
var dlg = NSOpenPanel.OpenPanel;
dlg.CanChooseFiles = true;
dlg.CanChooseDirectories = false;
dlg.AllowedFileTypes = new string[] { "txt", "html", "md", "css" };

if (dlg.RunModal () == 1) {
    // Nab the first file
    var url = dlg.Urls [0];

    if (url != null) {
        var path = url.Path;

        // Create a new window to hold the text
        var newWindowController = new MainWindowController ();
        newWindowController.Window.MakeKeyAndOrderFront (this);

        // Load the text into the window
        var window = newWindowController.Window as MainWindow;
        window.Text = File.ReadAllText(path);
        window.SetTitleWithRepresentedFilename (Path.GetFileName(path));
        window.RepresentedUrl = url;

    }
}
在上述程式代碼中,我們會開啟新的文檔視窗來顯示檔案的內容。 您必須將此程式碼取代為應用程式所需的功能。
使用 時 NSOpenPanel可以使用下列屬性:
- CanChooseFiles - 如果使用者
true可以選取檔案。 - CanChooseDirectories - 如果使用者
true可以選取目錄。 - AllowsMultipleSelection - 如果使用者
true一次可以選取多個檔案。 - ResolveAliases - 如果
true選取和別名,請將它解析為源文件的路徑。 - AllowedFileTypes - 這是使用者可以選取為擴展名或 UTI 之文件類型的字串陣列。 預設值為
null,允許開啟任何檔案。
方法RunModal ()會顯示 [開啟對話框],並允許使用者選取檔案或目錄(如屬性所指定),並在使用者按兩下 [開啟] 按鈕時傳回 1 。
[開啟對話框] 會以 屬性中的 URL URL 陣列傳回使用者選取的檔案或目錄。
如果我們執行程式,並從 [檔案] 功能選取 [開啟...] 專案,則會顯示下列專案:
[列印] 和 [頁面設定] 對話框
macOS 提供應用程式可顯示的標準列印和頁面設定對話框,讓用戶可以在所使用的每個應用程式中都有一致的列印體驗。
下列程式代碼會顯示標準列印對話框:
public bool ShowPrintAsSheet { get; set;} = true;
...

[Export ("showPrinter:")]
void ShowDocument (NSObject sender) {
    var dlg = new NSPrintPanel();

    // Display the print dialog as dialog box
    if (ShowPrintAsSheet) {
        dlg.BeginSheet(new NSPrintInfo(),this,this,null,new IntPtr());
    } else {
        if (dlg.RunModalWithPrintInfo(new NSPrintInfo()) == 1) {
            var alert = new NSAlert () {
                AlertStyle = NSAlertStyle.Critical,
                InformativeText = "We need to print the document here...",
                MessageText = "Print Document",
            };
            alert.RunModal ();
        }
    }
}
如果我們將 ShowPrintAsSheet 屬性設定為 false,請執行應用程式並顯示列印對話方塊,將會顯示下列內容:
如果將 ShowPrintAsSheet 屬性設定為 true,請執行應用程式並顯示列印對話框,則會顯示下列內容:
下列程式代碼會顯示 [版面設定] 對話框:
[Export ("showLayout:")]
void ShowLayout (NSObject sender) {
    var dlg = new NSPageLayout();

    // Display the print dialog as dialog box
    if (ShowPrintAsSheet) {
        dlg.BeginSheet (new NSPrintInfo (), this);
    } else {
        if (dlg.RunModal () == 1) {
            var alert = new NSAlert () {
                AlertStyle = NSAlertStyle.Critical,
                InformativeText = "We need to print the document here...",
                MessageText = "Print Document",
            };
            alert.RunModal ();
        }
    }
}
如果我們將 ShowPrintAsSheet 屬性設定為 false,請執行應用程式並顯示列印版面配置對話框,則會顯示下列內容:
如果將 屬性設定 ShowPrintAsSheet 為 true,請執行應用程式並顯示列印版面設定對話框,則會顯示下列內容:
如需使用列印和頁面設定對話框的詳細資訊,請參閱Apple的 NSPrintPanel 和 NSPageLayout 檔。
儲存對話框
[儲存] 對話框可讓使用者以一致的方式將專案儲存在應用程式中。
下列程式代碼會顯示標準儲存對話框:
public bool ShowSaveAsSheet { get; set;} = true;
...

[Export("saveDocumentAs:")]
void ShowSaveAs (NSObject sender)
{
    var dlg = new NSSavePanel ();
    dlg.Title = "Save Text File";
    dlg.AllowedFileTypes = new string[] { "txt", "html", "md", "css" };

    if (ShowSaveAsSheet) {
        dlg.BeginSheet(mainWindowController.Window,(result) => {
            var alert = new NSAlert () {
                AlertStyle = NSAlertStyle.Critical,
                InformativeText = "We need to save the document here...",
                MessageText = "Save Document",
            };
            alert.RunModal ();
        });
    } else {
        if (dlg.RunModal () == 1) {
            var alert = new NSAlert () {
                AlertStyle = NSAlertStyle.Critical,
                InformativeText = "We need to save the document here...",
                MessageText = "Save Document",
            };
            alert.RunModal ();
        }
    }

}
屬性 AllowedFileTypes 是檔案類型的字串數位,使用者可以選擇以將檔案儲存為 。 檔類型可以指定為擴展名或 UTI。 預設值為 null,允許使用任何文件類型。
如果我們將 ShowSaveAsSheet 屬性設定為 false,請執行應用程式,然後從 [檔案] 選單中選取 [另存新檔],則會顯示下列專案:
使用者可以展開對話框:
如果我們將 ShowSaveAsSheet 屬性設定為 true,請執行應用程式,然後從 [檔案] 選單中選取 [另存新檔],則會顯示下列專案:
使用者可以展開對話框:
如需使用儲存對話框的詳細資訊,請參閱Apple的 NSSavePanel 檔。
摘要
本文已詳細探討使用 Xamarin.Mac 應用程式中的強制回應 Windows、工作表和標準系統對話方塊。 我們看到模式 Windows、工作表和對話框的不同類型和用法、如何在 Xcode 的介面產生器中建立和維護強制回應 Windows 和工作表,以及如何在 C# 程式代碼中使用強制回應 Windows、工作表和對話框。