Xamarin.Forms 按鈕
按鈕會回應點選或按兩下,指示應用程式執行特定工作。
Button是所有 Xamarin.Forms中最基本的互動式控制件。 Button通常會顯示簡短的文字字串,指出命令,但它也可以顯示位圖影像,或文字和影像的組合。 使用者用手指按下 Button ,或使用滑鼠按下它以起始該命令。
下面討論的大部分主題會對應到 ButtonDemos 範例中的頁面。
處理按鈕點選
Button 定義 Clicked 當用戶點選 Button 手指或滑鼠指標時所引發的事件。 當手指或滑鼠按鈕從 表面 Button放開時,就會引發 事件。 Button必須IsEnabled將其 屬性設定為 true ,才能回應點選。
ButtonDemos 範例中的 [基本按鈕點選] 頁面示範如何在 XAML 中具現化 Button ,並處理其Clicked事件。 BasicButtonClickPage.xaml 檔案同時包含 StackLayout 和 LabelButton的 :
<ContentPage xmlns="http://xamarin.com/schemas/2014/forms"
             xmlns:x="http://schemas.microsoft.com/winfx/2009/xaml"
             x:Class="ButtonDemos.BasicButtonClickPage"
             Title="Basic Button Click">
    <StackLayout>

        <Label x:Name="label"
               Text="Click the Button below"
               FontSize="Large"
               VerticalOptions="CenterAndExpand"
               HorizontalOptions="Center" />

        <Button Text="Click to Rotate Text!"
                VerticalOptions="CenterAndExpand"
                HorizontalOptions="Center"
                Clicked="OnButtonClicked" />

    </StackLayout>
</ContentPage>
通常會 Button 佔用它允許的所有空間。 例如,如果您未將 HorizontalOptions 的 Button 屬性設定為 以外的 Fill專案,則會 Button 佔用其父代的完整寬度。
根據預設,Button是矩形,但您可以使用 屬性提供圓角CornerRadius,如 Button 外觀一節中所述。
Text 屬性可指定出現在 Button 中的文字。 事件 Clicked 會設定為名為的 OnButtonClicked事件處理程式。 此處理程式位於程式代碼後置檔案中, BasicButtonClickPage.xaml.cs:
public partial class BasicButtonClickPage : ContentPage
{
    public BasicButtonClickPage ()
    {
        InitializeComponent ();
    }

    async void OnButtonClicked(object sender, EventArgs args)
    {
        await label.RelRotateTo(360, 1000);
    }
}
OnButtonClicked方法會在點選 Button 時執行。 自 sender 變數是 Button 負責此事件的物件。 您可以使用這個來存取Button物件,或區分共用相同Clicked事件的多個Button物件。
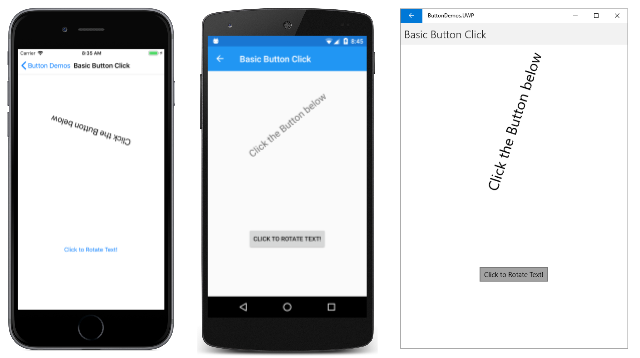
這個特定 Clicked 處理程式會呼叫動畫函式,以 1000 毫秒旋轉 Label 360 度。 以下是在 iOS 和 Android 裝置上執行的程式,以及作為 Windows 10 桌面上的 通用 Windows 平台 (UWP) 應用程式:
請注意, OnButtonClicked 方法包含 修飾詞, async 因為 await 是在事件處理程式內使用。 Clicked只有當處理程式的主體使用 await時,async事件處理程式才需要 修飾詞。
每個平台都會以自己的特定方式呈現 Button 。 在 [ 按鈕外觀 ] 區段中,您將瞭解如何設定色彩,並讓 Button 框線顯示更自定義的外觀。 Button 會實作 IFontElement 介面,使其包含 FontFamily、 FontSize和 FontAttributes 屬性。
在程式代碼中建立按鈕
在 XAML 中具現化 Button 很常見,但您也可以在程式碼中建立 Button 。 當您的應用程式需要根據迴圈可 foreach 列舉的數據建立多個按鈕時,這可能很方便。
[程式 代碼按鈕點 選] 頁面示範如何建立功能相當於 基本按鈕點選 頁面但完全在 C# 中的頁面:
public class CodeButtonClickPage : ContentPage
{
    public CodeButtonClickPage ()
    {
        Title = "Code Button Click";

        Label label = new Label
        {
            Text = "Click the Button below",
            FontSize = Device.GetNamedSize(NamedSize.Large, typeof(Label)),
            VerticalOptions = LayoutOptions.CenterAndExpand,
            HorizontalOptions = LayoutOptions.Center
        };

        Button button = new Button
        {
            Text = "Click to Rotate Text!",
            VerticalOptions = LayoutOptions.CenterAndExpand,
            HorizontalOptions = LayoutOptions.Center
        };
        button.Clicked += async (sender, args) => await label.RelRotateTo(360, 1000);

        Content = new StackLayout
        {
            Children =
            {
                label,
                button
            }
        };
    }
}
在類別的建構函式中,一切都已完成。 Clicked因為處理程式只有一個語句長,所以可以非常簡單地附加至 事件:
button.Clicked += async (sender, args) => await label.RelRotateTo(360, 1000);
當然,您也可以將事件處理程式定義為個別的方法(就像基本按鈕按兩下中的方法一樣OnButtonClick),並將該方法附加至 事件:
button.Clicked += OnButtonClicked;
停用按鈕
有時候,應用程式處於特定 Button 按兩下不是有效作業的特定狀態。 在這些情況下, Button 應該藉由將其 IsEnabled 屬性設定為 false來停用 。 傳統範例是 Entry 檔名的控件,隨附於檔案開啟 Button: Button 只有在某些文字已輸入 至 Entry時,才應該啟用 。
您可以針對這項工作使用 DataTrigger ,如數據觸發程式一文所示。
使用命令介面
應用程式可以在不處理Clicked事件的情況下回應Button點選。 會 Button 實作稱為 命令 或 命令介面的 替代通知機制。 這包含兩個屬性:
Command型ICommand別 為 ,這是命名空間中System.Windows.Input定義的介面。CommandParameter類型的Object屬性。
此方法特別適用於與數據系結的連線,特別是在實作 Model-View-ViewModel (MVVM) 架構時。 這些主題會在數據系結、從數據系結至MVVM和MVVM一文中討論。
在MVVM應用程式中,viewmodel 會定義型 ICommand 別的屬性,然後使用資料系結連接到 XAML Button 元素。 Xamarin.Forms 也會定義 Command 和 Command<T> 類別,這些類別會實 ICommand 作 介面,並協助 viewmodel 定義 型別 ICommand的屬性。
命令在命令介面一文中會更詳細地說明命令,但 ButtonDemos 範例中的 [基本按鈕命令] 頁面會顯示基本方法。
類別CommandDemoViewModel是一個非常簡單的 viewmodel,定義名為 Number類型的double屬性,以及名為 MultiplyBy2Command 和 DivideBy2Command類型的ICommand兩個屬性:
class CommandDemoViewModel : INotifyPropertyChanged
{
    double number = 1;

    public event PropertyChangedEventHandler PropertyChanged;

    public CommandDemoViewModel()
    {
        MultiplyBy2Command = new Command(() => Number *= 2);

        DivideBy2Command = new Command(() => Number /= 2);
    }

    public double Number
    {
        set
        {
            if (number != value)
            {
                number = value;
                PropertyChanged?.Invoke(this, new PropertyChangedEventArgs("Number"));
            }
        }
        get
        {
            return number;
        }
    }

    public ICommand MultiplyBy2Command { private set; get; }

    public ICommand DivideBy2Command { private set; get; }
}
這兩 ICommand 個屬性會在 類別的建構函式中初始化,並具有 兩個 型 Command別的物件。 建 Command 構函式包含一個小函式(稱為建 execute 構函式自變數),可將 屬性加倍或減半 Number 。
BasicButtonCommand.xaml 檔案會將其BindingContext設定為 的CommandDemoViewModel實例。 元素 Label 與兩 Button 個專案包含 中三個屬性的 CommandDemoViewModel系結:
<ContentPage xmlns="http://xamarin.com/schemas/2014/forms"
             xmlns:x="http://schemas.microsoft.com/winfx/2009/xaml"
             xmlns:local="clr-namespace:ButtonDemos"
             x:Class="ButtonDemos.BasicButtonCommandPage"
             Title="Basic Button Command">

    <ContentPage.BindingContext>
        <local:CommandDemoViewModel />
    </ContentPage.BindingContext>

    <StackLayout>
        <Label Text="{Binding Number, StringFormat='Value is now {0}'}"
               FontSize="Large"
               VerticalOptions="CenterAndExpand"
               HorizontalOptions="Center" />

        <Button Text="Multiply by 2"
                VerticalOptions="CenterAndExpand"
                HorizontalOptions="Center"
                Command="{Binding MultiplyBy2Command}" />

        <Button Text="Divide by 2"
                VerticalOptions="CenterAndExpand"
                HorizontalOptions="Center"
                Command="{Binding DivideBy2Command}" />
    </StackLayout>
</ContentPage>
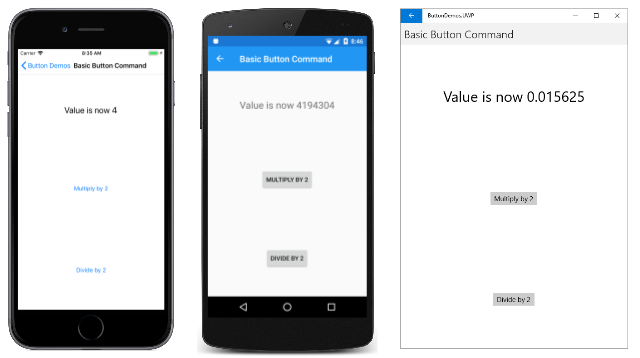
點選這兩 Button 個元素時,會執行命令,而數位會變更值:
此方法優於 Clicked 處理程式的優點是,與此頁面功能相關的所有邏輯都位於 viewmodel 中,而不是程式碼後置檔案中,因此能更好地區分使用者介面與商業規則。
物件也可以 Command 控制項目的啟用和停用 Button 。 例如,假設您想要限制介於 210 到 2–10 之間的數位值範圍。 您可以將另一個函式新增至建構函式(稱為 canExecute 自變數),以在應該啟用 時Button傳回 true 。 以下是對建構函式的 CommandDemoViewModel 修改:
class CommandDemoViewModel : INotifyPropertyChanged
{
    ···
    public CommandDemoViewModel()
    {
        MultiplyBy2Command = new Command(
            execute: () =>
            {
                Number *= 2;
                ((Command)MultiplyBy2Command).ChangeCanExecute();
                ((Command)DivideBy2Command).ChangeCanExecute();
            },
            canExecute: () => Number < Math.Pow(2, 10));

        DivideBy2Command = new Command(
            execute: () =>
            {
                Number /= 2;
                ((Command)MultiplyBy2Command).ChangeCanExecute();
                ((Command)DivideBy2Command).ChangeCanExecute();
            },
            canExecute: () => Number > Math.Pow(2, -10));
    }
    ···
}
對 方法Command的ChangeCanExecute呼叫是必要的,Command因此方法可以呼叫 canExecute 方法,並判斷是否Button應該停用 。 隨著此程式碼變更,當數字達到限制時, Button 會停用 :
有兩個以上的 Button 元素可以系結至相同的 ICommand 屬性。 元素Button可以使用 的Button屬性來區別CommandParameter。 在此情況下,您會想要使用泛型 Command<T> 類別。 然後,物件 CommandParameter 會當做 自變數傳遞至 execute 和 canExecute 方法。 這項技術會在命令介面一文的基本命令一節中詳細說明。
ButtonDemos 範例也會在其 MainPage 類別中使用這項技術。 MainPage.xaml 檔案包含Button範例每個頁面的 :
<ContentPage xmlns="http://xamarin.com/schemas/2014/forms"
             xmlns:x="http://schemas.microsoft.com/winfx/2009/xaml"
             xmlns:local="clr-namespace:ButtonDemos"
             x:Class="ButtonDemos.MainPage"
             Title="Button Demos">
    <ScrollView>
        <FlexLayout Direction="Column"
                    JustifyContent="SpaceEvenly"
                    AlignItems="Center">

            <Button Text="Basic Button Click"
                    Command="{Binding NavigateCommand}"
                    CommandParameter="{x:Type local:BasicButtonClickPage}" />

            <Button Text="Code Button Click"
                    Command="{Binding NavigateCommand}"
                    CommandParameter="{x:Type local:CodeButtonClickPage}" />

            <Button Text="Basic Button Command"
                    Command="{Binding NavigateCommand}"
                    CommandParameter="{x:Type local:BasicButtonCommandPage}" />

            <Button Text="Press and Release Button"
                    Command="{Binding NavigateCommand}"
                    CommandParameter="{x:Type local:PressAndReleaseButtonPage}" />

            <Button Text="Button Appearance"
                    Command="{Binding NavigateCommand}"
                    CommandParameter="{x:Type local:ButtonAppearancePage}" />

            <Button Text="Toggle Button Demo"
                    Command="{Binding NavigateCommand}"
                    CommandParameter="{x:Type local:ToggleButtonDemoPage}" />

            <Button Text="Image Button Demo"
                    Command="{Binding NavigateCommand}"
                    CommandParameter="{x:Type local:ImageButtonDemoPage}" />

        </FlexLayout>
    </ScrollView>
</ContentPage>
每個 Button 屬性 Command 都會系結至名為 NavigateCommand的屬性,且 CommandParameter 會設定為 對應至專案中其中一個 Type 頁面類別的物件。
該 NavigateCommand 屬性的類型為 ICommand ,且定義於程式代碼後置檔案中:
public partial class MainPage : ContentPage
{
    public MainPage()
    {
        InitializeComponent();

        NavigateCommand = new Command<Type>(async (Type pageType) =>
        {
            Page page = (Page)Activator.CreateInstance(pageType);
            await Navigation.PushAsync(page);
        });

        BindingContext = this;
    }

    public ICommand NavigateCommand { private set; get; }
}
建構函式會將 NavigateCommand 屬性初始化為 Command<Type> 對象,因為 Type 是 XAML 檔案中物件集的類型 CommandParameter 。 這表示execute方法具有對應至這個CommandParameter物件的 型Type別自變數。 函式會具現化頁面,然後流覽至頁面。
請注意,建構函式會藉由將建構函式設定為 BindingContext 本身來結束。 XAML 檔案中的屬性必須系結至 NavigateCommand 屬性。
按下並放開按鈕
除了 Clicked 事件,Button 也會定義 Pressed 和 Released 事件。 當 Pressed 手指按下 Button,或按下滑鼠按鈕時,會按下位於 上方的 Button指標時發生此事件。 放 Released 開手指或滑鼠按鈕時,就會發生此事件。 一般而言, Clicked 事件也會與 Released 事件同時引發,但如果手指或滑鼠指標在放開之前從表面 Button 滑出,則 Clicked 可能不會發生事件。
Pressed和 Released 事件不常使用,但可用於特殊用途,如 [新聞和釋放按鈕] 頁面中所示。 XAML 檔案包含 Label 和 ,其中包含和 Button 事件附加PressedReleased的處理程式:
<ContentPage xmlns="http://xamarin.com/schemas/2014/forms"
             xmlns:x="http://schemas.microsoft.com/winfx/2009/xaml"
             x:Class="ButtonDemos.PressAndReleaseButtonPage"
             Title="Press and Release Button">
    <StackLayout>

        <Label x:Name="label"
               Text="Press and hold the Button below"
               FontSize="Large"
               VerticalOptions="CenterAndExpand"
               HorizontalOptions="Center" />

        <Button Text="Press to Rotate Text!"
                VerticalOptions="CenterAndExpand"
                HorizontalOptions="Center"
                Pressed="OnButtonPressed"
                Released="OnButtonReleased" />

    </StackLayout>
</ContentPage>
程序代碼後置檔案會在 Label 事件發生時 Pressed 產生動畫效果,但在事件發生時 Released 暫停輪替:
public partial class PressAndReleaseButtonPage : ContentPage
{
    bool animationInProgress = false;
    Stopwatch stopwatch = new Stopwatch();

    public PressAndReleaseButtonPage ()
    {
        InitializeComponent ();
    }

    void OnButtonPressed(object sender, EventArgs args)
    {
        stopwatch.Start();
        animationInProgress = true;

        Device.StartTimer(TimeSpan.FromMilliseconds(16), () =>
        {
            label.Rotation = 360 * (stopwatch.Elapsed.TotalSeconds % 1);

            return animationInProgress;
        });
    }

    void OnButtonReleased(object sender, EventArgs args)
    {
        animationInProgress = false;
        stopwatch.Stop();
    }
}
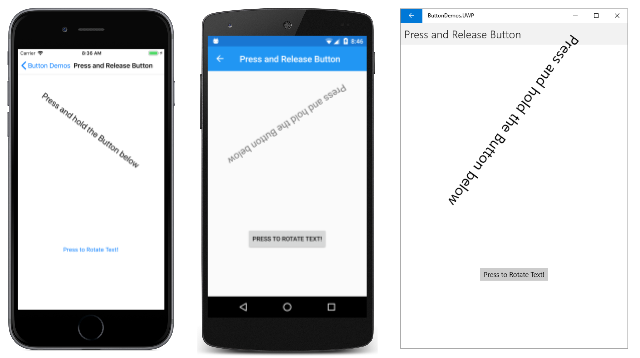
結果是 Label ,當手指與 Button接觸時,唯一旋轉,並在放開手指時停止:
這種行為具有遊戲的應用程式:按住的 Button 手指可能會使螢幕上的物件以特定方向移動。
按鈕外觀
會 Button 繼承或定義影響其外觀的數個屬性:
TextColor是文字的Button色彩BackgroundColor是該文字的背景色彩BorderColor是周圍區域的色彩ButtonFontFamily是用於文字的字型系列FontSize是文字的大小FontAttributes指出文字是否為斜體或粗體BorderWidth是框線的寬度CornerRadius是的圓角半徑ButtonCharacterSpacing是文字字元Button之間的間距。TextTransform會決定文字的大小Button寫。
這些屬性的六個效果(不包括 FontFamily 和 FontAttributes)會顯示在 [按鈕外觀 ] 頁面中。 另一個 屬性,Image會在使用位圖搭配按鈕一節中討論。
[按鈕外觀] 頁面中的所有檢視和數據系結都會定義在 XAML 檔案中:
<ContentPage xmlns="http://xamarin.com/schemas/2014/forms"
             xmlns:x="http://schemas.microsoft.com/winfx/2009/xaml"
             xmlns:local="clr-namespace:ButtonDemos"
             x:Class="ButtonDemos.ButtonAppearancePage"
             Title="Button Appearance">
    <StackLayout>
        <Button x:Name="button"
                Text="Button"
                VerticalOptions="CenterAndExpand"
                HorizontalOptions="Center"
                TextColor="{Binding Source={x:Reference textColorPicker},
                                    Path=SelectedItem.Color}"
                BackgroundColor="{Binding Source={x:Reference backgroundColorPicker},
                                          Path=SelectedItem.Color}"
                BorderColor="{Binding Source={x:Reference borderColorPicker},
                                      Path=SelectedItem.Color}" />

        <StackLayout BindingContext="{x:Reference button}"
                     Padding="10">

            <Slider x:Name="fontSizeSlider"
                    Maximum="48"
                    Minimum="1"
                    Value="{Binding FontSize}" />

            <Label Text="{Binding Source={x:Reference fontSizeSlider},
                                  Path=Value,
                                  StringFormat='FontSize = {0:F0}'}"
                   HorizontalTextAlignment="Center" />

            <Slider x:Name="borderWidthSlider"
                    Minimum="-1"
                    Maximum="12"
                    Value="{Binding BorderWidth}" />

            <Label Text="{Binding Source={x:Reference borderWidthSlider},
                                  Path=Value,
                                  StringFormat='BorderWidth = {0:F0}'}"
                   HorizontalTextAlignment="Center" />

            <Slider x:Name="cornerRadiusSlider"
                    Minimum="-1"
                    Maximum="24"
                    Value="{Binding CornerRadius}" />

            <Label Text="{Binding Source={x:Reference cornerRadiusSlider},
                                  Path=Value,
                                  StringFormat='CornerRadius = {0:F0}'}"
                   HorizontalTextAlignment="Center" />

            <Grid>
                <Grid.RowDefinitions>
                    <RowDefinition Height="Auto" />
                    <RowDefinition Height="Auto" />
                    <RowDefinition Height="Auto" />
                </Grid.RowDefinitions>

                <Grid.ColumnDefinitions>
                    <ColumnDefinition Width="*" />
                    <ColumnDefinition Width="*" />
                </Grid.ColumnDefinitions>

                <Grid.Resources>
                    <Style TargetType="Label">
                        <Setter Property="VerticalOptions" Value="Center" />
                    </Style>
                </Grid.Resources>

                <Label Text="Text Color:"
                       Grid.Row="0" Grid.Column="0" />

                <Picker x:Name="textColorPicker"
                        ItemsSource="{Binding Source={x:Static local:NamedColor.All}}"
                        ItemDisplayBinding="{Binding FriendlyName}"
                        SelectedIndex="0"
                        Grid.Row="0" Grid.Column="1" />

                <Label Text="Background Color:"
                       Grid.Row="1" Grid.Column="0" />

                <Picker x:Name="backgroundColorPicker"
                        ItemsSource="{Binding Source={x:Static local:NamedColor.All}}"
                        ItemDisplayBinding="{Binding FriendlyName}"
                        SelectedIndex="0"
                        Grid.Row="1" Grid.Column="1" />

                <Label Text="Border Color:"
                       Grid.Row="2" Grid.Column="0" />

                <Picker x:Name="borderColorPicker"
                        ItemsSource="{Binding Source={x:Static local:NamedColor.All}}"
                        ItemDisplayBinding="{Binding FriendlyName}"
                        SelectedIndex="0"
                        Grid.Row="2" Grid.Column="1" />
            </Grid>
        </StackLayout>
    </StackLayout>
</ContentPage>
Button頁面頂端的 ,其三Color個屬性會系結至Picker頁面底部的專案。 專案中的專案 Picker 是專案中所含類別的色彩 NamedColor 。 三 Slider 個元素包含 對 FontSize、 BorderWidth和 CornerRadius 屬性的 Button雙向系結。
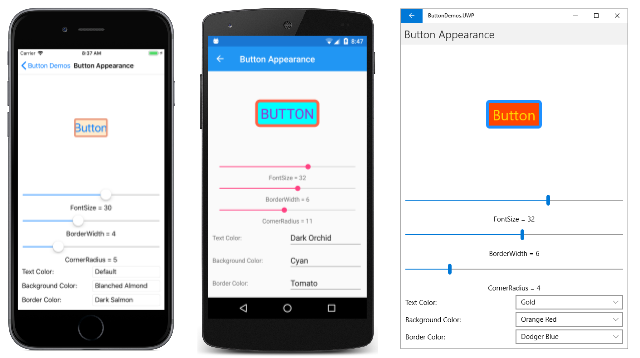
此程式可讓您實驗所有這些屬性的組合:
Button若要查看框線,您必須將 設定為 以外的Default專案,並將 BorderWidth 設定BorderColor為正值。
在 iOS 上,您會發現大型框線寬度會侵入 內部 Button ,並干擾文字的顯示。 如果您選擇使用與 iOS Button的框線,您可能會想要以空白開始和結束 Text 屬性,以保留其可見度。
在UWP上,選取 CornerRadius 超過一半高度的 Button 會引發例外狀況。
按鈕視覺狀態
ButtonPressedVisualState具有 ,可在使用者按下時起始視覺效果變更Button,前提是已啟用。
下列 XAML 範例示範如何定義狀態的 Pressed 視覺狀態:
<Button Text="Click me!"
        ...>
    <VisualStateManager.VisualStateGroups>
        <VisualStateGroup x:Name="CommonStates">
            <VisualState x:Name="Normal">
                <VisualState.Setters>
                    <Setter Property="Scale"
                            Value="1" />
                </VisualState.Setters>
            </VisualState>

            <VisualState x:Name="Pressed">
                <VisualState.Setters>
                    <Setter Property="Scale"
                            Value="0.8" />
                </VisualState.Setters>
            </VisualState>

        </VisualStateGroup>
    </VisualStateManager.VisualStateGroups>
</Button>
PressedVisualState指定按下 時Button,其 Scale 屬性會從預設值 1 變更為 0.8。 NormalVisualState指定 當 處於正常狀態時Button,其 Scale 屬性會設定為 1。 因此,整體效果是按下 時 Button ,會重新調整為稍微小一點,而釋放 時 Button ,它會重新調整為其預設大小。
如需視覺狀態的詳細資訊,請參閱 Xamarin.Forms Visual State Manager。
建立切換按鈕
子類別 Button 可以讓其運作就像關閉開關:點選按鈕一次,將按鈕切換為開啟,然後再次點選以將其關閉。
下列 ToggleButton 類別衍生自 Button ,並定義名為 Toggled 的新事件,以及名為 IsToggled的布爾值屬性。 這些是 所 Xamarin.FormsSwitch定義的兩個屬性:
class ToggleButton : Button
{
    public event EventHandler<ToggledEventArgs> Toggled;

    public static BindableProperty IsToggledProperty =
        BindableProperty.Create("IsToggled", typeof(bool), typeof(ToggleButton), false,
                                propertyChanged: OnIsToggledChanged);

    public ToggleButton()
    {
        Clicked += (sender, args) => IsToggled ^= true;
    }

    public bool IsToggled
    {
        set { SetValue(IsToggledProperty, value); }
        get { return (bool)GetValue(IsToggledProperty); }
    }

    protected override void OnParentSet()
    {
        base.OnParentSet();
        VisualStateManager.GoToState(this, "ToggledOff");
    }

    static void OnIsToggledChanged(BindableObject bindable, object oldValue, object newValue)
    {
        ToggleButton toggleButton = (ToggleButton)bindable;
        bool isToggled = (bool)newValue;

        // Fire event
        toggleButton.Toggled?.Invoke(toggleButton, new ToggledEventArgs(isToggled));

        // Set the visual state
        VisualStateManager.GoToState(toggleButton, isToggled ? "ToggledOn" : "ToggledOff");
    }
}
建 ToggleButton 構函式會將處理程式附加至 Clicked 事件,以便變更 屬性的值 IsToggled 。 方法 OnIsToggledChanged 會 Toggled 引發事件。
方法的最後一行 OnIsToggledChanged 會使用兩個文字字串 「ToggledOn」 和 「ToggledOff」 呼叫靜態 VisualStateManager.GoToState 方法。 您可以閱讀此方法,以及應用程式如何在 Visual State Manager 一文Xamarin.Forms中回應視覺狀態。
由於 ToggleButton 呼叫 VisualStateManager.GoToState,因此類別本身不需要包含任何其他設施,才能根據 IsToggled 按鈕的狀態變更按鈕的外觀。 這是裝載 之 ToggleButtonXAML 的責任。
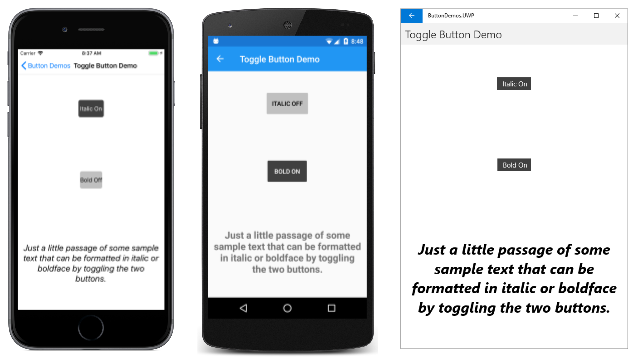
[ 切換按鈕示範 ] 頁面包含兩個 實例 ToggleButton,包括 Visual State Manager 標記,這些標記會根據視覺狀態設定 Text按鈕的 、 BackgroundColor和 TextColor :
<?xml version="1.0" encoding="utf-8" ?>
<ContentPage xmlns="http://xamarin.com/schemas/2014/forms"
             xmlns:x="http://schemas.microsoft.com/winfx/2009/xaml"
             xmlns:local="clr-namespace:ButtonDemos"
             x:Class="ButtonDemos.ToggleButtonDemoPage"
             Title="Toggle Button Demo">

    <ContentPage.Resources>
        <Style TargetType="local:ToggleButton">
            <Setter Property="VerticalOptions" Value="CenterAndExpand" />
            <Setter Property="HorizontalOptions" Value="Center" />
        </Style>
    </ContentPage.Resources>

    <StackLayout Padding="10, 0">
        <local:ToggleButton Toggled="OnItalicButtonToggled">
            <VisualStateManager.VisualStateGroups>
                <VisualStateGroup Name="ToggleStates">
                    <VisualState Name="ToggledOff">
                        <VisualState.Setters>
                            <Setter Property="Text" Value="Italic Off" />
                            <Setter Property="BackgroundColor" Value="#C0C0C0" />
                            <Setter Property="TextColor" Value="Black" />
                        </VisualState.Setters>
                    </VisualState>

                    <VisualState Name="ToggledOn">
                        <VisualState.Setters>
                            <Setter Property="Text" Value=" Italic On " />
                            <Setter Property="BackgroundColor" Value="#404040" />
                            <Setter Property="TextColor" Value="White" />
                        </VisualState.Setters>
                    </VisualState>
                </VisualStateGroup>
            </VisualStateManager.VisualStateGroups>
        </local:ToggleButton>

        <local:ToggleButton Toggled="OnBoldButtonToggled">
            <VisualStateManager.VisualStateGroups>
                <VisualStateGroup Name="ToggleStates">
                    <VisualState Name="ToggledOff">
                        <VisualState.Setters>
                            <Setter Property="Text" Value="Bold Off" />
                            <Setter Property="BackgroundColor" Value="#C0C0C0" />
                            <Setter Property="TextColor" Value="Black" />
                        </VisualState.Setters>
                    </VisualState>

                    <VisualState Name="ToggledOn">
                        <VisualState.Setters>
                            <Setter Property="Text" Value=" Bold On " />
                            <Setter Property="BackgroundColor" Value="#404040" />
                            <Setter Property="TextColor" Value="White" />
                        </VisualState.Setters>
                    </VisualState>
                </VisualStateGroup>
            </VisualStateManager.VisualStateGroups>
        </local:ToggleButton>

        <Label x:Name="label"
               Text="Just a little passage of some sample text that can be formatted in italic or boldface by toggling the two buttons."
               FontSize="Large"
               HorizontalTextAlignment="Center"
               VerticalOptions="CenterAndExpand" />

    </StackLayout>
</ContentPage>
Toggled事件處理程式位於程式代碼後置檔案中。 他們負責根據按鈕的狀態來設定 FontAttributes 的屬性 Label :
public partial class ToggleButtonDemoPage : ContentPage
{
    public ToggleButtonDemoPage ()
    {
        InitializeComponent ();
    }

    void OnItalicButtonToggled(object sender, ToggledEventArgs args)
    {
        if (args.Value)
        {
            label.FontAttributes |= FontAttributes.Italic;
        }
        else
        {
            label.FontAttributes &= ~FontAttributes.Italic;
        }
    }

    void OnBoldButtonToggled(object sender, ToggledEventArgs args)
    {
        if (args.Value)
        {
            label.FontAttributes |= FontAttributes.Bold;
        }
        else
        {
            label.FontAttributes &= ~FontAttributes.Bold;
        }
    }
}
以下是在 iOS、Android 和 UWP 上執行的程式:
搭配按鈕使用位圖
類別 Button 會 ImageSource 定義屬性,可讓您單獨或結合文字,在 上 Button顯示位圖影像。 您也可以指定文字和影像的排列方式。
屬性 ImageSource 的類型為 ImageSource,這表示位圖可以從檔案、內嵌資源、URI 或數據流載入。
注意
Button雖然 可以載入動畫 GIF,但它只會顯示 GIF 的第一個畫面。
支援 Xamarin.Forms 的每個平臺都允許針對應用程式可能執行之各種裝置的不同圖元解析度,以多個大小儲存影像。 這些多個點陣圖的命名或儲存方式,讓操作系統可以挑選最適合裝置的視訊顯示解析度。
針對上的 Button點陣圖,最佳大小通常介於 32 到 64 個裝置獨立單位之間,視您想要的大小而定。 此範例中使用的映像是以 48 個裝置獨立單位的大小為基礎。
在 iOS 專案中,[ 資源 ] 資料夾包含此影像的三種大小:
- 儲存為 /Resources/MonkeyFace.png 的 48 像素方形點陣圖
- 儲存為 /Resource/ 的 96 像素方形位圖MonkeyFace@2x.png
- 儲存為 /Resource/ 的 144 像素平方點陣圖MonkeyFace@3x.png
這三個位圖都得到了 BundleResource 的建置動作。
針對 Android 專案,位陣圖全都有相同的名稱,但它們會儲存在 Resources 資料夾的不同子資料夾中:
- 儲存為 /Resources/drawable-hdpi/MonkeyFace.png 的 72 像素方形位圖
- 儲存為 /Resources/drawable-xhdpi/MonkeyFace.png的 96 像素方形位圖
- 儲存為 /Resources/drawable-xxhdpi/MonkeyFace.png 的 144 像素方形位圖
- 儲存為 /Resources/drawable-xxxhdpi/MonkeyFace.png 的 192 像素平方位圖
這些已獲得AndroidResource的建置動作。
在UWP專案中,點陣圖可以儲存在專案中的任何位置,但通常會儲存在自定義資料夾或 Assets 現有資料夾。 UWP 專案包含下列點陣圖:
- 儲存為 /Assets/MonkeyFace.scale-100.png 的 48 像素方形點陣圖
- 儲存為 /Assets/MonkeyFace.scale-200.png 的 96 像素方形點陣圖
- 儲存為 /Assets/MonkeyFace.scale-400.png 的 192 像素方形點陣圖
他們全都獲得了內容建置動作。
您可以使用 的 屬性,Text指定 在 上ButtonContentLayout排列 和 ImageSource 屬性Button的方式。 這個屬性的類型為 ButtonContentLayout,這是 中的 Button內嵌類別。 建 構函式 有兩個自變數:
- 列舉的成員
ImagePosition:Left、Top、Right或 ,表示Bottom位圖相對於文字的顯示方式。 double位圖與文字之間的間距值。
預設值為 Left 和10個單位。 兩個具名Position的ButtonContentLayout唯讀屬性,並提供Spacing這些屬性的值。
在程式代碼中,您可以建立 Button 並設定 ContentLayout 屬性,如下所示:
Button button = new Button
{
    Text = "button text",
    ImageSource = new FileImageSource
    {
        File = "image filename"
    },
    ContentLayout = new Button.ButtonContentLayout(Button.ButtonContentLayout.ImagePosition.Right, 20)
};
在 XAML 中,您只需要指定列舉成員或間距,或以逗號分隔的任何順序兩者:
<Button Text="button text"
        ImageSource="image filename"
        ContentLayout="Right, 20" />
[ 影像按鈕示範 ] 頁面會使用 OnPlatform 來指定 iOS、Android 和 UWP 位圖檔案的不同檔名。 如果您要針對每個平臺使用相同的檔名,並避免使用 OnPlatform,您必須將 UWP 位圖儲存在專案的根目錄中。
[影像按鈕示範] 頁面上的第一個Button會設定 屬性,Image但不會設定 Text 屬性:
<Button>
    <Button.ImageSource>
        <OnPlatform x:TypeArguments="ImageSource">
            <On Platform="iOS, Android" Value="MonkeyFace.png" />
            <On Platform="UWP" Value="Assets/MonkeyFace.png" />
        </OnPlatform>
    </Button.ImageSource>
</Button>
如果 UWP 位陣圖儲存在專案的根目錄中,此標記可以大幅簡化:
<Button ImageSource="MonkeyFace.png" />
若要避免 ImageButtonDemo.xaml 檔案中的大量重複標記,也會定義隱含Style標記來設定 ImageSource 屬性。 這 Style 會自動套用至其他五個 Button 元素。 以下是完整的 XAML 檔案:
<ContentPage xmlns="http://xamarin.com/schemas/2014/forms"
             xmlns:x="http://schemas.microsoft.com/winfx/2009/xaml"
             x:Class="ButtonDemos.ImageButtonDemoPage">

    <FlexLayout Direction="Column"
                JustifyContent="SpaceEvenly"
                AlignItems="Center">

        <FlexLayout.Resources>
            <Style TargetType="Button">
                <Setter Property="ImageSource">
                    <OnPlatform x:TypeArguments="ImageSource">
                        <On Platform="iOS, Android" Value="MonkeyFace.png" />
                        <On Platform="UWP" Value="Assets/MonkeyFace.png" />
                    </OnPlatform>
                </Setter>
            </Style>
        </FlexLayout.Resources>

        <Button>
            <Button.ImageSource>
                <OnPlatform x:TypeArguments="ImageSource">
                    <On Platform="iOS, Android" Value="MonkeyFace.png" />
                    <On Platform="UWP" Value="Assets/MonkeyFace.png" />
                </OnPlatform>
            </Button.ImageSource>
        </Button>

        <Button Text="Default" />

        <Button Text="Left - 10"
                ContentLayout="Left, 10" />

        <Button Text="Top - 10"
                ContentLayout="Top, 10" />

        <Button Text="Right - 20"
                ContentLayout="Right, 20" />

        <Button Text="Bottom - 20"
                ContentLayout="Bottom, 20" />
    </FlexLayout>
</ContentPage>
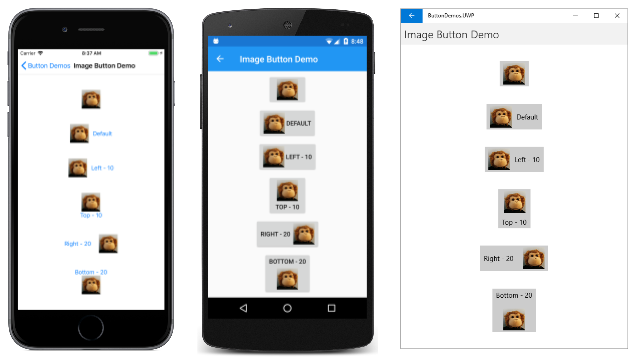
最後四 Button 個元素會使用 ContentLayout 屬性來指定文字和點陣圖的位置和間距:
您現在已看到各種方式可以處理 Button 事件並變更 Button 外觀。
 下載範例
下載範例