Azure Container Apps image pull with managed identity
You can pull images from private repositories in Microsoft Azure Container Registry using managed identities for authentication to avoid the use of administrative credentials. You can use a system-assigned or user-assigned managed identity to authenticate with Azure Container Registry.
With a system-assigned managed identity, the identity is created and managed by Azure Container Apps. The identity is tied to your container app and is deleted when your app is deleted. With a user-assigned managed identity, you create and manage the identity outside of Azure Container Apps. It can be assigned to multiple Azure resources, including Azure Container Apps.
Container Apps checks for a new version of the image whenever a container is started. In Docker or Kubernetes terminology, Container Apps sets each container's image pull policy to always.
This article describes how to use the Azure portal to configure your container app to use user-assigned and system-assigned managed identities to pull images from private Azure Container Registry repositories.
User-assigned managed identity
The following steps describe the process to configure your container app to use a user-assigned managed identity to pull images from private Azure Container Registry repositories.
- Create a container app with a public image.
- Add the user-assigned managed identity to the container app.
- Create a container app revision with a private image and the user-assigned managed identity.
Prerequisites
An Azure account with an active subscription.
- If you don't have one, you can create one for free.
A private Azure Container Registry containing an image you want to pull.
Your Azure Container Registry must allow ARM audience tokens for authentication in order to use managed identity to pull images. Use the following command to check if ARM tokens are allowed to access your ACR:
az acr config authentication-as-arm show -r <REGISTRY>If ARM tokens are disallowed, you can allow them with the following command:
az acr config authentication-as-arm update -r <REGISTRY> --status enabledCreate a user-assigned managed identity. For more information, see Create a user-assigned managed identity.
Create a container app
Use the following steps to create a container app with the default quickstart image.
Navigate to the portal Home page.
Search for Container Apps in the top search bar.
Select Container Apps in the search results.
Select the Create button.
In the Basics tab, do the following actions.
Setting Action Subscription Select your Azure subscription. Resource group Select an existing resource group or create a new one. Container app name Enter a container app name. Location Select a location. Create Container App Environment Create a new or select an existing environment. Select the Review + Create button at the bottom of the Create Container App page.
Select the Create button at the bottom of the Create Container App window.
Allow a few minutes for the container app deployment to finish. When deployment is complete, select Go to resource.
Add the user-assigned managed identity
- Select Identity from the left menu.
- Select the User assigned tab.
- Select the Add user assigned managed identity button.
- Select your subscription.
- Select the identity you created.
- Select Add.
Create a container app revision
Create a container app revision with a private image and the system-assigned managed identity.
Select Revision Management from the left menu.
Select Create new revision.
Select the container image from the Container Image table.
Enter the information in the Edit a container dialog.
Field Action Name Enter a name for the container. Image source Select Azure Container Registry. Authentication Select Managed Identity. Identity Select the identity you created from the drop-down menu. Registry Select the registry you want to use from the drop-down menu. Image Enter the name of the image you want to use. Image Tag Enter the name and tag of the image you want to pull. 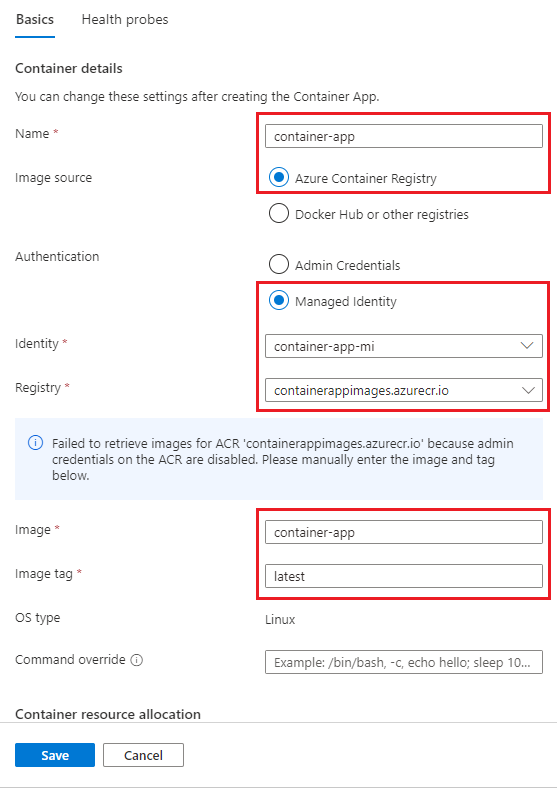
Note
If the administrative credentials are not enabled on your Azure Container Registry registry, you will see a warning message displayed and you will need to enter the image name and tag information manually.
Select Save.
Select Create from the Create and deploy new revision page.
A new revision will be created and deployed. The portal will automatically attempt to add the acrpull role to the user-assigned managed identity. If the role isn't added, you can add it manually.
You can verify that the role was added by checking the identity from the Identity pane of the container app page.
- Select Identity from the left menu.
- Select the User assigned tab.
- Select the user-assigned managed identity.
- Select Azure role assignments from the menu on the managed identity resource page.
- Verify that the
acrpullrole is assigned to the user-assigned managed identity.
Create a container app with a private image
If you don't want to start by creating a container app with a public image, you can also do the following.
- Create a user-assigned managed identity.
- Add the
acrpullrole to the user-assigned managed identity. - Create a container app with a private image and the user-assigned managed identity.
This method is typical in Infrastructure as Code (IaC) scenarios.
Clean up resources
If you're not going to continue to use this application, you can delete the Azure Container Apps instance and all the associated services by removing the resource group.
Warning
Deleting the resource group will delete all the resources in the group. If you have other resources in the group, they will also be deleted. If you want to keep the resources, you can delete the container app instance and the container app environment.
- Select your resource group from the Overview section.
- Select the Delete resource group button at the top of the resource group Overview.
- Enter the resource group name in the confirmation dialog.
- Select Delete.
The process to delete the resource group may take a few minutes to complete.
System-assigned managed identity
The method for configuring a system-assigned managed identity in the Azure portal is the same as configuring a user-assigned managed identity. The only difference is that you don't need to create a user-assigned managed identity. Instead, the system-assigned managed identity is created when you create the container app.
The method to configure a system-assigned managed identity in the Azure portal is:
- Create a container app with a public image.
- Create a container app revision with a private image and the system-assigned managed identity.
Prerequisites
- An Azure account with an active subscription.
- If you don't have one, you can create one for free.
- A private Azure Container Registry containing an image you want to pull. See Create a private Azure Container Registry.
Create a container app
Follow these steps to create a container app with the default quickstart image.
Navigate to the portal Home page.
Search for Container Apps in the top search bar.
Select Container Apps in the search results.
Select the Create button.
In the Basics tab, do the following actions.
Setting Action Subscription Select your Azure subscription. Resource group Select an existing resource group or create a new one. Container app name Enter a container app name. Location Select a location. Create Container App Environment Create a new or select an existing environment. Select the Review + Create button at the bottom of the Create Container App page.
Select the Create button at the bottom of the Create Container App page.
Allow a few minutes for the container app deployment to finish. When deployment is complete, select Go to resource.
Edit and deploy a revision
Edit the container to use the image from your private Azure Container Registry, and configure the authentication to use system-assigned identity.
The Containers from the side menu on the left.
Select Edit and deploy.
Select the simple-hello-world-container container from the list.
Setting Action Name Enter the container app name. Image source Select Azure Container Registry. Authentication Select Managed identity. Identity Select System assigned. Registry Enter the Registry name. Image Enter the image name. Image tag Enter the tag. 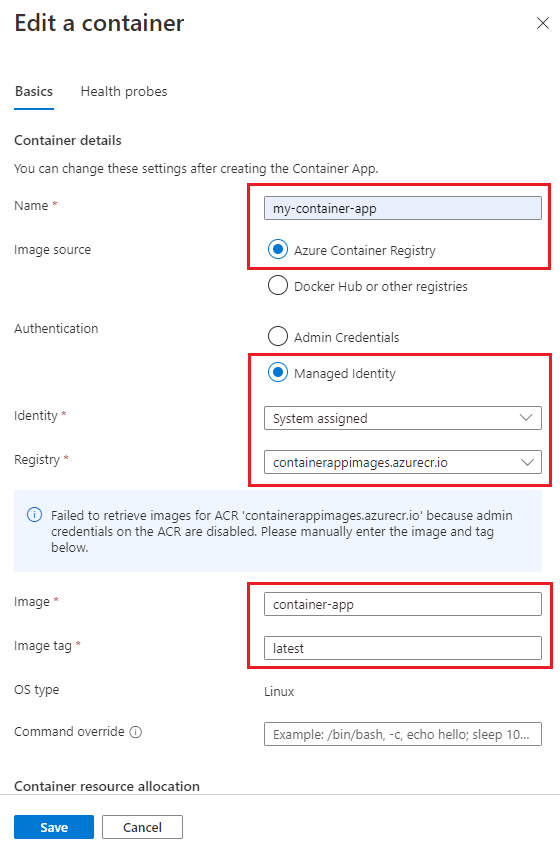
Note
If the administrative credentials are not enabled on your Azure Container Registry registry, you will see a warning message displayed and you will need to enter the image name and tag information manually.
Select Save at the bottom of the page.
Select Create at the bottom of the Create and deploy new revision page
After a few minutes, select Refresh on the Revision management page to see the new revision.
A new revision will be created and deployed. The portal will automatically attempt to add the acrpull role to the system-assigned managed identity. If the role isn't added, you can add it manually.
You can verify that the role was added by checking the identity in the Identity pane of the container app page.
- Select Identity from the left menu.
- Select the System assigned tab.
- Select Azure role assignments.
- Verify that the
acrpullrole is assigned to the system-assigned managed identity.
Clean up resources
If you're not going to continue to use this application, you can delete the Azure Container Apps instance and all the associated services by removing the resource group.
Warning
Deleting the resource group will delete all the resources in the group. If you have other resources in the group, they will also be deleted. If you want to keep the resources, you can delete the container app instance and the container app environment.
- Select your resource group from the Overview section.
- Select the Delete resource group button at the top of the resource group Overview.
- Enter the resource group name in the confirmation dialog.
- Select Delete.
The process to delete the resource group may take a few minutes to complete.
This article describes how to configure your container app to use managed identities to pull images from a private Azure Container Registry repository using Azure CLI and Azure PowerShell.
Prerequisites
| Prerequisite | Description |
|---|---|
| Azure account | An Azure account with an active subscription. If you don't have one, you can can create one for free. |
| Azure CLI | If using Azure CLI, install the Azure CLI on your local machine. |
| Azure PowerShell | If using PowerShell, install the Azure PowerShell on your local machine. Ensure that the latest version of the Az.App module is installed by running the command Install-Module -Name Az.App. |
| Azure Container Registry | A private Azure Container Registry containing an image you want to pull. Quickstart: Create a private container registry using the Azure CLI or Quickstart: Create a private container registry using Azure PowerShell |
Setup
First, sign in to Azure from the CLI or PowerShell. Run the following command, and follow the prompts to complete the authentication process.
az login
Install the Azure Container Apps extension for the CLI.
az extension add --name containerapp --upgrade
Now that the current extension or module is installed, register the Microsoft.App namespace and the Microsoft.OperationalInsights provider if you haven't register them before.
az provider register --namespace Microsoft.App
az provider register --namespace Microsoft.OperationalInsights
Next, set the following environment variables. Replace the <PLACEHOLDERS> with your own values.
RESOURCE_GROUP="<YOUR_RESOURCE_GROUP_NAME>"
LOCATION="<YOUR_LOCATION>"
CONTAINERAPPS_ENVIRONMENT="<YOUR_ENVIRONMENT_NAME>"
REGISTRY_NAME="<YOUR_REGISTRY_NAME>"
CONTAINERAPP_NAME="<YOUR_CONTAINERAPP_NAME>"
IMAGE_NAME="<YOUR_IMAGE_NAME>"
If you already have a resource group, skip this step. Otherwise, create a resource group.
az group create \
  --name $RESOURCE_GROUP \
  --location $LOCATION
Create a container app environment
If the environment doesn't exist, run the following command:
To create the environment, run the following command:
az containerapp env create \
  --name $CONTAINERAPPS_ENVIRONMENT \
  --resource-group $RESOURCE_GROUP \
  --location $LOCATION
Continue to the next section to configure user-assigned managed identity or skip to the System-assigned managed identity section.
User-assigned managed identity
Follow this procedure to configure user-assigned managed identity:
- Create a user-assigned managed identity.
- If you're using PowerShell, assign a
acrpullrole for your registry to the managed identity. The Azure CLI automatically makes this assignment. - Create a container app with the image from the private registry that is authenticated with the user-assigned managed identity.
Create a user-assigned managed identity
Create a user-assigned managed identity. Replace the <PLACEHOLDERS> with the name of your managed identity.
IDENTITY="<YOUR_IDENTITY_NAME>"
az identity create \
  --name $IDENTITY \
  --resource-group $RESOURCE_GROUP
Get identity's resource ID.
IDENTITY_ID=`az identity show \
  --name $IDENTITY \
  --resource-group $RESOURCE_GROUP \
  --query id`
Create a container app
Create your container app with your image from the private registry authenticated with the identity.
Copy the identity's resource ID to paste into the <IDENTITY_ID> placeholders in the command below. If your image tag isn't latest, replace 'latest' with your tag.
echo $IDENTITY_ID
az containerapp create \
  --name $CONTAINERAPP_NAME \
  --resource-group $RESOURCE_GROUP \
  --environment $CONTAINERAPPS_ENVIRONMENT \
  --user-assigned <IDENTITY_ID> \
  --registry-identity <IDENTITY_ID> \
  --registry-server "$REGISTRY_NAME.azurecr.io" \
  --image "$REGISTRY_NAME.azurecr.io/$IMAGE_NAME:latest"
Clean up
Caution
The following command deletes the specified resource group and all resources contained within it. If resources outside the scope of this quickstart exist in the specified resource group, they will also be deleted.
az group delete --name $RESOURCE_GROUP
System-assigned managed identity
To configure a system-assigned identity, you'll need to:
- Create a container app with a public image.
- Assign a system-assigned managed identity to the container app.
- Update the container app with the private image.
Create a container app
Create a container with a public image.
az containerapp create \
  --name $CONTAINERAPP_NAME \
  --resource-group $RESOURCE_GROUP \
  --environment $CONTAINERAPPS_ENVIRONMENT \
  --image mcr.microsoft.com/k8se/quickstart:latest \
  --target-port 80 \
  --ingress external
Update the container app
Update the container app with the image from your private container registry and add a system-assigned identity to authenticate the Azure Container Registry pull. You can also include other settings necessary for your container app, such as ingress, scale and Dapr settings.
Set the registry server and turn on system-assigned managed identity in the container app.
az containerapp registry set \
  --name $CONTAINERAPP_NAME \
  --resource-group $RESOURCE_GROUP \
  --identity system \
  --server "$REGISTRY_NAME.azurecr.io"
az containerapp update \
  --name $CONTAINERAPP_NAME \
  --resource-group $RESOURCE_GROUP \
  --image "$REGISTRY_NAME.azurecr.io/$IMAGE_NAME:latest"
Clean up
Caution
The following command deletes the specified resource group and all resources contained within it. If resources outside the scope of this quickstart exist in the specified resource group, they will also be deleted.
az group delete --name $RESOURCE_GROUP
Next steps
Feedback
Coming soon: Throughout 2024 we will be phasing out GitHub Issues as the feedback mechanism for content and replacing it with a new feedback system. For more information see: https://aka.ms/ContentUserFeedback.
Submit and view feedback for