Move an Azure Cosmos DB account to another region
APPLIES TO:
![]() NoSQL
NoSQL
![]() MongoDB
MongoDB
![]() Cassandra
Cassandra
![]() Gremlin
Gremlin
![]() Table
Table
This article describes how to either:
- Move a region where data is replicated in Azure Cosmos DB.
- Migrate account (Azure Resource Manager) metadata and data from one region to another.
Move data from one region to another
Azure Cosmos DB supports data replication natively, so moving data from one region to another is simple. You can accomplish it by using the Azure portal, Azure PowerShell, or the Azure CLI. It involves the following steps:
Add a new region to the account.
To add a new region to an Azure Cosmos DB account, see Add/remove regions to an Azure Cosmos DB account.
Perform a manual failover to the new region.
When the region that's being removed is currently the write region for the account, you'll need to start a failover to the new region added in the previous step. This is a zero-downtime operation. If you're moving a read region in a multiple-region account, you can skip this step.
To start a failover, see Perform manual failover on an Azure Cosmos DB account.
Remove the original region.
To remove a region from an Azure Cosmos DB account, see Add/remove regions from your Azure Cosmos DB account.
Note
If you perform a failover operation or add/remove a new region while an asynchronous throughput scaling operation is in progress, the throughput scale-up operation will be paused. It will resume automatically when the failover or add/remove region operation is complete.
Migrate Azure Cosmos DB account metadata
Azure Cosmos DB does not natively support migrating account metadata from one region to another. To migrate both the account metadata and customer data from one region to another, you must create a new account in the desired region and then copy the data manually.
Important
It is not necessary to migrate the account metadata if the data is stored or moved to a different region. The region in which the account metadata resides has no impact on the performance, security or any other operational aspects of your Azure Cosmos DB account.
A near-zero-downtime migration for the API for NoSQL requires the use of the change feed or a tool that uses it.
The following steps demonstrate how to migrate an Azure Cosmos DB account for the API for NoSQL and its data from one region to another:
Create a new Azure Cosmos DB account in the desired region.
To create a new account via the Azure portal, PowerShell, or the Azure CLI, see Create an Azure Cosmos DB account.
Create a new database and container.
To create a new database and container, see Create an Azure Cosmos DB container.
Migrate data by using the Azure Cosmos DB Spark Connector live migration sample.
To migrate data with near zero downtime, see Live Migrate Azure Cosmos DB SQL API Containers data with Spark Connector.
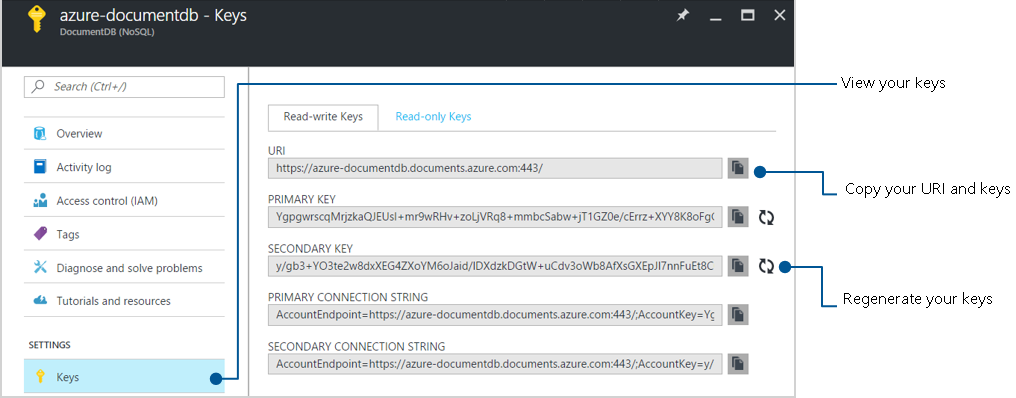
Update the application connection string.
With the Live Data Migration sample still running, update the connection information in the new deployment of your application. You can retrieve the endpoints and keys for your application from the Azure portal.
Redirect requests to the new application.
After the new application is connected to Azure Cosmos DB, you can redirect client requests to your new deployment.
Delete any resources that you no longer need.
With requests now fully redirected to the new instance, you can delete the old Azure Cosmos DB account and stop the Live Data Migrator sample.
Next steps
For more information and examples on how to manage the Azure Cosmos DB account as well as databases and containers, read the following articles:
Feedback
Coming soon: Throughout 2024 we will be phasing out GitHub Issues as the feedback mechanism for content and replacing it with a new feedback system. For more information see: https://aka.ms/ContentUserFeedback.
Submit and view feedback for