Tutorial: Build a Node.js web app by using the JavaScript SDK to manage an API for NoSQL account in Azure Cosmos DB
APPLIES TO: ![]() NoSQL
NoSQL
As a developer, you might have applications that use NoSQL document data. You can use an API for NoSQL account in Azure Cosmos DB to store and access this document data. This Node.js tutorial shows you how to store and access data from an API for NoSQL account in Azure Cosmos DB. The tutorial uses a Node.js Express application that's hosted on the Web Apps feature of Microsoft Azure App Service. In this tutorial, you build a web-based application (Todo app) that allows you to create, retrieve, and complete tasks. The tasks are stored as JSON documents in Azure Cosmos DB.
This tutorial demonstrates how to create an API for NoSQL account in Azure Cosmos DB by using the Azure portal. Without a credit card or an Azure subscription, you can:
- Set up a free Try Azure Cosmos DB account.
- Build and run a web app that's built on the Node.js SDK to create a database and container.
- Add items to the container.
This tutorial uses JavaScript SDK version 3.0 and covers the following tasks:
- Create an Azure Cosmos DB account
- Create a new Node.js application
- Connect the application to Azure Cosmos DB
- Run and deploy the application to Azure
Prerequisites
Before following the instructions in this article, ensure that you have the following resources:
Without an Azure subscription, a credit card, or an Azure subscription, you can set up a free Try Azure Cosmos DB account.
You can try Azure Cosmos DB for free, without an Azure subscription, and with no commitment required. Alternatively, you can create an Azure Cosmos DB free tier account, with the first 1000 RU/s and 25 GB of storage for free. You can also use the Azure Cosmos DB emulator with a URI of
https://localhost:8081. For the key to use with the emulator, see Authenticating requests.Node.js version 6.10 or higher.
Express generator (you can install Express via
npm install express-generator -g)Install Git on your local workstation.
Create an Azure Cosmos DB account
Start by creating an Azure Cosmos DB account. If you already have an account or if you use the Azure Cosmos DB Emulator for this tutorial, you can skip to Create a new Node.js application.
From the Azure portal menu or the Home page, select Create a resource.
Search for Azure Cosmos DB. Select Create > Azure Cosmos DB.
On the Create an Azure Cosmos DB account page, select the Create option within the Azure Cosmos DB for NoSQL section.
Azure Cosmos DB provides several APIs:
- NoSQL, for document data
- PostgreSQL
- MongoDB, for document data
- Apache Cassandra
- Table
- Apache Gremlin, for graph data
To learn more about the API for NoSQL, see Welcome to Azure Cosmos DB.
In the Create Azure Cosmos DB Account page, enter the basic settings for the new Azure Cosmos DB account.
Setting Value Description Subscription Subscription name Select the Azure subscription that you want to use for this Azure Cosmos DB account. Resource Group Resource group name Select a resource group, or select Create new, then enter a unique name for the new resource group. Account Name A unique name Enter a name to identify your Azure Cosmos DB account. Because documents.azure.com is appended to the name that you provide to create your URI, use a unique name. The name can contain only lowercase letters, numbers, and the hyphen (-) character. It must be 3-44 characters. Location The region closest to your users Select a geographic location to host your Azure Cosmos DB account. Use the location that is closest to your users to give them the fastest access to the data. Capacity mode Provisioned throughput or Serverless Select Provisioned throughput to create an account in provisioned throughput mode. Select Serverless to create an account in serverless mode. Apply Azure Cosmos DB free tier discount Apply or Do not apply With Azure Cosmos DB free tier, you get the first 1000 RU/s and 25 GB of storage for free in an account. Learn more about free tier. Limit total account throughput Selected or not Limit the total amount of throughput that can be provisioned on this account. This limit prevents unexpected charges related to provisioned throughput. You can update or remove this limit after your account is created. You can have up to one free tier Azure Cosmos DB account per Azure subscription and must opt in when creating the account. If you don't see the option to apply the free tier discount, another account in the subscription has already been enabled with free tier.

Note
The following options are not available if you select Serverless as the Capacity mode:
- Apply Free Tier Discount
- Limit total account throughput
In the Global Distribution tab, configure the following details. You can leave the default values for this quickstart:
Setting Value Description Geo-Redundancy Disable Enable or disable global distribution on your account by pairing your region with a pair region. You can add more regions to your account later. Multi-region Writes Disable Multi-region writes capability allows you to take advantage of the provisioned throughput for your databases and containers across the globe. Availability Zones Disable Availability Zones help you further improve availability and resiliency of your application. Note
The following options are not available if you select Serverless as the Capacity mode in the previous Basics page:
- Geo-redundancy
- Multi-region Writes
Optionally, you can configure more details in the following tabs:
- Networking. Configure access from a virtual network.
- Backup Policy. Configure either periodic or continuous backup policy.
- Encryption. Use either service-managed key or a customer-managed key.
- Tags. Tags are name/value pairs that enable you to categorize resources and view consolidated billing by applying the same tag to multiple resources and resource groups.
Select Review + create.
Review the account settings, and then select Create. It takes a few minutes to create the account. Wait for the portal page to display Your deployment is complete.

Select Go to resource to go to the Azure Cosmos DB account page.


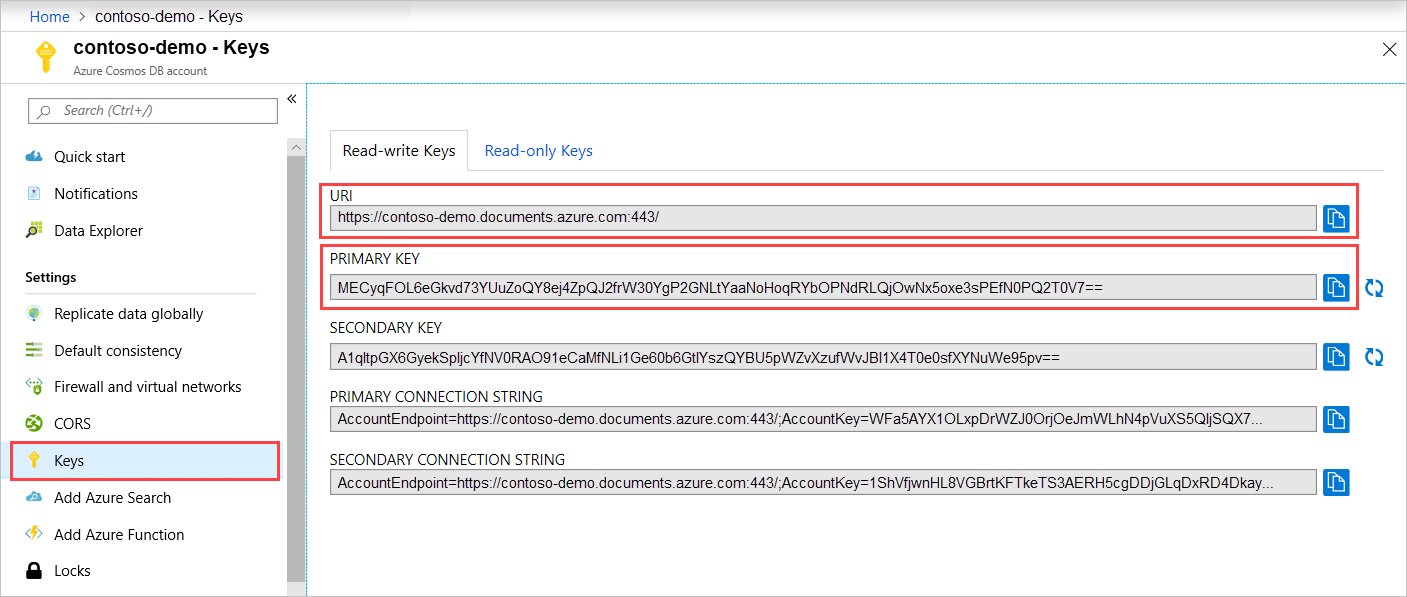
Go to the Azure Cosmos DB account page, and select Keys. Copy the values to use in the web application you create next.
Create a new Node.js application
Now, learn how create a basic Hello World Node.js project by using the Express framework.
Open your favorite terminal, such as the Node.js command prompt.
Navigate to the directory in which you'd like to store the new application.
Use the express generator to generate a new application called todo.
express todoOpen the todo directory and install dependencies.
cd todo
npm install
Run the new application.
npm startTo view your new application in a browser, go to
http://localhost:3000.
Stop the application by using CTRL+C in the terminal window, and select y to terminate the batch job.
Install the required modules
The package.json file is one of the files created in the root of the project. This file contains a list of other modules that are required for your Node.js application. When you deploy this application to Azure, this file is used to determine which modules should be installed on Azure to support your application. Install two more packages for this tutorial.
Install the @azure/cosmos module via npm.
npm install @azure/cosmos
Connect the Node.js application to Azure Cosmos DB
After you've completed the initial setup and configuration, learn how to write the code that the todo application requires to communicate with Azure Cosmos DB.
Create the model
At the root of your project directory, create a new directory named models.
In the models directory, create a new file named taskDao.js. This file contains code required to create the database and container. It also defines methods to read, update, create, and find tasks in Azure Cosmos DB.
Copy the following code into the taskDao.js file:
 // @ts-check
 const CosmosClient = require('@azure/cosmos').CosmosClient
 const debug = require('debug')('todo:taskDao')

 // For simplicity we'll set a constant partition key
 const partitionKey = undefined
 class TaskDao {
   /**
    * Manages reading, adding, and updating Tasks in Azure Cosmos DB
    * @param {CosmosClient} cosmosClient
    * @param {string} databaseId
    * @param {string} containerId
    */
   constructor(cosmosClient, databaseId, containerId) {
     this.client = cosmosClient
     this.databaseId = databaseId
     this.collectionId = containerId

     this.database = null
     this.container = null
   }

   async init() {
     debug('Setting up the database...')
     const dbResponse = await this.client.databases.createIfNotExists({
       id: this.databaseId
     })
     this.database = dbResponse.database
     debug('Setting up the database...done!')
     debug('Setting up the container...')
     const coResponse = await this.database.containers.createIfNotExists({
       id: this.collectionId
     })
     this.container = coResponse.container
     debug('Setting up the container...done!')
   }

   async find(querySpec) {
     debug('Querying for items from the database')
     if (!this.container) {
       throw new Error('Collection is not initialized.')
     }
     const { resources } = await this.container.items.query(querySpec).fetchAll()
     return resources
   }

   async addItem(item) {
     debug('Adding an item to the database')
     item.date = Date.now()
     item.completed = false
     const { resource: doc } = await this.container.items.create(item)
     return doc
   }

   async updateItem(itemId) {
     debug('Update an item in the database')
     const doc = await this.getItem(itemId)
     doc.completed = true

     const { resource: replaced } = await this.container
       .item(itemId, partitionKey)
       .replace(doc)
     return replaced
   }

   async getItem(itemId) {
     debug('Getting an item from the database')
     const { resource } = await this.container.item(itemId, partitionKey).read()
     return resource
   }
 }

 module.exports = TaskDao
Save and close the taskDao.js file.
Create the controller
In the routes directory of your project, create a new file named tasklist.js.
Add the following code to tasklist.js. This code loads the CosmosClient and async modules, which are used by tasklist.js. This code also defines the TaskList class, which is passed as an instance of the TaskDao object we defined earlier:
 const TaskDao = require("../models/TaskDao");

 class TaskList {
   /**
    * Handles the various APIs for displaying and managing tasks
    * @param {TaskDao} taskDao
    */
   constructor(taskDao) {
     this.taskDao = taskDao;
   }
   async showTasks(req, res) {
     const querySpec = {
       query: "SELECT * FROM root r WHERE r.completed=@completed",
       parameters: [
         {
           name: "@completed",
           value: false
         }
       ]
     };

     const items = await this.taskDao.find(querySpec);
     res.render("index", {
       title: "My ToDo List ",
       tasks: items
     });
   }

   async addTask(req, res) {
     const item = req.body;

     await this.taskDao.addItem(item);
     res.redirect("/");
   }

   async completeTask(req, res) {
     const completedTasks = Object.keys(req.body);
     const tasks = [];

     completedTasks.forEach(task => {
       tasks.push(this.taskDao.updateItem(task));
     });

     await Promise.all(tasks);

     res.redirect("/");
   }
 }

 module.exports = TaskList;
Save and close the tasklist.js file.
Add config.js
At the root of your project directory, create a new file named config.js.
Add the following code to config.js file. This code defines configuration settings and values needed for our application.
const config = {};

config.host = process.env.HOST || "[the endpoint URI of your Azure Cosmos DB account]";
config.authKey =
  process.env.AUTH_KEY || "[the PRIMARY KEY value of your Azure Cosmos DB account";
config.databaseId = "ToDoList";
config.containerId = "Items";

if (config.host.includes("https://localhost:")) {
  console.log("Local environment detected");
  console.log("WARNING: Disabled checking of self-signed certs. Do not have this code in production.");
  process.env.NODE_TLS_REJECT_UNAUTHORIZED = "0";
  console.log(`Go to http://localhost:${process.env.PORT || '3000'} to try the sample.`);
}

module.exports = config;
In the config.js file, update the values of HOST and AUTH_KEY by using the values found in the Keys page of your Azure Cosmos DB account on the Azure portal.
Save and close the config.js file.
Modify app.js
In the project directory, open the app.js file. This file was created earlier when the Express web application was created.
Add the following code to the app.js file. This code defines the config file to be used and loads the values into some variables that you'll use in the next sections.
 const CosmosClient = require('@azure/cosmos').CosmosClient
 const config = require('./config')
 const TaskList = require('./routes/tasklist')
 const TaskDao = require('./models/taskDao')

 const express = require('express')
 const path = require('path')
 const logger = require('morgan')
 const cookieParser = require('cookie-parser')
 const bodyParser = require('body-parser')

 const app = express()

 // view engine setup
 app.set('views', path.join(__dirname, 'views'))
 app.set('view engine', 'jade')

 // uncomment after placing your favicon in /public
 //app.use(favicon(path.join(__dirname, 'public', 'favicon.ico')));
 app.use(logger('dev'))
 app.use(bodyParser.json())
 app.use(bodyParser.urlencoded({ extended: false }))
 app.use(cookieParser())
 app.use(express.static(path.join(__dirname, 'public')))

 //Todo App:
 const cosmosClient = new CosmosClient({
   endpoint: config.host,
   key: config.authKey
 })
 const taskDao = new TaskDao(cosmosClient, config.databaseId, config.containerId)
 const taskList = new TaskList(taskDao)
 taskDao
   .init(err => {
     console.error(err)
   })
   .catch(err => {
     console.error(err)
     console.error(
       'Shutting down because there was an error settinig up the database.'
     )
     process.exit(1)
   })

 app.get('/', (req, res, next) => taskList.showTasks(req, res).catch(next))
 app.post('/addtask', (req, res, next) => taskList.addTask(req, res).catch(next))
 app.post('/completetask', (req, res, next) =>
   taskList.completeTask(req, res).catch(next)
 )
 app.set('view engine', 'jade')

 // catch 404 and forward to error handler
 app.use(function(req, res, next) {
   const err = new Error('Not Found')
   err.status = 404
   next(err)
 })

 // error handler
 app.use(function(err, req, res, next) {
   // set locals, only providing error in development
   res.locals.message = err.message
   res.locals.error = req.app.get('env') === 'development' ? err : {}

   // render the error page
   res.status(err.status || 500)
   res.render('error')
 })

 module.exports = app
Finally, save and close the app.js file.
Build a user interface
Now build the user interface so that a user can interact with the application. The Express application you created in the previous sections uses Jade as the view engine.
The layout.jade file in the views directory is used as a global template for other .jade files. In this step, you modify it to use Twitter Bootstrap, which is a toolkit used to design a website.
Open the layout.jade file found in the views folder and replace the contents with the following code:
doctype html
html
  head
    title= title
    link(rel='stylesheet', href='//ajax.aspnetcdn.com/ajax/bootstrap/3.3.2/css/bootstrap.min.css')
    link(rel='stylesheet', href='/stylesheets/style.css')
  body
    nav.navbar.navbar-inverse.navbar-fixed-top
      div.navbar-header
        a.navbar-brand(href='#') My Tasks
    block content
    script(src='//ajax.aspnetcdn.com/ajax/jQuery/jquery-1.11.2.min.js')
    script(src='//ajax.aspnetcdn.com/ajax/bootstrap/3.3.2/bootstrap.min.js')
This code tells the Jade engine to render some HTML for the application and creates a block called content where you can supply the layout for the content pages. Save and close the layout.jade file.
Open the index.jade file, the view used by the application. Replace the content of the file with the following code:
extends layout
block content
     h1 #{title}
     br

     form(action="/completetask", method="post")
      table.table.table-striped.table-bordered
         tr
           td Name
           td Category
           td Date
           td Complete
         if (typeof tasks === "undefined")
           tr
             td
         else
           each task in tasks
             tr
               td #{task.name}
               td #{task.category}
               - var date  = new Date(task.date);
               - var day   = date.getDate();
               - var month = date.getMonth() + 1;
               - var year  = date.getFullYear();
               td #{month + "/" + day + "/" + year}
               td
                if(task.completed)
                 input(type="checkbox", name="#{task.id}", value="#{!task.completed}", checked=task.completed)
                else
                 input(type="checkbox", name="#{task.id}", value="#{!task.completed}", checked=task.completed)
       button.btn.btn-primary(type="submit") Update tasks
     hr
     form.well(action="/addtask", method="post")
       label Item Name:
       input(name="name", type="textbox")
       label Item Category:
       input(name="category", type="textbox")
       br
       button.btn(type="submit") Add item
This code extends layout and provides content for the content placeholder you saw in the layout.jade file. In that layout, you created two HTML forms.
The first form contains a table for your data and a button that allows you to update items by posting to the /completeTask method of the controller.
The second form contains two input fields and a button that allows you to create a new item by posting to the /addtask method of the controller, which is all you need for the application to work.
Run your application locally
After you've built the application, you can run it locally by using the following steps:
To test the application on your local machine, run
npm startin the terminal to start your application, and then refresh thehttp://localhost:3000page. The page should now look like the following screenshot:
Tip
If you receive an error about the indent in the layout.jade file or the index.jade file, ensure that the first two lines in both files are left-justified, with no spaces. If there are spaces before the first two lines, remove them, save both files, and then refresh your browser window.
Use the Item Name and Item Category fields to enter a new task, and then select Add Item to create a document in Azure Cosmos DB with those properties.
The page updates to display the newly created item in the ToDo list.

To complete a task, select the check box in the Complete column, and then select Update tasks to update the document you already created and remove it from the view.
To stop the application, press CTRL+C in the terminal window and then select y to terminate the batch job.
Deploy your application to App Service
After your application succeeds locally, you can deploy it to Azure App Service. In the terminal, make sure you're in the todo app directory. Deploy the code in your local folder (todo) by using the following az webapp up command:
az webapp up --sku F1 --name <app-name>
Replace <app_name> with a name that's unique across all of Azure (valid characters are a-z, 0-9, and -). A good pattern is to use a combination of your company name and an app identifier. To learn more about the app deployment, see Node.js app deployment in Azure.
The command might take a few minutes to complete. The command provides messages about creating the resource group, the App Service plan, and the app resource, configuring logging and doing ZIP deployment. The command provides these messages while running. It then gives you a URL to launch the app at http://<app-name>.azurewebsites.net, which is the app's URL on Azure.
Clean up resources
When these resources are no longer needed, you can delete the resource group, the Azure Cosmos DB account, and all the related resources. To do so, select the resource group that you used for the Azure Cosmos DB account, select Delete, and then confirm the name of the resource group to delete.
Next steps
You can use information about your existing database cluster for capacity planning.
Feedback
Coming soon: Throughout 2024 we will be phasing out GitHub Issues as the feedback mechanism for content and replacing it with a new feedback system. For more information see: https://aka.ms/ContentUserFeedback.
Submit and view feedback for