Bring a Linux custom image from a physical lab environment to Azure Lab Services
This article describes how to import a Linux-based custom image from a physical lab environment for creating a lab in Azure Lab Services.
Azure supports various distributions and versions. The steps to bring a custom Linux image from a VHD varies for each distribution. Every distribution is different because each one has unique prerequisites for running on Azure.
In this article, you bring a custom Ubuntu 18.04\20.04 image from a VHD. For information on using a VHD to create custom images for other distributions, see Generic steps for Linux distributions.
The import process consists of the following steps:
- Create a virtual hard drive (VHD) from your physical environment
- Import the VHD into an Azure compute gallery
- Attach the compute gallery to your lab plan
- Create a lab based by using the image in the compute gallery
Before you import an image from a physical lab, learn more about recommended approaches for creating custom images.
Prerequisites
Your Azure account has permission to create an Azure managed disk. Learn about the Azure RBAC roles you need to create a managed disk.
Restructure each virtual machine image so that it only includes the software that is needed for a lab's class. Learn more about moving from a Physical Lab to Azure Lab Services.
Prepare a custom image by using Hyper-V Manager
First, create a virtual hard disk (VHD) for the physical environment. The following steps show how to create an Ubuntu 18.04\20.04 image from a Hyper-V virtual machine (VM) by using Windows Hyper-V Manager.
Download the official Linux Ubuntu Server image to the Windows host machine that you use to set up the custom image on a Hyper-V VM.
If you're using Ubuntu 18.04 LTS, we recommend using an image that does not have the GNOME or MATE graphical desktops installed. GNOME and MATE currently have a networking conflict with the Azure Linux Agent, which is needed for the image to work properly in Azure Lab Services. Instead, use an Ubuntu Server image and install a different graphical desktop, such as XFCE. Another option is to install GNOME\MATE using a lab's template VM.
Ubuntu also publishes prebuilt Azure VHDs for download. These VHDs are intended for creating custom images from a Linux host machine and hypervisor, such as KVM. These VHDs require that you first set the default user password, which can only be done by using Linux tooling, such as qemu. As a result, when you create a custom image by using Windows Hyper-V, you're not able to connect to these VHDs to make image customizations. For more information about the prebuilt Azure VHDs, read Ubuntu's documentation.
Create a Hyper-V virtual machine in your physical lab environment based on your custom image.
The VM must be created as a Generation 1 VM.
Use the Default Switch network configuration option to allow the VM to connect to the internet.
The VM's virtual disk must be a fixed size VHD. The disk size must not be greater than 128 GB. When you create the VM, enter the size of the disk as shown in the below image.
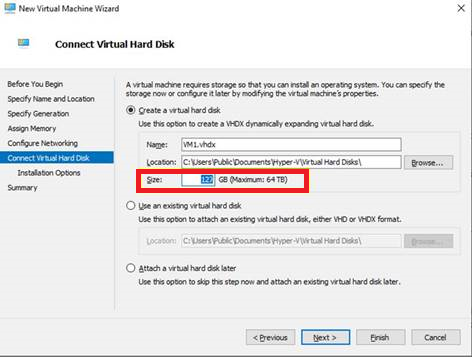
In the Installation Options settings, select the .iso file that you previously downloaded from Ubuntu.
Azure Lab Services does not support images with disk size greater than 128 GB.
Learn more about how to create a virtual machine in Hyper-V.
Connect to the Hyper-V VM and prepare it for Azure by following the steps in Manual steps to create and upload an Ubuntu VHD.
The steps to prepare a Linux image for Azure vary based on the distribution. For more information and specific steps for each distribution, see distributions and versions.
When you follow the preceding steps, there are a few important points to highlight:
- The steps create a generalized image when you run the deprovision+user command. But it doesn't guarantee that the image is cleared of all sensitive information or that it's suitable for redistribution.
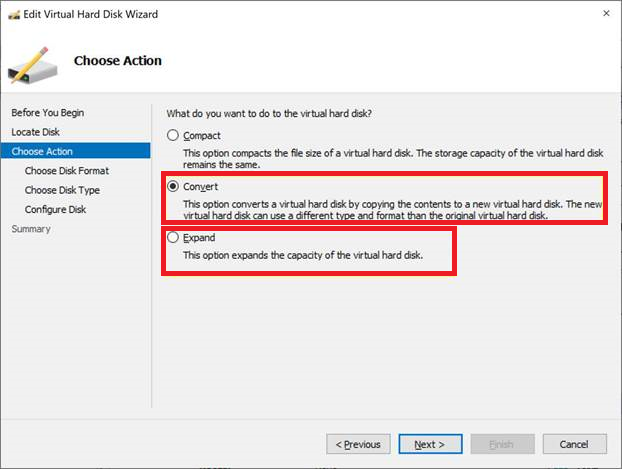
Convert the default Hyper-V
VHDXhard disk file format toVHD:In Hyper-V Manager, select the virtual machine, and then select Action > Edit Disk.
Locate the VHDX disk to convert.
Next, select Convert to convert the disk from a VHDX to a VHD.
For the Disk Type, select Fixed size.
If you also choose to expand the disk size at this point, make sure that you do not exceed 128 GB.
Alternately, you can resize and convert a VHDX by using PowerShell:
Upload the custom image to a compute gallery
Next, you upload the VHD file from your physical environment to an Azure compute gallery.
Upload the VHD to Azure to create a managed disk.
You can use either Azure Storage Explorer or AzCopy from the command line, as shown in Upload a VHD to Azure or copy a managed disk to another region.
Warning
If your machine goes to sleep or locks, the upload process might get interrupted and fail. Also, make sure that when AzCopy completes, that you revoke SAS access to the disk. Otherwise, when you attempt to create an image from the disk, you'll see the error "Operation 'Create Image' is not supported with disk 'your disk name' in state 'Active Upload'. Error Code: OperationNotAllowed*."
After you've uploaded the VHD, you should now have a managed disk that you can see in the Azure portal.
You can use the Azure portal's Size+Performance tab for the managed disk to change your disk size. As mentioned before, the size must not be greater than 128 GB.
In a compute gallery, create an image definition and version:
-
Choose Gen 1 for the VM generation.
Choose Linux for the Operating system.
Choose generalized for the Operating system state.
For more information about the values you can specify for an image definition, see Image definitions.
You can also choose to use an existing image definition and create a new version for your custom image.
-
The Version number property uses the following format: MajorVersion.MinorVersion.Patch. When you use Lab Services to create a lab and choose a custom image, the most recent version of the image is automatically used. The most recent version is chosen based on the highest value of MajorVersion, then MinorVersion, and then Patch.
For the Source, select Disks and/or snapshots from the dropdown list.
For the OS disk property, choose the disk that you created in previous steps.
For more information about the values you can specify for an image version, see Image versions.
-
Create a lab
Now that the custom image is available in an Azure compute gallery, you can create a lab by using the image.
Create the lab and select the custom image from the compute gallery.
If you expanded the disk after the OS was installed on the original Hyper-V VM, you might also need to extend the partition in Linux's filesystem to use the unallocated disk space. Sign in to the lab's template VM and follow steps similar to what is shown in Expand a disk partition and filesystem.
The OS disk typically exists on the /dev/sad2 partition. To view the current size of the OS disk's partition, use the command df -h.
Next steps
Feedback
Coming soon: Throughout 2024 we will be phasing out GitHub Issues as the feedback mechanism for content and replacing it with a new feedback system. For more information see: https://aka.ms/ContentUserFeedback.
Submit and view feedback for