How to configure BGP for Azure VPN Gateway: CLI
This article helps you enable BGP on cross-premises site-to-site (S2S) VPN connections and VNet-to-VNet connections using Azure CLI. You can also create this configuration using the Azure portal or PowerShell steps.
BGP is the standard routing protocol commonly used in the Internet to exchange routing and reachability information between two or more networks. BGP enables the Azure VPN gateways and your on-premises VPN devices, called BGP peers or neighbors, to exchange "routes" that will inform both gateways on the availability and reachability for those prefixes to go through the gateways or routers involved. BGP can also enable transit routing among multiple networks by propagating routes a BGP gateway learns from one BGP peer to all other BGP peers.
For more information about the benefits of BGP and to understand the technical requirements and considerations of using BGP, see About BGP and Azure VPN Gateway.
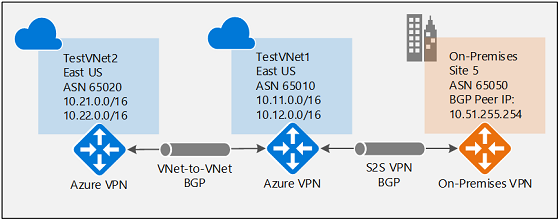
Each part of this article helps you form a basic building block for enabling BGP in your network connectivity. If you complete all three parts (configure BGP on the gateway, S2S connection, and VNet-to-VNet connection) you build the topology as shown in Diagram 1.
Diagram 1
You can combine these sections to build a more complex multihop transit network that meets your needs.
Prerequisites
Use the Bash environment in Azure Cloud Shell. For more information, see Quickstart for Bash in Azure Cloud Shell.

If you prefer to run CLI reference commands locally, install the Azure CLI. If you're running on Windows or macOS, consider running Azure CLI in a Docker container. For more information, see How to run the Azure CLI in a Docker container.
If you're using a local installation, sign in to the Azure CLI by using the az login command. To finish the authentication process, follow the steps displayed in your terminal. For other sign-in options, see Sign in with the Azure CLI.
When you're prompted, install the Azure CLI extension on first use. For more information about extensions, see Use extensions with the Azure CLI.
Run az version to find the version and dependent libraries that are installed. To upgrade to the latest version, run az upgrade.
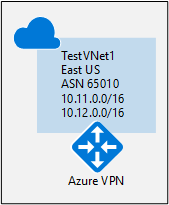
Enable BGP for the VPN gateway
This section is required before you perform any of the steps in the other two configuration sections. The following configuration steps set up the BGP parameters of the Azure VPN gateway as shown in Diagram 2.
Diagram 2
Create and configure TestVNet1
1. Create a resource group
The following example creates a resource group named TestRG1 in the "eastus" location. If you already have a resource group in the region where you want to create your virtual network, you can use that one instead.
az group create --name TestRG1 --location eastus
2. Create TestVNet1
The following example creates a virtual network named TestVNet1 and three subnets: GatewaySubnet, FrontEnd, and BackEnd. When you're substituting values, it's important that you always name your gateway subnet specifically GatewaySubnet. If you name it something else, your gateway creation fails.
The first command creates the front-end address space and the FrontEnd subnet. The second command creates an additional address space for the BackEnd subnet. The third and fourth commands create the BackEnd subnet and GatewaySubnet.
az network vnet create -n TestVNet1 -g TestRG1 --address-prefix 10.11.0.0/16 --subnet-name FrontEnd --subnet-prefix 10.11.0.0/24
az network vnet update -n TestVNet1 --address-prefixes 10.11.0.0/16 10.12.0.0/16 -g TestRG1

az network vnet subnet create --vnet-name TestVNet1 -n BackEnd -g TestRG1 --address-prefix 10.12.0.0/24

az network vnet subnet create --vnet-name TestVNet1 -n GatewaySubnet -g TestRG1 --address-prefix 10.12.255.0/27
Create the VPN gateway for TestVNet1 with BGP parameters
1. Create the public IP address
Request a public IP address. The public IP address will be allocated to the VPN gateway that you create for your virtual network.
az network public-ip create -n GWPubIP -g TestRG1 --allocation-method Dynamic
2. Create the VPN gateway with the AS number
Create the virtual network gateway for TestVNet1. BGP requires a Route-Based VPN gateway. You also need the additional parameter -Asn to set the autonomous system number (ASN) for TestVNet1. Creating a gateway can often take 45 minutes or more, depending on the selected gateway SKU.
If you run this command by using the --no-wait parameter, you don't see any feedback or output. The --no-wait parameter allows the gateway to be created in the background. It doesn't mean that the VPN gateway is created immediately.
az network vnet-gateway create -n VNet1GW -l eastus --public-ip-address GWPubIP -g TestRG1 --vnet TestVNet1 --gateway-type Vpn --sku HighPerformance --vpn-type RouteBased --asn 65010 --no-wait
After the gateway is created, you can use this gateway to establish a cross-premises connection or a VNet-to-VNet connection with BGP.
3. Obtain the Azure BGP peer IP address
After the gateway is created, you need to obtain the BGP peer IP address on the Azure VPN gateway. This address is needed to configure the VPN gateway as a BGP peer for your on-premises VPN devices.
Run the following command.
az network vnet-gateway list -g TestRG1
Make a note of the bgpSettings section at the top of the output. You'll use this
"bgpSettings": {
      "asn": 65010,
      "bgpPeeringAddress": "10.12.255.30",
      "peerWeight": 0
    }
If you don't see the BgpPeeringAddress displayed as an IP address, your gateway is still being configured. Try again when the gateway is complete.
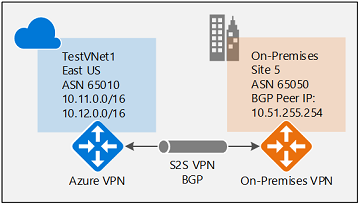
Establish a cross-premises connection with BGP
To establish a cross-premises connection, you need to create a local network gateway to represent your on-premises VPN device. Then you connect the Azure VPN gateway with the local network gateway. Although these steps are similar to creating other connections, they include the additional properties required to specify the BGP configuration parameter, as shown in Diagram 3.
Diagram 3
Create and configure the local network gateway
This exercise continues to build the configuration shown in the diagram. Be sure to replace the values with the ones that you want to use for your configuration. When you're working with local network gateways, keep in mind the following things:
- The local network gateway can be in the same location and resource group as the VPN gateway, or it can be in a different location and resource group. This example shows the gateways in different resource groups in different locations.
- The minimum prefix that you need to declare for the local network gateway is the host address of your BGP peer IP address on your VPN device. In this case, it's a /32 prefix of 10.51.255.254/32.
- As a reminder, you must use different BGP ASNs between your on-premises networks and the Azure virtual network. If they're the same, you need to change your VNet ASN if your on-premises VPN devices already use the ASN to peer with other BGP neighbors.
Before you proceed, make sure that you've completed the Enable BGP for your VPN gateway section of this exercise. Notice that in this example, you create a new resource group. Also, notice the two additional parameters for the local network gateway: Asn and BgpPeerAddress.
az group create -n TestRG5 -l westus

az network local-gateway create --gateway-ip-address 23.99.221.164 -n Site5 -g TestRG5 --local-address-prefixes 10.51.255.254/32 --asn 65050 --bgp-peering-address 10.51.255.254
Connect the VNet gateway and local network gateway
In this step, you create the connection from TestVNet1 to Site5. You must specify the --enable-bgp parameter to enable BGP for this connection.
In this example, the virtual network gateway and local network gateway are in different resource groups. When the gateways are in different resource groups, you must specify the entire resource ID of the two gateways to set up a connection between the virtual networks.
1. Get the resource ID of VNet1GW
Use the output from the following command to get the resource ID for VNet1GW:
az network vnet-gateway show -n VNet1GW -g TestRG1
In the output, find the "id": line. You need the values within the quotation marks to create the connection in the next section.
Example output:
{
  "activeActive": false,
  "bgpSettings": {
    "asn": 65010,
    "bgpPeeringAddress": "10.12.255.30",
    "peerWeight": 0
  },
  "enableBgp": true,
  "etag": "W/\"<your etag number>\"",
  "gatewayDefaultSite": null,
  "gatewayType": "Vpn",
  "id": "/subscriptions/<subscription ID>/resourceGroups/TestRG1/providers/Microsoft.Network/virtualNetworkGateways/VNet1GW",
Copy the values after "id": to a text editor, such as Notepad, so that you can easily paste them when creating your connection.
"id": "/subscriptions/<subscription ID>/resourceGroups/TestRG1/providers/Microsoft.Network/virtualNetworkGateways/VNet1GW"
2. Get the resource ID of Site5
Use the following command to get the resource ID of Site5 from the output:
az network local-gateway show -n Site5 -g TestRG5
3. Create the TestVNet1-to-Site5 connection
In this step, you create the connection from TestVNet1 to Site5. As discussed earlier, it's possible to have both BGP and non-BGP connections for the same Azure VPN gateway. Unless BGP is enabled in the connection property, Azure won't enable BGP for this connection, even though BGP parameters are already configured on both gateways. Replace the subscription IDs with your own.
az network vpn-connection create -n VNet1ToSite5 -g TestRG1 --vnet-gateway1 /subscriptions/<subscription ID>/resourceGroups/TestRG1/providers/Microsoft.Network/virtualNetworkGateways/VNet1GW --enable-bgp -l eastus --shared-key "abc123" --local-gateway2 /subscriptions/<subscription ID>/resourceGroups/TestRG5/providers/Microsoft.Network/localNetworkGateways/Site5
On-premises device configuration
The following example lists the parameters you enter into the BGP configuration section on your on-premises VPN device for this exercise:
- Site5 ASN            : 65050
- Site5 BGP IP         : 10.51.255.254
- Prefixes to announce : (for example) 10.51.0.0/16
- Azure VNet ASN       : 65010
- Azure VNet BGP IP    : 10.12.255.30
- Static route         : Add a route for 10.12.255.30/32, with nexthop being the VPN tunnel interface on your device
- eBGP Multihop        : Ensure the "multihop" option for eBGP is enabled on your device if needed
The connection should be established after a few minutes. The BGP peering session starts after the IPsec connection is established.
Establish a VNet-to-VNet connection with BGP
This section adds a VNet-to-VNet connection with BGP, as shown in Diagram 4.
Diagram 4
The following instructions continue from the steps in the preceding sections. To create and configure TestVNet1 and the VPN gateway with BGP, you must complete the Enable BGP for your VPN gateway section.
Create TestVNet2 and the VPN gateway
It's important to make sure that the IP address space of the new virtual network, TestVNet2, doesn't overlap with any of your VNet ranges.
In this example, the virtual networks belong to the same subscription. You can set up VNet-to-VNet connections between different subscriptions. To learn more, see Configure a VNet-to-VNet connection. Make sure that you add -EnableBgp $True when creating the connections to enable BGP.
1. Create a new resource group
az group create -n TestRG2 -l eastus
2. Create TestVNet2 in the new resource group
The first command creates the front-end address space and the FrontEnd subnet. The second command creates an additional address space for the BackEnd subnet. The third and fourth commands create the BackEnd subnet and GatewaySubnet.
az network vnet create -n TestVNet2 -g TestRG2 --address-prefix 10.21.0.0/16 --subnet-name FrontEnd --subnet-prefix 10.21.0.0/24
az network vnet update -n TestVNet2 --address-prefixes 10.21.0.0/16 10.22.0.0/16 -g TestRG2

az network vnet subnet create --vnet-name TestVNet2 -n BackEnd -g TestRG2 --address-prefix 10.22.0.0/24

az network vnet subnet create --vnet-name TestVNet2 -n GatewaySubnet -g TestRG2 --address-prefix 10.22.255.0/27
3. Create the public IP address
Request a public IP address. The public IP address will be allocated to the VPN gateway that you create for your virtual network.
az network public-ip create -n GWPubIP2 -g TestRG2 --allocation-method Dynamic
4. Create the VPN gateway with the AS number
Create the virtual network gateway for TestVNet2. You must override the default ASN on your Azure VPN gateways. The ASNs for the connected virtual networks must be different to enable BGP and transit routing.
az network vnet-gateway create -n VNet2GW -l eastus --public-ip-address GWPubIP2 -g TestRG2 --vnet TestVNet2 --gateway-type Vpn --sku Standard --vpn-type RouteBased --asn 65020 --no-wait
Connect the TestVNet1 and TestVNet2 gateways
In this step, you create the connection from TestVNet1 to Site5. To enable BGP for this connection, you must specify the --enable-bgp parameter.
In the following example, the virtual network gateway and local network gateway are in different resource groups. When the gateways are in different resource groups, you must specify the entire resource ID of the two gateways to set up a connection between the virtual networks.
1. Get the resource ID of VNet1GW
Get the resource ID of VNet1GW from the output of the following command:
az network vnet-gateway show -n VNet1GW -g TestRG1
Example value for the gateway resource:
"/subscriptions/<subscripion ID value>/resourceGroups/TestRG2/providers/Microsoft.Network/virtualNetworkGateways/VNet2GW"
2. Get the resource ID of VNet2GW
Get the resource ID of VNet2GW from the output of the following command:
az network vnet-gateway show -n VNet2GW -g TestRG2
3. Create the connections
Create the connection from TestVNet1 to TestVNet2, and the connection from TestVNet2 to TestVNet1. These commands use the resource IDs. For this exercise, most of the resource ID is already in the example. Be sure to replace the subscription ID values with your own. The subscription ID is used in multiple places in the same command. When using this command for production, you'll replace the entire resource ID for each object you are referencing.
az network vpn-connection create -n VNet1ToVNet2 -g TestRG1 --vnet-gateway1 /subscriptions/<subscription ID>/resourceGroups/TestRG1/providers/Microsoft.Network/virtualNetworkGateways/VNet1GW --enable-bgp -l eastus --shared-key "abc123" --vnet-gateway2 /subscriptions/<subscription ID>/resourceGroups/TestRG2/providers/Microsoft.Network/virtualNetworkGateways/VNet2GW
az network vpn-connection create -n VNet2ToVNet1 -g TestRG2 --vnet-gateway1 /subscriptions/<subscription ID>/resourceGroups/TestRG2/providers/Microsoft.Network/virtualNetworkGateways/VNet2GW --enable-bgp -l eastus --shared-key "abc123" --vnet-gateway2 /subscriptions/<subscription ID>/resourceGroups/TestRG1/providers/Microsoft.Network/virtualNetworkGateways/VNet1GW
Important
Enable BGP for both connections.
After you complete these steps, the connection will be established in a few minutes. The BGP peering session will be up after the VNet-to-VNet connection is completed.
Next steps
For more information about BGP, see About BGP and VPN Gateway.
Feedback
Coming soon: Throughout 2024 we will be phasing out GitHub Issues as the feedback mechanism for content and replacing it with a new feedback system. For more information see: https://aka.ms/ContentUserFeedback.
Submit and view feedback for