Tutorial: Get started with a Python script in Azure Machine Learning (SDK v1, part 1 of 3)
APPLIES TO:  Python SDK azureml v1
In this tutorial, you run your first Python script in the cloud with Azure Machine Learning. This tutorial is part 1 of a two-part tutorial series.
This tutorial avoids the complexity of training a machine learning model. You'll run a "Hello World" Python script in the cloud. You'll learn how a control script is used to configure and create a run in Azure Machine Learning.
In this tutorial, you will:
- Create and run a "Hello world!" Python script.
- Create a Python control script to submit "Hello world!" to Azure Machine Learning.
- Understand the Azure Machine Learning concepts in the control script.
- Submit and run the "Hello world!" script.
- View your code output in the cloud.
Prerequisites
- Complete Create resources you need to get started to create a workspace and compute instance to use in this tutorial series.
-
- Create a cloud-based compute cluster. Name it 'cpu-cluster' to match the code in this tutorial.
Create and run a Python script
This tutorial uses the compute instance as your development computer. First create a few folders and the script:
- Sign in to the Azure Machine Learning studio and select your workspace if prompted.
- On the left, select Notebooks
- In the Files toolbar, select +, then select Create new folder.
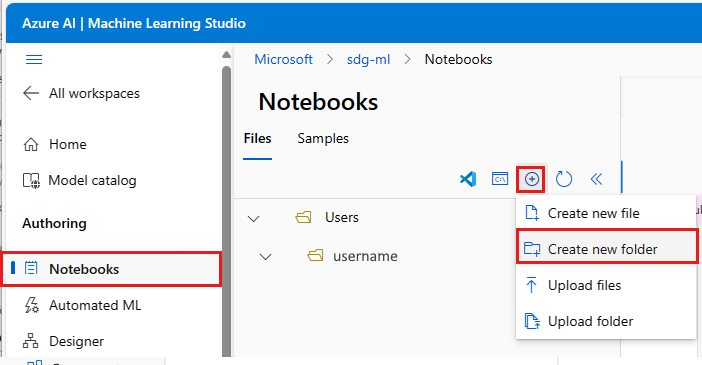
- Name the folder get-started.
- To the right of the folder name, use the ... to create another folder under get-started.
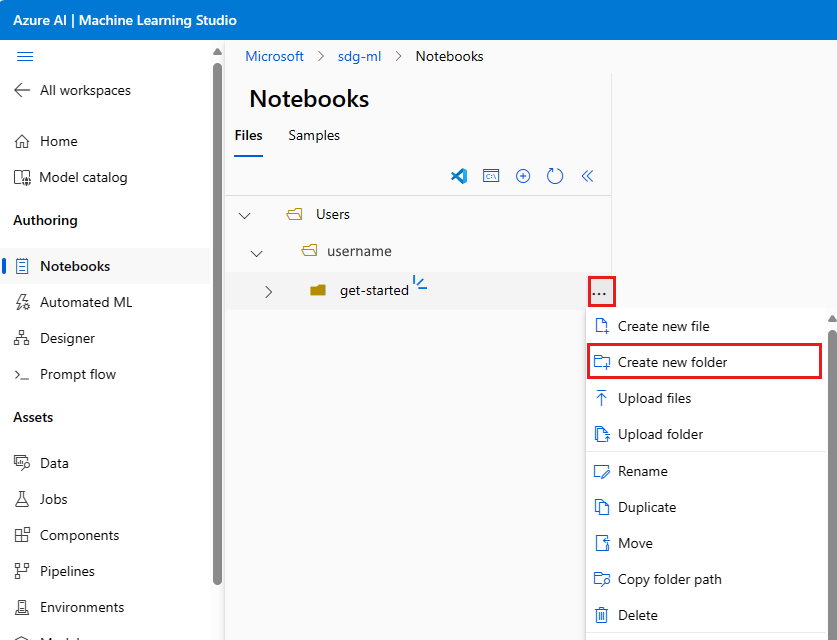
- Name the new folder src. Use the Edit location link if the file location isn't correct.
- To the right of the src folder, use the ... to create a new file in the src folder.
- Name your file hello.py. Switch the File type to Python (.py)*.
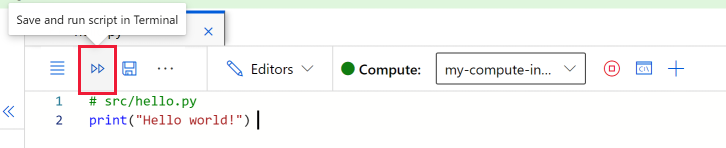
Copy this code into your file:
# src/hello.py
print("Hello world!")
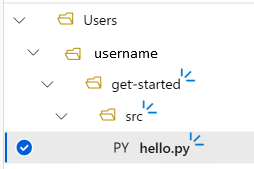
Your project folder structure will now look like:
Test your script
You can run your code locally, which in this case means on the compute instance. Running code locally has the benefit of interactive debugging of code.
If you have previously stopped your compute instance, start it now with the Start compute tool to the right of the compute dropdown. Wait about a minute for state to change to Running.

Select Save and run script in terminal to run the script.
You see the output of the script in the terminal window that opens. Close the tab and select Terminate to close the session.
Create a control script
A control script allows you to run your hello.py script on different compute resources. You use the control script to control how and where your machine learning code is run.
Select the ... at the end of get-started folder to create a new file. Create a Python file called run-hello.py and copy/paste the following code into that file:
# get-started/run-hello.py
from azureml.core import Workspace, Experiment, Environment, ScriptRunConfig

ws = Workspace.from_config()
experiment = Experiment(workspace=ws, name='day1-experiment-hello')

config = ScriptRunConfig(source_directory='./src', script='hello.py', compute_target='cpu-cluster')

run = experiment.submit(config)
aml_url = run.get_portal_url()
print(aml_url)
Tip
If you used a different name when you created your compute cluster, make sure to adjust the name in the code compute_target='cpu-cluster' as well.
Understand the code
Here's a description of how the control script works:
ws = Workspace.from_config()
Workspace connects to your Azure Machine Learning workspace, so that you can communicate with your Azure Machine Learning resources.
experiment = Experiment( ... )
Experiment provides a simple way to organize multiple jobs under a single name. Later you can see how experiments make it easy to compare metrics between dozens of jobs.
config = ScriptRunConfig( ... )
ScriptRunConfig wraps your hello.py code and passes it to your workspace. As the name suggests, you can use this class to configure how you want your script to run in Azure Machine Learning. It also specifies what compute target the script runs on. In this code, the target is the compute cluster that you created in the setup tutorial.
run = experiment.submit(config)
Submits your script. This submission is called a run. In v2, it has been renamed to a job. A run/job encapsulates a single execution of your code. Use a job to monitor the script progress, capture the output, analyze the results, visualize metrics, and more.
aml_url = run.get_portal_url()
The run object provides a handle on the execution of your code. Monitor its progress from the Azure Machine Learning studio with the URL that prints from the Python script.
Submit and run your code in the cloud
Select Save and run script in terminal to run your control script, which in turn runs
hello.pyon the compute cluster that you created in the setup tutorial.In the terminal, you may be asked to sign in to authenticate. Copy the code and follow the link to complete this step.
Once you're authenticated, you see a link in the terminal. Select the link to view the job.
Monitor your code in the cloud in the studio
The output from your script contains a link to the studio that looks something like this:
https://ml.azure.com/experiments/hello-world/runs/<run-id>?wsid=/subscriptions/<subscription-id>/resourcegroups/<resource-group>/workspaces/<workspace-name>.
Follow the link. At first, you see a status of Queued or Preparing. The first run takes 5-10 minutes to complete. This is because the following occurs:
- A docker image is built in the cloud
- The compute cluster is resized from 0 to 1 node
- The docker image is downloaded to the compute.
Subsequent jobs are quicker (~15 seconds) as the docker image is cached on the compute. You can test this by resubmitting the code below after the first job has completed.
Wait about 10 minutes. You see a message that the job has completed. Then use Refresh to see the status change to Completed. Once the job completes, go to the Outputs + logs tab. There you can see a std_log.txt file in the user_logs folder. The output of your script is in this file.
The azureml-logs and system-logs folders contain files that can be useful when you're debugging remote jobs in the cloud.
Next step
In this tutorial, you took a simple "Hello world!" script and ran it on Azure. You saw how to connect to your Azure Machine Learning workspace, create an experiment, and submit your hello.py code to the cloud.
In the next tutorial, you build on these learnings by running something more interesting than print("Hello world!").
Note
If you want to finish the tutorial series here and not progress to the next step, remember to clean up your resources.
Povratne informacije
Uskoro: tokom 2024. postepeno ćemo ukidati probleme s uslugom GitHub kao mehanizam povratnih informacija za sadržaj i zamijeniti ga novim sistemom povratnih informacija. Za više informacija, pogledajte https://aka.ms/ContentUserFeedback.
Pošalјite i prikažite povratne informacije za