Nasazení virtuálního počítače s bezpečně uloženým certifikátem ve službě Azure Stack Hub
Tento článek popisuje, jak nasadit virtuální počítač Služby Azure Stack Hub s nainstalovaným certifikátem Key Vault.
Přehled
Certifikáty se používají v mnoha scénářích, jako je ověřování ve službě Active Directory nebo šifrování webového provozu. Certifikáty můžete bezpečně ukládat jako tajné kódy v trezoru klíčů služby Azure Stack Hub. Výhody používání služby Azure Stack Hub Key Vault jsou:
- Certifikáty se nezpřístupní ve skriptu, historii příkazového řádku nebo šabloně.
- Proces správy certifikátů je zjednodušený.
- Máte kontrolu nad klíči, které mají přístup k certifikátům.
Popis procesu
Následující kroky popisují proces potřebný k odeslání certifikátu do virtuálního počítače:
- Vytvořte tajný kód trezoru klíčů.
- Aktualizujte soubor azuredeploy.parameters.json .
- Nasazení šablony
Poznámka
Tyto kroky můžete použít ze sady Azure Stack Development Kit (ASDK) nebo z externího klienta, pokud jste připojení přes SÍŤ VPN.
Požadavky
- Musíte se přihlásit k odběru nabídky, která zahrnuje službu Key Vault.
- Nainstalujte PowerShell pro Azure Stack Hub.
- Nakonfigurujte prostředí PowerShell uživatele služby Azure Stack Hub.
Vytvoření tajného kódu trezoru klíčů
Následující skript vytvoří certifikát ve formátu .pfx, vytvoří trezor klíčů a uloží certifikát do trezoru klíčů jako tajný kód. Tajný contentType klíč musí být nastavený na pfxhodnotu .
Důležité
Při vytváření trezoru -EnabledForDeployment klíčů musíte použít parametr . Tento parametr zajišťuje, že se na trezor klíčů dá odkazovat ze šablon Azure Resource Manager.
# Create a certificate in the .pfx format
New-SelfSignedCertificate `
  -certstorelocation cert:\LocalMachine\My `
  -dnsname contoso.microsoft.com

$pwd = ConvertTo-SecureString `
  -String "<Password used to export the certificate>" `
  -Force `
  -AsPlainText

Export-PfxCertificate `
  -cert "cert:\localMachine\my\<certificate thumbprint that was created in the previous step>" `
  -FilePath "<Fully qualified path to where the exported certificate can be stored>" `
  -Password $pwd

# Create a key vault and upload the certificate into the key vault as a secret
$vaultName = "contosovault"
$resourceGroup = "contosovaultrg"
$location = "local"
$secretName = "servicecert"
$fileName = "<Fully qualified path to where the exported certificate can be stored>"
$certPassword = "<Password used to export the certificate>"

$fileContentBytes = get-content $fileName `
  -Encoding Byte

$fileContentEncoded = [System.Convert]::ToBase64String($fileContentBytes)
$jsonObject = @"
{
"data": "$filecontentencoded",
"dataType" :"pfx",
"password": "$certPassword"
}
"@
$jsonObjectBytes = [System.Text.Encoding]::UTF8.GetBytes($jsonObject)
$jsonEncoded = [System.Convert]::ToBase64String($jsonObjectBytes)

New-AzResourceGroup `
  -Name $resourceGroup `
  -Location $location

New-AzKeyVault `
  -VaultName $vaultName `
  -ResourceGroupName $resourceGroup `
  -Location $location `
  -sku standard `
  -EnabledForDeployment

$secret = ConvertTo-SecureString `
  -String $jsonEncoded `
  -AsPlainText -Force

Set-AzureKeyVaultSecret `
  -VaultName $vaultName `
  -Name $secretName `
   -SecretValue $secret
Při spuštění tohoto skriptu bude výstup obsahovat identifikátor URI tajného kódu. Poznamenejte si tento identifikátor URI, protože na něj musíte odkazovat v šabloně Nabízené certifikáty systému Windows Resource Manager. Stáhněte si do vývojového počítače složku šablony vm-push-certificate-windows . Tato složka obsahuje soubory azuredeploy.json a azuredeploy.parameters.json , které potřebujete v následujících krocích.
Upravte soubor azuredeploy.parameters.json podle hodnot vašeho prostředí. Důležitými parametry jsou název trezoru, skupina prostředků trezoru a identifikátor URI tajného klíče (vygenerovaný předchozím skriptem). Následující část ukazuje příklad souboru parametrů.
Aktualizace souboru azuredeploy.parameters.json
Aktualizujte soubor azuredeploy.parameters.json pomocí , identifikátoru vaultNameURI VmNametajného klíče a dalších parametrů podle vašeho prostředí. Následující soubor JSON ukazuje příklad souboru parametrů šablony:
{
  "$schema": "https://schema.management.azure.com/schemas/2015-01-01/deploymentParameters.json#",
  "contentVersion": "1.0.0.0",
  "parameters": {
    "newStorageAccountName": {
      "value": "kvstorage01"
    },
    "vmName": {
      "value": "VM1"
    },
    "vmSize": {
      "value": "Standard_D1_v2"
    },
    "adminUserName": {
      "value": "demouser"
    },
    "adminPassword": {
      "value": "demouser@123"
    },
    "vaultName": {
      "value": "contosovault"
    },
    "vaultResourceGroup": {
      "value": "contosovaultrg"
    },
    "secretUrlWithVersion": {
      "value": "https://testkv001.vault.local.azurestack.external/secrets/testcert002/82afeeb84f4442329ce06593502e7840"
    }
  }
}
Nasazení šablony
Nasaďte šablonu pomocí následujícího skriptu PowerShellu:
# Deploy a Resource Manager template to create a VM and push the secret to it
New-AzResourceGroupDeployment `
  -Name KVDeployment `
  -ResourceGroupName $resourceGroup `
  -TemplateFile "<Fully qualified path to the azuredeploy.json file>" `
  -TemplateParameterFile "<Fully qualified path to the azuredeploy.parameters.json file>"
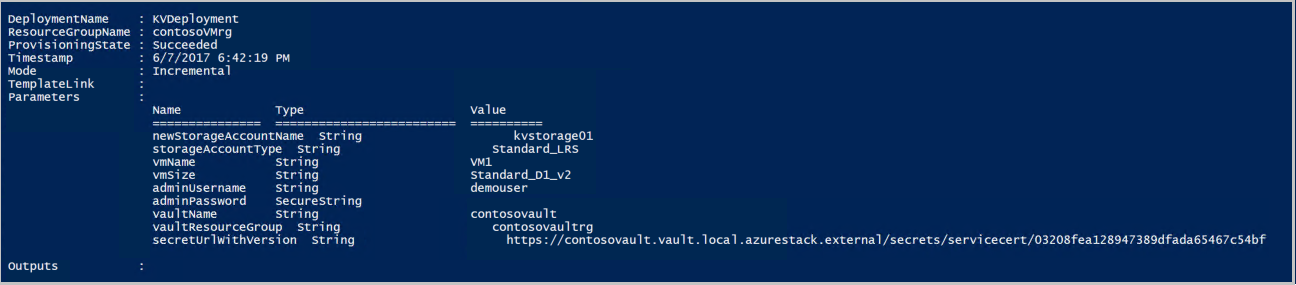
Po úspěšném nasazení šablony se zobrazí následující výstup:
Azure Stack Hub během nasazení odešle certifikát do virtuálního počítače. Umístění certifikátu závisí na operačním systému virtuálního počítače:
- Ve Windows se certifikát přidá do umístění certifikátu LocalMachine s úložištěm certifikátů, které uživatel zadal.
- V Linuxu se certifikát umístí do adresáře /var/lib/waagent s názvem souboru UppercaseThumbprint.crt pro soubor certifikátu X509 a velkými písmenyThumbprint.prv pro privátní klíč.
Vyřazení certifikátů
Vyřazení certifikátů je součástí procesu správy certifikátů. Starší verzi certifikátu nemůžete odstranit, ale můžete ji zakázat pomocí rutiny Set-AzureKeyVaultSecretAttribute .
Následující příklad ukazuje, jak zakázat certifikát. Pro parametry , Namea Version použijte vlastní hodnotyVaultName.
Set-AzureKeyVaultSecretAttribute -VaultName contosovault -Name servicecert -Version e3391a126b65414f93f6f9806743a1f7 -Enable 0
Další kroky
Váš názor
Připravujeme: V průběhu roku 2024 budeme postupně vyřazovat problémy z GitHub coby mechanismus zpětné vazby pro obsah a nahrazovat ho novým systémem zpětné vazby. Další informace naleznete v tématu: https://aka.ms/ContentUserFeedback.
Odeslat a zobrazit názory pro