TileBrush – přehled
TileBrush objekty poskytují velkou kontrolu nad tím, jak je oblast malována obrázkem, Drawingnebo Visual. Toto téma popisuje, jak pomocí TileBrush funkcí získat větší kontrolu nad tím, jak , ImageBrushDrawingBrushnebo VisualBrush maluje oblast.
Předpoklady
Abyste pochopili toto téma, je užitečné pochopit, jak používat základní funkce ImageBrush, DrawingBrushnebo VisualBrush třídy. Úvod k těmto typům najdete v Malování obrázků, výkresů a vizuálů.
Malování oblasti s dlaždicemi
ImageBrush, DrawingBrushjsou VisualBrush typy TileBrush objektů. Štětce dlaždic poskytují velkou kontrolu nad tím, jak se oblast maluje pomocí obrázku, výkresu nebo vizuálu. Místo pouhého malování oblasti s jedním roztaženým obrázkem můžete například nakreslit oblast řadou dlaždic obrázků, které vytvářejí vzor.
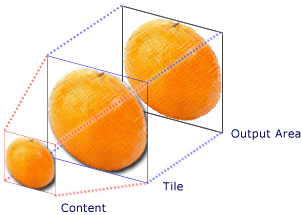
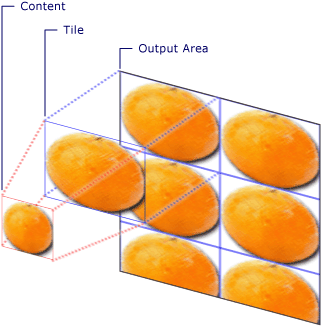
Malování štětec dlaždice zahrnuje tři komponenty: obsah, základní dlaždici a výstupní oblast.

Komponenty TileBrush s jednou dlaždicí

Komponenty TileBrush s tileMode dlaždice
Výstupní oblast je oblast, která se maluje, jako Fill je například oblast nebo nákres BackgroundEllipseButton. Další části popisují další dvě komponenty TileBrush.
Obsah štětce
Existují tři různé typy TileBrush a jednotlivé barvy s jiným typem obsahu.
Pokud je ImageBrushštětec , tento obsah je obrázek Vlastnost ImageSource určuje obsah objektu ImageBrush.
Pokud je štětcem DrawingBrush, jedná se o výkres. Vlastnost Drawing určuje obsah objektu DrawingBrush.
Pokud je štětec , VisualBrushjedná se o vizuál. Vlastnost Visual určuje obsah objektu VisualBrush.
Umístění a rozměry TileBrush obsahu můžete zadat pomocí Viewbox vlastnosti, i když je běžné ponechat nastavenou Viewbox na výchozí hodnotu. Ve výchozím nastavení je nakonfigurovaná tak, Viewbox aby zcela obsahovala obsah štětce. Další informace o konfiguraci Viewboxstránky vlastností.Viewbox
Základní dlaždice
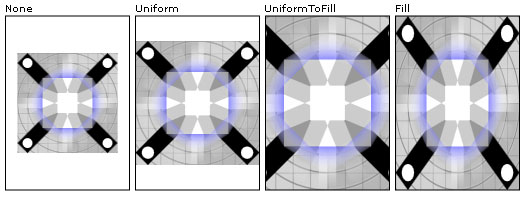
Projektuje TileBrush svůj obsah na základní dlaždici. Vlastnost Stretch určuje, jak TileBrush je obsah roztažený tak, aby vyplnil základní dlaždici. Vlastnost Stretch přijímá následující hodnoty definované výčtem Stretch :
None: Obsah štětce není roztažený tak, aby vyplnil dlaždici.
Fill: Obsah štětce se škáluje tak, aby odpovídal dlaždici. Vzhledem k tomu, že výška a šířka obsahu se škálují nezávisle, nemusí být zachován původní poměr stran obsahu. To znamená, že obsah štětce může být závlečný, aby se dlaždice výstupu úplně vyplnila.
Uniform: Obsah štětce se škáluje tak, aby se zcela vešel do dlaždice. Poměr stran obsahu se zachová.
UniformToFill: Obsah štětce se škáluje tak, aby zcela vyplnil výstupní oblast při zachování původního poměru stran obsahu.
Následující obrázek znázorňuje různá Stretch nastavení.

V následujícím příkladu je obsah objektu ImageBrush nastaven tak, aby se nepřetáhl k vyplnění výstupní oblasti.
<Rectangle
  Width="125" Height="175"
  Stroke="Black"
  StrokeThickness="1"
  Margin="0,0,5,0">
  <Rectangle.Fill>
    <ImageBrush
      Stretch="None"
      ImageSource="sampleImages\testImage.gif"/>
  </Rectangle.Fill>
</Rectangle>
// Create a rectangle.
Rectangle myRectangle = new Rectangle();
myRectangle.Width = 125;
myRectangle.Height = 175;
myRectangle.Stroke = Brushes.Black;
myRectangle.StrokeThickness = 1;
myRectangle.Margin = new Thickness(0,5,0,0);

// Load the image.
BitmapImage theImage =
    new BitmapImage(
        new Uri("sampleImages\\testImage.gif", UriKind.Relative));
ImageBrush myImageBrush = new ImageBrush(theImage);

// Configure the brush so that it
// doesn't stretch its image to fill
// the rectangle.
myImageBrush.Stretch = Stretch.None;

// Use the ImageBrush to paint the rectangle's background.
myRectangle.Fill = myImageBrush;
' Create a rectangle.
Dim myRectangle As New Rectangle()
With myRectangle
    .Width = 125
    .Height = 175
    .Stroke = Brushes.Black
    .StrokeThickness = 1
    .Margin = New Thickness(0, 5, 0, 0)
End With

' Load the image.
Dim theImage As New BitmapImage(New Uri("sampleImages\testImage.gif", UriKind.Relative))
Dim myImageBrush As New ImageBrush(theImage)

' Configure the brush so that it
' doesn't stretch its image to fill
' the rectangle.
myImageBrush.Stretch = Stretch.None

' Use the ImageBrush to paint the rectangle's background.
myRectangle.Fill = myImageBrush
Ve výchozím nastavení vygeneruje TileBrush jednu dlaždici (základní dlaždici) a roztáhne ji tak, aby zcela vyplnila výstupní oblast. Velikost a umístění základní dlaždice můžete změnit nastavením Viewport a ViewportUnits vlastností.
Velikost základní dlaždice
Vlastnost Viewport určuje velikost a umístění základní dlaždice a ViewportUnits vlastnost určuje, zda Viewport je zadán pomocí absolutních nebo relativních souřadnic. Pokud jsou souřadnice relativní, jsou relativní vzhledem k velikosti výstupní oblasti. Bod (0,0) představuje levý horní roh výstupní oblasti a (1,1) představuje pravý dolní roh výstupní oblasti. Chcete-li určit, že Viewport vlastnost používá absolutní souřadnice, nastavte ViewportUnits vlastnost na Absolute.
Následující obrázek ukazuje rozdíl ve výstupu TileBrush mezi relativním a absolutním ViewportUnits. Všimněte si, že jednotlivé ilustrace zobrazují dlaždicový vzor; Další část popisuje, jak určit vzor dlaždice.

V následujícím příkladu se obrázek používá k vytvoření dlaždice, která má šířku a výšku 50 %. Základní dlaždice se nachází v oblasti výstupu (0,0).
<Rectangle
 Width="50" Height="100">
  <Rectangle.Fill>

    <!-- Paints an area with 4 tiles. -->
    <ImageBrush ImageSource="sampleImages\cherries_larger.jpg"
      Viewport="0,0,0.5,0.5"
      ViewportUnits="RelativeToBoundingBox"
      TileMode="Tile" />
  </Rectangle.Fill>
</Rectangle>
// Create a rectangle.
Rectangle myRectangle = new Rectangle();
myRectangle.Width = 50;
myRectangle.Height = 100;

// Load the image.
BitmapImage theImage =
    new BitmapImage(
        new Uri("sampleImages\\cherries_larger.jpg", UriKind.Relative));
ImageBrush myImageBrush = new ImageBrush(theImage);

// Create tiles that are 1/4 the size of
// the output area.
myImageBrush.Viewport = new Rect(0,0,0.25,0.25);
myImageBrush.ViewportUnits = BrushMappingMode.RelativeToBoundingBox;

// Set the tile mode to Tile.
myImageBrush.TileMode = TileMode.Tile;

// Use the ImageBrush to paint the rectangle's background.
myRectangle.Fill = myImageBrush;
' Create a rectangle.
Dim myRectangle As New Rectangle()
myRectangle.Width = 50
myRectangle.Height = 100

' Load the image.
Dim theImage As New BitmapImage(New Uri("sampleImages\cherries_larger.jpg", UriKind.Relative))
Dim myImageBrush As New ImageBrush(theImage)

' Create tiles that are 1/4 the size of
' the output area.
myImageBrush.Viewport = New Rect(0, 0, 0.25, 0.25)
myImageBrush.ViewportUnits = BrushMappingMode.RelativeToBoundingBox

' Set the tile mode to Tile.
myImageBrush.TileMode = TileMode.Tile

' Use the ImageBrush to paint the rectangle's background.
myRectangle.Fill = myImageBrush
Další příklad nastaví dlaždice na ImageBrush 25 až 25 pixelů nezávislých na zařízení. ViewportUnits Vzhledem k tomu, že jsou absolutní, ImageBrush dlaždice jsou vždy 25 až 25 pixelů bez ohledu na velikost plochy, která se maluje.
<Rectangle
 Width="50" Height="100">
  <Rectangle.Fill>

    <!-- Paints an area with 25 x 25 tiles. -->
    <ImageBrush ImageSource="sampleImages\cherries_larger.jpg"
      Viewport="0,0,25,25"
      ViewportUnits="Absolute"
      TileMode="Tile" />
  </Rectangle.Fill>
</Rectangle>
// Create a rectangle.
Rectangle myRectangle = new Rectangle();
myRectangle.Width = 50;
myRectangle.Height = 100;

// Load the image.
BitmapImage theImage =
    new BitmapImage(
        new Uri("sampleImages\\cherries_larger.jpg", UriKind.Relative));
ImageBrush myImageBrush = new ImageBrush(theImage);

// Create tiles that are 25 x 25, regardless of the size
// of the output area.
myImageBrush.Viewport = new Rect(0, 0, 25, 25);
myImageBrush.ViewportUnits = BrushMappingMode.Absolute;

// Set the tile mode to Tile.
myImageBrush.TileMode = TileMode.Tile;

// Use the ImageBrush to paint the rectangle's background.
myRectangle.Fill = myImageBrush;
' Create a rectangle.
Dim myRectangle As New Rectangle()
myRectangle.Width = 50
myRectangle.Height = 100

' Load the image.
Dim theImage As New BitmapImage(New Uri("sampleImages\cherries_larger.jpg", UriKind.Relative))
Dim myImageBrush As New ImageBrush(theImage)

' Create tiles that are 25 x 25, regardless of the size
' of the output area.
myImageBrush.Viewport = New Rect(0, 0, 25, 25)
myImageBrush.ViewportUnits = BrushMappingMode.Absolute

' Set the tile mode to Tile.
myImageBrush.TileMode = TileMode.Tile

' Use the ImageBrush to paint the rectangle's background.
myRectangle.Fill = myImageBrush
Chování při vazbě
A TileBrush vytvoří dlaždicový vzor, když jeho základní dlaždice zcela nevyplní výstupní oblast a režim provazování jiný, pak None je zadán. Pokud dlaždice štětce dlaždice zcela nevyplní výstupní oblast, jeho TileMode vlastnost určuje, zda má být základní dlaždice duplikována k vyplnění výstupní oblasti, a pokud ano, jak by měla být základní dlaždice duplikována. Vlastnost TileMode přijímá následující hodnoty definované výčtem TileMode :
None: Nakreslený je pouze základní dlaždice.
Tile: Základní dlaždice se nakreslí a zbývající oblast se vyplní opakováním základní dlaždice tak, aby pravý okraj jedné dlaždice sousedil s levým okrajem dalšího a podobně pro dolní a horní okraj.
FlipX: Stejné jako Tile, ale alternativní sloupce dlaždic jsou překlopené vodorovně.
FlipY: Stejné jako Tile, ale alternativní řádky dlaždic jsou překlopené svisle.
Následující obrázek znázorňuje různé režimy provazování.

V následujícím příkladu se obrázek používá k vykreslení obdélníku, který má šířku 100 pixelů a výšku 100 pixelů. Nastavením štětce je nastavena na 0,0,0,25,0,25, je základní dlaždice štětce Viewport nastavena na 1/4 výstupní oblasti. TileMode Kartáček je nastavený na FlipXY. tak, aby vyplnil obdélník řádky dlaždic.
<Rectangle
 Width="100" Height="100" >
  <Rectangle.Fill>
    <ImageBrush ImageSource="sampleImages\triangle.jpg"
      Viewport="0,0,0.25,0.25"
      TileMode="FlipXY"
      />
  </Rectangle.Fill>
</Rectangle>
// Create a rectangle.
Rectangle myRectangle = new Rectangle();
myRectangle.Width = 100;
myRectangle.Height = 100;

// Load the image.
BitmapImage theImage =
    new BitmapImage(
        new Uri("sampleImages\\triangle.jpg", UriKind.Relative));
ImageBrush myImageBrush = new ImageBrush(theImage);

// Create tiles that are 1/4 the size of
// the output area.
myImageBrush.Viewport = new Rect(0,0,0.25,0.25);

// Set the tile mode to FlipXY.
myImageBrush.TileMode = TileMode.FlipXY;

// Use the ImageBrush to paint the rectangle's background.
myRectangle.Fill = myImageBrush;
' Create a rectangle.
Dim myRectangle As New Rectangle()
myRectangle.Width = 100
myRectangle.Height = 100

' Load the image.
Dim theImage As New BitmapImage(New Uri("sampleImages\triangle.jpg", UriKind.Relative))
Dim myImageBrush As New ImageBrush(theImage)

' Create tiles that are 1/4 the size of
' the output area.
myImageBrush.Viewport = New Rect(0, 0, 0.25, 0.25)

' Set the tile mode to FlipXY.
myImageBrush.TileMode = TileMode.FlipXY

' Use the ImageBrush to paint the rectangle's background.
myRectangle.Fill = myImageBrush
Viz také
.NET Desktop feedback
Váš názor
Připravujeme: V průběhu roku 2024 budeme postupně vyřazovat problémy z GitHub coby mechanismus zpětné vazby pro obsah a nahrazovat ho novým systémem zpětné vazby. Další informace naleznete v tématu: https://aka.ms/ContentUserFeedback.
Odeslat a zobrazit názory pro
