Azure Linux virtual machine fails to boot after applying kernel changes
Note
CentOS referenced in this article is a Linux distribution and will reach End Of Life (EOL). Consider your use and plan accordingly. For more information, see CentOS End Of Life guidance.
This article provides solutions to an issue in which a Linux virtual machine (VM) can't boot after applying kernel changes.
Prerequisites
Make sure the serial console is enabled and functional in the Linux VM.
How to identify kernel-related boot issue
To identify a kernel-related boot issue, check the specific kernel panic string. To do this, use the Azure CLI or the Azure portal to view the serial console log output of the VM in the boot diagnostics pane or serial console pane.
A kernel panic looks like the following output and will show up at the end of the serial console log:
Probing EDD (edd=off to disable)... ok
Memory KASLR using RDRAND RDTSC...
[  300.206297] Kernel panic - xxxxxxxx
[  300.207216] CPU: 1 PID: 1 Comm: swapper/0 Tainted: G               ------------ T 3.xxx.x86_64 #1
Online troubleshooting
Tip
If you have a recent backup of the VM, restore the VM from the backup to fix the boot issue.
The serial console is the fastest method to resolve the boot issue. It allows you to directly fix the issue without having to present the system disk to a recovery VM. Make sure you meet the necessary prerequisites for your distribution. For more information, see Virtual machine serial console for Linux.
Use the Azure serial console to interrupt your VM at the GRUB menu and select any previous kernel to boot it up. For more information, see Boot system on older kernel version.
Go to the corresponding section to resolve the specific kernel-related boot issue:
After the kernel-related boot issue is resolved, restart the VM so it can boot over the latest kernel version.
Offline troubleshooting
Tip
If you have a recent backup of the VM, restore the VM from the backup to fix the boot issue.
If the Azure serial console doesn't work in the specific VM or isn't an option in your subscription, troubleshoot the boot issue by using a rescue/repair VM. To do this, follow these steps:
Use vm repair commands to create a repair VM that has a copy of the affected VM's OS disk attached. Mount the copy of the OS file systems in the repair VM by using chroot.
Note
Alternatively, you can create a rescue VM manually by using the Azure portal. For more information, see Troubleshoot a Linux VM by attaching the OS disk to a recovery VM using the Azure portal.
Go to the corresponding section to resolve the specific kernel-related boot issue:
After the kernel-related boot issue is resolved, perform the following actions:
- Exit chroot.
- Unmount the copy of the file systems from the rescue/repair VM.
- Run the
az vm repair restorecommand to swap the repaired OS disk with the original OS disk of the VM. For more information, see Step 5 in Repair a Linux VM by using the Azure Virtual Machine repair commands. - Validate if the VM is able to boot up by taking a look at the Azure serial console or by trying to connect to the VM.
If there are important kernel-related contents, the entire
/bootpartition, or other important contents are missing, and they can't be recovered, we recommend restoring the VM from a backup. For more information, see How to restore Azure VM data in Azure portal.
Boot system on older kernel version
Use Azure serial console
Restart the VM by using the Azure serial console.
- Select the shutdown button at the top of the serial console window.
- Select the Restart VM (Hard) option.
Once the serial console connection resumes, you'll see a countdown counter at the left top corner of the serial console window. Press the ESCAPE key to interrupt your VM at the GRUB menu.
Press the down arrow key to select any previous kernel version.

Change the
GRUB_DEFAULTvariable in the /etc/default/grub file as instructed in Change default kernel version manually. This is a persistent change.

Note
If there's only one kernel version listed in the GRUB menu, follow the Offline troubleshooting approach to troubleshoot this issue from a repair VM.
Use repair VM (ALAR scripts)
Run the following bash command in Azure Cloud Shell to create a repair VM. For more information, see Use Azure Linux Auto Repair (ALAR) to fix a Linux VM - kernel option.
az vm repair create --verbose -g $RGNAME -n $VMNAME --repair-username rescue --repair-password 'password!234' --copy-disk-name repairdiskcopyRun the following command to replace the broken kernel with the previously installed version:
az vm repair run --verbose -g $RGNAME -n $VMNAME --run-id linux-alar2 --parameters kernel --run-on-repair

az vm repair restore --verbose -g $RGNAME -n $VMNAME
Note
If there is only one kernel version installed in the system, follow the Offline troubleshooting approach to troubleshoot this issue from a repair VM.
Change default kernel version manually
To modify the default kernel version from a repair VM (inside chroot) or on a running VM, follow these steps:
Note
If a kernel downgrade rollback is done, select the most recent kernel version instead of the older one.
RHEL 7, Oracle Linux 7, and CentOS 7
Validate the list of available kernels in the GRUB configuration file by running one of the following commands:
Gen1 VMs:
cat /boot/grub2/grub.cfg | grep menuentryGen2 VMs:
cat /boot/efi/EFI/*/grub.cfg | grep menuentry
Set the new default kernel and specify the corresponding kernel title by running the following command:
# grub2-set-default 'Red Hat Enterprise Linux Server, with Linux 3.10.0-123.el7.x86_64'Note
Replace
Red Hat Enterprise Linux Server, with Linux 3.10.0-123.el7.x86_64with the corresponding menu entry title.Validate that the new default kernel is the desired one by running the following command:
grub2-editenv listMake sure the value of the
GRUB_DEFAULTvariable in the /etc/default/grub file is set tosaved. To modify it, make sure you regenerate the GRUB configuration file to apply the changes.
RHEL 8/9 and CentOS 8
List the available kernels by running the following command:
ls -l /boot/vmlinuz-*Set the new default kernel by running the following command:
grubby --set-default /boot/vmlinuz-4.18.0-372.19.1.el8_6.x86_64Note
Replace
4.18.0-372.19.1.el8_6.x86_64with the corresponding kernel version.Validate that the new default kernel is the desired one by running the following command:
grubby --default-kernel
SLES 12/15, Ubuntu 18.04/20.04
List the available kernels in the GRUB configuration file by running the following command:
Gen1 VMs:
SLES 12/15:
cat /boot/grub2/grub.cfg | grep menuentryUbuntu 18.04/20.04:
cat /boot/grub/grub.cfg | grep menuentry
Gen2 VMs:
cat /boot/efi/EFI/*/grub.cfg | grep menuentry
Set the new default kernel by modifying the value of the
GRUB_DEFAULTvariable in the /etc/default/grub file. For the most recent kernel version installed in the system, the default value is 0. The next available kernel is set to "1>2".vi /etc/default/grub GRUB_DEFAULT="1>2"Note
For more information about how to configure the
GRUB_DEFAULTvariable, see SUSE Boot Loader GRUB2 and Ubuntu Grub2/Setup. As a reference: the top level menuentry value is 0, the first top level submenu value is 1, and each nested menuentry value starts with 0. For example, "1>2" is the third menuentry from the first submenu.Regenerate the GRUB configuration file to apply the changes. Follow the instructions in Reinstall GRUB and regenerate GRUB configuration file for the corresponding Linux distribution and VM generation.
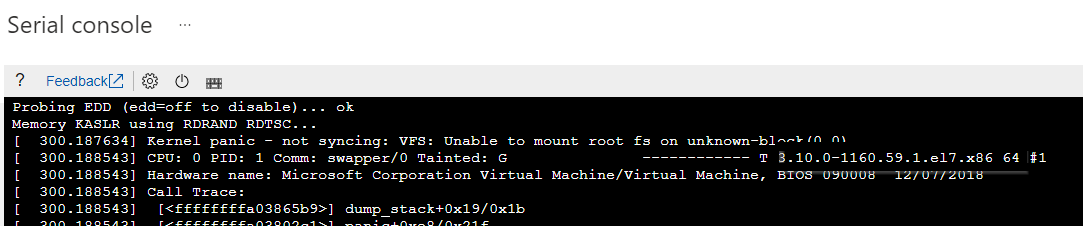
Kernel panic - not syncing: VFS: Unable to mount root fs on unknown-block(0,0)
This error occurs because of a recent system update (kernel). It's most commonly seen in RHEL-based distributions. You can identify this issue from the Azure serial console. You'll see any of the following error messages:
"Kernel panic - not syncing: VFS: Unable to mount root fs on unknown-block(0,0)"
[  301.026129] Kernel panic - not syncing: VFS: Unable to mount root fs on unknown-block(0,0)
[  301.027122] CPU: 0 PID: 1 Comm: swapper/0 Tainted: G               ------------ T 3.10.0-1160.36.2.el7.x86_64 #1
[  301.027122] Hardware name: Microsoft Corporation Virtual Machine/Virtual Machine, BIOS 090008  12/07/2018
[  301.027122] Call Trace:
[  301.027122]  [<ffffffff82383559>] dump_stack+0x19/0x1b
[  301.027122]  [<ffffffff8237d261>] panic+0xe8/0x21f
[  301.027122]  [<ffffffff8298b794>] mount_block_root+0x291/0x2a0
[  301.027122]  [<ffffffff8298b7f6>] mount_root+0x53/0x56
[  301.027122]  [<ffffffff8298b935>] prepare_namespace+0x13c/0x174
[  301.027122]  [<ffffffff8298b412>] kernel_init_freeable+0x222/0x249
[  301.027122]  [<ffffffff8298ab28>] ? initcall_blcklist+0xb0/0xb0
[  301.027122]  [<ffffffff82372350>] ? rest_init+0x80/0x80
[  301.027122]  [<ffffffff8237235e>] kernel_init+0xe/0x100
[  301.027122]  [<ffffffff82395df7>] ret_from_fork_nospec_begin+0x21/0x21
[  301.027122]  [<ffffffff82372350>] ? rest_init+0x80/0x80
[  301.027122] Kernel Offset: 0xc00000 from 0xffffffff81000000 (relocation range: 0xffffffff80000000-0xffffffffbfffffff)
"error: file '/initramfs-*.img' not found"
error: file '/initramfs-3.10.0-1160.36.2.el7.x86_64.img' not found.
This kind of error indicates that the initramfs file isn't generated, the GRUB configuration file has the initrd entry missing after a patching process, or a GRUB manual misconfiguration.
Before rebooting a server, we recommend validating the GRUB configuration and /boot contents if there's a kernel update by running one of the following commands. It's important to ensure the update is done and there are no missing initramfs files.
BIOS based - Gen1 systems
# ls -l /boot
# cat /boot/grub2/grub.cfg
UEFI based - Gen2 systems
# ls -l /boot
# cat /boot/efi/EFI/*/grub.cfg
Regenerate missing initramfs by using Azure Repair VM ALAR scripts
Create a repair VM by running the following Bash command line with Azure Cloud Shell. For more information, see Use Azure Linux Auto Repair (ALAR) to fix a Linux VM - initrd option.
az vm repair create --verbose -g $RGNAME -n $VMNAME --repair-username rescue --repair-password 'password!234' --copy-disk-name repairdiskcopyRegenerate the initrd/initramfs image and regenerate the GRUB configuration file if it has the initrd entry missing. To do this, run the following command:
az vm repair run --verbose -g $RGNAME -n $VMNAME --run-id linux-alar2 --parameters initrd --run-on-repair

az vm repair restore --verbose -g $RGNAME -n $VMNAME
Once the restore command has been executed, restart the original VM and validate that it's able to boot up.
Regenerate missing initramfs manually
Important
- If you're able to boot the VM up by using a previous kernel version or inside chroot from the repair/rescue VM, regenerate missing initramfs manually.
- To regenerate missing initramfs manually from a repair VM, make sure that step 1 in Offline troubleshooting has already been followed, and those commands are executed inside chroot.
Identify the specific kernel version that has issues with booting. You can extract the version information from the corresponding kernel panic error.
Refer to the following screenshot as an example. The kernel panic error shows that the kernel version is "3.10.0-1160.59.1.el7.x86_64":
Regenerate the missing initramfs file by running one of the following commands:
RHEL/CentOS/Oracle Linux 7/8
sudo depmod -a 3.10.0-1160.59.1.el7.x86_64
sudo dracut -f /boot/initramfs-3.10.0-1160.59.1.el7.x86_64.img 3.10.0-1160.59.1.el7.x86_64
Important
Replace
3.10.0-1160.59.1.el7.x86_64with the corresponding kernel version.SLES 12/15
sudo depmod -a 5.3.18-150300.38.53-azure
sudo dracut -f /boot/initrd-5.3.18-150300.38.53-azure 5.3.18-150300.38.53-azure
Important
Replace
5.3.18-150300.38.53-azurewith the corresponding kernel version.Ubuntu 18.04
sudo depmod -a 5.4.0-1077-azure
sudo mkinitramfs -k -o /boot/initrd.img-5.4.0-1077-azure
Important
Replace
5.4.0-1077-azurewith the corresponding kernel version.
Regenerate the GRUB configuration file. Follow the instructions in Reinstall GRUB and regenerate GRUB configuration file for the corresponding Linux distribution and VM generation
If the steps above are performed from a repair VM, follow step 3 in Offline troubleshooting. If the steps above are performed from the Azure Serial console, follow the Online troubleshooting method.
Reboot your VM over the most recent kernel version.
Kernel panic - not syncing: Attempted to kill init
Identify this issue from the Azure serial console. You'll see output like the following:
dracut Warning: Boot has failed. To debug this issue add "rdshell" to the kernel command line.
Kernel panic - not syncing: Attempted to kill init!
Pid: 1, comm: init Not tainted 2.6.32-754.17.1.el6.x86_64 #1
Call Trace:
 [<ffffffff81558bfa>] ? panic+0xa7/0x18b
 [<ffffffff81130370>] ? perf_event_exit_task+0xc0/0x340
 [<ffffffff81086433>] ? do_exit+0x853/0x860
 [<ffffffff811a33b5>] ? fput+0x25/0x30
 [<ffffffff81564272>] ? system_call_after_swapgs+0xa2/0x152
 [<ffffffff81086498>] ? do_group_exit+0x58/0xd0
 [<ffffffff81086527>] ? sys_exit_group+0x17/0x20
 [<ffffffff81564357>] ? system_call_fastpath+0x35/0x3a
 [<ffffffff8156427e>] ? system_call_after_swapgs+0xae/0x152
This kind of kernel panic occurs due to the following possible causes:
See the following sections for cause details and solutions. Make sure that the commands are executed from a repair/rescue VM inside a chroot environment as instructed in Offline troubleshooting.
Missing important files and directories
Important Linux files and directories are missing due to a human error. For example, files are accidentally deleted or file system corruption.
Validate the OS disk contents after attaching the copy of the OS disk to a repair VM and mounting the corresponding file systems by using chroot. You can compare the outputs with the ones from a working VM running the same OS version.
ls -l /
ls -l /usr/lib
ls -l /usr/lib64
ls -lR / | more
Restore the missing files from a backup. For more information, see Recover files from Azure virtual machine backup. Depending on the number of missing files, it might be better to do a full VM restore. For more information, see How to restore Azure VM data in Azure portal.
Missing important system core libraries and packages
Important system core libraries, files, or packages are deleted from the system or got corrupted. To resolve this issue, reinstall the affected libraries, files, or packages. This solution works on RPM-based distributions like Red Hat/CentOS/SUSE VMs. For other Linux distributions, we recommend restoring the VM from backup.
To perform the reinstallation, follow these steps:
Create a rescue VM by using a raw image with the same OS version and generation as the affected VM.
Access the chroot environment in the rescue VM to troubleshoot the issue.
sudo chroot /rescueThe command output will indicate which library is missing or corrupted, as shown below:
/bin/bash: error while loading shared libraries: libc.so.6: cannot open shared object file: No such file or directoryVerify all system packages and their corresponding status in the rescue VM. Compare the output against a healthy VM running the same OS version.
sudo rpm --verify --all --root=/rescueHere's an example of the command output:
error: Failed to dlopen /usr/lib64/rpm-plugins/systemd_inhibit.so /lib64/librt.so.1: undefined symbol: __pthread_attr_copy, version GLIBC_PRIVATE
S.5....T.  c /etc/dnf/dnf.conf
S.5....T.  c /etc/ssh/sshd_config
.M.......    /boot/efi/EFI/BOOT/BOOTX64.EFI
.M.......    /boot/efi/EFI/BOOT/fbx64.efi
.M.......    /boot/efi/EFI/redhat/BOOTX64.CSV
.M.......    /boot/efi/EFI/redhat/mmx64.efi
.M.......    /boot/efi/EFI/redhat/shimx64-redhat.efi
.M.......    /boot/efi/EFI/redhat/shimx64.efi
missing     /run/motd.d
.M.......  g /var/spool/anacron/cron.daily
.M.......  g /var/spool/anacron/cron.monthly
.M.......  g /var/spool/anacron/cron.weekly
missing     /lib64/libc-2.28.so     <-------
.M.......    /boot/efi/EFI/redhat
S.5....T.  c /etc/security/pwquality.conf
The output line
missing /lib64/libc-2.28.sois related to the previous error in step 2, and it indicates the libc-2.28.so package is missing. However, the libc-2.28.so package can be modified. In this case, the output will show.M.....instead ofmissing. The libc-2.28.so package is referenced as an example in the following steps.In the rescue VM, verify which package contains the library /lib64/libc-2.28.so.
sudo rpm -qf /lib64/libc-2.28.soglibc-2.28-127.0.1.el8.x86_64Note
The output will show the package that needs to be reinstalled, including the package name and version. The package version might be different from the one installed on the affected VM.
In the affected VM, verify which version of the glibc package is installed.
sudo rpm -qa --all --root=/rescue | grep -i glibcglibc-common-2.28-211.0.1.el8.x86_64 glibc-gconv-extra-2.28-211.0.1.el8.x86_64 glibc-2.28-211.0.1.el8.x86_64 <---- glibc-langpack-en-2.28-211.0.1.el8.x86_64Download the package glibc-2.28-211.0.1.el8.x86_64. You can download it from the official website of the OS vendor or from the rescue VM by using a package management tool like
yumdownloaderorzypper install --download-only <packagename>depending on the OS you're running.Here's an example of using the
yumdownloadertool:cd /tmp sudo yumdownloader glibc-2.28-211.0.1.el8.x86_64Last metadata expiration check: 0:03:24 ago on Thu 25 May 2023 02:36:25 PM UTC. glibc-2.28-211.0.1.el8.x86_64.rpm 8.7 MB/s | 2.2 MB 00:00Reinstall the affected package in the rescue VM.
sudo rpm -ivh --root=/rescue /tmp/glibc-*.rpm --replacepkgs --replacefileswarning: /tmp/glibc-2.28-211.0.1.el8.x86_64.rpm: Header V3 RSA/SHA256 Signature, key ID ad986da3: NOKEY Verifying... ################################# [100%] Preparing... ################################# [100%] Updating / installing... 1:glibc-2.28-211.0.1.el8 ################################# [100%]Access the chroot environment in the rescue VM to validate the reinstallation.
sudo chroot /rescueTurn off the rescue VM and swap the OS disk to the affected VM.
Wrong file permissions
Wrong system wide file permissions are modified due to a human error (for example, someone runs chmod 777 on / or other important OS file systems). To resolve this issue, restore the file permissions. This solution works on RPM-based distributions like Red Hat/CentOS/SUSE VMs. For other Linux distributions, we recommend restoring the VM from backup.
To restore the file permissions, run the following command after attaching the copy of the OS disk to a repair VM and mounting the corresponding file systems by using chroot:
rpm -a --setperms
rpm --setugids --all
chmod u+s /bin/sudo
chmod 660 /etc/sudoers.d/*
chmod 644 /etc/ssh/*.pub
chmod 640 /etc/ssh/*.key
Note
Don't run this command on running production systems.
If the issue still exists after manually recovering the corresponding file permissions, perform a restore from backup.
Missing partitions
In cases where /usr, /opt, /var, /home, /tmp, and / file systems are spread across different partitions, the data may be inaccessible because of issues at the partitions level, which might be caused by mistakes during partition resize operations or others.
In this scenario, if you document the original partition table layout, with the exact start and end sectors for each of the original partitions, and no further modifications are done on the system, like new file systems creation, recreate the partitions by using the same original layout with tools like fdisk (for MBR partition tables) or gdisk (for GPT partition tables) to gain access to the missing file system.
If this approach doesn't work, perform a restore from backup.
SELinux issues
Wrong SELinux permissions might prevent the system from accessing important files. To resolve this issue, follow these steps:
To verify if the system has issues due to wrong SELinux permissions, start the system with SELinux disabled by adding the selinux=0 kernel option to the GRUB linux16 line.
If the system is able to boot up, run the following command to trigger a SELinux relabel at boot time and reboot the system:
touch /.autorelabelIf the VM still can't boot, do a full VM restore from backup. For more information, see How to restore Azure VM data in Azure portal.
Other kernel-related boot issues
This article covers the most common Linux kernel panics identified in Azure. For more information about common kernel panic scenarios, see Kernel panic in Azure Linux VMs - Common kernel panic events.
There are some other important possible kernel panics that might cause no boot or no secure shell (SSH) scenarios.
Make sure you execute any commands from a repair VM inside a chroot environment, as instructed in Offline troubleshooting. If the system is already booted up over a previous kernel version, these commands can also be executed from the original VM by using root privileges or sudo, as instructed in Online troubleshooting.
Recent kernel upgrade
If the kernel panics start after a recent kernel upgrade, boot the VM over the previous kernel version. For more information, see Boot system on older kernel version.
You could also check if there's already a newer kernel version released by the Linux distribution vendor and install it. For more information about how to install the latest kernel version, see Kernel update process.
Recent kernel downgrade
If the kernel panics start after a recent kernel downgrade, return to the latest installed kernel. You could also check if there's already a newer kernel version released by the Linux distribution vendor and install it. For more information about how to install the latest kernel version, see Kernel update process.
To boot the system over the most recent kernel version, follow the instructions in Change the default kernel version manually, but select the first kernel listed in the GRUB menu. In a manual modification, you could set the GRUB_DEFAULT value to 0 and regenerate the corresponding GRUB configuration file.
Kernel module changes
You might experience a kernel panic that's related to a new kernel module or a missing kernel module. To get details about the specific kernel module that causes issues (if any), check the corresponding kernel panic trace.
To validate the loaded kernel modules and the disabled ones in /etc/modprobe.d/*.conf files, run one of the following commands:
RHEL/CentOS/Oracle Linux 7/8
lsinitrd /boot/initramfs-3.10.0-1160.59.1.el7.x86_64.img
lsmod
cat /etc/modprobe.d/*.conf
Important
Replace
3.10.0-1160.59.1.el7.x86_64with the corresponding kernel version.SLES 12/15
lsinitrd /boot/initrd-5.3.18-150300.38.53-azure
lsmod
cat /etc/modprobe.d/*.conf
Important
Replace
5.3.18-150300.38.53-azurewith the corresponding kernel version.Ubuntu 18.04
lsinitramfs /boot/initrd.img-5.4.0-1077-azure
lsmod
cat /etc/modprobe.d/*.conf
Important
Replace
5.4.0-1077-azurewith the corresponding kernel version.
To remove any specific kernel module, run the following command and regenerate the initramfs if needed.
rmmod <kernel_module_name>
If a system service uses the specific kernel module, disable it by running the systemctl disable <serviceName> or systemctl stop <serviceName> command.
Operating system recent configuration changes
Identify any recent kernel configuration changes that might cause issues. To resolve the issues, adjust those settings or roll back the configuration changes.
Run the following command to find persistent kernel parameters configured in any of the following files:
cat /etc/systctl.conf
cat /etc/sysctl.d/*
Run the following command to analyze the current kernel parameters and their current values:
sysctl -a
Note
Run this command on a running system and not from a chroot environment.
Possible missing files
For more information about this kind of issue, see Missing important files and directories.
Wrong permissions on files
For more information about this kind of issue, see Wrong file permissions.
Missing partitions
For more information about this kind of issue, see Missing partitions.
Kernel bugs
Identify this issue from the Azure serial console. This kind of issue will look like the following output:
[5275698.017004] kernel BUG at XXX/YYY.c:72!
[5275698.017004] invalid opcode: 0000 [#1] SMP
This kind of kernel panic is associated with kernel bugs or third-party kernel bugs.
To fix kernel bugs, search the vendor Knowledge Base by using the kernel BUG string and look for known issues in the corresponding kernel version your system is running. Here are some important vendor resources:
-
This tool is designed to help you diagnose a kernel crash. When you input a text, vmcore-dmesg.txt, or a file including one or more kernel oops messages, it will walk you through diagnosing the kernel crash issue.
-
To get access to the Red Hat resources, link your Microsoft Azure and Red Hat accounts. For more information, see How Microsoft Azure Customers Can Access the Red Hat Customer Portal.
We recommend keeping all your systems up to date to rule out any possible bugs already fixed in the most recent kernel versions. For more information, see Kernel update process.
If further analysis is required from the vendor, configure and enable kdump to generate a core dump:
- Kdump configuration in Red Hat based VMs.
- Kernel crash dump configuration in Ubuntu VMs.
- Kernel core dump configuration in SLES VMs
Kernel update process
To install the latest available kernel version, run one of the following commands:
RHEL/CentOS/Oracle Linux
yum update kernelSLES 12/15
zypper refresh
zypper update kernel*
Ubuntu 18.04/20.04
apt update
apt install linux-azure
To reinstall a specific kernel version, run one of the following commands. Make sure you aren't booted over the same kernel version you're trying to reinstall. For more information, see Boot system on older kernel version.
RHEL/CentOS/Oracle Linux
yum reinstall kernel-3.10.0-1160.59.1.el7.x86_64Important
Replace
3.10.0-1160.59.1.el7.x86_64with the corresponding kernel version.SLES 12/15
zypper refresh
zypper install -f kernel-azure-5.3.18-150300.38.75.1.x86_64
Important
Replace
kernel-azure-5.3.18-150300.38.75.1.x86_64with the corresponding kernel version.Ubuntu 18.04/20.04
apt update
apt install --reinstall linux-azure=5.4.0.1091.68
Important
Replace
5.4.0.1091.68with the corresponding kernel version.
To update the system and apply the latest available changes, run one of the following commands:
RHEL/CentOS/Oracle Linux
yum updateSLES 12/15
zypper refresh
zypper update
Ubuntu 18.04/20.04
apt update
apt upgrade
Kernel panics might be related to any of the following items. For more information, see Kernel panics at run time.
- Application workload changes.
- Application development or application bugs.
- Performance-related issues, and so on.
Next steps
If the specific boot error isn't a kernel related boot issue, see Troubleshoot Azure Linux Virtual Machines boot errors for further troubleshooting options.
Contact us for help
If you have questions or need help, create a support request, or ask Azure community support. You can also submit product feedback to Azure feedback community.
Váš názor
Připravujeme: V průběhu roku 2024 budeme postupně vyřazovat problémy z GitHub coby mechanismus zpětné vazby pro obsah a nahrazovat ho novým systémem zpětné vazby. Další informace naleznete v tématu: https://aka.ms/ContentUserFeedback.
Odeslat a zobrazit názory pro