Azure Firewall Premium certificates
To properly configure Azure Firewall Premium TLS inspection, you must provide a valid intermediate CA certificate and deposit it in Azure Key vault.
Certificates used by Azure Firewall Premium
There are three types of certificates used in a typical deployment:
Intermediate CA Certificate (CA Certificate)
A Certificate Authority (CA) is an organization that is trusted to sign digital certificates. A CA verifies identity and legitimacy of a company or individual requesting a certificate. If the verification is successful, the CA issues a signed certificate. When the server presents the certificate to the client (for example, your web browser) during a SSL/TLS handshake, the client attempts to verify the signature against a list of known good signers. Web browsers normally come with lists of CAs that they implicitly trust to identify hosts. If the authority is not in the list, as with some sites that sign their own certificates, the browser alerts the user that the certificate is not signed by a recognized authority and asks the user if they wish to continue communications with unverified site.
Server Certificate (Website certificate)
A certificate associated with a specific domain name. If a website has a valid certificate, it means that a certificate authority has taken steps to verify that the web address actually belongs to that organization. When you type a URL or follow a link to a secure website, your browser checks the certificate for the following characteristics:
- The website address matches the address on the certificate.
- The certificate is signed by a certificate authority that the browser recognizes as a trusted authority.
Occasionally users may connect to a server with an untrusted certificate. Azure Firewall will drop the connection as if the server terminated the connection.
Root CA Certificate (root certificate)
A certificate authority can issue multiple certificates in the form of a tree structure. A root certificate is the top-most certificate of the tree.
Azure Firewall Premium can intercept outbound HTTP/S traffic and auto-generate a server certificate for www.website.com. This certificate is generated using the Intermediate CA certificate that you provide. End-user browser and client applications (IaaS, PaaS and other workloads) must trust your organization Root CA certificate or intermediate CA certificate for this procedure to work.

Intermediate CA certificate requirements
Ensure your CA certificate complies with the following requirements:
When deployed as a Key Vault secret, you must use Password-less PFX (PKCS12) with a certificate and a private key. PEM certificates are not supported.
It must be a single certificate, and shouldn’t include the entire chain of certificates.
It must be valid for one year forward.
It must be an RSA private key with minimal size of 4096 bytes.
It must have the
KeyUsageextension marked as Critical with theKeyCertSignflag (RFC 5280; 4.2.1.3 Key Usage).It must have the
BasicConstraintsextension marked as Critical (RFC 5280; 4.2.1.9 Basic Constraints).The
CAflag must be set to TRUE.The Path Length must be greater than or equal to one.
It must be exportable.
Azure Key Vault
Azure Key Vault is a platform-managed secret store that you can use to safeguard secrets, keys, and TLS/SSL certificates. Azure Firewall Premium supports integration with Key Vault for server certificates that are attached to a Firewall Policy.
To configure your key vault:
- You need to import an existing certificate with its key pair into your key vault.
- Alternatively, you can also use a key vault secret that's stored as a password-less, base-64 encoded PFX file. A PFX file is a digital certificate containing both private key and public key.
- It's recommended to use a CA certificate import because it allows you to configure an alert based on certificate expiration date.
- After you've imported a certificate or a secret, you need to define access policies in the key vault to allow the identity to be granted get access to the certificate/secret.
- The provided CA certificate needs to be trusted by your Azure workload. Ensure they are deployed correctly.
- Since Azure Firewall Premium is listed as Key Vault Trusted Service, it allows you to bypass Key Vault internal Firewall and to eliminate any exposure of your Key Vault to the Internet.
Note
Whenever you import a new Firewall CA certificate into Azure Key Vault (either for the first time or replacing an expired CA certification), you should explicitly update the Azure Firewall Policy TLS setting with the new certificate.
You can either create or reuse an existing user-assigned managed identity, which Azure Firewall uses to retrieve certificates from Key Vault on your behalf. For more information, see What is managed identities for Azure resources?
Note
Azure role-based access control (Azure RBAC) is not currently supported for authorization. Use the access policy model instead. For more information, see Azure role-based access control (Azure RBAC) vs. access policies.
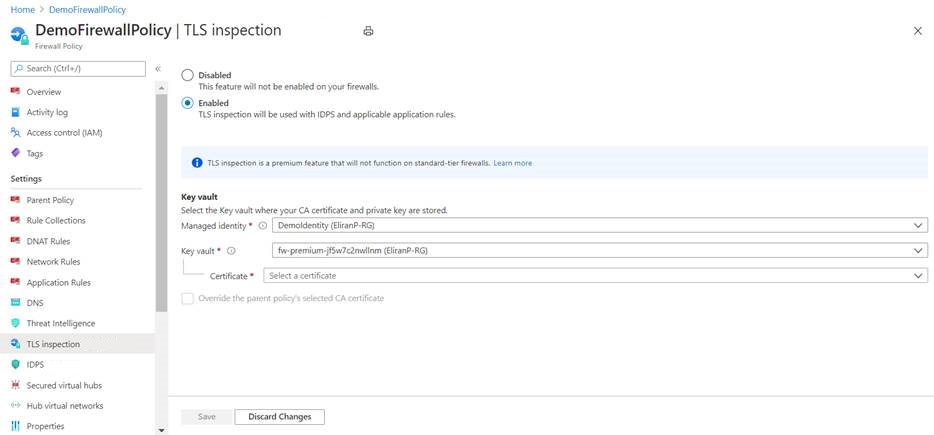
Configure a certificate in your policy
To configure a CA certificate in your Firewall Premium policy, select your policy and then select TLS inspection. Select Enabled on the TLS inspection page. Then select your CA certificate in Azure Key Vault, as shown in the following figure:
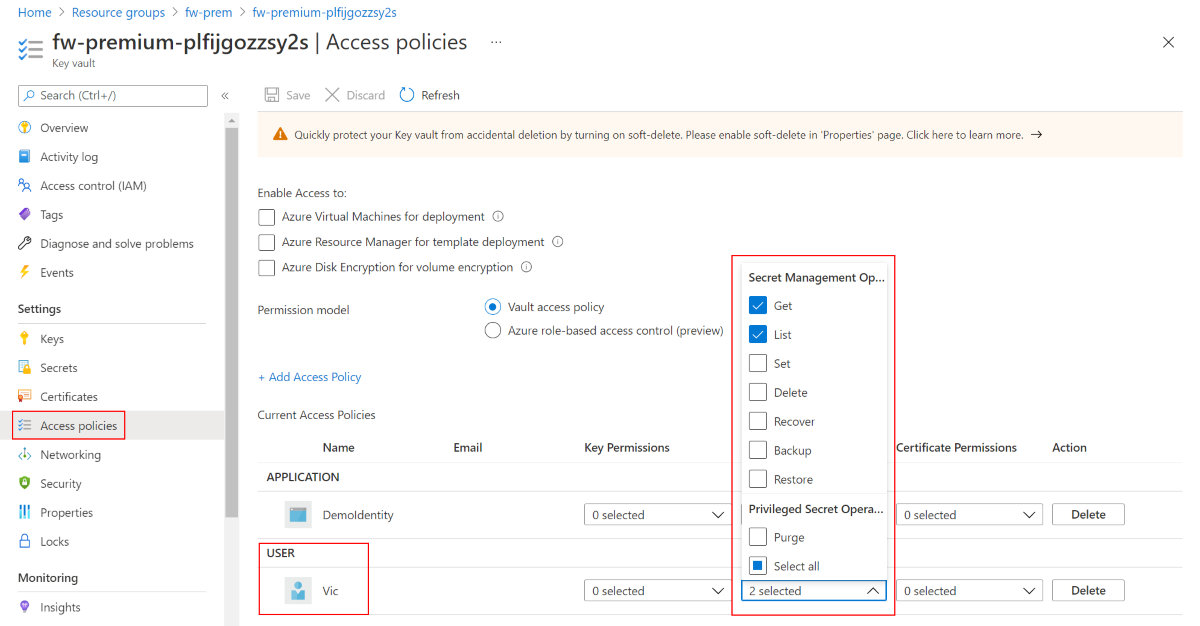
Important
To see and configure a certificate from the Azure portal, you must add your Azure user account to the Key Vault Access policy. Give your user account Get and List under Secret Permissions.
Create your own self-signed CA certificate
If you want to create your own certificates to help you test and verify TLS inspection, you can use the following scripts to create your own self-signed Root CA and Intermediate CA.
Important
For production, you should use your corporate PKI to create an Intermediate CA certificate. A corporate PKI leverages the existing infrastructure and handles the Root CA distribution to all endpoint machines. For more information, see Deploy and configure Enterprise CA certificates for Azure Firewall.
There are two versions of this script:
- a bash script
cert.sh - a PowerShell script
cert.ps1
Also, both scripts use the openssl.cnf configuration file. To use the scripts, copy the contents of openssl.cnf, and cert.sh or cert.ps1 to your local computer.
The scripts generate the following files:
- rootCA.crt/rootCA.key - Root CA public certificate and private key.
- interCA.crt/interCA.key - Intermediate CA public certificate and private key
- interCA.pfx - Intermediate CA pkcs12 package which will be used by firewall
Important
rootCA.key should be stored in a secure offline location. The scripts generate a certificate with validity of 1024 days. The scripts require openssl binaries installed in your local machine. For more information see https://www.openssl.org/
After the certificates are created, deploy them to the following locations:
- rootCA.crt - Deploy on endpoint machines (Public certificate only).
- interCA.pfx - Import as certificate on a Key Vault and assign to firewall policy.
openssl.cnf
[ req ]
default_bits        = 4096
distinguished_name  = req_distinguished_name
string_mask         = utf8only
default_md          = sha512

[ req_distinguished_name ]
countryName                     = Country Name (2 letter code)
stateOrProvinceName             = State or Province Name
localityName                    = Locality Name
0.organizationName              = Organization Name
organizationalUnitName          = Organizational Unit Name
commonName                      = Common Name
emailAddress                    = Email Address

[ rootCA_ext ]
subjectKeyIdentifier = hash
authorityKeyIdentifier = keyid:always,issuer
basicConstraints = critical, CA:true
keyUsage = critical, digitalSignature, cRLSign, keyCertSign

[ interCA_ext ]
subjectKeyIdentifier = hash
authorityKeyIdentifier = keyid:always,issuer
basicConstraints = critical, CA:true, pathlen:1
keyUsage = critical, digitalSignature, cRLSign, keyCertSign

[ server_ext ]
subjectKeyIdentifier = hash
authorityKeyIdentifier = keyid:always,issuer
basicConstraints = critical, CA:false
keyUsage = critical, digitalSignature
extendedKeyUsage = serverAuth
Bash script - cert.sh
#!/bin/bash

# Create root CA
openssl req -x509 -new -nodes -newkey rsa:4096 -keyout rootCA.key -sha256 -days 1024 -out rootCA.crt -subj "/C=US/ST=US/O=Self Signed/CN=Self Signed Root CA" -config openssl.cnf -extensions rootCA_ext

# Create intermediate CA request
openssl req -new -nodes -newkey rsa:4096 -keyout interCA.key -sha256 -out interCA.csr -subj "/C=US/ST=US/O=Self Signed/CN=Self Signed Intermediate CA"

# Sign on the intermediate CA
openssl x509 -req -in interCA.csr -CA rootCA.crt -CAkey rootCA.key -CAcreateserial -out interCA.crt -days 1024 -sha256 -extfile openssl.cnf -extensions interCA_ext

# Export the intermediate CA into PFX
openssl pkcs12 -export -out interCA.pfx -inkey interCA.key -in interCA.crt -password "pass:"

echo ""
echo "================"
echo "Successfully generated root and intermediate CA certificates"
echo "   - rootCA.crt/rootCA.key - Root CA public certificate and private key"
echo "   - interCA.crt/interCA.key - Intermediate CA public certificate and private key"
echo "   - interCA.pfx - Intermediate CA pkcs12 package which could be uploaded to Key Vault"
echo "================"
PowerShell - cert.ps1
# Create root CA
openssl req -x509 -new -nodes -newkey rsa:4096 -keyout rootCA.key -sha256 -days 3650 -out rootCA.crt -subj '/C=US/ST=US/O=Self Signed/CN=Self Signed Root CA' -config openssl.cnf -extensions rootCA_ext

# Create intermediate CA request
openssl req -new -nodes -newkey rsa:4096 -keyout interCA.key -sha256 -out interCA.csr -subj '/C=US/ST=US/O=Self Signed/CN=Self Signed Intermediate CA'

# Sign on the intermediate CA
openssl x509 -req -in interCA.csr -CA rootCA.crt -CAkey rootCA.key -CAcreateserial -out interCA.crt -days 3650 -sha256 -extfile openssl.cnf -extensions interCA_ext

# Export the intermediate CA into PFX
openssl pkcs12 -export -out interCA.pfx -inkey interCA.key -in interCA.crt -password 'pass:'

Write-Host ""
Write-Host "================"
Write-Host "Successfully generated root and intermediate CA certificates"
Write-Host "   - rootCA.crt/rootCA.key - Root CA public certificate and private key"
Write-Host "   - interCA.crt/interCA.key - Intermediate CA public certificate and private key"
Write-Host "   - interCA.pfx - Intermediate CA pkcs12 package which could be uploaded to Key Vault"
Write-Host "================"
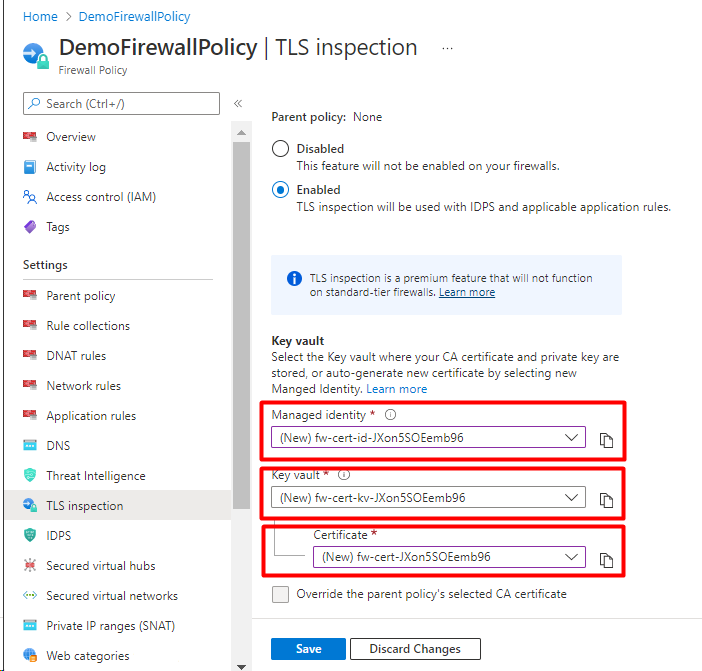
Certificate auto-generation
For non-production deployments, you can use the Azure Firewall Premium Certification Auto-Generation mechanism, which automatically creates the following three resources for you:
- Managed Identity
- Key Vault
- Self-signed Root CA certificate
Just choose the new managed identity, and it ties the three resources together in your Premium policy and sets up TLS inspection.
Troubleshooting
If your CA certificate is valid, but you can’t access FQDNs or URLs under TLS inspection, check the following items:
Ensure the web server certificate is valid.
Ensure the Root CA certificate is installed on client operating system.
Ensure the browser or HTTPS client contains a valid root certificate. Firefox and some other browsers may have special certification policies.
Ensure the URL destination type in your application rule covers the correct path and any other hyperlinks embedded in the destination HTML page. You can use wildcards for easy coverage of the entire required URL path.
Next steps
Feedback
Kommer snart: I hele 2024 udfaser vi GitHub-problemer som feedbackmekanisme for indhold og erstatter det med et nyt feedbacksystem. Du kan få flere oplysninger under: https://aka.ms/ContentUserFeedback.
Indsend og få vist feedback om