Rediger

Share via


Reset and reactivate your Azure Stack Edge device

APPLIES TO: Yes for Pro GPU SKUAzure Stack Edge Pro - GPUYes for Pro 2 SKUAzure Stack Edge Pro 2Yes for Pro R SKUAzure Stack Edge Pro RYes for Mini R SKUAzure Stack Edge Mini R                  

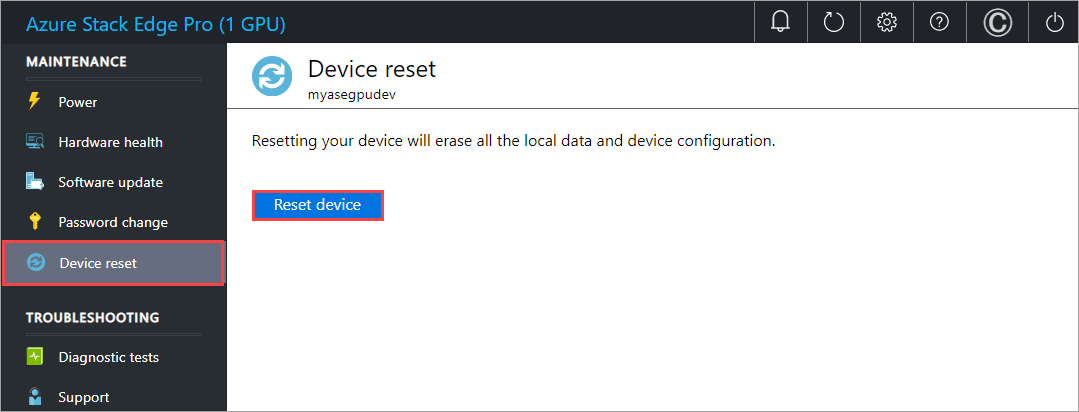
This article describes how to reset, reconfigure, and reactivate an Azure Stack Edge device if you're having issues with the device or need to start fresh for some other reason.

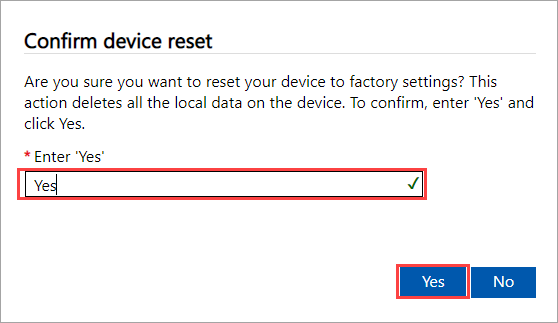
After you reset the device to remove the data, you'll need to reactivate the device as a new resource. Resetting a device removes the device configuration, so you'll need to reconfigure the device via the local web UI.

For example, you might need to move an existing Azure Stack Edge resource to a new subscription. To do so, you would:

  1. Reset data on the device by following the steps in Reset device.
  2. Create a new resource that uses the new subscription with your existing device, and then activate the device. Follow the steps in Reactivate device.

Prerequisites

Before you begin, make sure that:

  • You have access to an Azure Stack Edge device that you'll reset, reconfigure, and reactivate.
  • You have created a copy of the local data on the device if needed. You can copy the data from the device to an Azure Storage container.

Reset device

To wipe the data off the data disks of your device, you need to reset your device.

Important

Resetting your device will erase all local data and workloads from your device, and that can't be reversed. Reset your device only if you want to start afresh with the device.

You can reset your device in the local web UI or in PowerShell. For PowerShell instructions, see Reset your device.

The reset erases the data off the device data disks. Depending on the amount of data on your device, this process takes about 30-40 minutes.

To reset your device using the local web UI, take the following steps.

  1. In the local web UI, go to Maintenance > Device reset.

  2. Select Reset device.

    Reset device

  3. When prompted for confirmation, review the warning. Type Yes and then select Yes to continue.

    Confirm reset

    Important

    If running AP5GC/SAP Kubernetes workload profiles and you updated your Azure Stack Edge to 2309, and reset your Azure Stack Edge device, you see the following behavior:

    • In the local web UI, if you go to Software updates page, you see that the Kubernetes version is unavailable.
    • In Azure portal, you are prompted to apply a Kubernetes update. Go ahead and apply the Kubernetes update.
    • After device reset, you must select a Kubernetes workload profile again. Otherwise, the default "Other workloads" profile will be applied. For more information, see Configure compute IPs.

Remove Azure resources from your Azure Stack Edge device

In addition to resetting your device, complete the following steps to remove Azure resources associated with the device.

Note

While performing the device reset, only the data that resides locally on the device will be deleted. The data that's in the cloud won't be deleted and, if not removed, will continue to collect charges. This data must be deleted separately using a cloud storage management tool like Azure Storage Explorer.

Delete the Azure Stack Edge resource (name of the service) associated with the Azure Stack Edge device. You can also use this step to remove the associated key vault. This step also removes the managed identity associated with the Azure Stack Edge resource. Gather key vault details before you delete the Azure Stack Edge resource.

Use the following steps to delete the Azure Stack Edge resource, its managed identity, the associated key vault, and the Azure storage account:

  1. In Azure portal, go to your key vault, navigate to Diagnostic settings, and make note of the storage account name and the key vault name.

  2. Go to your Azure Stack Edge resource and then to Overview. From the command bar, select Delete.

  3. In the Delete device blade, specify the name of the device you want to delete and then select Delete.

  4. To continue, confirm the delete operation.

  5. When deleting the Azure Stack Edge resource, you'll also be prompted to remove the associated key vault. To get the key vault name, select Security in left navigation, and then select the key vault name to get to the key vault resource. The key vault name starts with the service name and is appended with a GUID. Select Diagnostic settings and also note the storage account name.

  6. Delete the Azure storage account used by the key vault. Look for a Zone redundant storage account in the same scope as the Azure Stack Edge resource; manually delete the storage account.

Reactivate device

After you reset the device, you must reactivate the device as a new management resource. After placing a new order, you must reconfigure and then reactivate the new resource.

Use the following steps to create a new management resource for your existing device:

  1. On the Azure services page of Azure portal, select Azure Stack Edge.

    Screenshot of Azure services page on Azure portal. The Azure Stack Edge option is highlighted.

  2. On the Azure Stack Edge page, select + Create.

    Screenshot of Azure Stack Edge page on Azure portal. The Create resource option is highlighted.

  3. On the Manage Azure Stack Edge page, select Manage a device.

    Screenshot of Manage Azure Stack Edge page on Azure portal. The Manage a device button is highlighted.

  4. On the Basics tab, specify project details for your resource, and then select Next: Tags.

    Screenshot of Create management resource page Basics tab on Azure portal. The Project details fields are highlighted.

  5. On the Tags tab, specify Name and Value tags for your management resource, and then select Review + create.

    Screenshot of Create management resource page Tags tab on Azure portal. The Name and Value fields are highlighted.

  6. On the Review + create tab, review Terms and conditions and Basics for your management resource, and then review and accept the Privacy terms. To complete the operation, select Create.

    Screenshot of Create management resource page Review and create tab on Azure portal. The Privacy terms checkbox is highlighted.

Complete device configuration

After you create the management resource for your device, use the following steps to complete device configuration.

Next step