Quickstart for Resource Scheduling Optimization
Resource scheduling optimization automatically schedules work orders, cases, opportunities, and even custom entities to the resources that are most available and best qualified. Many field service organizations that perform work orders on site at their customers' locations benefit from automatic scheduling because it optimizes the routes and travel times of field technicians as they travel from work order to work order.
In this quickstart, we will configure Resource Scheduling Optimization to schedule and optimize a group of work orders to a predefined list of resources (field technicians). We will do this by setting up a scope, goal, and schedule that will run once a day to schedule work orders in the Washington state service territory to resources in that territory up to 48 hours in advance to minimize travel time.
For a guided walkthrough, see the following video.
Note
For additional Field Service videos, see this full playlist.
Prerequisites
The images and definitions in this quickstart reflect Field Service v8.7 and Resource Scheduling Optimization v3.0.
This quickstart assumes you already have Resource Scheduling Optimization deployed into your Field Service environment. You can do this by first purchasing a Field Service license and then purchasing a Resource Scheduling Optimization license in the "Purchase Services" section of Microsoft 365. For more details, visit the article on Deployment of the Resource Scheduling Optimization solution.

Make sure the person who sets up Resource Scheduling Optimization has the Field Service-Administrator and Resource Scheduling Optimization security roles and the Field Service-Administrator and Resource Scheduling Optimization-Administrator field security profiles. For more information, see: Resource scheduling optimization configuration.
Resource scheduling optimization works with Universal Resource Scheduling to schedule field service work orders. A working knowledge of how Universal Resource Scheduling works will help with this quickstart. For more details, view the article on Universal Resource Scheduling for Field Service.
Step 1: Turn on Resource Scheduling Optimization
After deploying Resource Scheduling Optimization into your environment, you must enable it.
Go to Resource Scheduling > Settings > Administration > Scheduling Parameters > Resource Scheduling Optimization tab
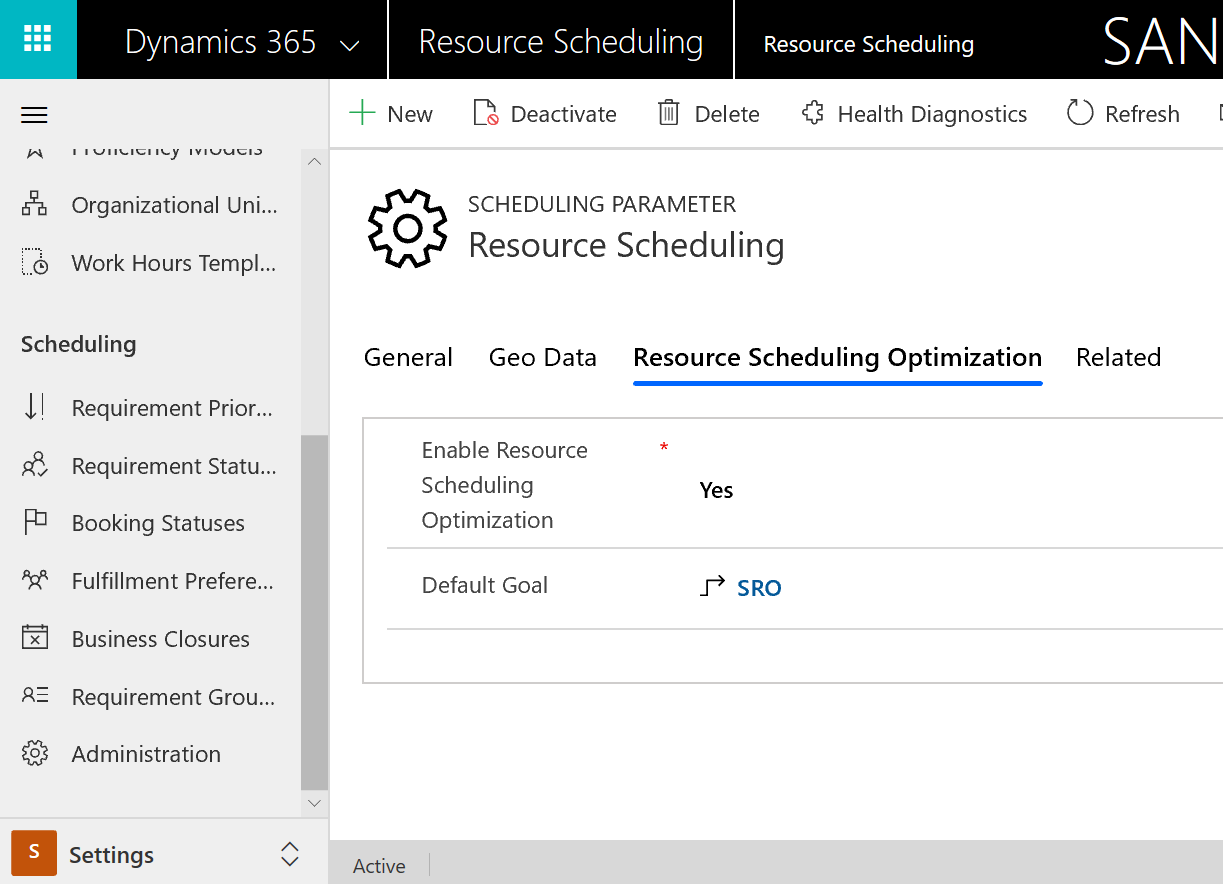
Set Enable Resource Scheduling Optimization to Yes.
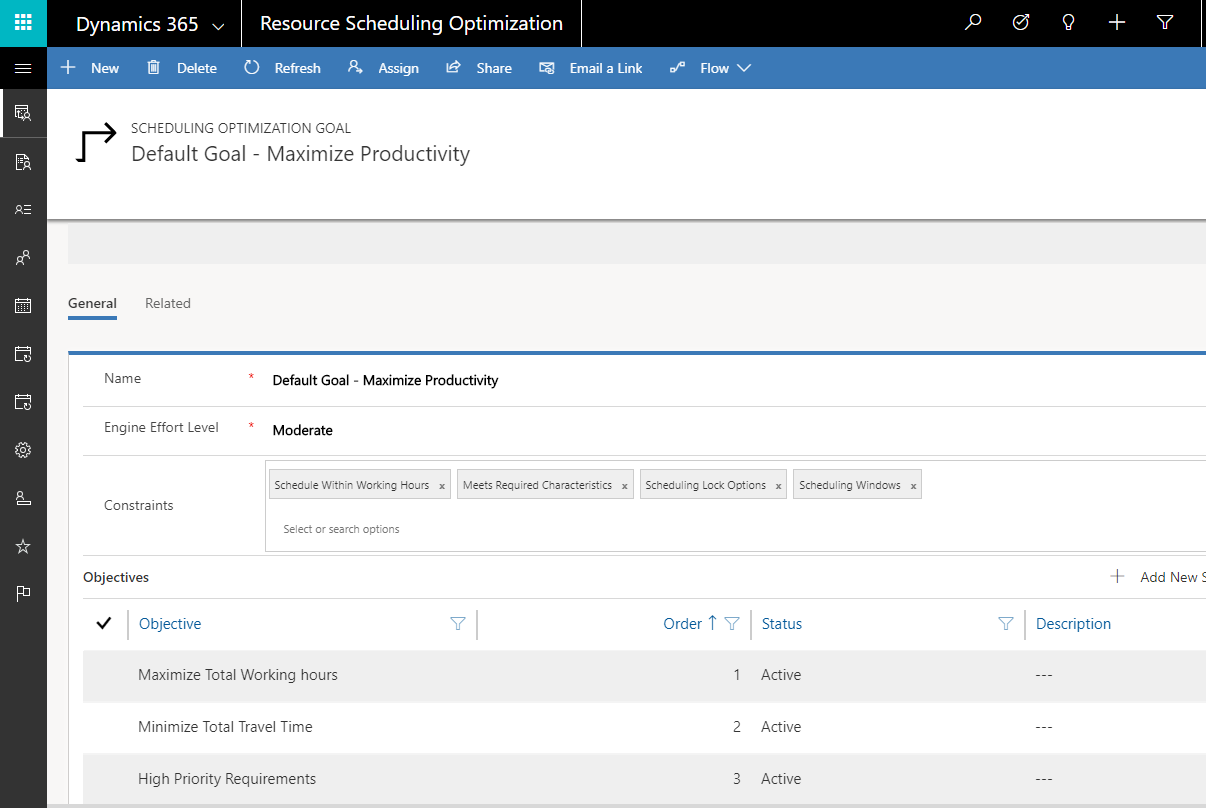
Select a Default Goal. Among other uses, a default goal tells Resource Scheduling Optimization what to prioritize by default (such as maximizing working hours) and is important for using Single Resource Optimization. If no default goal is present, select +New and create one. See the following screenshot for some recommended settings.
Step 2: Verify Booking Statuses
Installing Field Service will import booking statuses, and installing Resource Scheduling Optimization will add the scheduling methods Ignore, Do Not Move, or Optimize to those booking statuses. Make sure the highlighted booking statuses match your system.
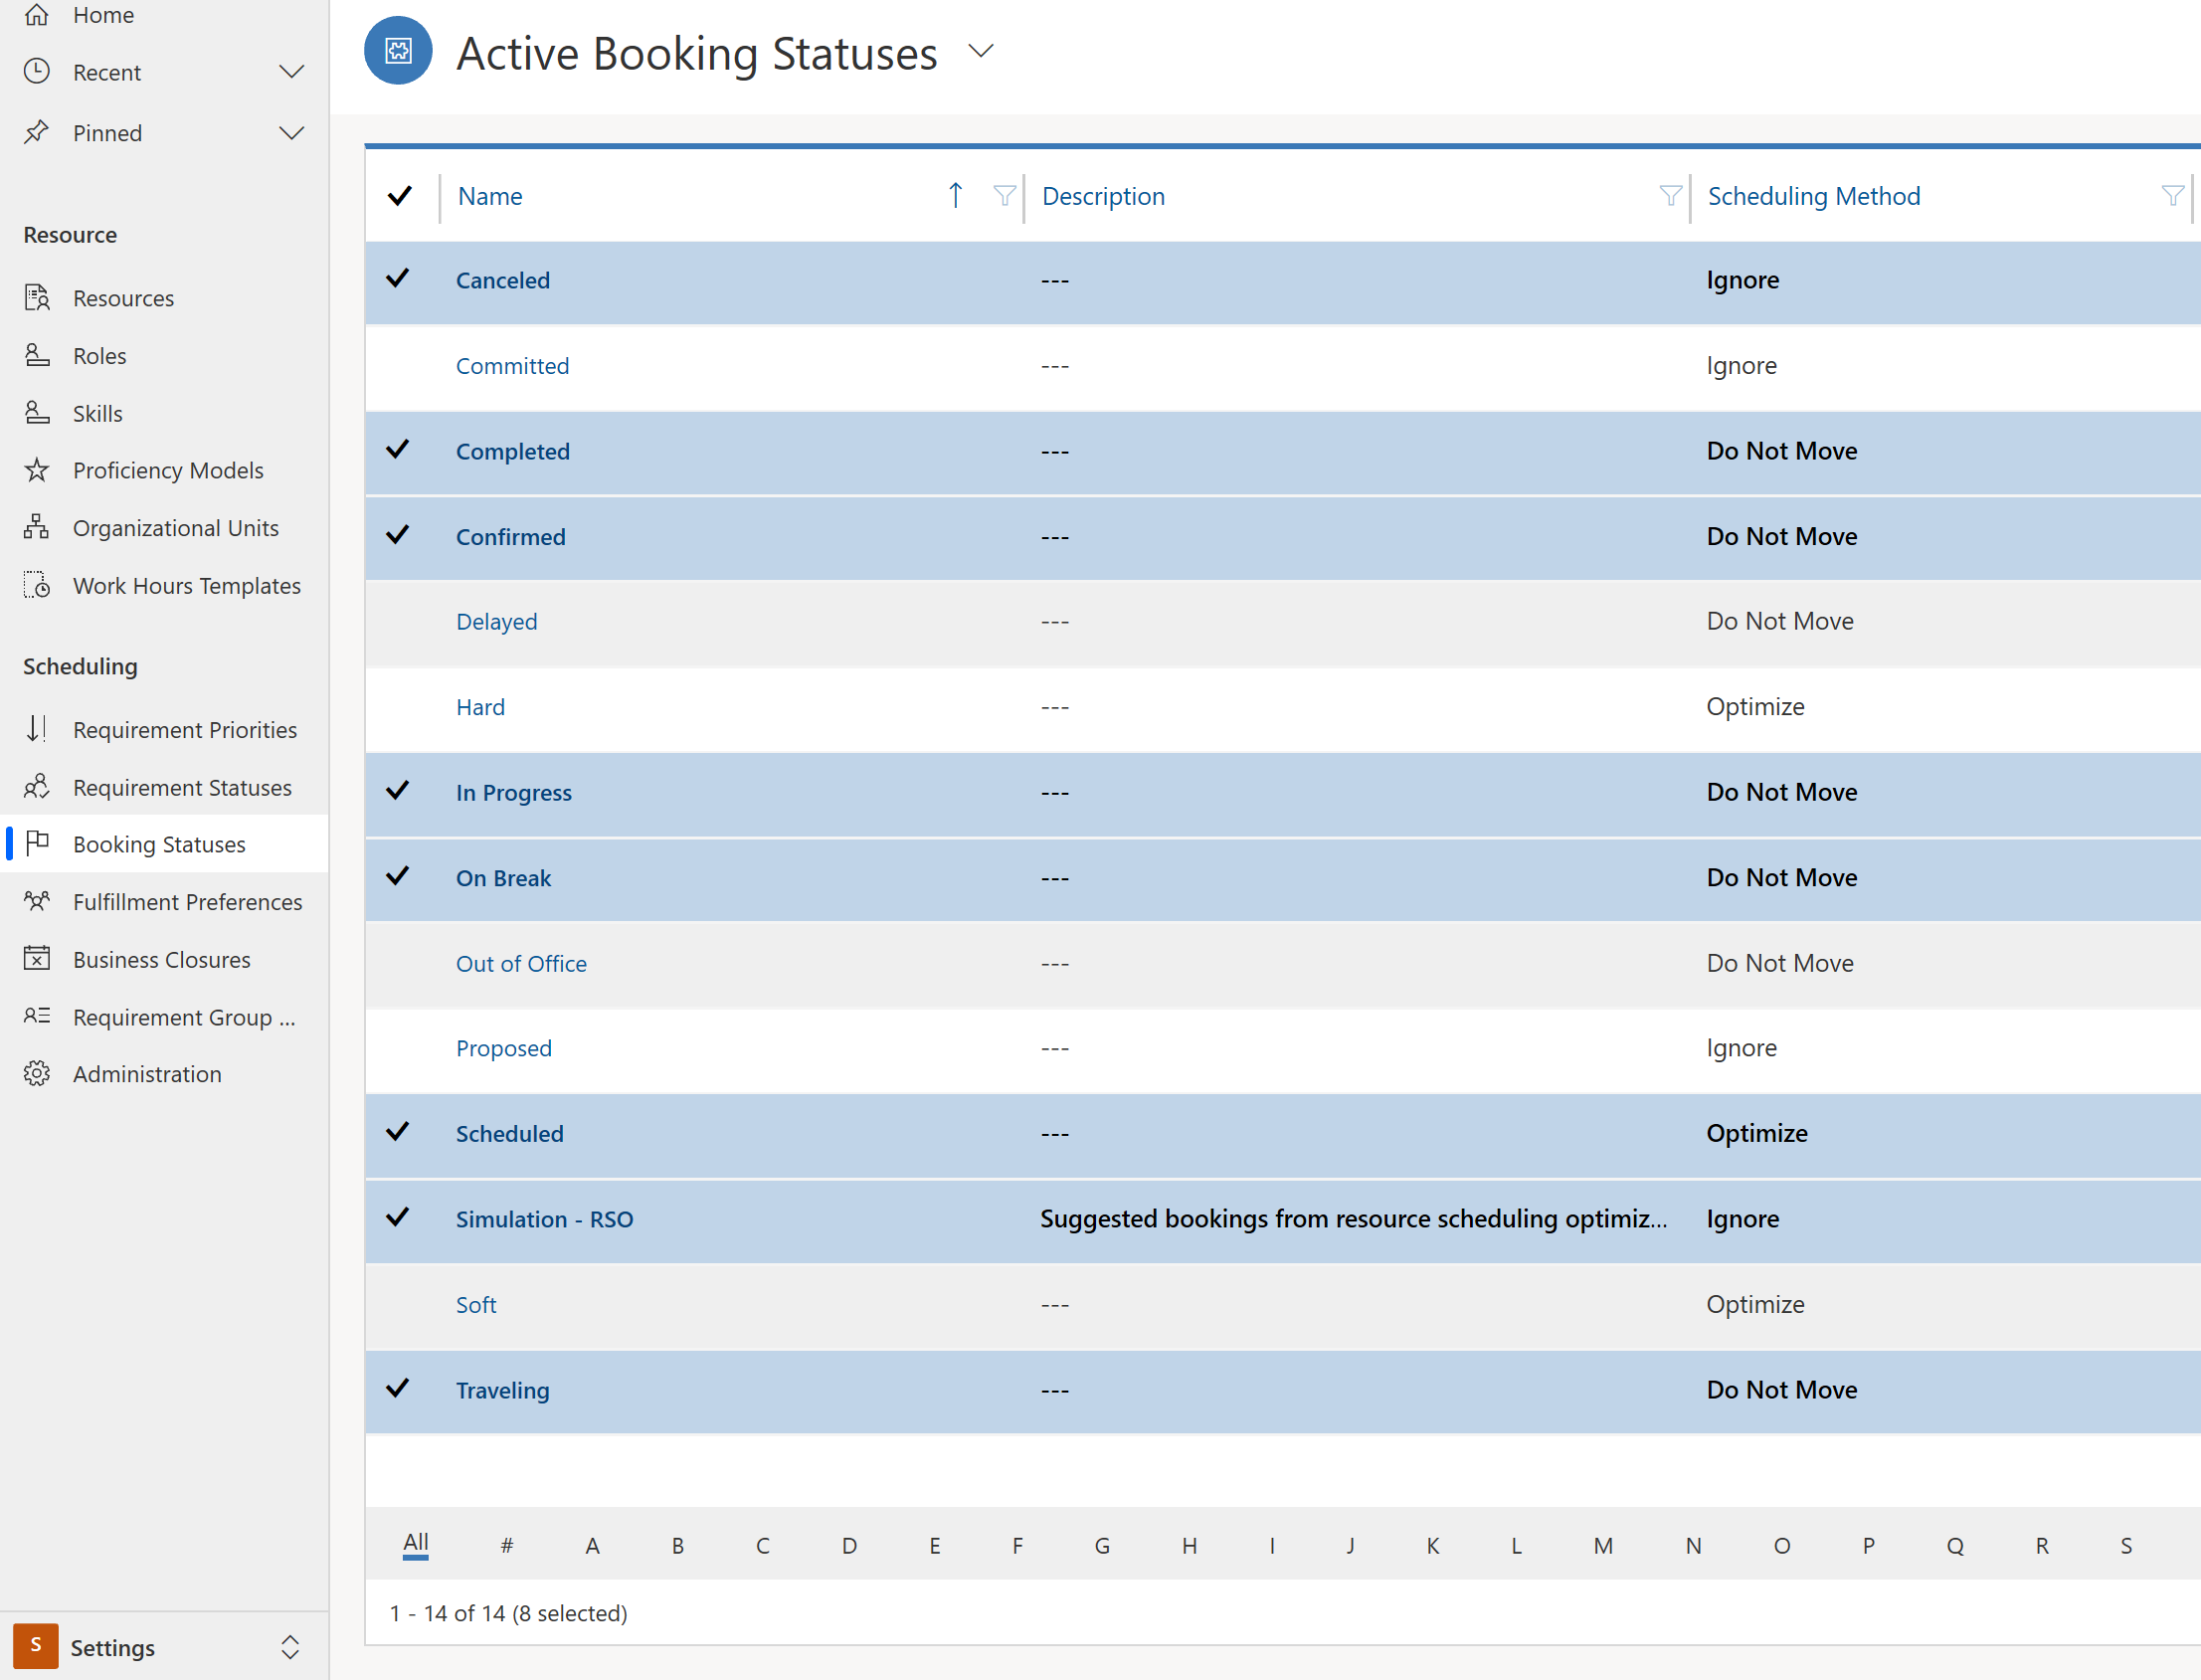
If they do not match, make sure Resource Scheduling Optimization is finished installing. If it is finished, try resetting Resource Scheduling Optimization by going to Resource Scheduling Optimization > Optimization Schedules > and selecting Reset in the top ribbon.
Step 3: Set work orders to optimize
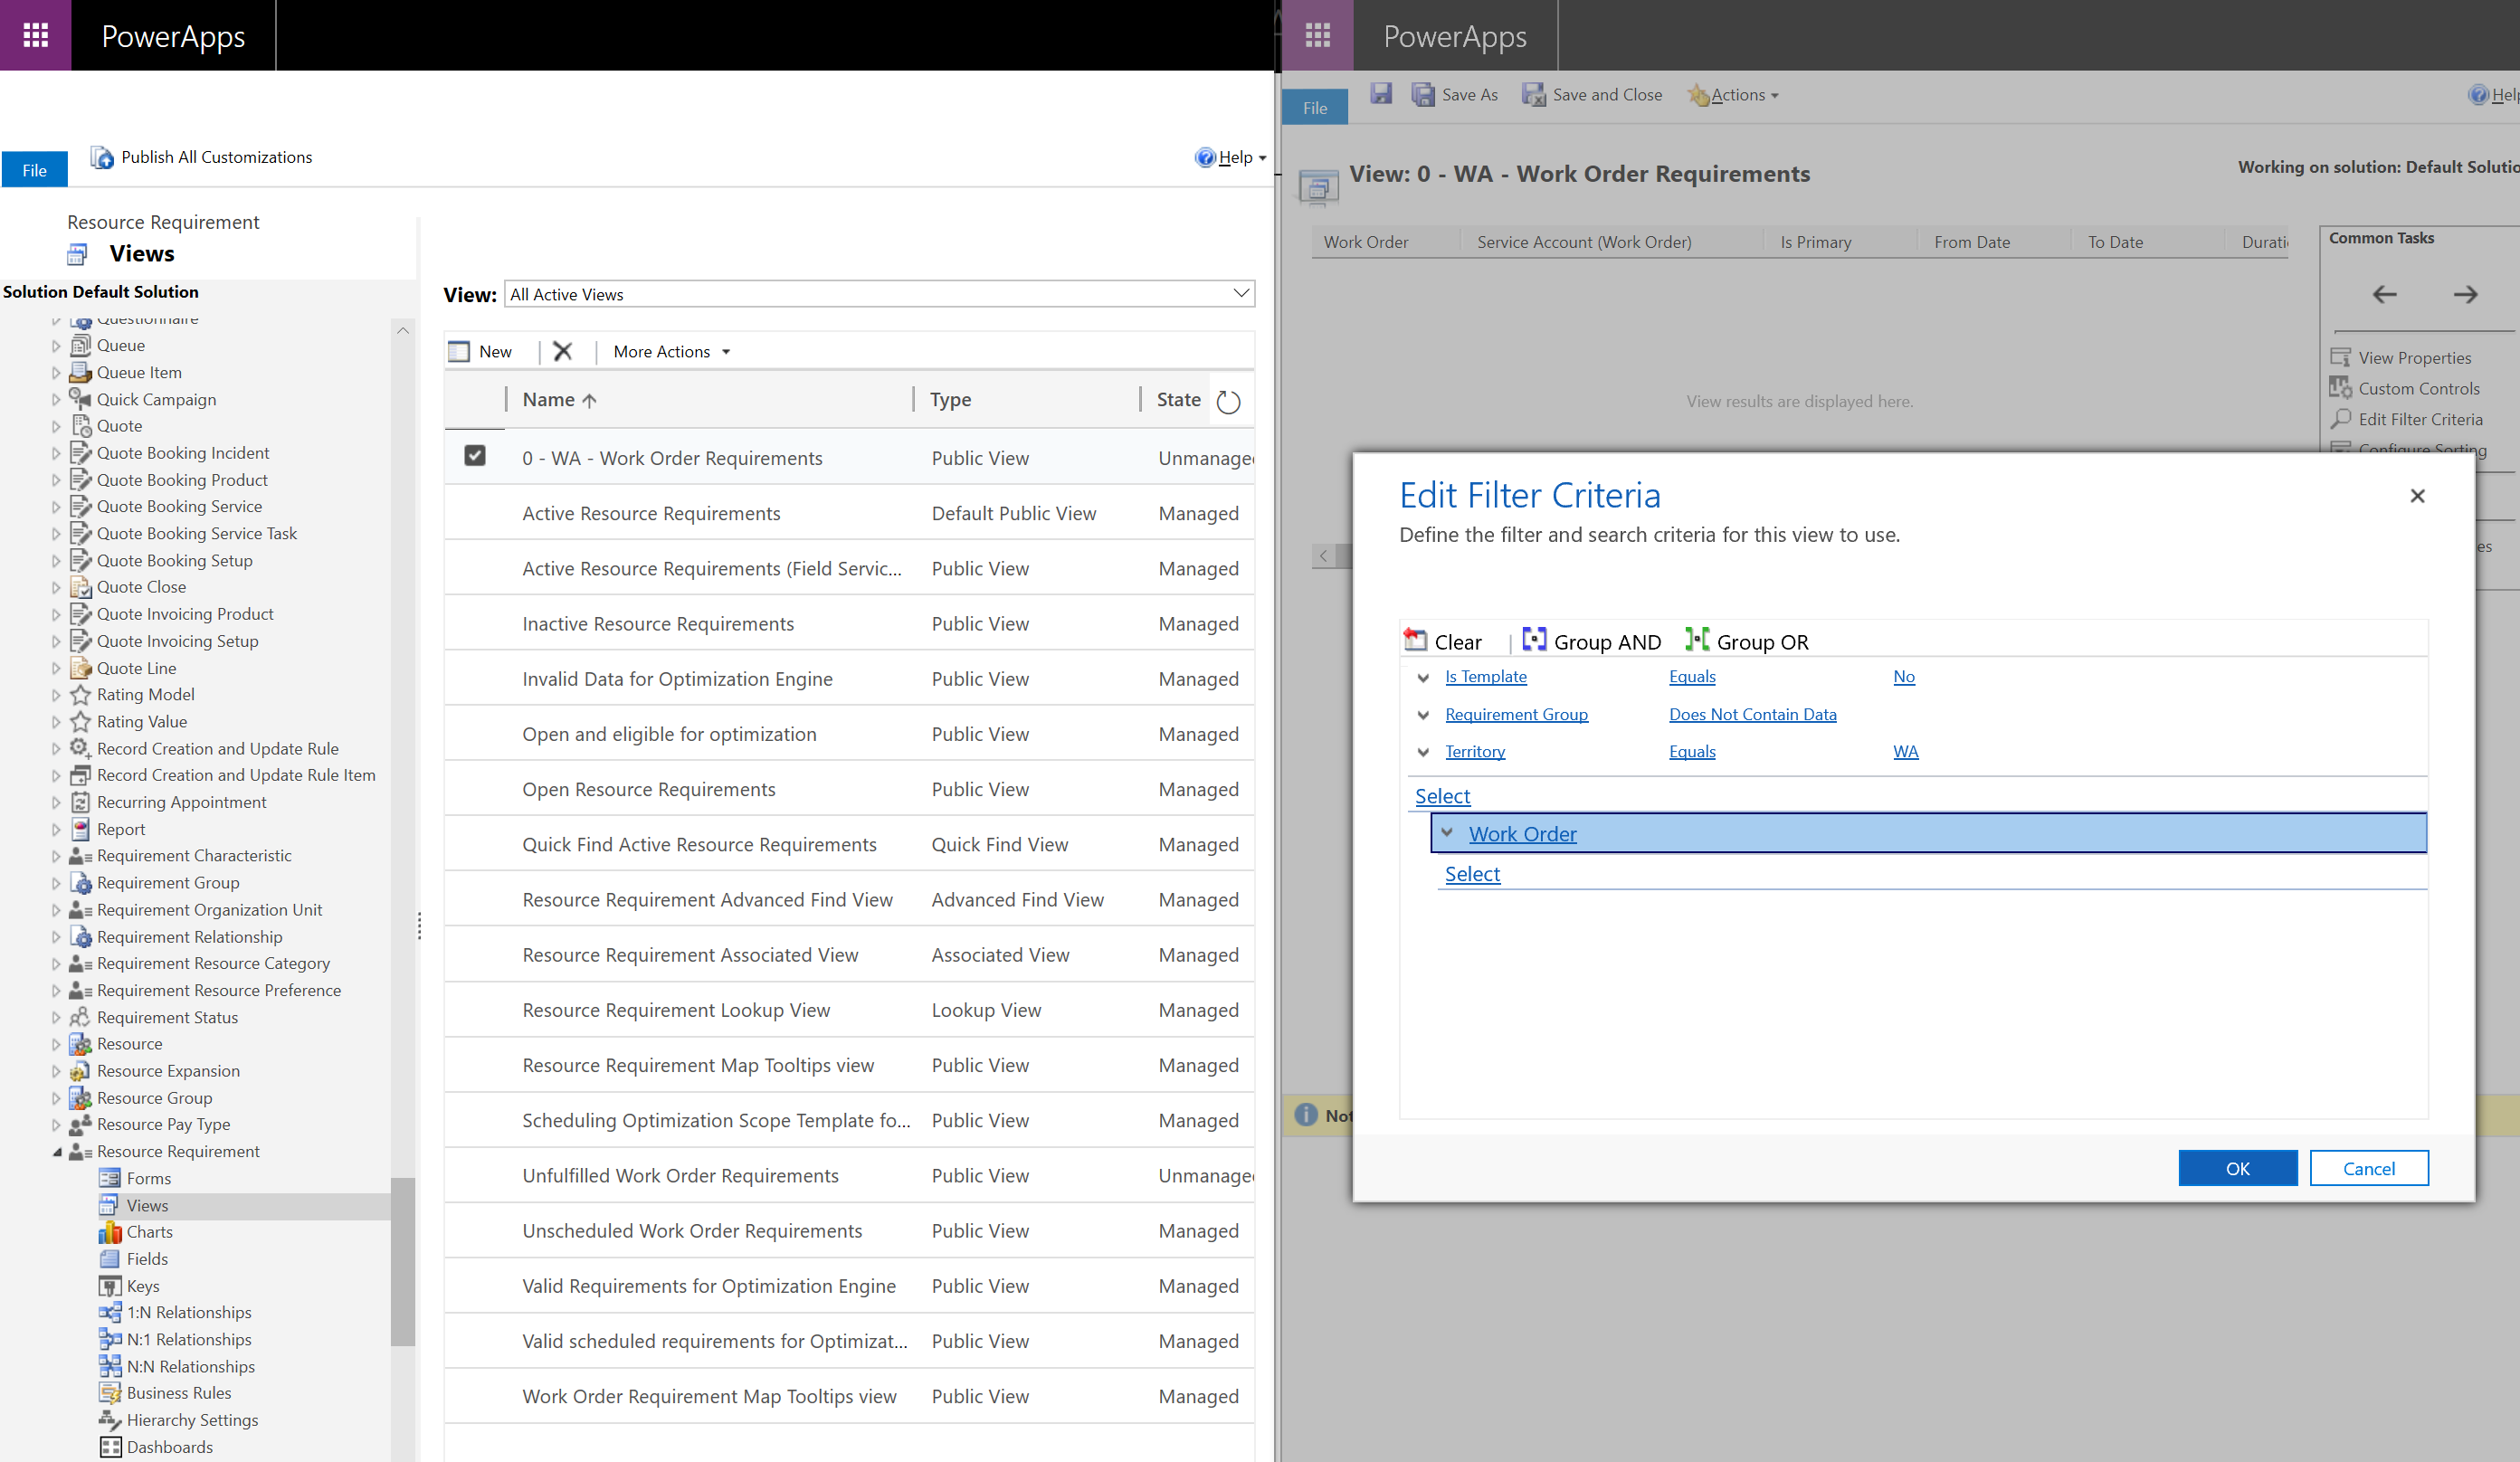
Next, create a system view that filters resource requirements to the ones you want to optimize.
Create a new view in Settings > Customizations
For our quickstart scenario, create a new view for the Resource Requirement entity for requirements related to work orders in the Washington (WA) service territory.
Next, ensure the requirements in that view are eligible for optimization.
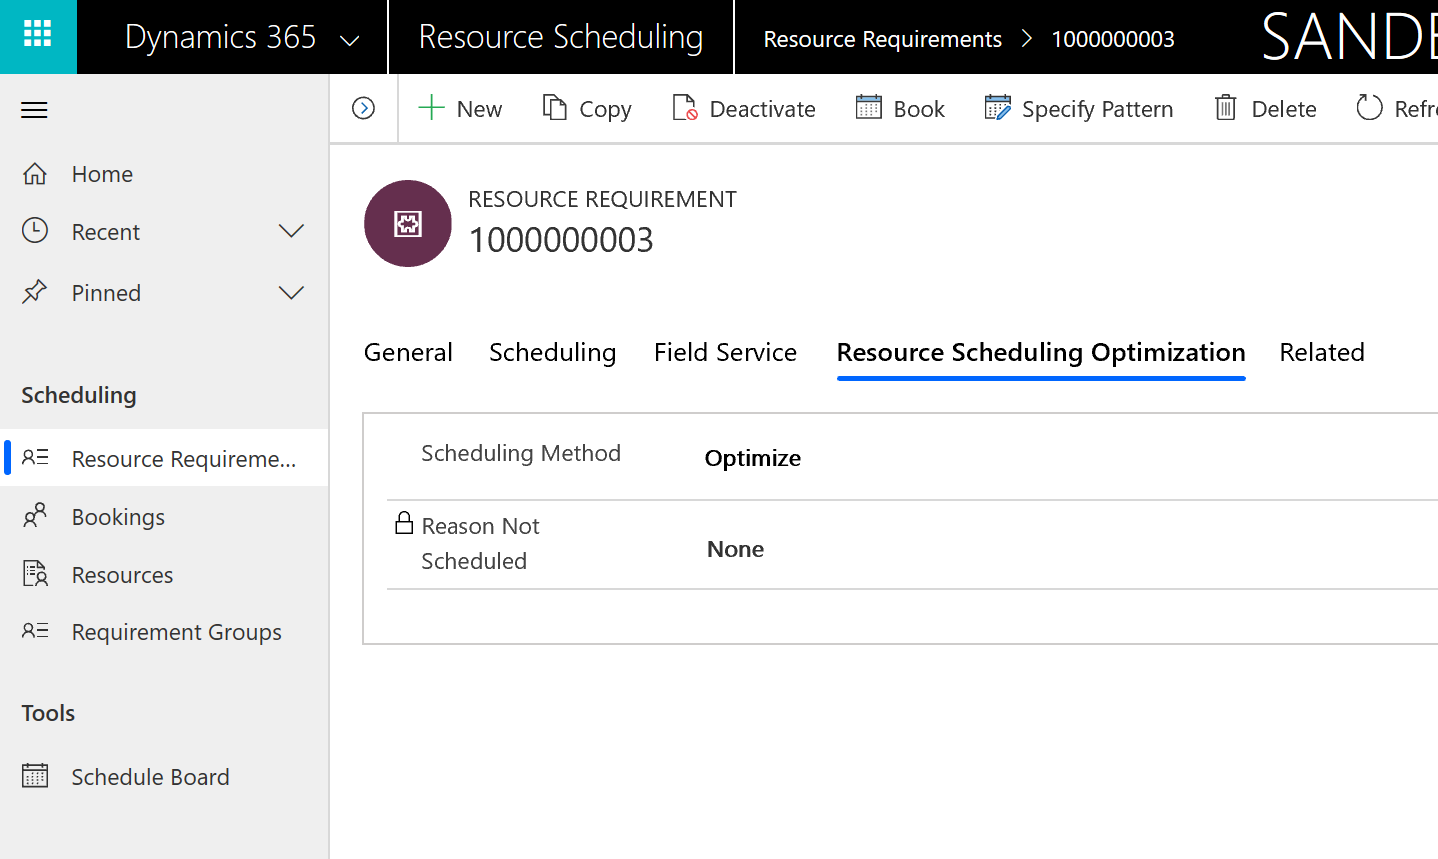
Go to Resource Scheduling > Resource Requirements and select the view you just created; highlight and edit those records.
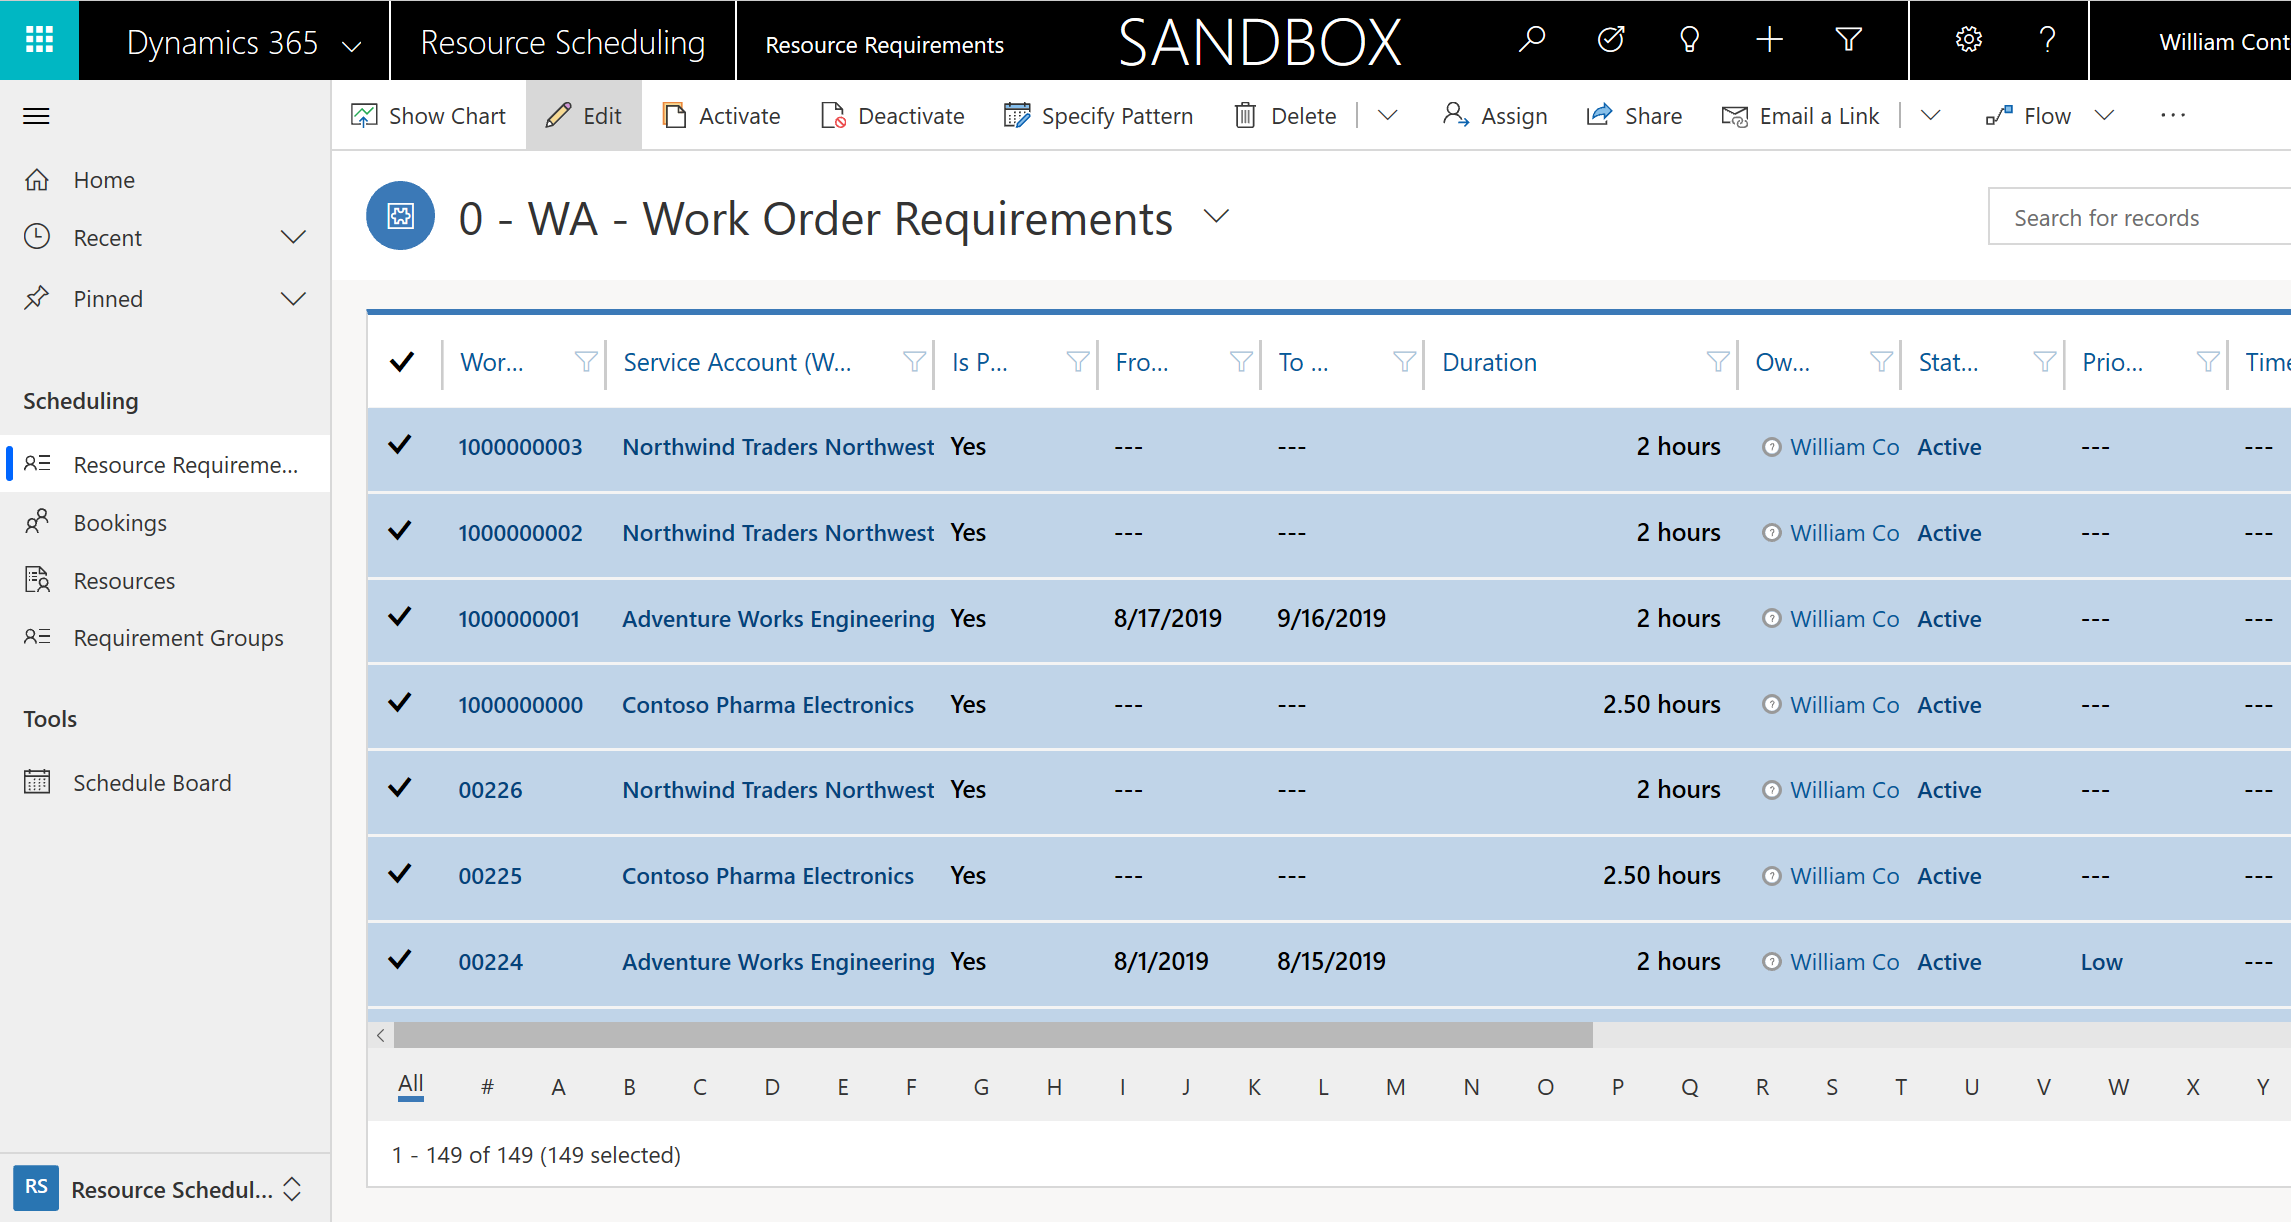
Set the Scheduling Method to Optimize. This means that if Resource Scheduling Optimization runs and targets this requirement, it can be scheduled automatically. This field also allows you to add workflows and business processes to which requirements can be automatically scheduled.
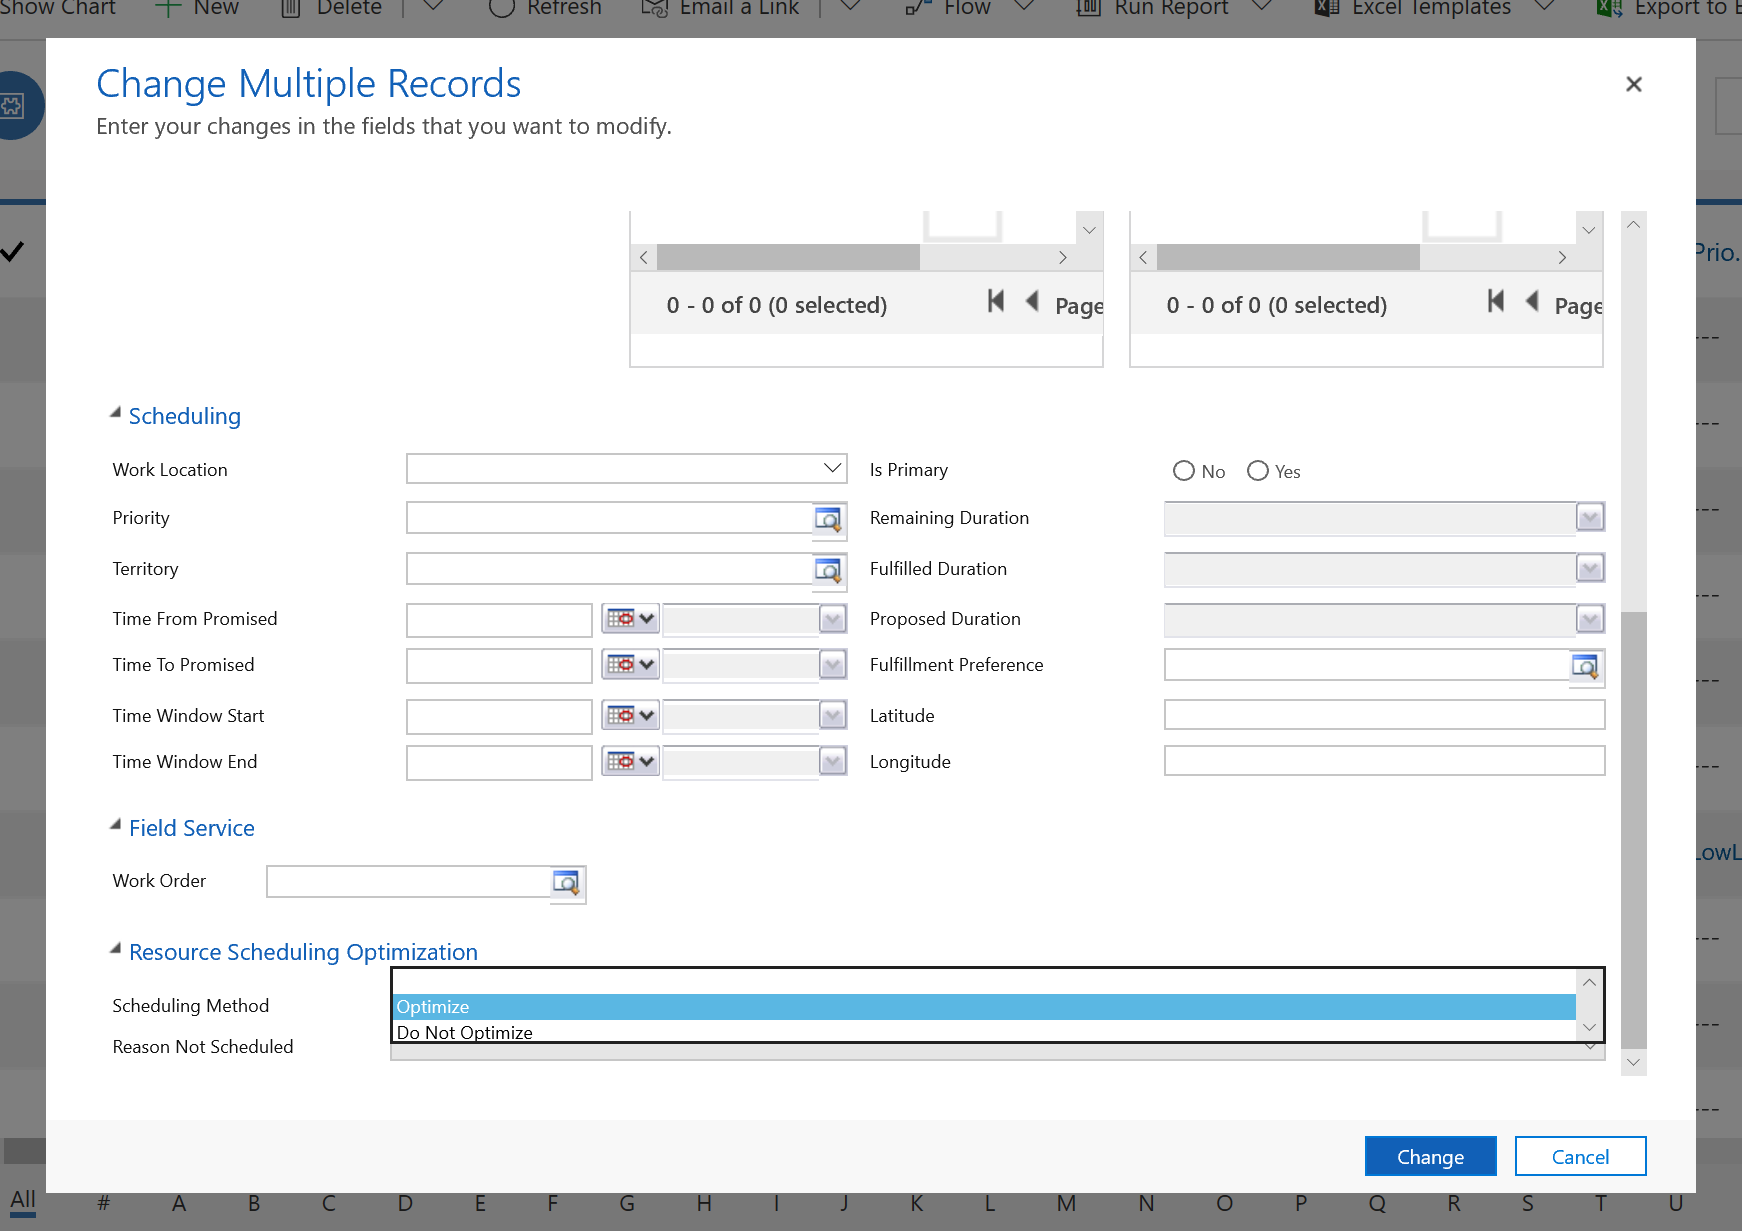
This can also be done individually for each requirement record.
Additionally, you can have the system automatically set work order requirements to be optimized by default when a work order requirement is created in Booking Setup Metadata.
Go to Resource Scheduling > Settings > Administration > Enable Resource Scheduling for Entities
Then double-click on Work Order and set Default Scheduling Method to Optimize.

Step 4: Set resources as eligible for optimization
So at this point you have a set of work orders in the Washington territory that need to be scheduled in an optimal way. But who could or should they be scheduled to?
Let's define the resources that are eligible for optimization.
To fulfill our scenario, we want to create a view of Bookable Resources that are part of the Washington (WA) state service territory.

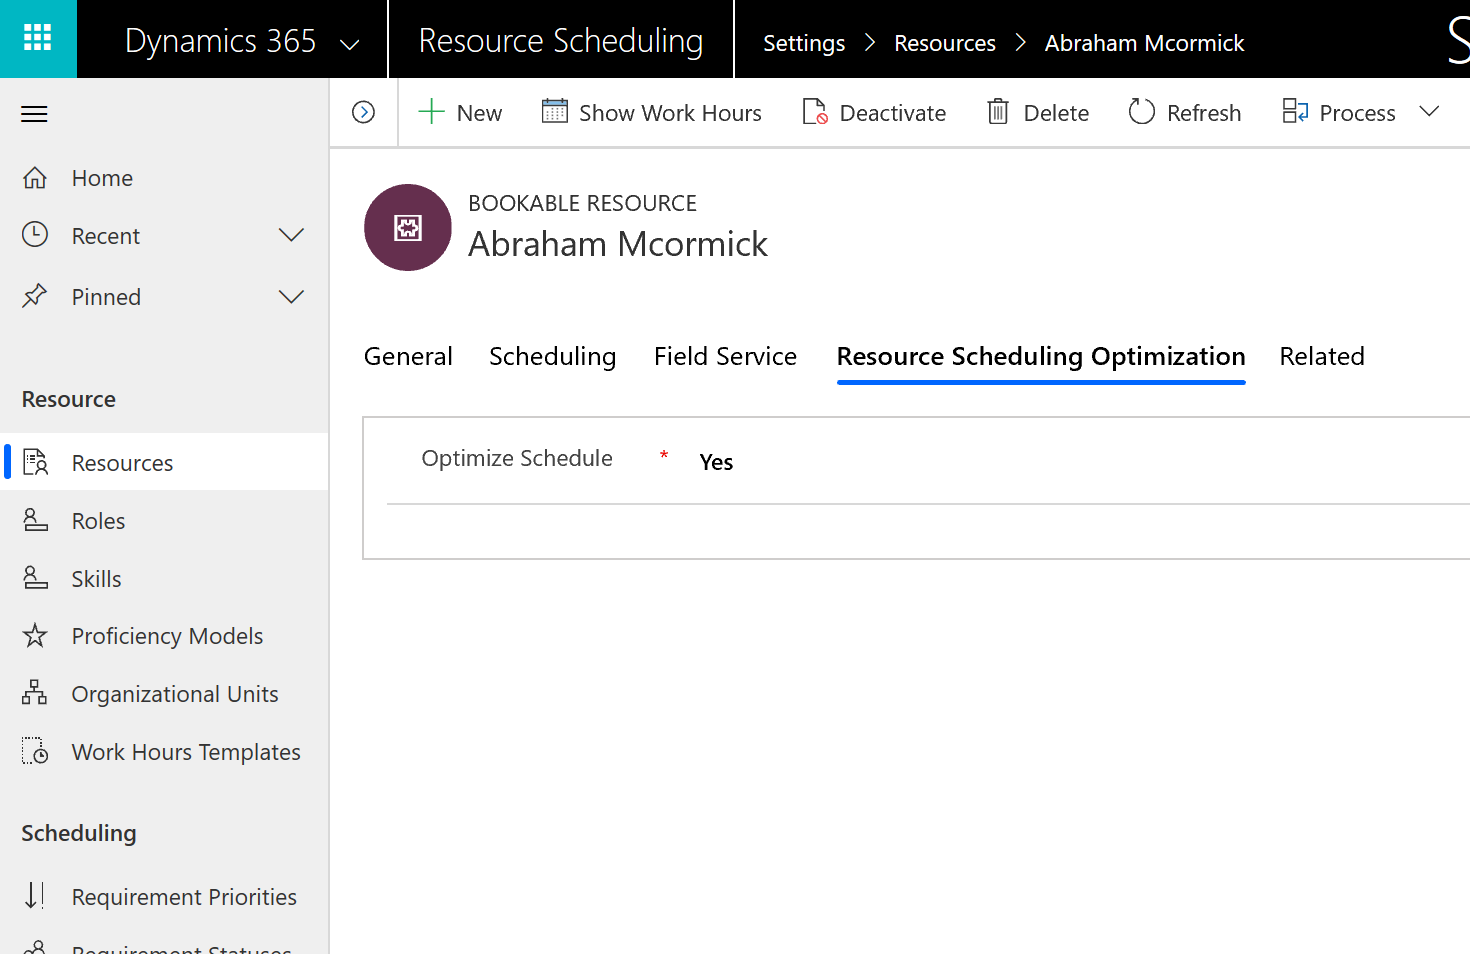
After the view is created to partition the bookable resources that will later be fed into Resource Scheduling Optimization, make sure they are marked as eligible for optimization.
For each resource in your view, set the Optimize Schedule field to Yes.
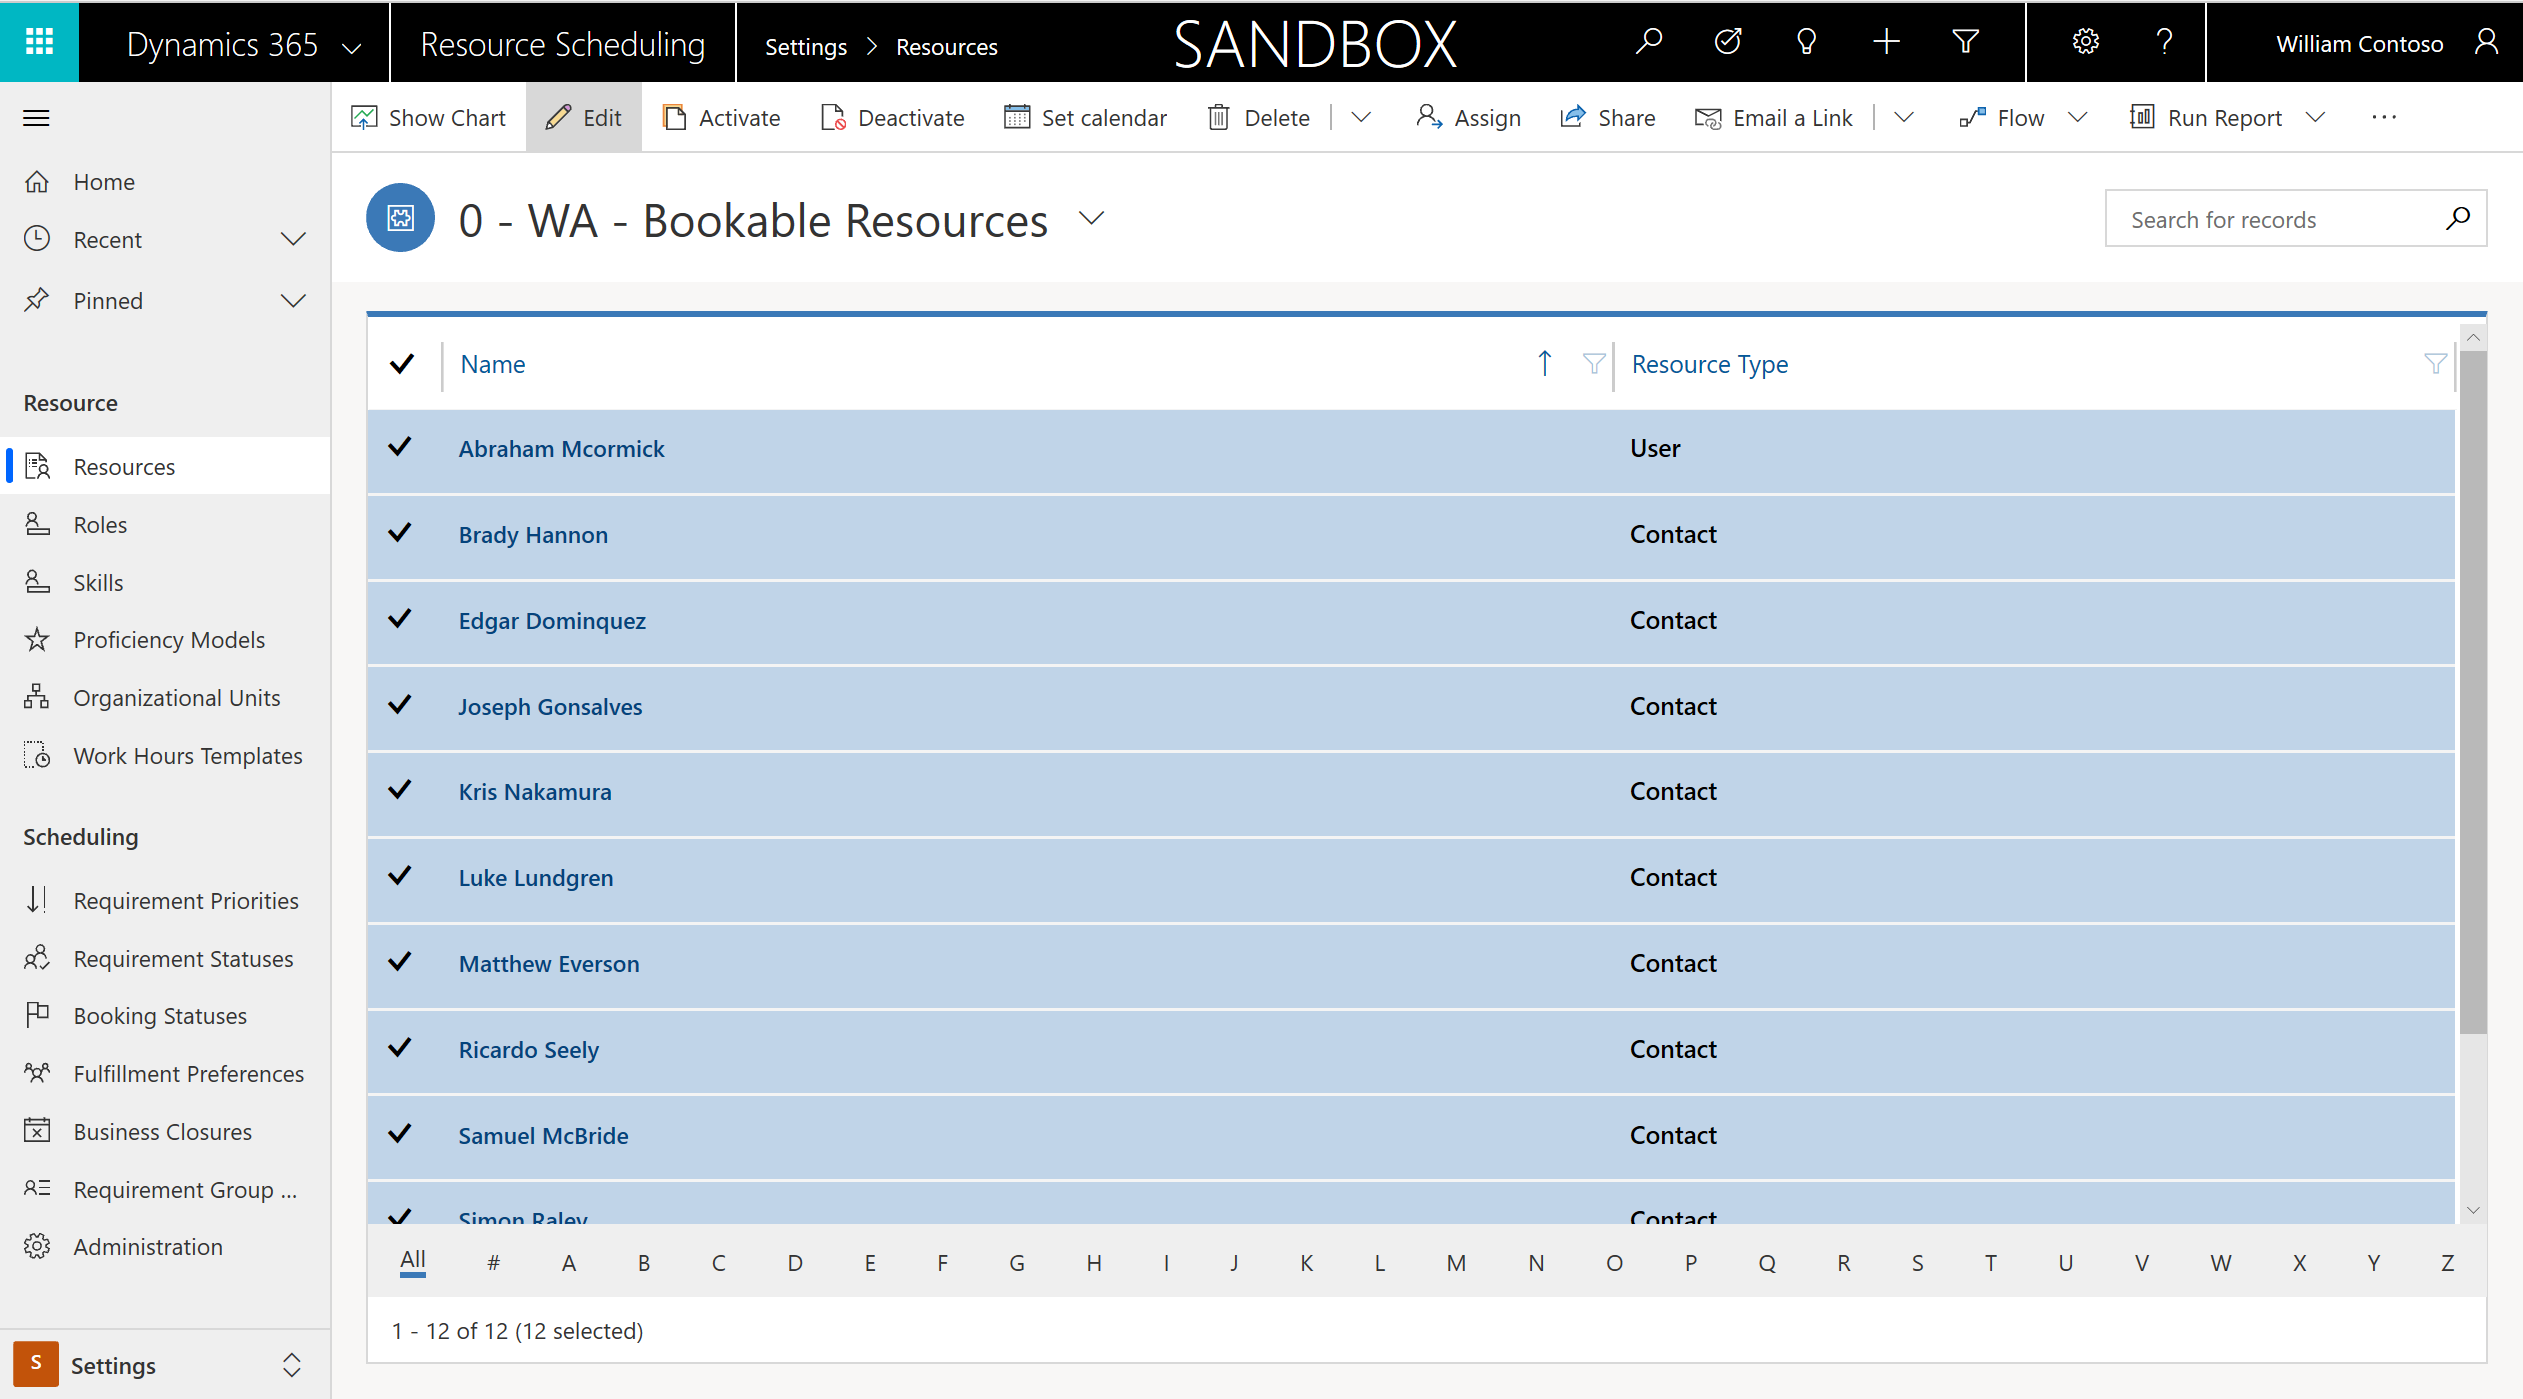
Similar to requirements, this can be done individually or with a bulk edit.
Step 5: Create scope
Now that we have enabled Resource Scheduling Optimization, and have:
- A list of the requirements (work orders) we want to optimize
- A list of the resources that the requirements should be scheduled to
You now need to set up a Resource Scheduling Optimization run and input both of these lists.
Go to the Resource Scheduling Optimization app, which is a separate app from the Field Service and Universal Resource Scheduling apps.
Choose Optimization Scopes in the left pane then +New.
Enter a Name that describes the requirements and resources you are optimizing.
In the Resources and Unscheduled Requirements for this Optimization section, select the Resource View and the Requirement View you created in the previous steps.

In the Bookings for the Optimization section, select the Active Bookable Resource Bookings view or a similar view for bookings.
Note
By entering a view for unscheduled requirements and bookings, we are configuring Resource Scheduling Optimization to optimize both unscheduled jobs and scheduled jobs. If you only select a booking view, then Resource Scheduling Optimization will only optimize existing bookings and you must schedule the unscheduled jobs manually or with the schedule assistant. By only selecting an unscheduled requirement view, Resource Scheduling Optimization will not move existing bookings and simply attempt to schedule the unscheduled jobs to available time slots.
For Optimization Range Settings, enter the following values:
Range Reference: Job Current Time
Range Offset: 5 minutes. This means the first booking Resource Scheduling Optimization can schedule will be five minutes after the time Resource Scheduling Optimization is run. Some organizations would like Resource Scheduling Optimization to schedule jobs starting tomorrow, in which case the Range Offset should be set to 1 day.
Range Duration: 2 days. This means Resource Scheduling Optimization will schedule requirements to fill up a maximum of two days.
Then Save.
Step 6: Create goal
Now we need to create goals or objectives for the Resource Scheduling Optimization run.
Choose Optimization Goals in the left pane, then +New.
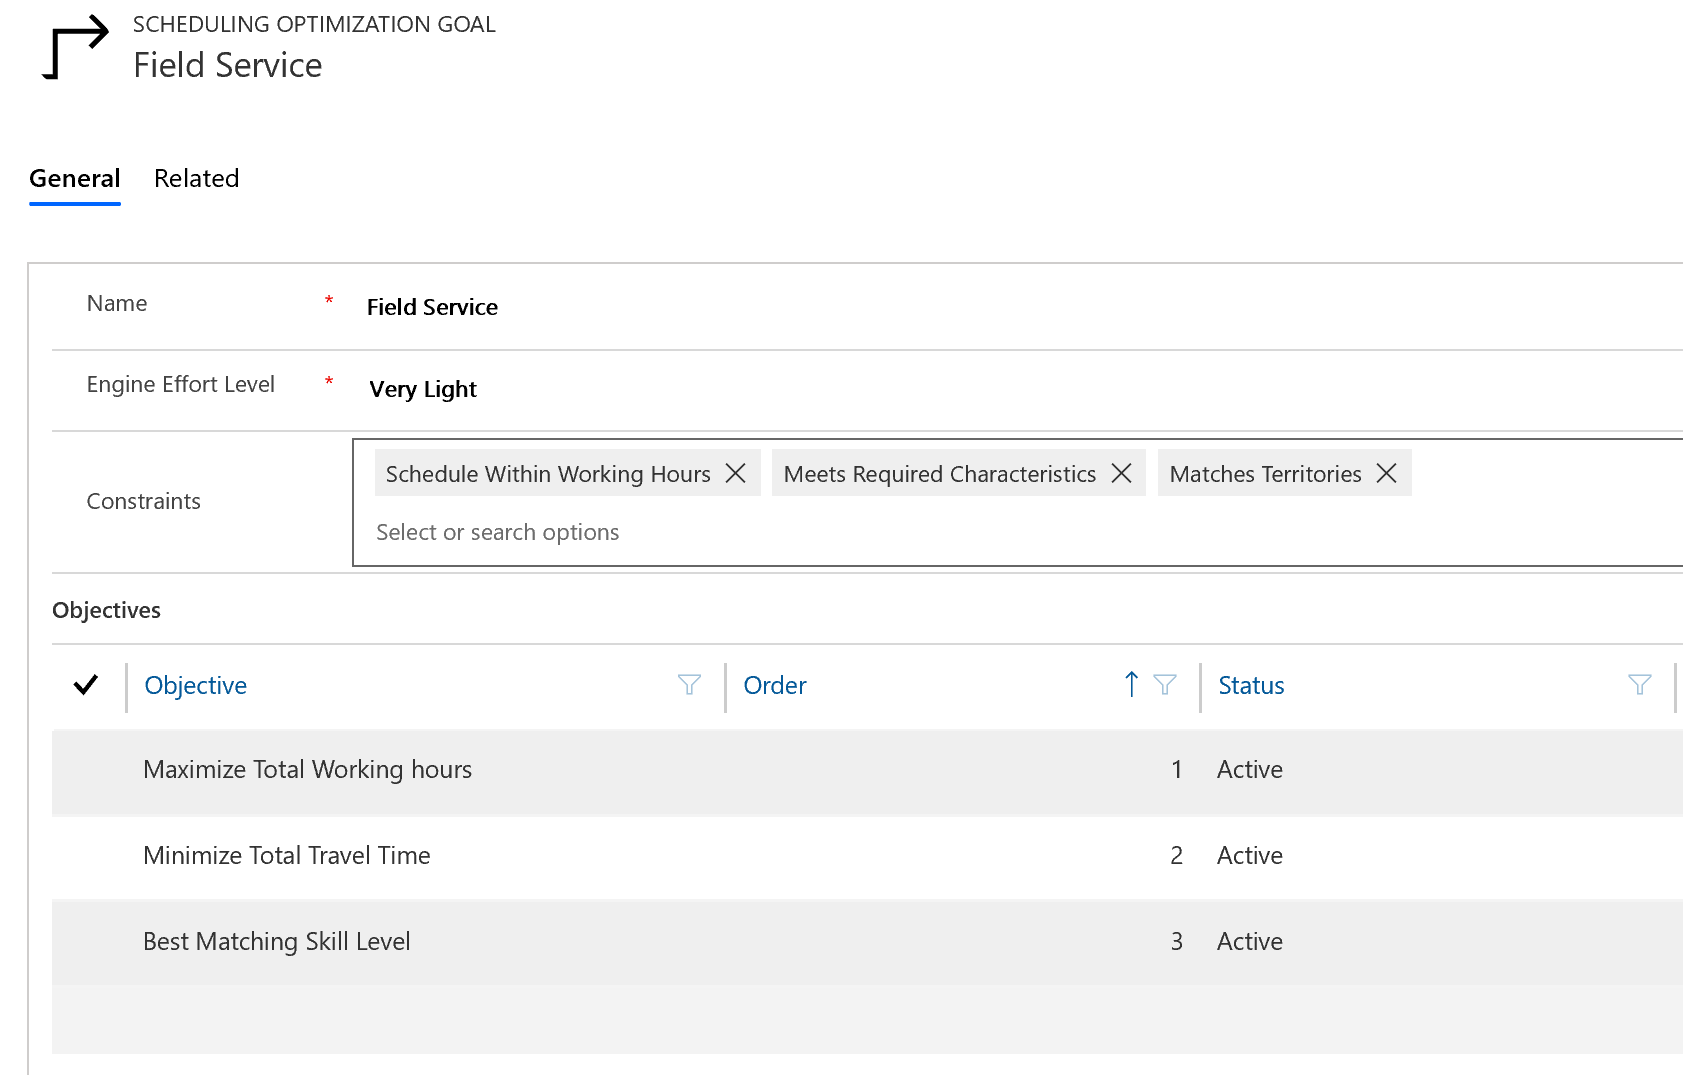
Enter a Name that describes the goal.
For Engine Effort Level, select Very Light, meaning Resource Scheduling Optimization will run quickly but may not find the most optimal solution.
For constraints, select the following:
- Schedule Within Working Hours
- Meets Required Characteristics (if your requirements and resources both have characteristics)
- Matches Territory (if your requirements and resources both belong to the same service territory - in our example, Washington state (WA))
Note
Start with fewer constraints and add more as you successfully run Resource Scheduling Optimization. This makes it easier to troubleshoot if Resource Scheduling Optimization produces unexpected results (or none at all).
For objectives, select the following order:
- Maximize Total Working Hours
- Minimize Total Travel Time
- Best Matching Skill Level
Note
Minimize Total Travel Time cannot be the first objective
As usual, don't forget to Save!
Step 7: Create schedule
The last configuration step is to combine your scope and goal into a schedule.
Go to Optimization Schedules in the left pane, then +New.
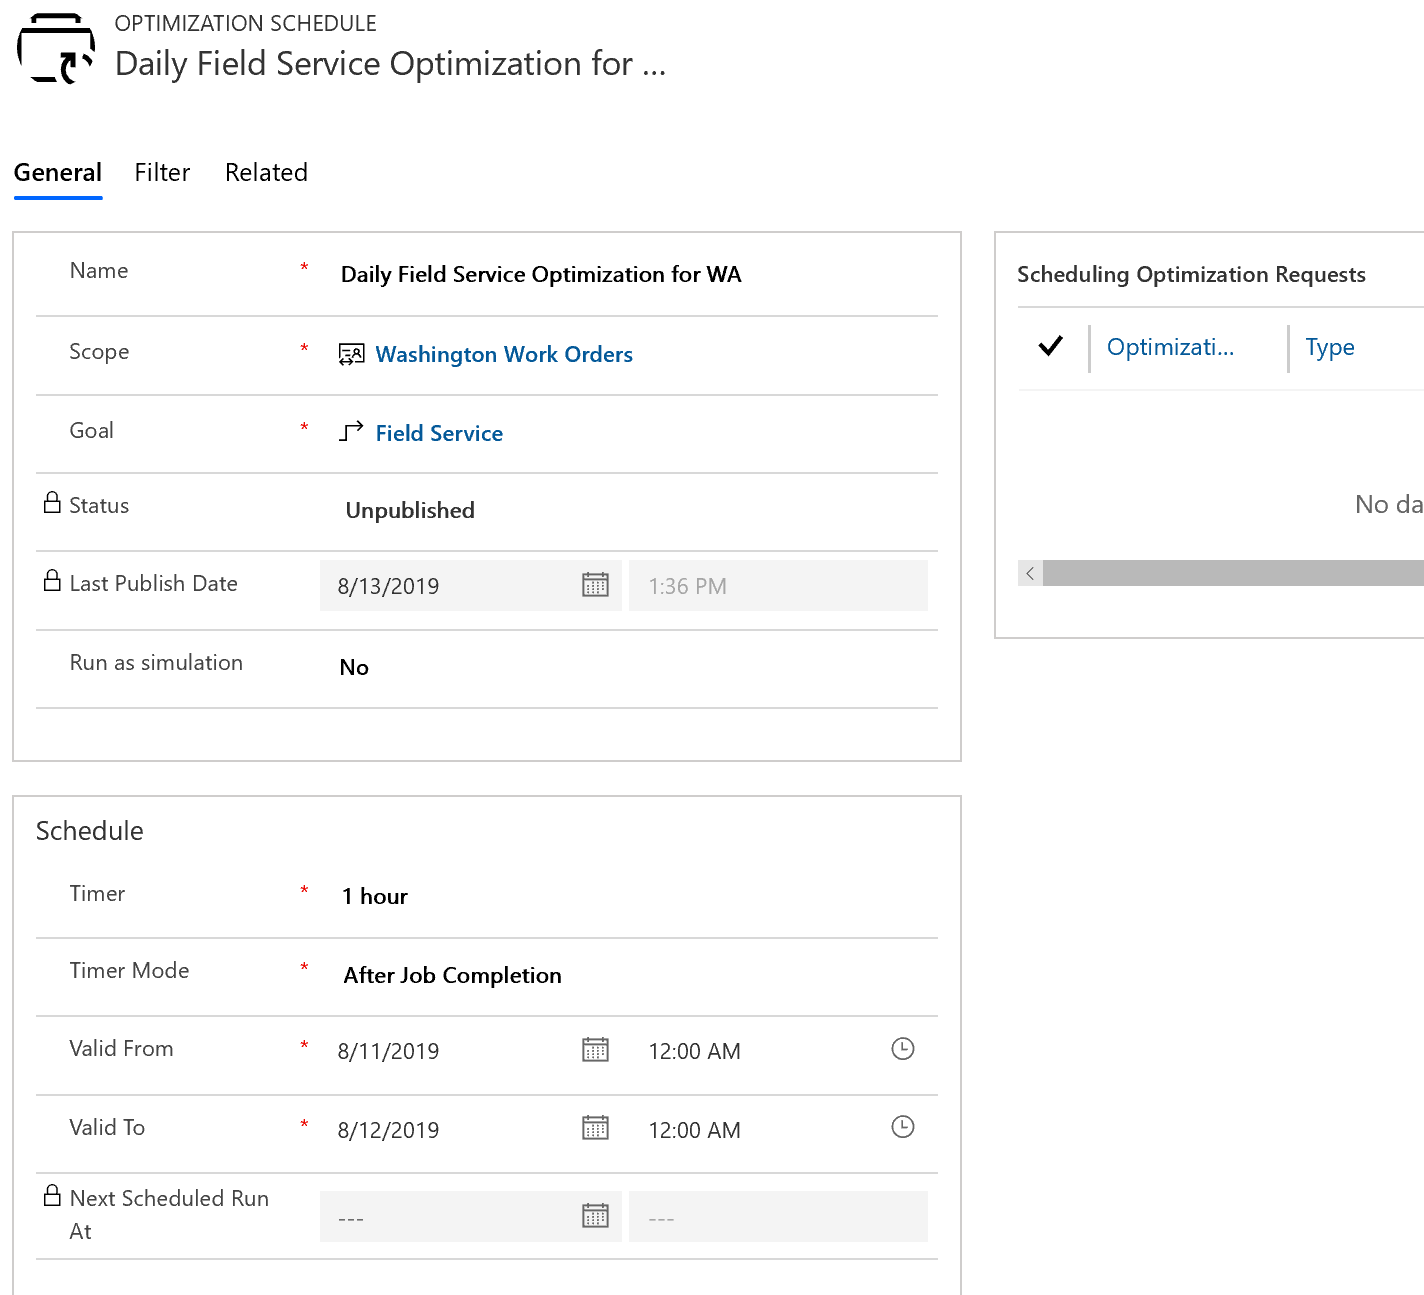
Enter a Name that will define your schedule, such as "Overnight Schedule."
Select a lookup to the Scope and Goal you created.
Set Timer to 1 hour. This represents how often Resource Scheduling Optimization will check if it should run based on the time this schedule is published.
Enter Valid From and Valid To dates.
If you plan to run Resource Scheduling Optimization manually, enter dates in the past.
Next, the Filter section. If you want Resource Scheduling Optimization to run every night, enter the date range during which you want it to run nightly. Also enter the time of night (and specify time zone) it should run.
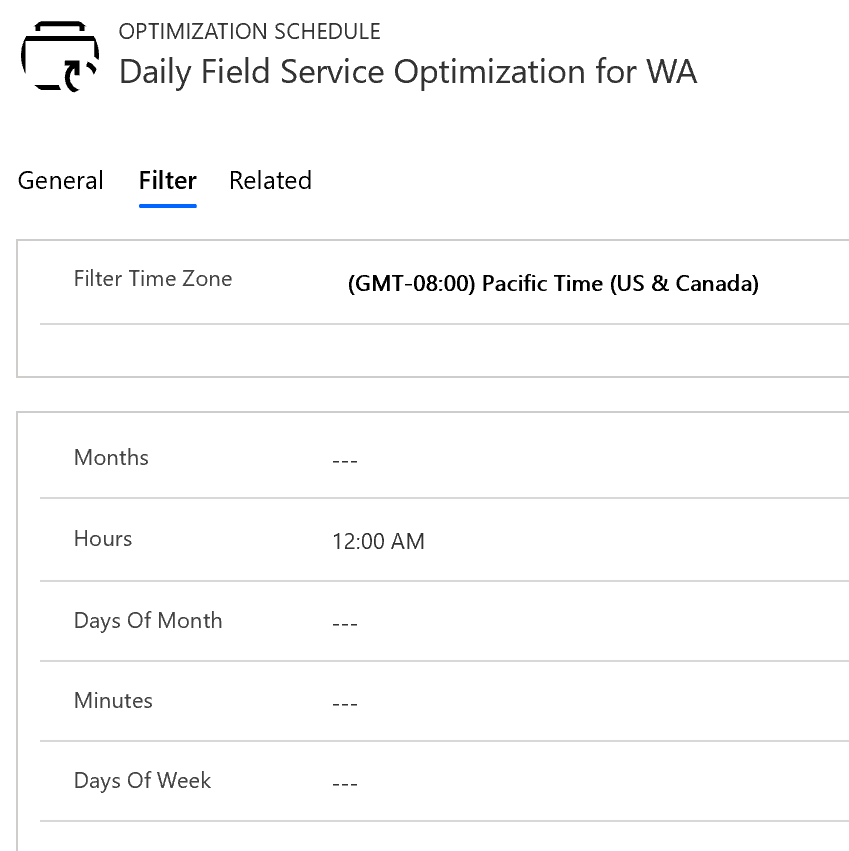
Every hour (based on the timer value previously set), Resource Scheduling Optimization will check the filter values to see if it should run. In this example, every hour Resource Scheduling Optimization will check to see if it should run, but only in the 12th hour of the morning (AM) will it actually run.
It is important to consider both timer and filter values when configuring Resource Scheduling Optimization schedules.
Finally, Save and Publish.
Step 8: Run Resource Scheduling Optimization
Finally, after the schedule is Published, test Resource Scheduling Optimization by selecting Run Now in the ribbon.
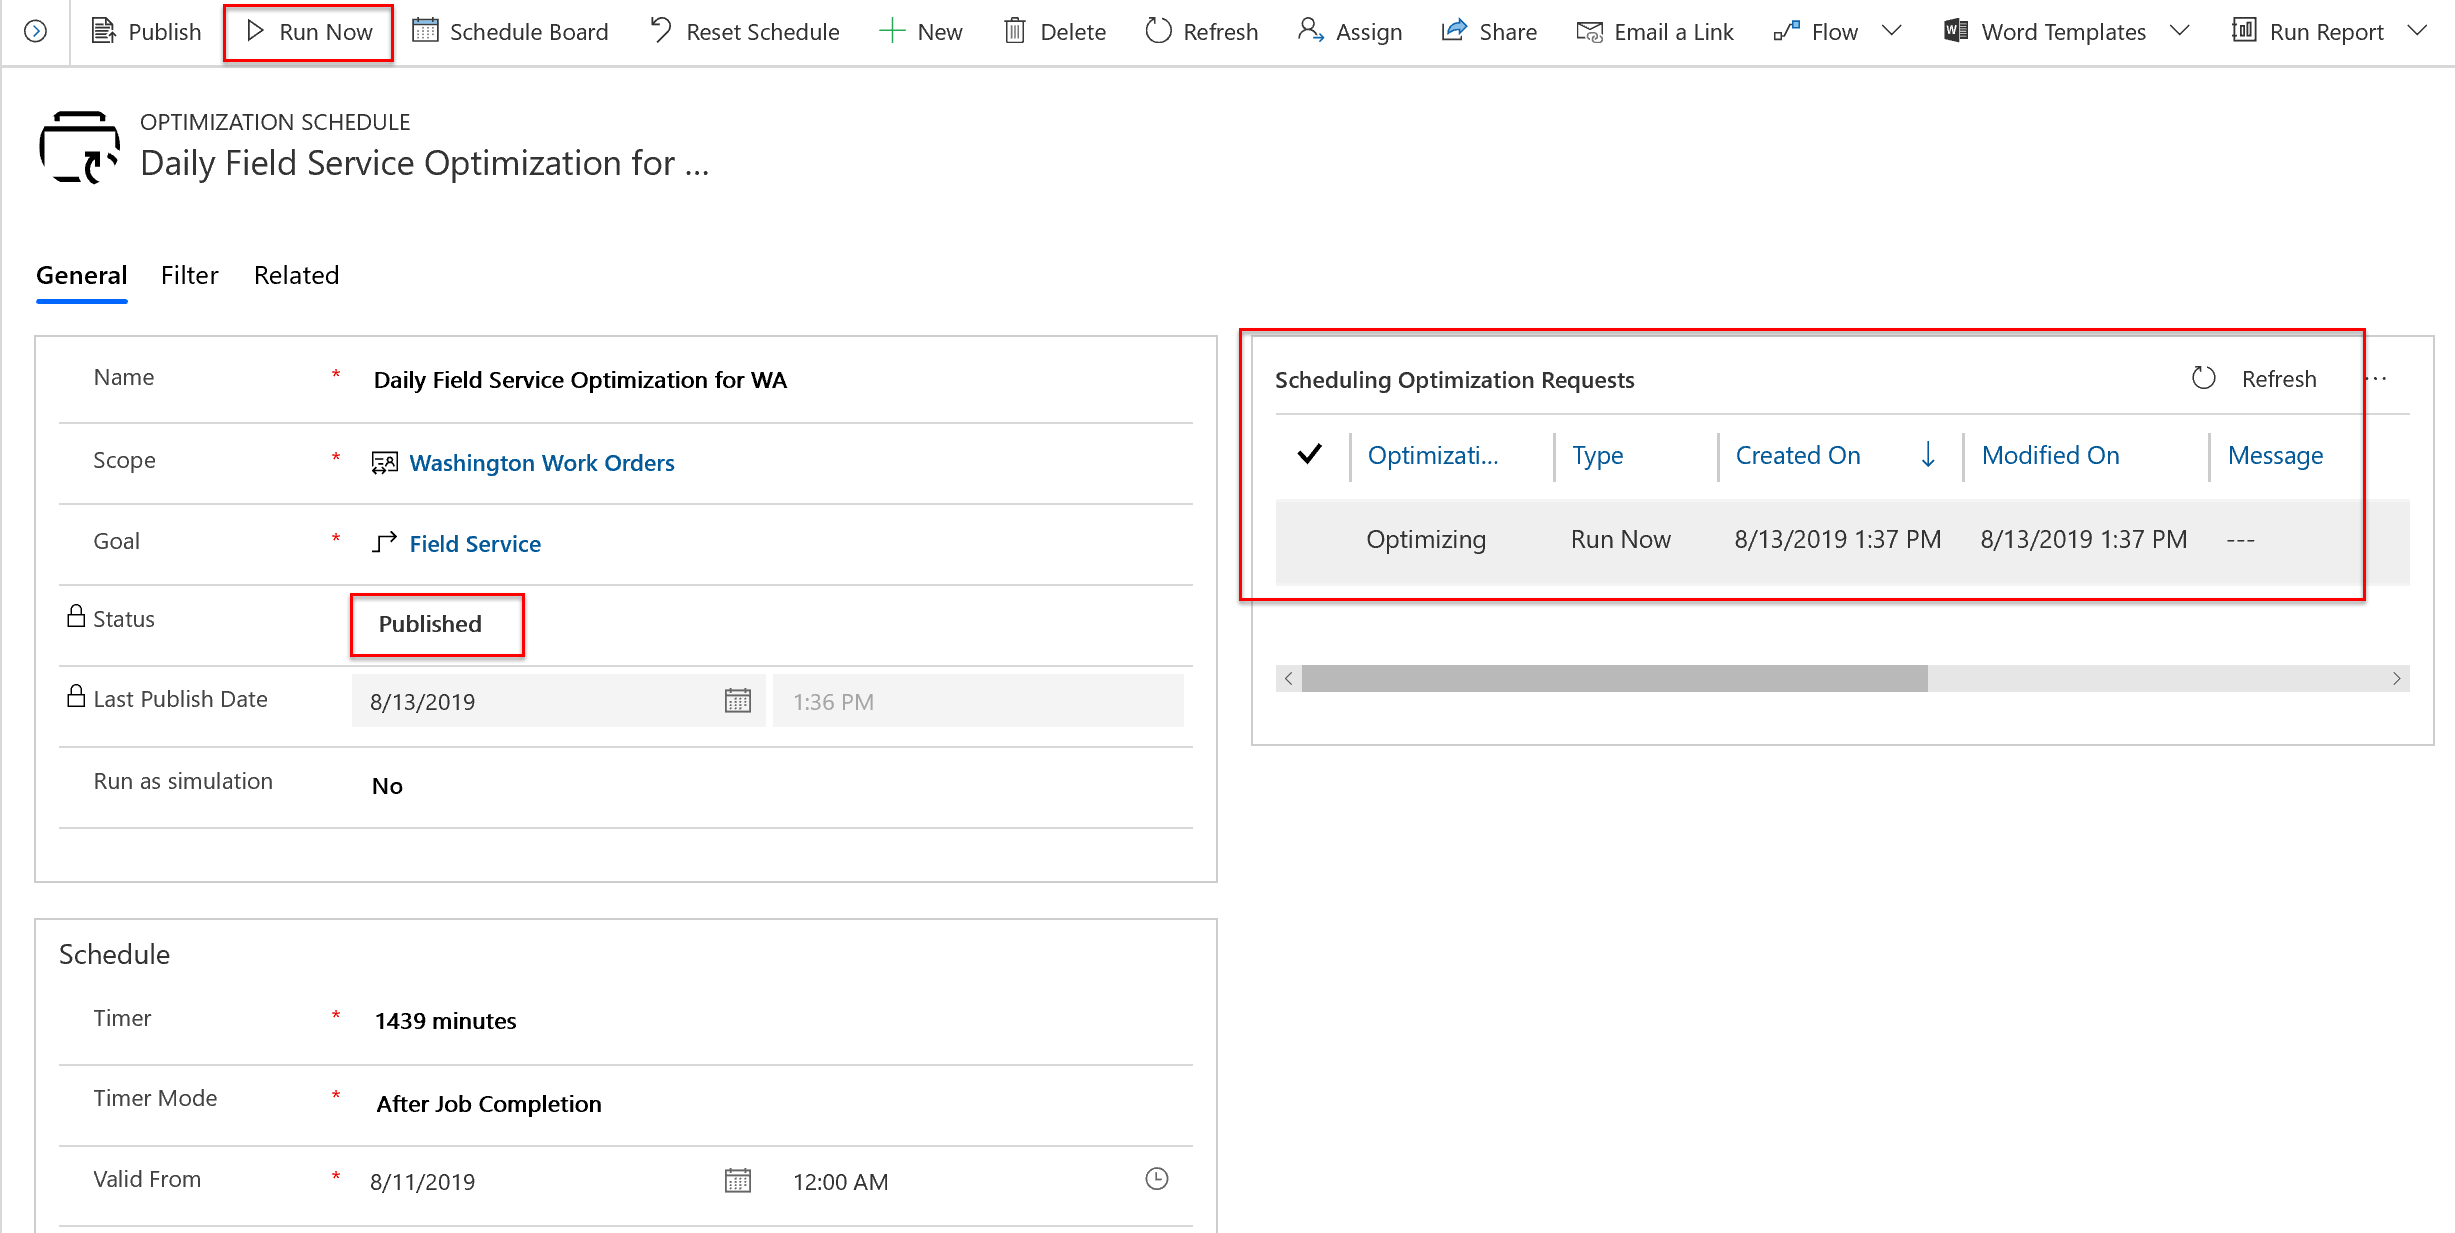
Every time Resource Scheduling Optimization runs, either successfully or not, an optimization request record is created.
Step 9: Analyze results
Once the Optimization Request status is Completed, go to the schedule board to see the optimized board.
A new schedule board tab named after your scope appears, and yellow bars indicate the beginning and ending time ranges of the optimization, in our case 2 days from the time Resource Scheduling Optimization is run.
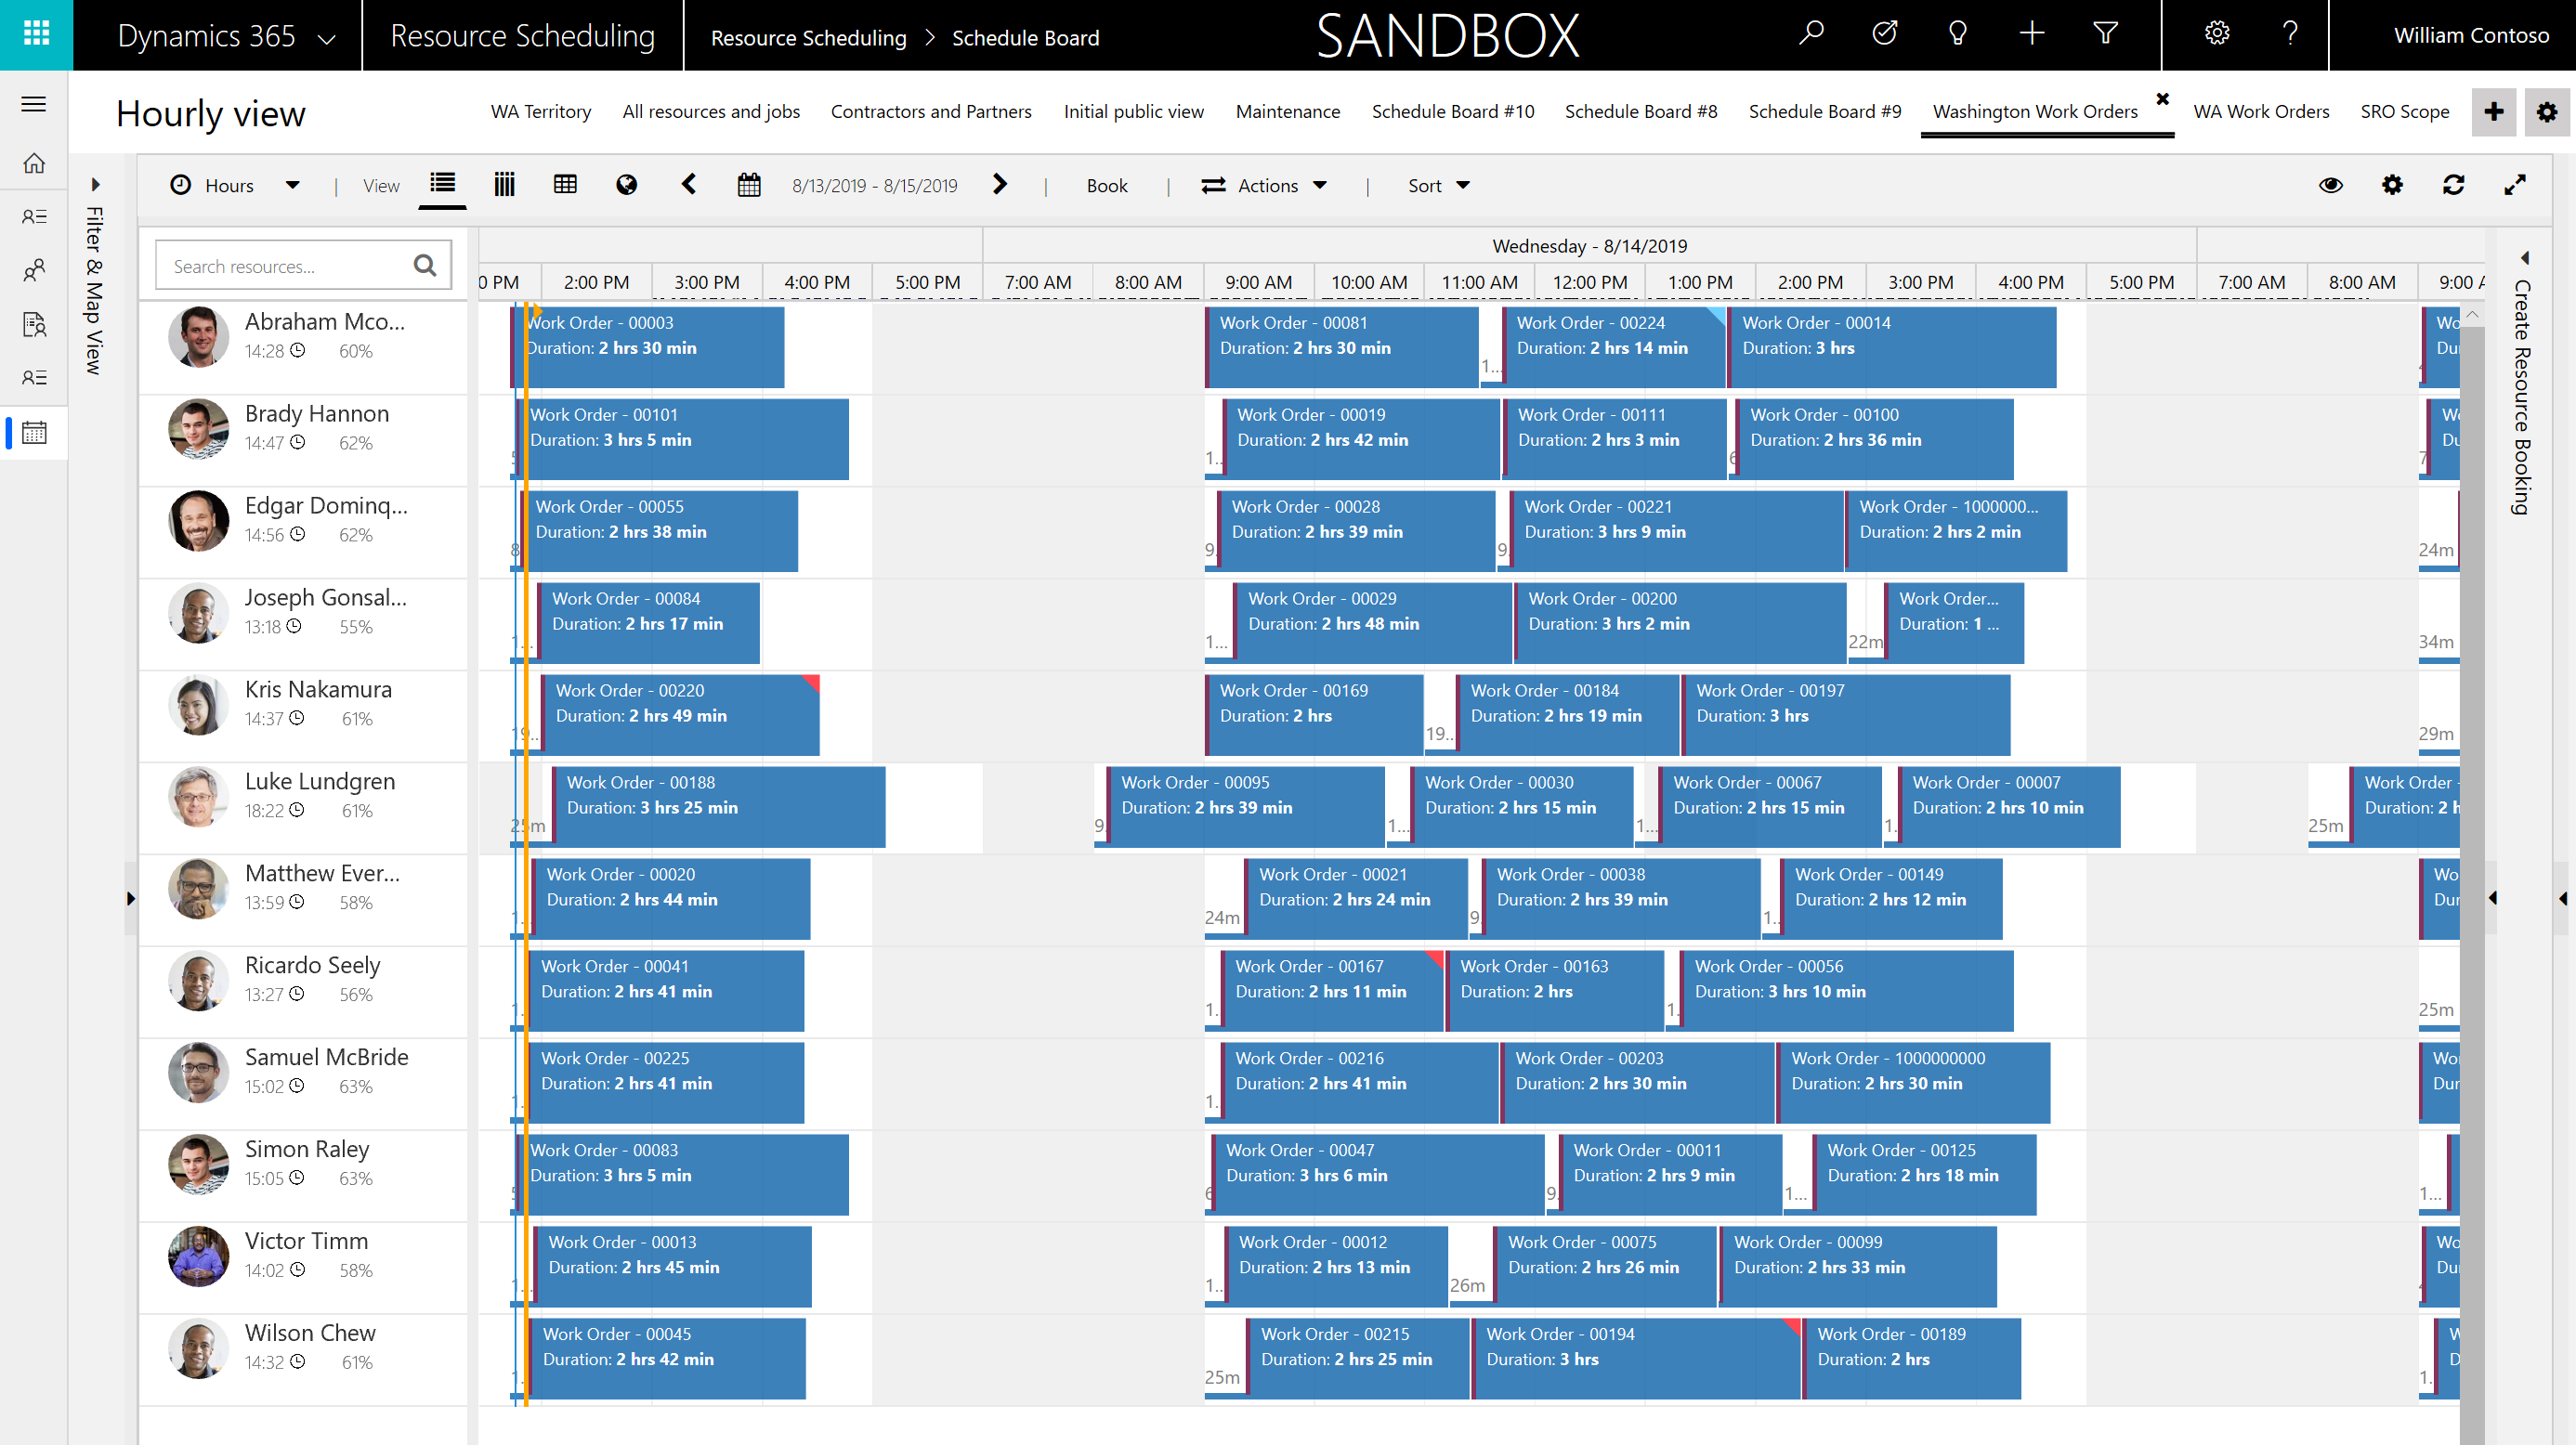
A simple example of Resource Scheduling Optimization optimizing travel time is when there is no travel time between two bookings. This means there were two work orders at the same location with the same service account and Resource Scheduling Optimization scheduled them back-to-back.
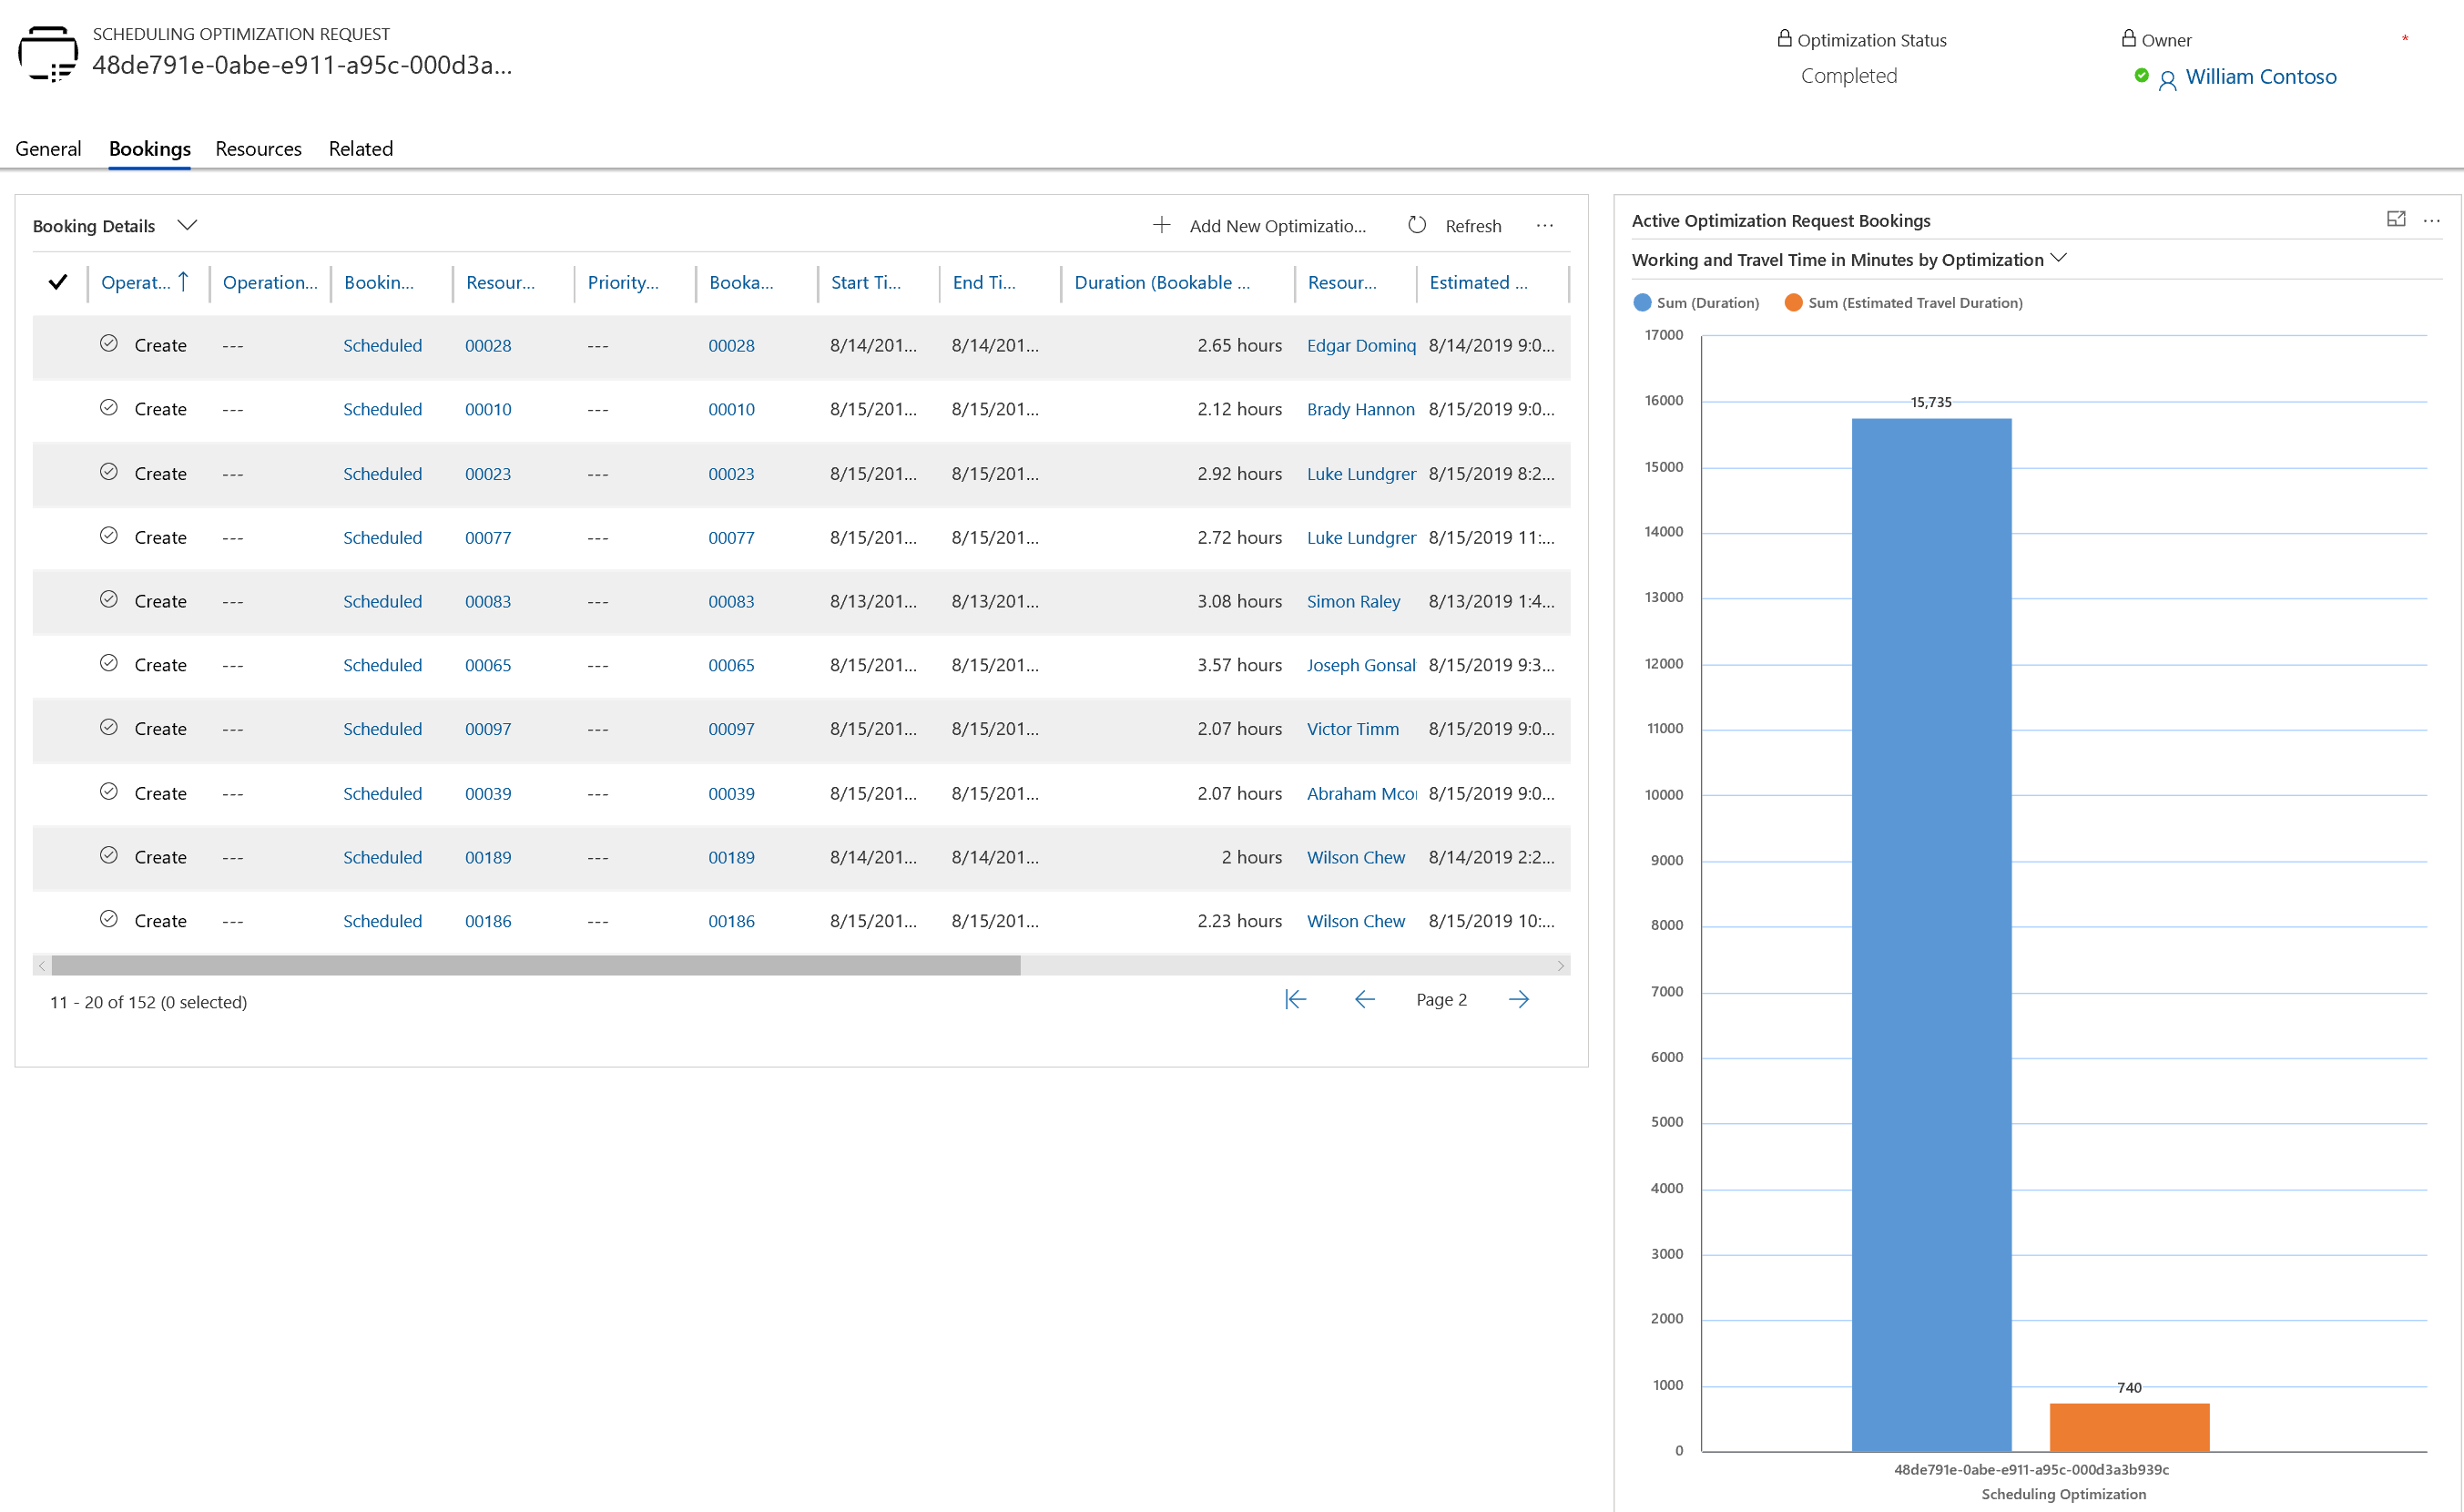
Back on the completed scheduling optimization request in the Bookings tab, you will see a list of bookings created or deleted, and a graph of the total travel time and working time of the optimized bookings.
Congratulations! You have successfully run Resource Scheduling Optimization!
Feedback
Coming soon: Throughout 2024 we will be phasing out GitHub Issues as the feedback mechanism for content and replacing it with a new feedback system. For more information see: https://aka.ms/ContentUserFeedback.
Submit and view feedback for