Local reports and primary forms in Accounts receivable and Accounts payable
This article explains how to work with the primary forms that are used in the Russian Federation and supported by Microsoft Dynamics 365. Here is a list of the supported primary forms:
-
- M-15
- TORG-12
-
- M-4
- M-7
- TORG-1
- TORG-2
- TORG-3
-
- 1-T bill of lading report
- Transportation invoice
- Job ticket
Counting act (INV-17) and Certificate (Appendix to INV-17) reports for customers
Invoices
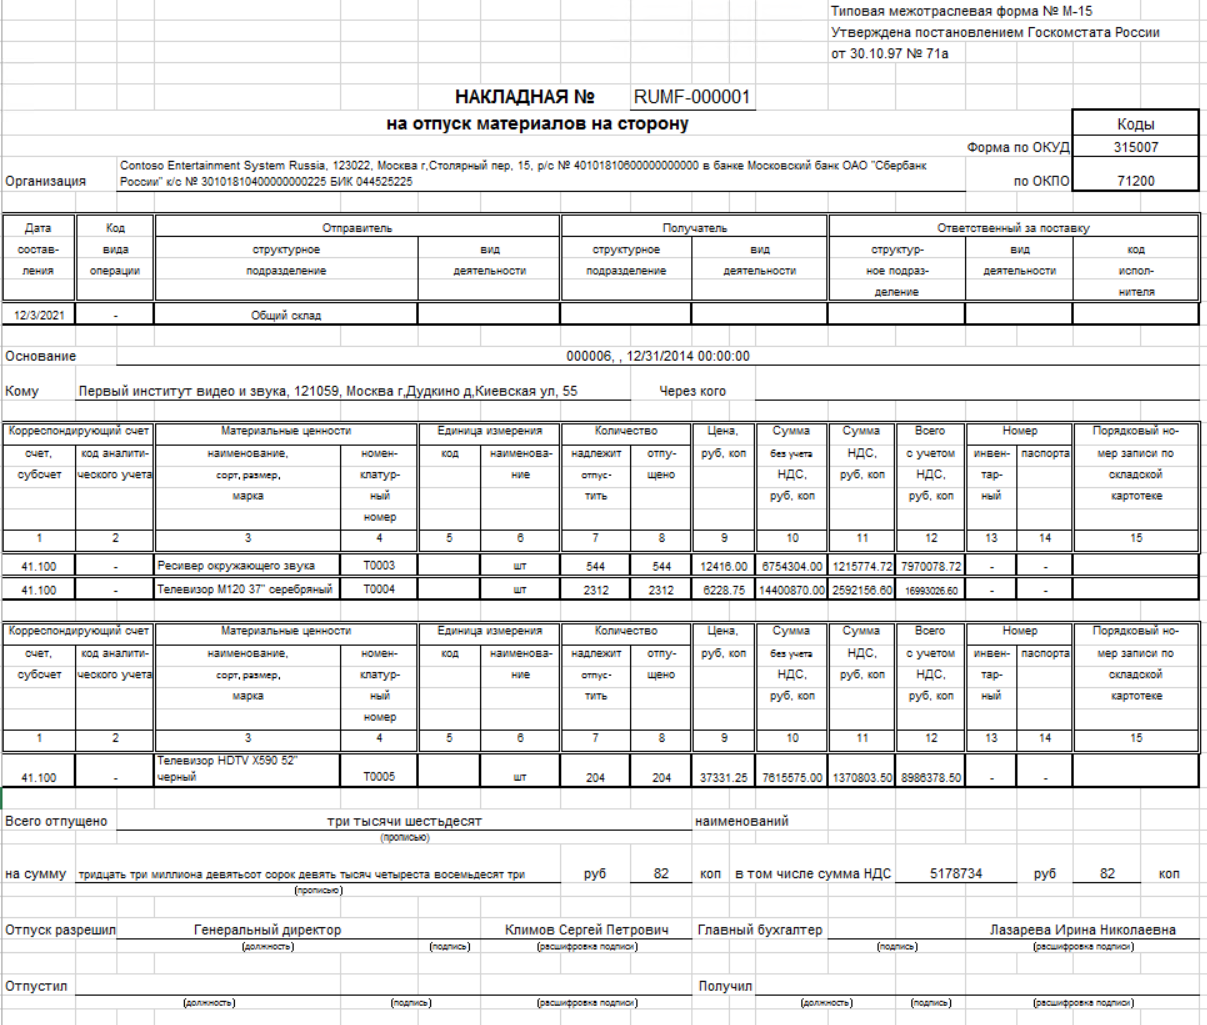
The form M-15 invoice for the release of materials is a document that is the basis for the movement of material values from one organization to another.
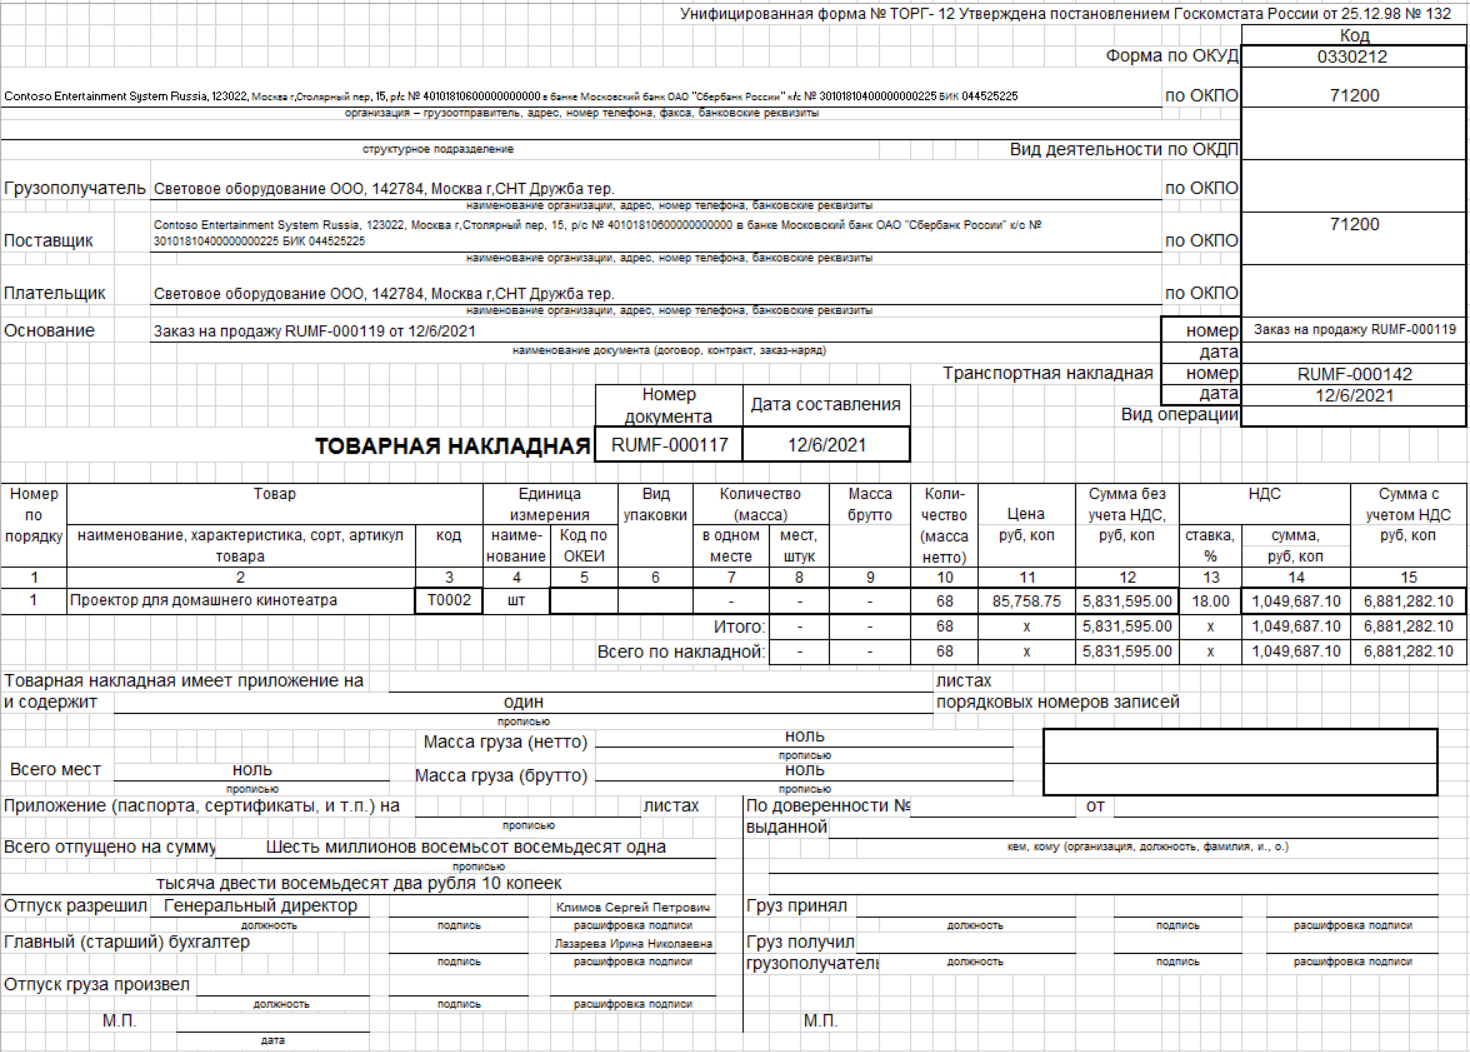
The form TORG-12 invoice is a document that is the basis for the transfer of inventory items from one organization to another.
Set up number sequences for invoices
You can use the Accounts receivable parameters page to set up number sequences for sales invoices and corrective invoices that are posted in the M-15 and TORG-12 formats. For all the selected number sequences, the Continuous option should be set to Yes.
- Go to Accounts receivable > Setup > Accounts receivable parameters.
- On the Number sequences tab, in the Number sequence code field, select a number sequence code for the following references.
|
Reporting form |
Number sequence reference types |
|
M-15 |
|
|
TORG-12 |
|
Generate an M-15 or TORG-12 report for a sales order
You can generate the M-15 and TORG-12 reports by using the Posting invoice page.
- Go to Accounts receivable > Orders > All sales orders.
- Create a sales order.
- On the Action Pane, on the Invoice tab, in the Generate group, select Invoice.
- On the Parameters FastTab, in the Print options section, in the Printout field, select M-15 to print the M-15 form on the report or TORG-12 to print the TORG-12 form on the report.
- Set the Print invoice option to Yes to print the report.
- Select OK to post the invoice and print the selected report.
The following illustration shows an example of an M-15 report.
The following illustration shows an example of a TORG-12 report.
Product receipts
For product receipts, the reporting forms are forms M-4 and M-7 when you work with materials, and forms TORG-1, TORG-2, and TORG-3 when you work with items. Forms M-7, TORG-2, and TORG-3 are used if there is a discrepancy between the order volume and the delivered volume. Forms M-4 and TORG-1 are used in all other cases.
Set up number sequences for product receipts
Before you work with product receipts, you must set up number sequences for them. The number sequence that you select for a product receipt is assigned when the document is posted. When the product receipt is generated, it's shown in the Document number field. For all the selected number sequences, the Continuous option should be set to Yes.
Go to Inventory management > Setup > Inventory and warehouse management parameters.
On the Number sequences tab, in the Number sequence field, select a number sequence for the following references.
Reporting form Number sequence reference types TORG-1 Receipt items statement voucher TORG-2 Receipts list voucherReceipt items statement voucher TORG-3 Receipts list voucherReceipt items statement voucher M-4 Reimbursement slip voucher M-7 Receipts list voucher
Post a product receipt for a purchase order
Follow these steps to generate and print the reports for a purchase order.
Go to Accounts payable > Purchase orders > All purchase orders.
On the Action Pane, select New to create a purchase order.
In the Create purchase order dialog box, on the Vendor FastTab, in the Vendor account field, select a vendor account.
On the General FastTab, in the Site field, select a site. Then, in the Warehouse field, select a warehouse.
Select OK to close the Create purchase order dialog box.
On the Purchase order lines FastTab, select Add line to create a purchase order line.
In the Item number field, select the item.
On the Action Pane, select Save.
On the Action Pane, on the Purchase tab, in the Action group, select Confirm.
On the Action Pane, on the Receive tab, in the Generate group, select Product receipt.
In the Receipt statement form type field, select one of the following options to indicate whether the receipt statement is related to items or materials:
- Receipt statement for materials – The receipt statement is related to materials (forms M-4 and M-7).
- Receipt statement for items – The receipt statement is related to items (forms TORG-1, TORG-2, and TORG-3).
Note
If you select Receipt statement for materials, either an M-4 statement or an M-7 statement will be printed. An M-7 statement will be printed only if you specify discrepancies in the Quantity and Deviation fields.
If you selected Receipt statement for items in the Receipt statement form type field, in the Document about deviation field, select one of the following options to indicate whether a TORG-1, TORG-2, or TORG-3 report should be generated:
- Receipt statement for items TORG-1
- Receipt list for items TORG-2
- Receipt list for items TORG-3
Note
A TORG-2 or TORG-3 statement will be printed only if you specify discrepancies in the Quantity and Deviation fields.
On the Overview FastTab, in the Product receipt field, enter the product receipt number.
Select OK to post the invoice and print the product receipt.
The following illustration shows an example of an M-4 report.

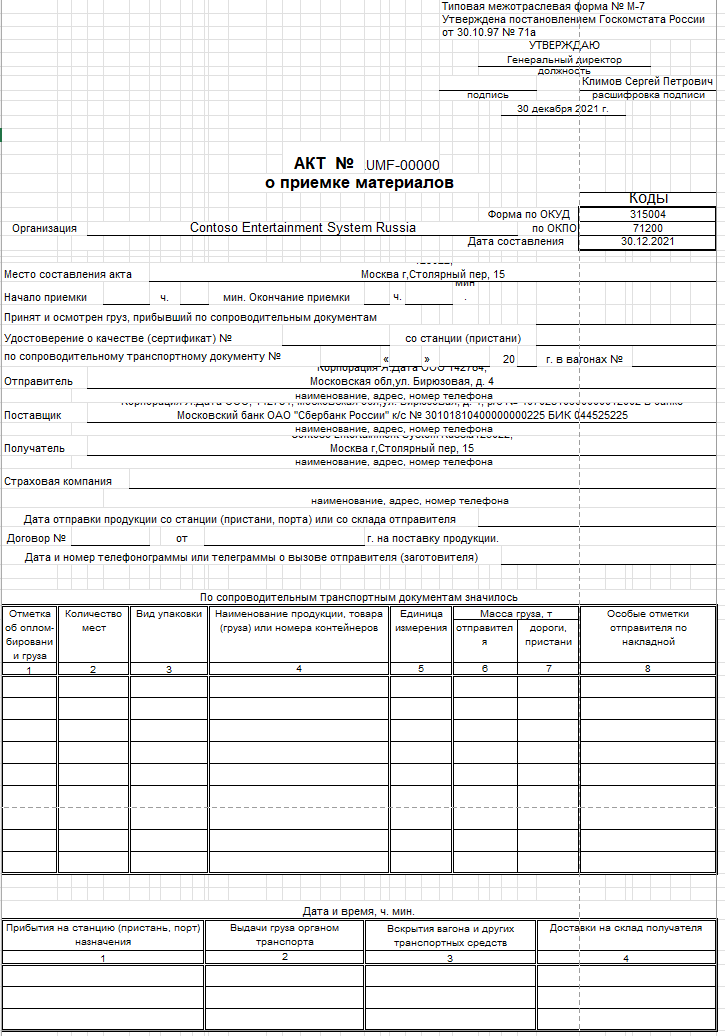
The following illustration shows an example of an M-7 report.
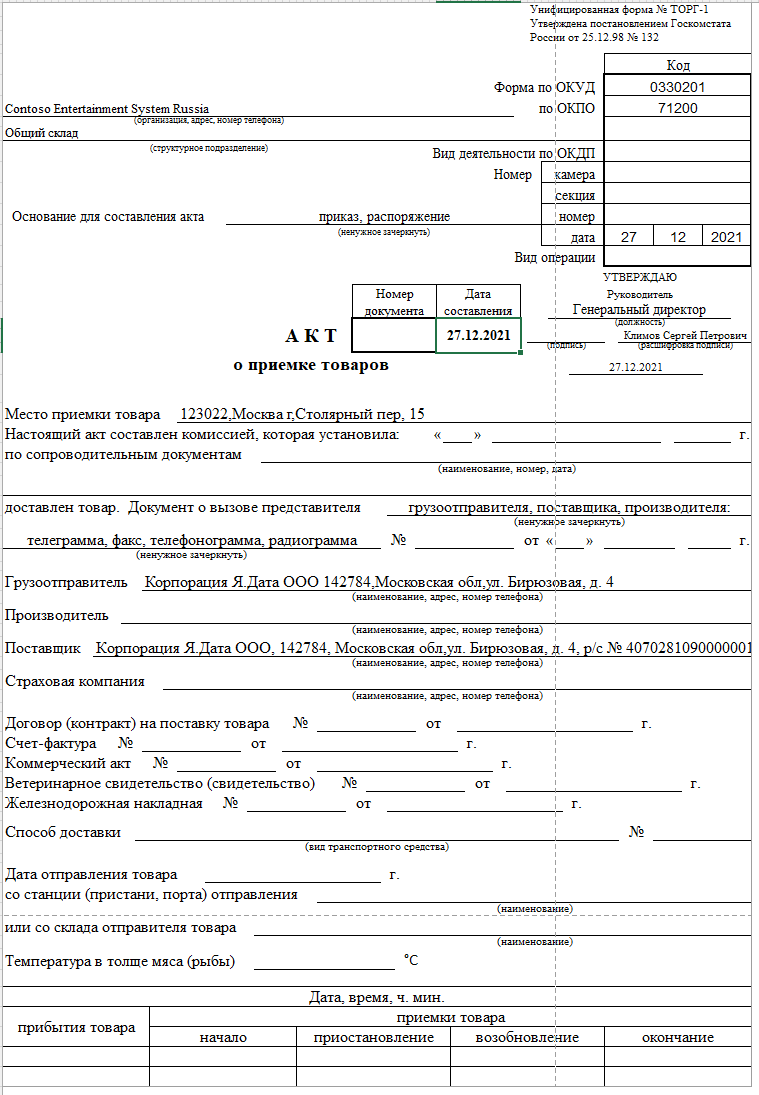
The following illustration shows an example of a TORG-1 report.
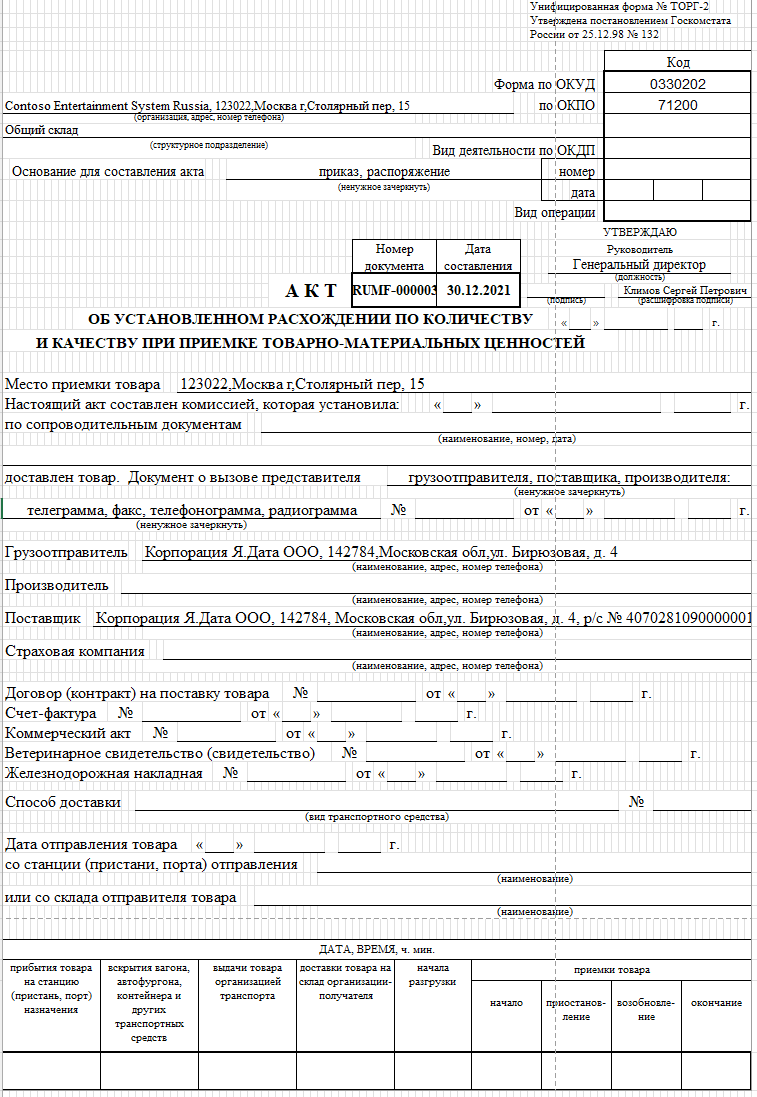
The following illustration shows an example of a TORG-2 report.
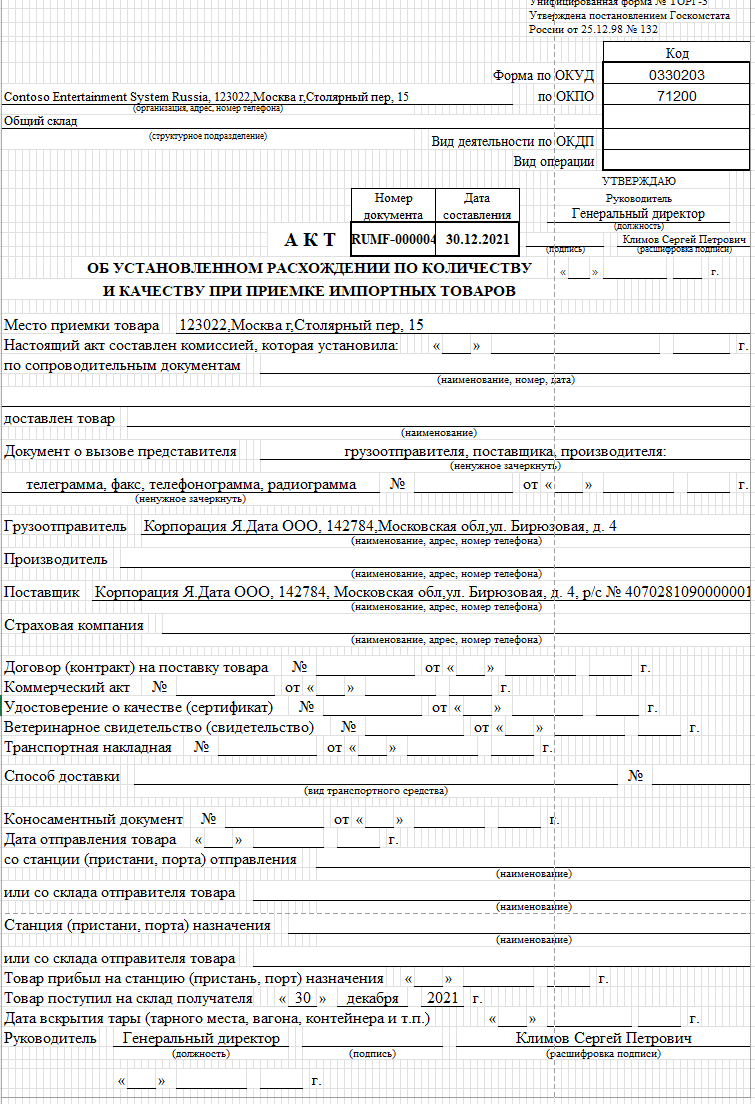
The following illustration shows an example of a TORG-3 report.
Product receipt corrections
You can correct a product receipt that has already been posted for a purchase order. The corrected product receipt contains information about the discrepancy between the quantity of items that was ordered on the original purchase order and the quantity that was received.
When you post a corrected product receipt, the original product receipt is canceled. If the corrected receipt contains at least one line that has a non-zero received quantity, a new version of the M-4, M-7, TORG-1, TORG-2, or TORG-3 receipt statement report is generated. You can print the new version of the receipt statement report.
You can retain the receipt statement document type and the number of the original product receipt for the corrected product receipt.
Follow one of these steps:
Go to Accounts payable > Purchase orders > All purchase orders. Select a purchase order that a product receipt is posted for, and then, on the Action Pane, on the Receive tab, in the Journals group, select Product receipt. Select a product receipt, and then select Correct.
Go to Accounts payable > Inquiries and reports > Product receipt. Select a product receipt line, and then select Correct.
In the Product receipt correction dialog box, set the Preserve receipt statement option to Yes to use the receipt statement document type and the number of the original product receipt for the corrected product receipt.
If you set the Preserve receipt statement option to No, you can follow these steps to manually enter the information for the product receipt correction.
In the Receipt statement form type field, select whether the receipt statement is related to items or materials.
If you selected Receipt statement for items in the Receipt statement form type field, in the Document about deviation field, select whether a TORG-1, TORG-2, or TORG-3 report should be generated.
Select OK to print the corrected product receipt.
Acts of adjustment
An act of adjustment is a document that is used for financial analysis. It contains the following information.
- The open total balance per counteragent (contract) at the start and end of the period. This balance includes the balance of invoices and credit notes, and the balance of advances and returns.
- Information about unpaid invoices from the previous period (credit and debit liabilities), and their payment and mutual reimbursement in the current period.
- Information about received and shipped invoices or credit notes for the selected period, together with information about payment and mutual reimbursement.
- Information about advances and returns of cash (unsettled payments for the current period).
- Information about advances and returns of cash (unsettled payments for the previous periods).
You can generate acts of adjustment for vendors and customers. Use the Act of adjustment page to generate an Act of adjustment report.
Follow one of these steps:
- To generate an act of adjustment for a vendor, go to Accounts payable > Inquiries and reports > Act of adjustment. Then, in the Vendor account field, select the vendor account.
- To generate an act of adjustment for a customer, go to Accounts receivable > Inquiries and reports > Act of adjustment. Then, in the Customer account field, select the customer account
If the counteragent is both a vendor and customer, you can set the Counteragent option to Yes to include the counteragent's transactions as a vendor and as a customer in the act of adjustment.
In the Date interval code field, select the interval code for the report period.
In the From date and To date fields, update the start and end dates of the report period as required.
In the Currency type field, select Accounting currency to use the company's accounting currency for the act of adjustment or Indicated currency to manually set the currency.
If you selected Indicated currency in the Currency type field, in the Currency field, select the currency that should be used for the act of adjustment.
Set the Totals only option to Yes to include only totals on the report that is printed.
Set the By data of counteragent option to Yes to automatically fill in the sections of the act of adjustment that must be completed by the counteragent.
Set the Delete zero balance option to Yes if the report should exclude invoice lines that have either a 0 (zero) balance or a balance that equals the amount of the invoice.
Set the Agreements option to Yes to include information about agreements.
Set the Documents option to Yes to include information about documents that create debts.
Select OK to open the Act of adjustment report for the selected vendor or customer.
On the Action Pane, select Select, make any required changes to the report setup that is defined on the Act of adjustment report page, and then select OK.
Select the transaction line, and then, on the Action Pane, select Transaction.
On the Vendor transaction page, review the vendor transaction information.
Select Print to review the report.
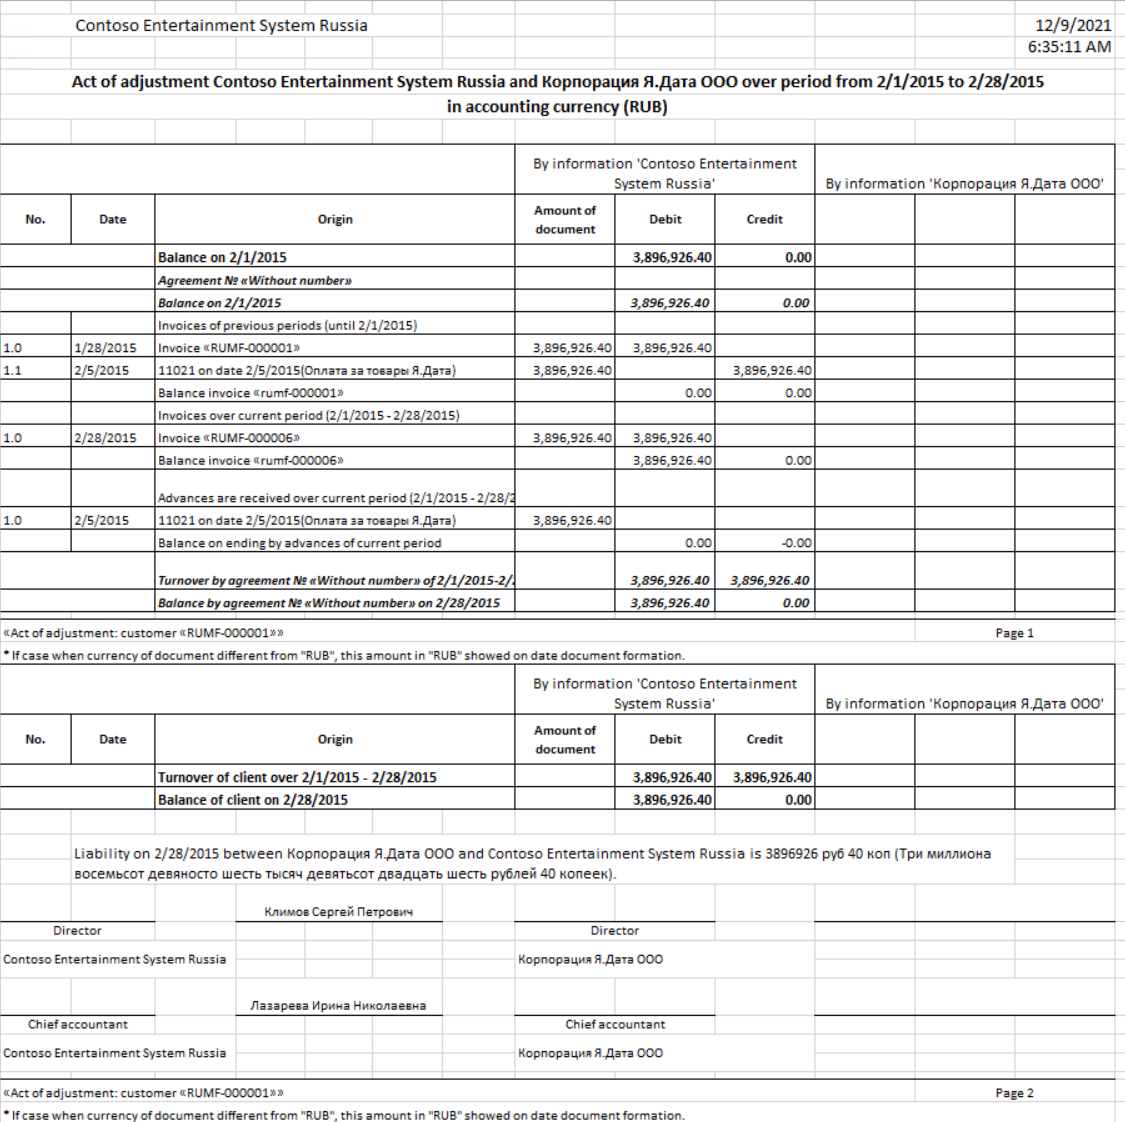
The following illustration shows an example of an act of adjustment for a customer.
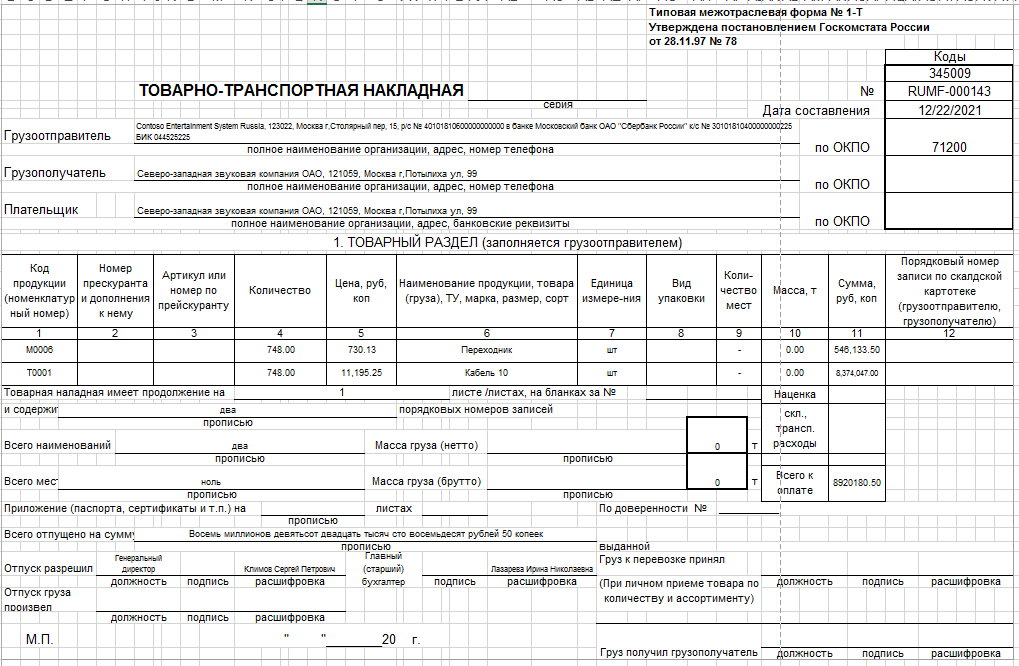
1-T bill of lading reports, transportation invoices, and job tickets
The 1-T bill of lading report is designed to account for the movement of inventory items when they are transported by using vehicles. You can generate and print the 1-T bill of lading report when you generate the sales order. In the Russian Federation, all cargo that is transported by using an automobile carrier must be accompanied by one of the following documents:
- Transportation invoice – The documented proof of a transportation agreement.
- Job ticket – The documented proof of a vehicle chartering agreement.
You can generate and print a transportation invoice and a job ticket for a sales order or a transfer order. You can print a transportation invoice and a job ticket from the Bill of lading page, which you can access from multiple pages. These pages include the packing slip journal, invoice journal, and transfer order pages.
Set up Accounts receivable parameters
Go to Accounts receivable > Setup > Accounts receivable parameters.
On the Shipments tab, on the Bill of lading FastTab, in the Bill of lading field, select one of the following options to specify the circumstances that a bill of lading is created in when a shipment is dispatched:
- None – No bill of lading is created.
- Packing slip update – A bill of lading is created when a packing slip is updated.
- Invoice posting – A bill of lading is created when an invoice is posted.
- Both – A bill of lading is created both when a packing slip is updated and when an invoice is posted.
On the Transportation document FastTab, in the Document type field, select Transportation invoice or Job ticket as the default type of the report. You can change the type of the printed document during document creation.
On the Number sequences tab, set up number sequence codes for the Transportation document number and Job ticket number number sequences.
Set up fixed unit parameters
The 1-T bill of lading report calculates weight in tons. Therefore, you must set up units for tons.
- Go to Organization administration > Setup > Units > Units.
- In the grid, select the unit for tons.
- On the Action Pane, select Edit.
- Set the Fixed unit assignment option to Yes.
- In the Fixed unit field, select Metric tons.
- You should also define system units for of the Mass and Dry volume unit classes. For more information, see Manage units of measure.
Print a 1-T bill of lading report, transportation invoice, or job ticket
You can generate and print a 1-T bill of lading report for a sales order. You can generate and print a transportation invoice and a job ticket from the sales order, packing slip, and transfer order pages. To set up information for a bill of lading, follow one of these steps, depending on the type of document that you're working with.
If you are working with the sales order, follow these steps:
- Go to Accounts receivable > Orders > All sales orders.
- Create an invoice.
- On the Action Pane, on the Invoice tab, in the Generate group, select Invoice.
- In the Posting invoice dialog box, on the Parameters tab, in the Print options section, set the Bill of lading option to Yes to print the 1-T bill of lading report for the sales order.
- Set the Transportation document option to Yes to print a transportation invoice or a job ticket for the sales order.
If you're working with the packing slip, follow these steps:
- Go to Accounts receivable > Orders > All sales orders.
- Create an invoice.
- On the Action Pane, on the Pick and pack tab, in the Generate group, select Post packing slip.
- On the Parameters tab, in the Print options section, set the Transportation document option to Yes to print a transportation invoice or a job ticket for the sales order.
If you are working with the transfer order, follow these steps:
- Go to Inventory management > Inbound orders > Transfer orders.
- Create an order.
- On the Header tab, on the Bill of lading FastTab, in the Carrier section, in the Carrier type field, select the type of carrier:
- Invoice account – The carrier is the customer that is selected as the invoice account on the sales order.
- Customer – The carrier is the customer account that is specified in the Carrier field.
- Vendor – The carrier is the vendor account that is specified in the Carrier field.
- In the Carrier field, select the registration number of the carrier. This field is available only if you selected Customer or Vendor in the Carrier type field.
To generate and print a 1-T bill of lading report, transportation invoice, or job ticket, follow these steps.
On the sales order, packing slip, or transfer order page, in the License card section, in the Registration number, Series, and Number fields, enter information for the license card.
In the Transportation section, in the Carrier type field, select the type of carrier:
- Invoice account – The carrier is the customer that is selected as the invoice account on the sales order.
- Customer – The carrier is the customer account that is specified in the Carrier field.
- Vendor – The carrier is the vendor account that is specified in the Carrier field.
In the Carrier field, select the registration number of the carrier. This field is available only if you selected Customer or Vendor in the Carrier type field.
In the Delivery date field, select the date of delivery.
In the Model field, select the model of the vehicle.
In the Registration number field, enter the registration number of the vehicle.
In the Waybill field, enter the waybill number of the vehicle.
In the Driver name, Driving license, and Driver contact data fields, enter information about the driver.
In the Type field, enter the type of transport.
In the Transportation documents section, in the Document type field, review the default value that you set earlier. You can change the value by selecting Transportation invoice or Job ticket.
In the Cargo description and Cargo packing fields, enter information about the shipping description of the cargo.
Select OK to post and print the packing slip that includes the details from the transportation invoice or job ticket.
Review the 1-T bill of lading report, transportation invoice, or job ticket
You can review the 1-T bill of lading report, transportation invoice, or job ticket from the Bill of lading page.
To access the Bill of lading page, follow one of these steps, depending on the type of document that you're working with.
If you're working with the sales order, follow these steps:
- Go to Accounts receivable > Orders > All sales orders.
- Select the posted sales order, and then, on the Action Pane, on the Invoice tab, in the Journals group, select Invoice.
- On the Invoice journal page, on the Action Pane, in the Ship group, select Bill of lading.
If you're working with the packing slip, follow these steps:
- Go to Accounts receivable > Orders > All sales orders.
- Select the posted sales order, and then, on the Action Pane, on the Pick and pack tab, in the Journals group, select Packing slip.
- On the Action Pane, select Inquiries > Bill of lading.
If you're working with the transfer order, follow these steps:
- Go to Inventory management > Inquiries and reports > Transfer orders > Transfer order history.
- On the Overview tab, select the posted transfer invoice.
- On the Action Pane, on the Transfer order tab, in the View group, select Bill of lading.
On the Bill of lading page, on the Action Pane, select Transportation document > Original preview or Copy preview. Then review the transportation invoice or job ticket.
For the sales order, on the Action Pane, select Preview/Print > Original preview or Copy preview. Then review the 1-T bill of lading report.
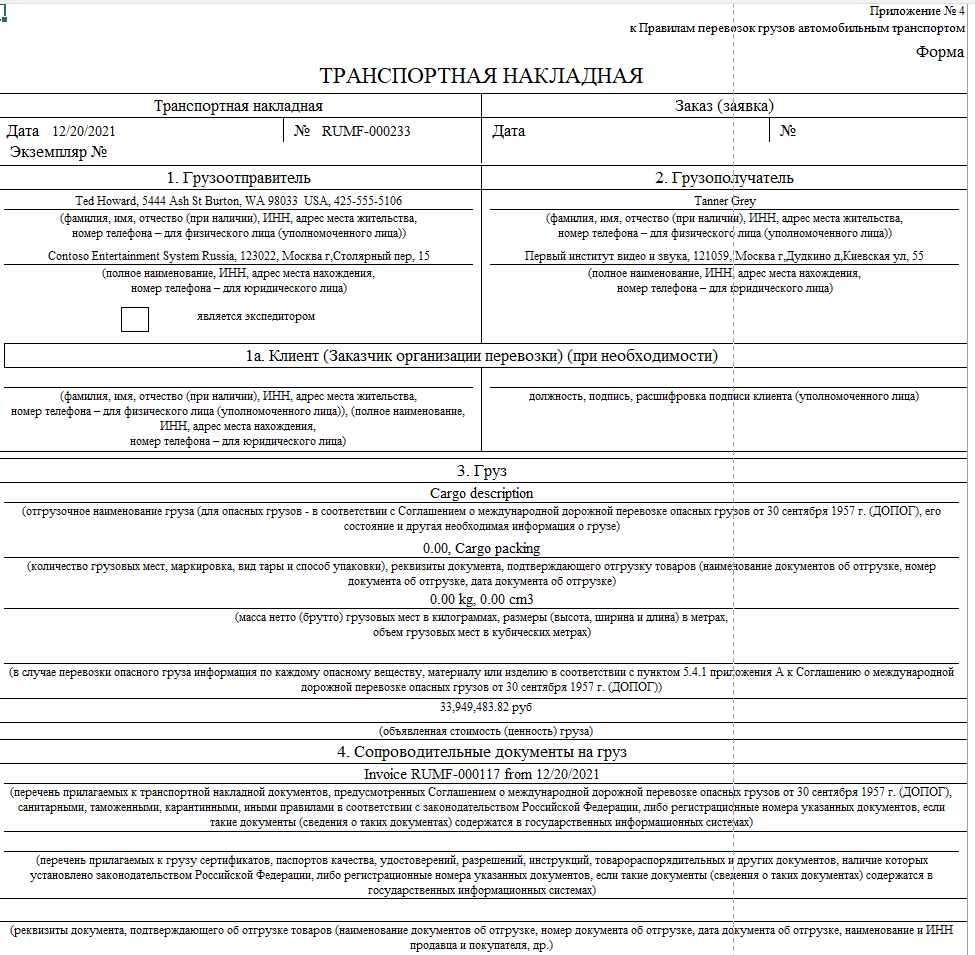
The following illustration shows an example of a transportation invoice.
The following illustration shows an example of a job ticket.

The following illustration shows an example of a 1-T bill of lading report.
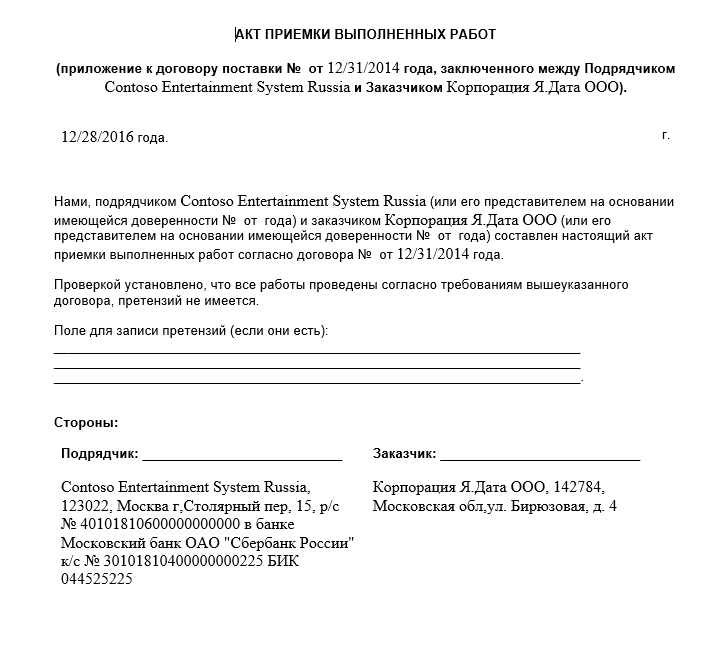
Customer acceptance reports
The Customer acceptance report confirms the transfer of the result of the work and the absence of claims from the customer. To print the Customer acceptance report, follow these steps.
Go to Accounts receivable > Invoices > Open customer invoices.
Select an open customer invoice, and then, on the Action Pane, on the Invoice tab, in the Document group, select Print > Range.
Alternatively, you can print the acceptance report by selecting View > Acceptance report.
In the Print customer invoice dialog box, on the Parameters FastTab, in the Invoice selection criteria section, in the Account type field, select Customer account.
In the From account and To account fields, select the range of customer accounts that the acceptance reports are printed for.
In the Type of date used field, select a type of date range for the invoices that are printed on the report.
In the From date field, select or enter the first day of the date range.
In the To date field, select or enter the last day of the date range.
In the Print options section, in the Print option field, select Acceptance report to print an acceptance report for the customer invoice.
Select OK to print the report.
The following illustration shows an example of a Customer acceptance report.
Counting act (INV-17) and Certificate (Appendix to INV-17) reports for customers
The Counting act (INV-17) report shows the results of the inventory settlements with counterparties. The report contains information about accounts receivable and accounts payable debt. Use the Accounts payable counting page to generate the Inventory act report.
- Set up the Accounting receivable inventory act register. For more information, see Tax registers.
- Go to Accounts payable > Periodic tasks > Accounts payable counting.
- In the Counting act dialog box, on the Parameters FastTab, in the Date section, in the Counting date field, select the inventory date.
- In the Set up section, set the Agreements option to Yes to add detailed agreement information.
- Set the Documents option to Yes to sort the lines by customer or vendor, and to show a total sum for each customer or vendor.
- Select OK.
- On the Accounts receivable counting lines page, review the inventory data that was collected from the Accounts receivable inventory act register.
- In the Non-confirmed debt field, enter the non-confirmed debt.
- On the Action Pane, on the Print tab, select Counting act (INV-17) to generate a Counting act (INV-17) report or Certificate (Appendix to INV-17) to generate a Certificate (Appendix to INV-17) report.
- In the Counting date field, select the inventory date.
- In the Document field, enter the document number that identifies the reason for the inventory.
- On the Officials tab, in the Position field, select the position title of the official.
- In the Title field, select the job title of the official.
- In the Employee name field, in the list of company employees, select the name of the official.
- Select OK to print the Counting act (INV-17) or Certificate (Appendix to INV-17) report.
Feedback
Coming soon: Throughout 2024 we will be phasing out GitHub Issues as the feedback mechanism for content and replacing it with a new feedback system. For more information see: https://aka.ms/ContentUserFeedback.
Submit and view feedback for