Use HAT Software Factory to create a hosted application in Unified Service Desk
The Hosted Application Toolkit (HAT) Software Factory provides you with Visual Studio templates to configure hosted Windows, web, or Java applications, and make them available to a UII desktop (such as Unified Service Desk). To use the HAT Software Factory, you must first install it.
Install HAT Software Factory
Ensure that you have Visual Studio installed. HAT supports Visual Studio 2015, Visual Studio 2013, Visual Studio 2012, and Visual Studio 2010.
Download and extract the UII SDK package. In the extracted folder, navigate to the UII\Templates folder to locate the HAT software plug-in for Visual Studio:
Microsoft.Uii.Tools.Inspector.vsix.Double-click the
Microsoft.Uii.Tools.Inspector.vsixfile to install the HAT software plug-in for Visual Studio.
Create a HAT hosted application project
Installing the HAT Software Factory creates new project templates in Visual Studio that let you create hosted applications that can use HAT automations.
Start Visual Studio, and create a new project.
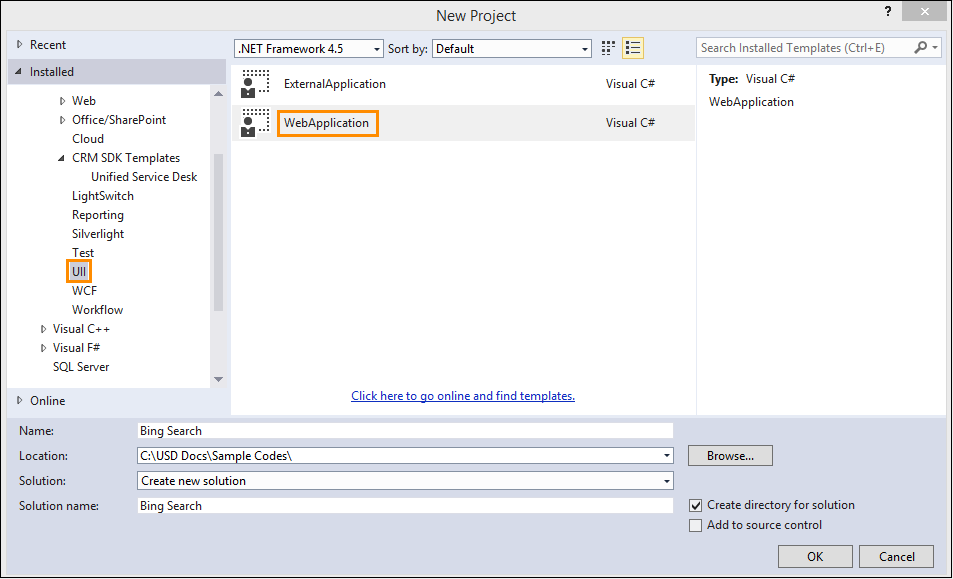
In the New Project dialog box, from the list of installed templates on the left, expand Visual C#, and select:
UII > External Application: Create a project with basic initialization string (Initstring.xml) file for an external application.
UII > Web Application: Create a project with basic initialization string (Initstring.xml) for a web application.
In this topic, you’ll create a web application.

Specify the name and location of the project, and click OK.
You are prompted to enter a URL for your web application. Type the URL, and then click OK.

This creates a web application project with an initialization string (Initstring.xml) that contains information about your web application URL, adapter info, and data bindings. This is basic information, and will get updated as you configure your hosted application with automations and bindings.
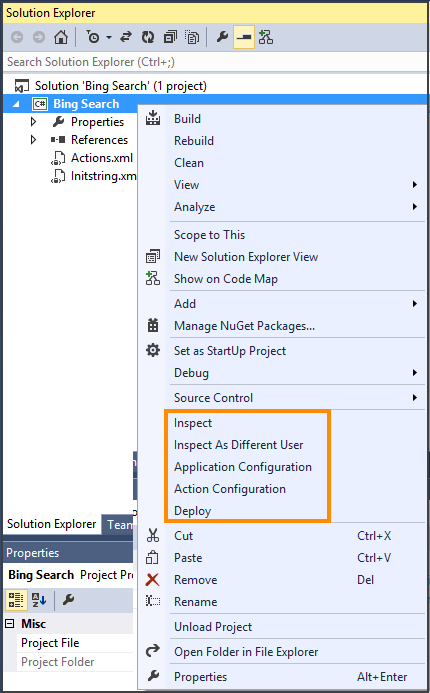
Next, configure the application by using one of the following options by right-clicking the project name, and selecting an option from the shortcut menu.

Option Description Inspect Start UII Inspector to inspect the application controls. More information: Using UII inspector to create bindings Inspect As Different User Start UII Inspector using different credentials. Application Configuration Configure the hosted control application. More information: Configure the HAT application Action Configuration Configure an action for the HAT application. More information: Configuring an action for the HAT application Deploy Deploy the hosted control application configuration to the Microsoft Dataverse server. More information: Deploy and import an application configuration to or from Dataverse server Note
When using Inspect as a different User for a Windows-based application with different access rights, the UII Inspector may sometimes not inspect the controls. In such cases, ensure that Visual Studio and the target application run with the same privileges and that you use the Inspect option instead of Inspect as a different User. This option isn’t available for web applications.
While inspecting an application with the Inspect as a different User function, if the application uses the
Set Parentmethod of hosting, the application bindings may have errors. While using theSet Parentmethod, you must selectUse FindWindowin theAlternate Top-Level windowsection and specify theCaptionandClassfor the application window.Save your project, and build it (Build > Build Solution). After the project is built successfully, an assembly (Bing_Search.dll) is generated in the \bin\debug folder of your project folder. This assembly will be used later when deploying the application.
See also
Using UII inspector to create bindings Configure the hosted application Configure an action for the hosted application Deploy the hosted application to Unified Service Desk Import the hosted application from Unified Service Desk
Feedback
Coming soon: Throughout 2024 we will be phasing out GitHub Issues as the feedback mechanism for content and replacing it with a new feedback system. For more information see: https://aka.ms/ContentUserFeedback.
Submit and view feedback for