Azure Container Registry implements Docker's content trust model, enabling pushing and pulling of signed images. This article gets you started enabling content trust in your container registries.
Content trust is a feature of the Premium service tier of Azure Container Registry.
Limitations
Token with repository-scoped permissions does not currently support docker push and pull of signed images.
How content trust works
Important to any distributed system designed with security in mind is verifying both the source and the integrity of data entering the system. Consumers of the data need to be able to verify both the publisher (source) of the data, as well as ensure it's not been modified after it was published (integrity).
As an image publisher, content trust allows you to sign the images you push to your registry. Consumers of your images (people or systems pulling images from your registry) can configure their clients to pull only signed images. When an image consumer pulls a signed image, their Docker client verifies the integrity of the image. In this model, consumers are assured that the signed images in your registry were indeed published by you, and that they've not been modified since being published.
Note
Azure Container Registry (ACR) does not support acr import to import images signed with Docker Content Trust (DCT). By design, the signatures are not visible after the import, and the notary v2 stores these signatures as artifacts.
Trusted images
Content trust works with the tags in a repository. Image repositories can contain images with both signed and unsigned tags. For example, you might sign only the myimage:stable and myimage:latest images, but not myimage:dev.
Signing keys
Content trust is managed through the use of a set of cryptographic signing keys. These keys are associated with a specific repository in a registry. There are several types of signing keys that Docker clients and your registry use in managing trust for the tags in a repository. When you enable content trust and integrate it into your container publishing and consumption pipeline, you must manage these keys carefully. For more information, see Key management later in this article and Manage keys for content trust in the Docker documentation.
Tip
This was a very high-level overview of Docker's content trust model. For an in-depth discussion of content trust, see Content trust in Docker.
Enable registry content trust
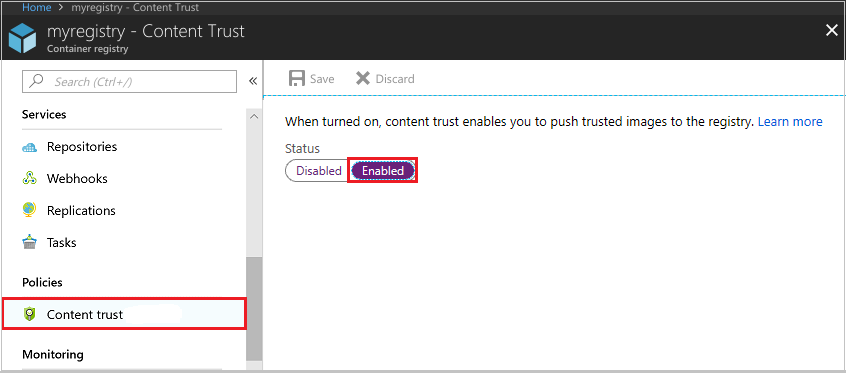
Your first step is to enable content trust at the registry level. Once you enable content trust, clients (users or services) can push signed images to your registry. Enabling content trust on your registry does not restrict registry usage only to consumers with content trust enabled. Consumers without content trust enabled can continue to use your registry as normal. Consumers who have enabled content trust in their clients, however, will be able to see only signed images in your registry.
To enable content trust for your registry, first navigate to the registry in the Azure portal. Under Policies, select Content Trust > Enabled > Save. You can also use the az acr config content-trust update command in the Azure CLI.
Enable client content trust
To work with trusted images, both image publishers and consumers need to enable content trust for their Docker clients. As a publisher, you can sign the images you push to a content trust-enabled registry. As a consumer, enabling content trust limits your view of a registry to signed images only. Content trust is disabled by default in Docker clients, but you can enable it per shell session or per command.
To enable content trust for a shell session, set the DOCKER_CONTENT_TRUST environment variable to 1. For example, in the Bash shell:
# Enable content trust for shell session
export DOCKER_CONTENT_TRUST=1
If instead you'd like to enable or disable content trust for a single command, several Docker commands support the --disable-content-trust argument. To enable content trust for a single command:
# Enable content trust for single command
docker build --disable-content-trust=false -t myacr.azurecr.io/myimage:v1 .
If you've enabled content trust for your shell session and want to disable it for a single command:
# Disable content trust for single command
docker build --disable-content-trust -t myacr.azurecr.io/myimage:v1 .
Grant image signing permissions
Only the users or systems you've granted permission can push trusted images to your registry. To grant trusted image push permission to a user (or a system using a service principal), grant their Microsoft Entra identities the AcrImageSigner role. This is in addition to the AcrPush (or equivalent) role required for pushing images to the registry. For details, see Azure Container Registry roles and permissions.
Important
You can't grant trusted image push permission to the following administrative accounts:
Starting July 2021, the AcrImageSigner role includes both the Microsoft.ContainerRegistry/registries/sign/write action and the Microsoft.ContainerRegistry/registries/trustedCollections/write data action.
Details for granting the AcrImageSigner role in the Azure portal and the Azure CLI follow.
Azure portal
Select Access control (IAM).
Select Add > Add role assignment to open the Add role assignment page.
To grant signing permissions to a user with the Azure CLI, assign the AcrImageSigner role to the user, scoped to your registry. The format of the command is:
az role assignment create --scope <registry ID> --role AcrImageSigner --assignee <user name>
For example, to grant a non-administrative user the role, you can run the following commands in an authenticated Azure CLI session. Modify the REGISTRY value to reflect the name of your Azure container registry.
# Grant signing permissions to authenticated Azure CLI user
REGISTRY=myregistry
REGISTRY_ID=$(az acr show --name $REGISTRY --query id --output tsv)
az role assignment create --scope $REGISTRY_ID --role AcrImageSigner --assignee azureuser@contoso.com
You can also grant a service principal the rights to push trusted images to your registry. Using a service principal is useful for build systems and other unattended systems that need to push trusted images to your registry. The format is similar to granting a user permission, but specify a service principal ID for the --assignee value.
az role assignment create --scope $REGISTRY_ID --role AcrImageSigner --assignee <service principal ID>
The <service principal ID> can be the service principal's appId, objectId, or one of its servicePrincipalNames. For more information about working with service principals and Azure Container Registry, see Azure Container Registry authentication with service principals.
To push a trusted image tag to your container registry, enable content trust and push the image with docker push. After push with a signed tag completes the first time, you're asked to create a passphrase for both a root signing key and a repository signing key. Both the root and repository keys are generated and stored locally on your machine.
$ docker push myregistry.azurecr.io/myimage:v1
[...]
The push refers to repository [myregistry.azurecr.io/myimage]
ee83fc5847cb: Pushed
v1: digest: sha256:aca41a608e5eb015f1ec6755f490f3be26b48010b178e78c00eac21ffbe246f1 size: 524
Signing and pushing trust metadata
You are about to create a new root signing key passphrase. This passphrase
will be used to protect the most sensitive key in your signing system. Please
choose a long, complex passphrase and be careful to keep the password and the
key file itself secure and backed up. It is highly recommended that you use a
password manager to generate the passphrase and keep it safe. There will be no
way to recover this key. You can find the key in your config directory.
Enter passphrase for new root key with ID 4c6c56a:
Repeat passphrase for new root key with ID 4c6c56a:
Enter passphrase for new repository key with ID bcd6d98:
Repeat passphrase for new repository key with ID bcd6d98:
Finished initializing "myregistry.azurecr.io/myimage"
Successfully signed myregistry.azurecr.io/myimage:v1
After your first docker push with content trust enabled, the Docker client uses the same root key for subsequent pushes. On each subsequent push to the same repository, you're asked only for the repository key. Each time you push a trusted image to a new repository, you're asked to supply a passphrase for a new repository key.
Pull a trusted image
To pull a trusted image, enable content trust and run the docker pull command as normal. To pull trusted images, the AcrPull role is enough for normal users. No additional roles like an AcrImageSigner role are required. Consumers with content trust enabled can pull only images with signed tags. Here's an example of pulling a signed tag:
$ docker pull myregistry.azurecr.io/myimage:signed
Pull (1 of 1): myregistry.azurecr.io/myimage:signed@sha256:0800d17e37fb4f8194495b1a188f121e5b54efb52b5d93dc9e0ed97fce49564b
sha256:0800d17e37fb4f8194495b1a188f121e5b54efb52b5d93dc9e0ed97fce49564b: Pulling from myimage
8e3ba11ec2a2: Pull complete
Digest: sha256:0800d17e37fb4f8194495b1a188f121e5b54efb52b5d93dc9e0ed97fce49564b
Status: Downloaded newer image for myregistry.azurecr.io/myimage@sha256:0800d17e37fb4f8194495b1a188f121e5b54efb52b5d93dc9e0ed97fce49564b
Tagging myregistry.azurecr.io/myimage@sha256:0800d17e37fb4f8194495b1a188f121e5b54efb52b5d93dc9e0ed97fce49564b as myregistry.azurecr.io/myimage:signed
If a client with content trust enabled tries to pull an unsigned tag, the operation fails with an error similar to the following:
$ docker pull myregistry.azurecr.io/myimage:unsigned
Error: remote trust data does not exist
Behind the scenes
When you run docker pull, the Docker client uses the same library as in the Notary CLI to request the tag-to-SHA-256 digest mapping for the tag you're pulling. After validating the signatures on the trust data, the client instructs Docker Engine to do a "pull by digest." During the pull, the Engine uses the SHA-256 checksum as a content address to request and validate the image manifest from the Azure container registry.
Note
Azure Container Registry does not officially support the Notary CLI but is compatible with the Notary Server API, which is included with Docker Desktop. Currently Notary version 0.6.0 is recommended.
Key management
As stated in the docker push output when you push your first trusted image, the root key is the most sensitive. Be sure to back up your root key and store it in a secure location. By default, the Docker client stores signing keys in the following directory:
~/.docker/trust/private
Back up your root and repository keys by compressing them in an archive and storing it in a secure location. For example, in Bash:
umask 077; tar -zcvf docker_private_keys_backup.tar.gz ~/.docker/trust/private; umask 022
Along with the locally generated root and repository keys, several others are generated and stored by Azure Container Registry when you push a trusted image. For a detailed discussion of the various keys in Docker's content trust implementation, including additional management guidance, see Manage keys for content trust in the Docker documentation.
Lost root key
If you lose access to your root key, you lose access to the signed tags in any repository whose tags were signed with that key. Azure Container Registry cannot restore access to image tags signed with a lost root key. To remove all trust data (signatures) for your registry, first disable, then re-enable content trust for the registry.
Warning
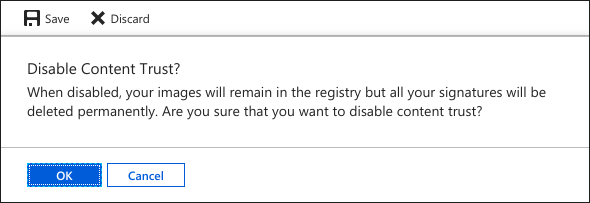
Disabling and re-enabling content trust in your registry deletes all trust data for all signed tags in every repository in your registry. This action is irreversible--Azure Container Registry cannot recover deleted trust data. Disabling content trust does not delete the images themselves.
To disable content trust for your registry, navigate to the registry in the Azure portal. Under Policies, select Content Trust > Disabled > Save. You're warned of the loss of all signatures in the registry. Select OK to permanently delete all signatures in your registry.
Next steps
See Content trust in Docker for additional information about content trust, including docker trust commands and trust delegations. While several key points were touched on in this article, content trust is an extensive topic and is covered more in-depth in the Docker documentation.
See the Azure Pipelines documentation for an example of using content trust when you build and push a Docker image.
Learn how to create and configure an Azure Container Registry, the process of pushing container images to Azure Container Registry and explore different authentication methods and security features for Azure Container Registry.