Exercise - Create a pull request
In this unit, you'll practice the process of submitting a pull request and merging your changes into the main branch so that everyone can benefit from your work.
In Create a build pipeline with Azure Pipelines, you created a Git branch named build-pipeline, where you defined a basic build pipeline for the Space Game website. Recall that your build definition is in a file named azure-pipelines.yml.
Although your branch produces a build artifact, that work exists only on the build-pipeline branch. You need to merge your branch into the main branch.
Recall that a pull request tells the other developers that you have code ready to review, if necessary, and you want your changes merged into another branch, such as the main branch.
Before we start, let's check in with Mara and Andy.
Andy: Hi, Mara. I know you've got a build pipeline running on Azure. I'm adding a feature to the website and I want to see the build process for myself. Are we ready to do that?
Mara: Absolutely. I created the pipeline on a branch. Why don't we create a pull request and get it merged into main so you can use the pipeline, too?
Andy: Sounds great. Let's take a look.
Create a branch and add starter code
Although you could use the build pipeline you built in the previous module, let's create a new branch named code-workflow. This branch is based on main, so you can practice the process from the beginning.
In Visual Studio Code, open the integrated terminal.
Switch to the
mainbranch:git checkout mainEnsure that you have the latest version of the code from GitHub:
git pull origin mainCreate a branch named
code-workflow:git checkout -B code-workflowThe
-bargument specifies to create a new branch if it doesn't exist. Omit the-bargument when you want to switch to an existing branch.By default, your new branch builds on the previous branch from where you ran the
git checkoutcommand. Here, the parent branch ismain, but the parent branch can be another one, such as a feature branch someone else started that you want to build on or experiment with.It's now safe to make whatever changes you need, because you're on your own local branch. If you want to see which branch you're on, run
git branch -v.From the file explorer, open azure-pipelines.yml and replace its contents with this:
trigger:
- '*'

pool:
  vmImage: 'ubuntu-20.04'
  demands:
  - npm

variables:
  buildConfiguration: 'Release'
  wwwrootDir: 'Tailspin.SpaceGame.Web/wwwroot'
  dotnetSdkVersion: '6.x'

steps:
- task: UseDotNet@2
  displayName: 'Use .NET SDK $(dotnetSdkVersion)'
  inputs:
    version: '$(dotnetSdkVersion)'

- task: Npm@1
  displayName: 'Run npm install'
  inputs:
    verbose: false

- script: './node_modules/.bin/node-sass $(wwwrootDir) --output $(wwwrootDir)'
  displayName: 'Compile Sass assets'

- task: gulp@1
  displayName: 'Run gulp tasks'

- script: 'echo "$(Build.DefinitionName), $(Build.BuildId), $(Build.BuildNumber)" > buildinfo.txt'
  displayName: 'Write build info'
  workingDirectory: $(wwwrootDir)

- task: DotNetCoreCLI@2
  displayName: 'Restore project dependencies'
  inputs:
    command: 'restore'
    projects: '**/*.csproj'

- task: DotNetCoreCLI@2
  displayName: 'Build the project - $(buildConfiguration)'
  inputs:
    command: 'build'
    arguments: '--no-restore --configuration $(buildConfiguration)'
    projects: '**/*.csproj'

- task: DotNetCoreCLI@2
  displayName: 'Publish the project - $(buildConfiguration)'
  inputs:
    command: 'publish'
    projects: '**/*.csproj'
    publishWebProjects: false
    arguments: '--no-build --configuration $(buildConfiguration) --output $(Build.ArtifactStagingDirectory)/$(buildConfiguration)'
    zipAfterPublish: true

- task: PublishBuildArtifacts@1
  displayName: 'Publish Artifact: drop'
  condition: succeeded()
This configuration resembles the basic one you created in the previous module. For brevity, it builds only your project's Release configuration.
Push your branch to GitHub
Here, you'll push your code-workflow branch to GitHub and watch Azure Pipelines build the application.
In the terminal, run
git statusto see what uncommitted work exists on your branch:git statusYou'll see that azure-pipelines.yml has been modified. You'll commit that to your branch shortly, but you first need to ensure that Git is tracking this file which is called staging the file.
Only staged changes are committed when you run
git commit. Next, you run thegit addcommand to add azure-pipelines.yml to the staging area, or index.Run the following
git addcommand to add azure-pipelines.yml to the staging area:git add azure-pipelines.ymlRun the following
git commitcommand to commit your staged file to thecode-workflowbranch:git commit -m "Add the build configuration"The
-margument specifies the commit message. The commit message becomes part of a changed file's history. It helps reviewers understand the change, and it helps future maintainers understand how the file changed over time.Tip
The best commit messages complete the sentence, "If you apply this commit, you will ..."
If you omit the
-margument, Git brings up a text editor where you can detail the change. This option is useful when you want to specify a commit message that spans multiple lines. The text up to the first blank line specifies the commit title.Run this
git pushcommand to push, or upload, thecode-workflowbranch to your repository on GitHub:git push origin code-workflowAs an optional step, go to your project in Azure Pipelines and trace the build as it runs.
This build is called a CI build. Your pipeline configuration uses what's called a trigger to control which branches participate in the build process. Here, "*" specifies all branches.
trigger:
- '*'
Later, you'll see how to control your pipeline configuration to build from only the branches that you need.
You'll see that the build completes successfully and produces an artifact that contains the built web application.
Create a pull request
Here, you'll create a pull request for your branch:
In a browser, sign in to GitHub.
Go to your mslearn-tailspin-spacegame-web repository.
In the Branch drop-down list, select your
code-workflowbranch.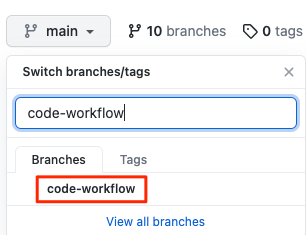
To start your pull request, select Contribute and then Open pull request.

Ensure that the base specifies your forked repository and not the Microsoft repository.
Your selection looks like this:

Important
This step is important because you can't merge your changes into the Microsoft repository. Ensure that the base repository points to your GitHub account and not MicrosoftDocs.
If you end up with a pull request against MicrosoftDocs, simply close the pull request and repeat these steps.
This process involves an extra step because you're working from a forked repository. When you work directly with your own repository, and not a fork, your
mainbranch is selected by default.Enter a title and description for your pull request.
Title:
Configure Azure Pipelines
Description:
This pipeline configuration builds the application and produces a build for the Release configuration.
To complete your pull request, select Create pull request.
This step does not merge any code. It tells others that you have proposed changes to be merged into the
mainbranch.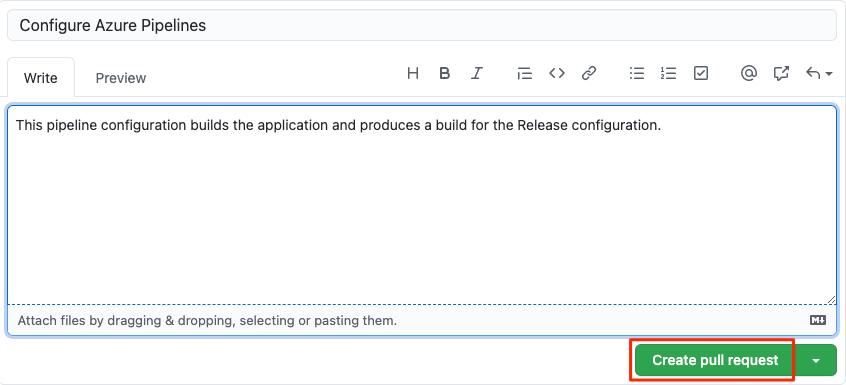
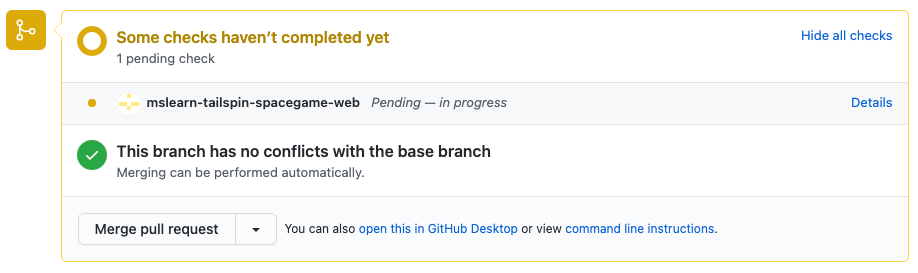
The pull request window is displayed. You can see that the build status in Azure Pipelines is configured to appear as part of the pull request. That way, you and others can view the status of the build as it's running.
Just like when you push a branch to GitHub, a pull request, by default, triggers Microsoft Azure Pipelines to build your application.
Tip
If you don't see the build status appear right away, wait a few moments or refresh the page.
Optionally, select the Details link, and then trace the build as it moves through the pipeline.
You can hand off your build to the next step in the process, such as QA. Later, you can configure the pipeline to push your change all the way out to your QA lab or production.
Go back to your pull request on GitHub.
Wait for the build to complete. You're now ready to merge your pull request.

Select Merge pull request, and then select Confirm merge.
To delete the
code-workflowbranch from GitHub, select Delete branch.
It's completely safe to delete a branch from GitHub after you've merged your pull request. In fact, it's a common practice, because the branch is no longer needed. The changes are merged and you can still find the details about the changes on GitHub or from the command line. Deleting a merged branch also helps others see only the work that's currently active.
Git branches are meant to be short-lived. After you merge a branch, you don't push additional commits onto it or merge it a second time. In most cases, every time you start on a new feature or bug fix, you start with a clean branch that's based on the
mainbranch.Deleting a branch on GitHub doesn't delete that branch from your local system. To do that, you would pass the
-dswitch to thegit branchcommand.
How many times is a change built?
The answer depends on how your build configuration is defined. Azure Pipelines enables you to define triggers that specify which events cause builds to happen. You can control which branches get built or even which files trigger the build.
As an example, let's say that you want a build to happen when a change is pushed to GitHub on any Git branch. But you don't want the build to happen when the only changes are to files in your project's docs folder. You might want to include this trigger section in your build configuration:
trigger:
  branches:
    include:
    - '*'     # build all branches
  paths:
    exclude:
    - docs/*  # exclude the docs folder
By default, a build is triggered when a change is pushed to any file on any branch.
A continuous integration (CI) build is a build that runs when you push a change to a branch.
A pull request (PR) build is a build that runs when you open a pull request or when you push additional changes to an existing pull request.
The changes you make through the code-workflow branch are built under three conditions:
- A CI build happens when you push changes to the
code-workflowbranch. - A PR build happens when you open a pull request on the
code-workflowbranch against themainbranch. - A final CI build happens after the pull request is merged to the
mainbranch.
PR builds help you verify that your proposed changes will work correctly after they're merged to main or another target branch.
The final CI build verifies that the changes are still good after the PR was merged.
As an optional step, go to Azure Pipelines and watch the final CI build happen on the main branch.