Implement virtual network traffic routing
Azure automatically creates a route table for each subnet within an Azure virtual network and adds system default routes to the table. You can override some of Azure's system routes with custom routes, and add additional custom routes to route tables. Azure routes outbound traffic from a subnet based on the routes in a subnet's route table.
System routes
Azure automatically creates system routes and assigns the routes to each subnet in a virtual network. You can't create or remove system routes, but you can override some system routes with custom routes. Azure creates default system routes for each subnet, and adds additional optional default routes to specific subnets, or every subnet, when you use specific Azure capabilities.
Default routes
Each route contains an address prefix and next hop type. When traffic leaving a subnet is sent to an IP address within the address prefix of a route, the route that contains the prefix is the route Azure uses. Whenever a virtual network is created, Azure automatically creates the following default system routes for each subnet within the virtual network:
Source
Address prefixes
Next hop type
Default
Unique to the virtual network
Virtual network
Default
0.0.0.0/0
Internet
Default
10.0.0.0/8
None
Default
192.168.0.0/16
None
Default
100.64.0.0/10
None
In routing terms, a hop is a waypoint on the overall route. Therefore, the next hop is the next waypoint that the traffic is directed to on its journey to its ultimate destination. The next hop types listed in the previous table represent how Azure routes traffic destined for the address prefix listed. The next hop types are defined as follows:
Virtual network: Routes traffic between address ranges within the address space of a virtual network. Azure creates a route with an address prefix that corresponds to each address range defined within the address space of a virtual network. Azure automatically routes traffic between subnets using the routes created for each address range.
Internet: Routes traffic specified by the address prefix to the Internet. The system default route specifies the 0.0.0.0/0 address prefix. Azure routes traffic for any address not specified by an address range within a virtual network to the Internet, unless the destination address is for an Azure service. Azure routes any traffic destined for its service directly to the service over the backbone network, rather than routing the traffic to the Internet. You can override Azure's default system route for the 0.0.0.0/0 address prefix with a custom route.
None: Traffic routed to the None next hop type is dropped, rather than routed outside the subnet. Azure automatically creates default routes for the following address prefixes:
- 10.0.0.0/8, 172.16.0.0/12 and 192.168.0.0/16: Reserved for private use in RFC 1918.
- 100.64.0.0/10: Reserved in RFC 6598.
If you assign any of the previous address ranges within the address space of a virtual network, Azure automatically changes the next hop type for the route from None to Virtual network. If you assign an address range to the address space of a virtual network that includes, but isn't the same as, one of the four reserved address prefixes, Azure removes the route for the prefix and adds a route for the address prefix you added, with Virtual network as the next hop type.
Optional default routes
Azure adds default system routes for any Azure capabilities that you enable. Depending on the capability, Azure adds optional default routes to either specific subnets within the virtual network, or to all subnets within a virtual network. The additional system routes and next hop types that Azure may add when you enable different capabilities are:
Source
Address prefixes
Next hop type
Subnet within virtual network that route is added to
Default
Unique to the virtual network, for example: 10.1.0.0/16
VNet peering
All
Virtual network gateway
Prefixes advertised from on-premises via BGP, or configured in the local network gateway
Virtual network gateway
All
Default
Multiple
VirtualNetworkServiceEndpoint
Only the subnet a service endpoint is enabled for
Virtual network (VNet) peering: When you create a virtual network peering between two virtual networks, a route is added for each address range within the address space of each virtual network.
Virtual network gateway: When you add a virtual network gateway to a virtual network, Azure adds one or more routes with Virtual network gateway as the next hop type. The source is listed as virtual network gateway because the gateway adds the routes to the subnet.
- If your on-premises network gateway exchanges border gateway protocol (BGP) routes with an Azure virtual network gateway, a route is added for each route propagated from the on-premises network gateway. There are limits to the number of routes you can propagate to an Azure virtual network gateway, so you should summarize on-premises routes to the largest address ranges possible. For more information on the number of routes you can propagate, see Networking limits.
VirtualNetworkServiceEndpoint: Azure adds the public IP addresses for certain services to the route table when you enable a service endpoint to the service. Service endpoints are enabled for individual subnets within a virtual network, so the route is only added to the route table of a subnet a service endpoint is enabled for. The public IP addresses of Azure services change periodically, and Azure manages the updates to the routing tables when necessary.
The VNet peering and VirtualNetworkServiceEndpoint next hop types are only added to route tables of subnets within virtual networks created through the Azure Resource Manager deployment model. The next hop types are not added to route tables that are associated to virtual network subnets created through the classic deployment model.
Custom routes
To control the way network traffic is routed more precisely, you can override the default routes that Azure creates by using your own user-defined routes (UDR). This technique can be useful when you want to ensure that traffic between two subnets passes through a firewall appliance, or if you want to ensure that no traffic from a VNet could be routed to the internet.
User-defined routes
You can create custom, or user-defined(static), routes in Azure to override Azure's default system routes, or to add additional routes to a subnet's route table.
In Azure, each subnet can have zero or one associated route table. When you create a route table and associate it to a subnet, the routes within it are combined with, or override, the default routes Azure adds to a subnet.
You can specify the following next hop types when creating a user-defined route:
Virtual appliance: A virtual appliance is a virtual machine that typically runs a network application, such as a firewall. When you create a route with the virtual appliance hop type, you also specify a next hop IP address. The IP address can be:
- The private IP address of a network interface attached to a virtual machine.
- The private IP address of an Azure internal load balancer.
Virtual network gateway: Specify when you want traffic destined for specific address prefixes routed to a virtual network gateway. The virtual network gateway must be created with type VPN.
None: Specify when you want to drop traffic to an address prefix, rather than forwarding the traffic to a destination.
Virtual network: Specify when you want to override the default routing within a virtual network.
Internet: Specify when you want to explicitly route traffic destined to an address prefix to the Internet, or if you want traffic destined for Azure services with public IP addresses kept within the Azure backbone network.
Configure User-defined routes
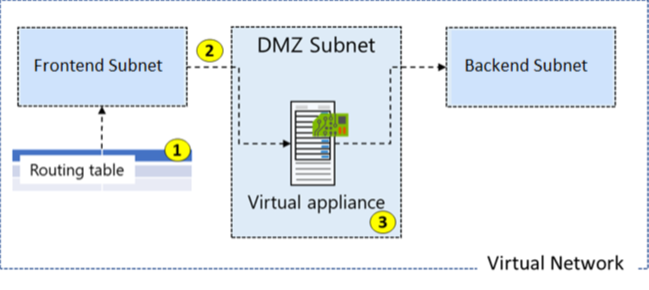
Here is an example where you have a virtual network that includes three subnets.
- The subnets are Frontend, DMZ, and Backend. In the DMZ subnet, there is a network virtual appliance (NVA). NVAs are VMs that help with network functions like routing and firewall optimization.
- You want to ensure all traffic from the Frontend subnet goes through the NVA to the Backend subnet.
Create a Routing Table
Creating a routing table is straightforward. You provide Name, Subscription, Resource Group, and Location. You also decide to use Virtual network gateway route propagation.
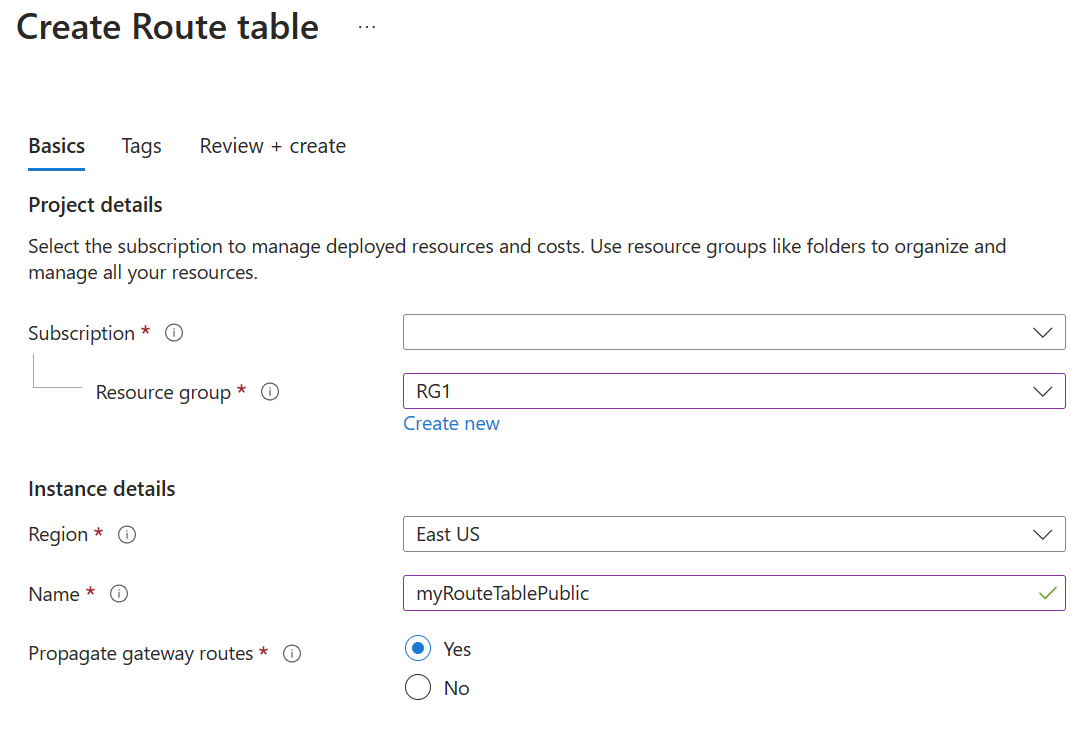
Routes are automatically added to the route table for all subnets with Virtual network gateway propagation enabled. When you are using ExpressRoute, propagation ensures all subnets get the routing information.
Create a Custom Route
For our example,
- The new route is named ToPrivateSubnet.
- The Private subnet is at 10.0.1.0/24.
- The route uses a virtual appliance. Notice the other choices for Next hop type: virtual network gateway, virtual network, internet, and none.
- The virtual appliance is located at 10.0.2.4.
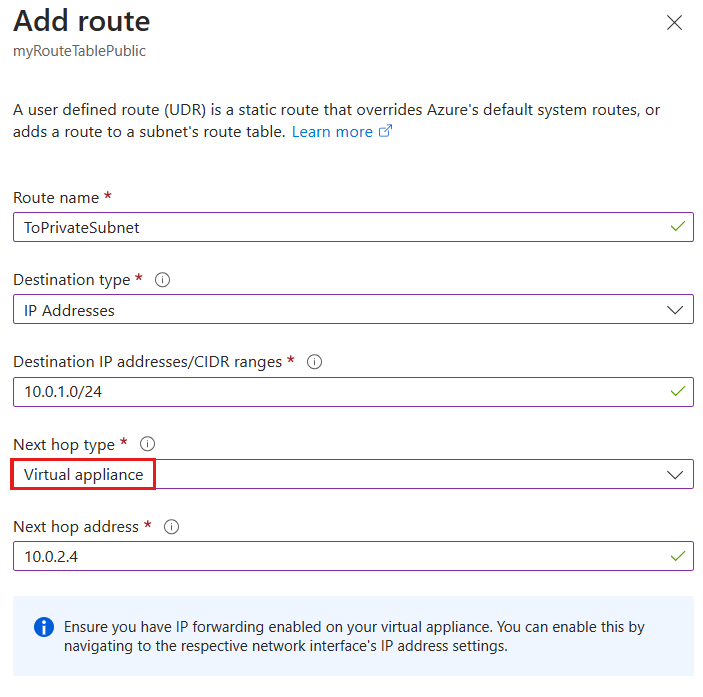
In summary, this route applies to any address prefixes in 10.0.1.0/24 (private subnet). Traffic headed to these addresses will be sent to the virtual appliance with a 10.0.2.4 address.
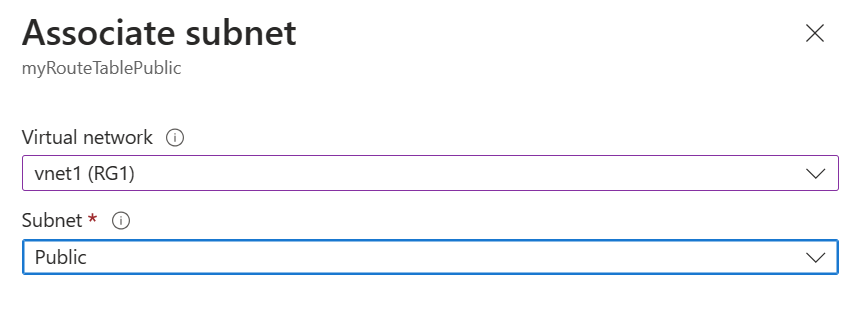
Associate the Route Table
The last step in our example is to associate the Public subnet with the new routing table. Each subnet can have zero or one route table associated to it.
Note
By default, using system routes traffic would go directly to the private subnet. However, with a user-defined route you can force the traffic through the virtual appliance.
Note
In this example, the virtual appliance shouldn't have a public IP address and IP forwarding should be enabled.
Secure a VNet by using forced tunneling
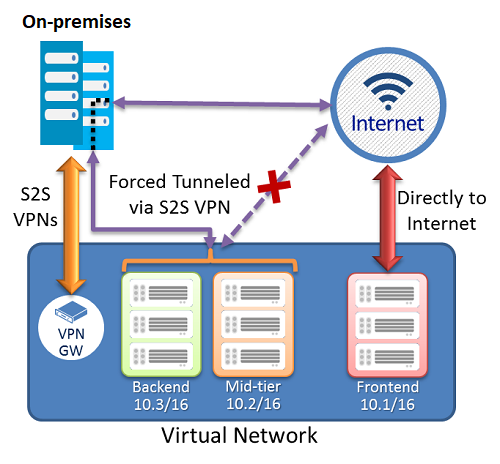
Forced tunneling lets you redirect or "force" all Internet-bound traffic back to your on-premises location via a Site-to-Site VPN tunnel for inspection and auditing. This is a critical security requirement for most enterprise IT policies. If you don't configure forced tunneling, Internet-bound traffic from your VMs in Azure always traverses from the Azure network infrastructure directly out to the Internet, without the option to allow you to inspect or audit the traffic. Unauthorized Internet access can potentially lead to information disclosure or other types of security breaches. Forced tunneling can be configured by using Azure PowerShell. It can't be configured using the Azure portal.
In the following example, the Frontend subnet is not force tunneled. The workloads in the Frontend subnet can continue to accept and respond to customer requests from the Internet directly. The Mid-tier and Backend subnets are forced tunneled. Any outbound connections from these two subnets to the Internet will be forced or redirected back to an on-premises site via one of the Site-to-site (S2S) VPN tunnels.
Configure forced tunneling
Forced tunneling in Azure is configured using virtual network custom user-defined routes.
Each virtual network subnet has a built-in, system routing table. The system routing table has the following three groups of routes:
- Local VNet routes: Route directly to the destination VMs in the same virtual network.
- On-premises routes: Route to the Azure VPN gateway.
- Default route: Route directly to the Internet. Packets destined to the private IP addresses not covered by the previous two routes are dropped.
To configure forced tunneling, you must:
- Create a routing table.
- Add a user-defined default route to the VPN Gateway.
- Associate the routing table to the appropriate VNet subnet(s).
Forced tunneling must be associated with a VNet that has a route-based VPN gateway.
- You must set a default site connection among the cross-premises local sites connected to the virtual network.
- The on-premises VPN device must be configured using 0.0.0.0/0 as traffic selectors.
Using forced tunneling allows you to restrict and inspect Internet access from your VMs and cloud services in Azure, while continuing to enable your multi-tier service architecture the Internet access it requires.
Configure Azure Route Server
Azure Route Server simplifies dynamic routing between your network virtual appliance (NVA) and your virtual network. It allows you to exchange routing information directly through Border Gateway Protocol (BGP) routing protocol between any NVA that supports the BGP routing protocol and the Azure Software Defined Network (SDN) in the Azure Virtual Network (VNET) without the need to manually configure or maintain route tables. Azure Route Server is a fully managed service and is configured with high availability.
Azure Route Server simplifies configuration, management, and deployment of your NVA in your virtual network.
You no longer need to manually update the routing table on your NVA whenever your virtual network addresses are updated.
You no longer need to update User-Defined Routes manually whenever your NVA announces new routes or withdraw old ones.
You can peer multiple instances of your NVA with Azure Route Server. You can configure the BGP attributes in your NVA and, depending on your design (e.g., active-active for performance or active-passive for resiliency), let Azure Route Server know which NVA instance is active or which one is passive.
The interface between NVA and Azure Route Server is based on a common standard protocol. As long as your NVA supports BGP, you can peer it with Azure Route Server.
You can deploy Azure Route Server in any of your new or existing virtual network.
Learn how to deploy Azure Route Server
Diagnose a routing problem
Imagine your attempts to connect to a specific virtual machine (VM) in your Azure virtual network fail persistently. You can diagnose a routing problem by viewing the routes that are effective for a network interface in a VM. The effective routes for all network interfaces in a subnet are the combination of routes you create, Azure's default routes, and any routes propagated from your on-premises network through an Azure VPN gateway via the border gateway protocol (BGP).
You can view the effective routes for each network interface by using the Azure portal, Azure PowerShell, or Azure CLI. The following steps show examples of each technique. In each case, output is only returned if the VM is in the running state. If there are multiple network interfaces attached to the VM, you can review the effective routes for each network interface. Since each network interface can be in a different subnet, each network interface can have different effective routes.
View effective routes in Azure portal
Log into the Azure portal with an Azure account that has the necessary permissions.
In the search box, enter the name of the VM that you want to investigate.
Select the VM from the search results.
Under Settings, select Networking, and navigate to the network interface resource by selecting its name.
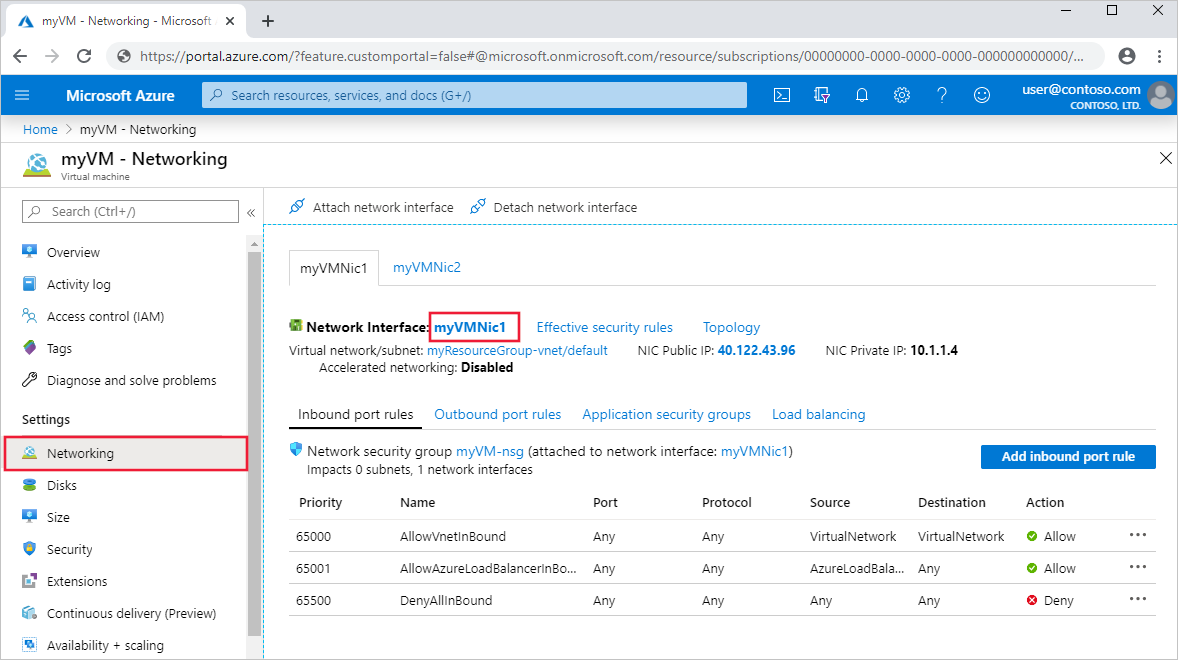
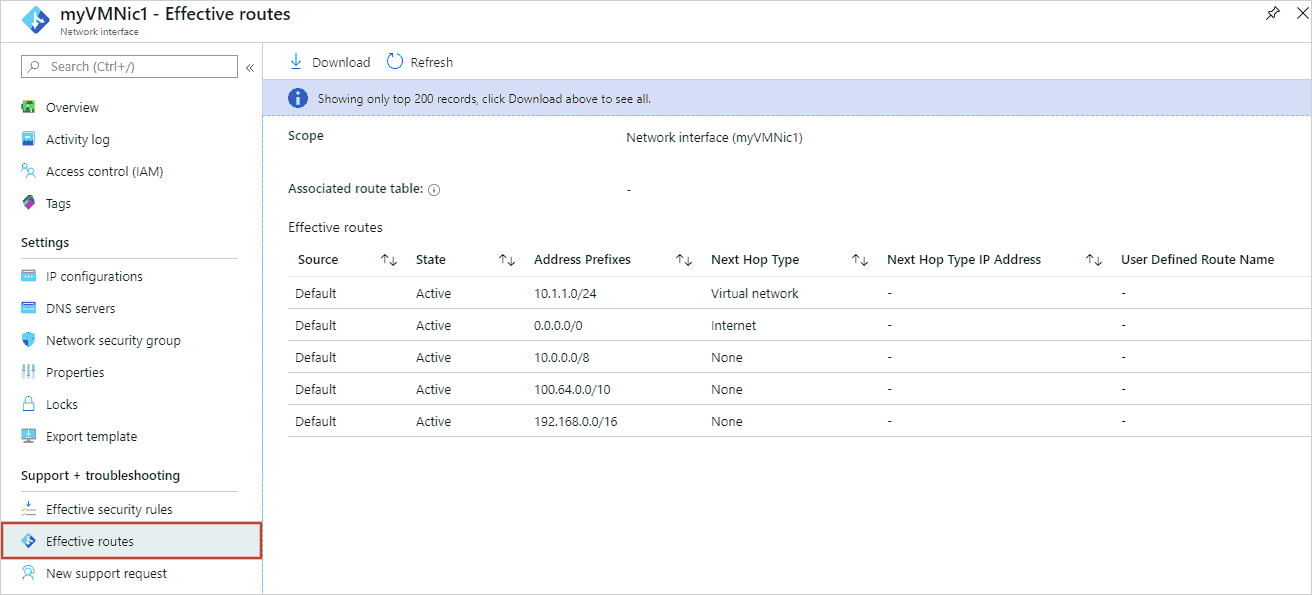
Under Support + troubleshooting, select Effective routes. The effective routes for a network interface named myVMNic1 are shown, in the following image:
View effective routes by using Azure PowerShell
You can view the effective routes for a network interface with the Get-AzEffectiveRouteTable command. The following example gets the effective routes for a network interface named myVMNic1, that is in a resource group named myResourceGroup:
Get-AzEffectiveRouteTable `

-NetworkInterfaceName myVMNic1 `

-ResourceGroupName myResourceGroup `
Resolve the routing issue
Steps you might take to resolve the routing problem might include:
- Add a custom route to override a default route. Learn how to add a custom route.
- Change or remove a custom route that causes traffic to be routed to an undesired location. Learn how to change or delete a custom route.
- Ensure that the route table is associated to the correct subnet (the one that contains the network interface). Learn how to associate a route table to a subnet.
- Ensure that devices such as Azure VPN gateway or network virtual appliances you've deployed are operating as intended.
Choose the best response for each of the questions below. Then select Check your answers.