Quick start guide: Set up and run Intelligent Recommendations with sample data
In this article, you create an Intelligent Recommendations account. You also connect to a sample dataset and start to see results for that dataset.
For more detailed steps to set up your Intelligent Recommendations account, see Create a new Intelligent Recommendations account.
Overview
Intelligent Recommendations reads data from your Azure Data Lake Storage account, models it, and enables recommendations consumption using a secure web endpoint.
This article guides you through the creation and configuration of a single Intelligent Recommendations account with a single modeling resource and a single serving resource, as depicted in this diagram:

Before starting, ensure that you have access to your organization's Azure portal and access for elevated permissions. For more information, see Prerequisites.
Quickly jump to the following steps
- Set up a Data Lake Storage account
- Upload a sample dataset
- Set up error logging
- Create the Intelligent Recommendations service account
- Set up data lake permissions
- Create modeling and serving resources
- View the recommendations results
Watch this video to learn how to set up and run Intelligent Recommendations with sample data:
Note
You can upload a sample dataset. The sample dataset is pre-loaded with data to help you quickly test Intelligent Recommendations and see results. You can also edit and replace the sample dataset with your custom dataset.
Prerequisites: Get Azure subscription and tenant information ready
Before setting up Intelligent Recommendations, you must have access to your organization's Azure portal and access for elevated permissions.
Before going any further, make sure you have the following requirements:
- An Azure subscription. If you're new to Azure, see Create your free Azure account today.
- A Microsoft Entra ID tenant ID. For instructions, see How to find your Microsoft Entra ID tenant ID.
- An Azure Data Lake Storage account. For more information, see Azure Data Lake Storage.
- Download a copy of the sample dataset folder.
- Start becoming familiar with the Azure portal. You may also want to learn about managing and deploying your Azure resources through Azure Resource Manager (ARM) templates. For more information, see Managing Azure resources using Azure portal.
Important
When onboarding to Intelligent Recommendations, data will be copied from your Data Lake Storage to the regions of the selected modeling resource. We recommend setting up the modeling resource in the same region as your Data Lake Storage account. If the Data Lake Storage account and modeling resources are in different regions, data will be copied from the Data Lake Storage region to the modeling resource region that you selected. If customers terminate Intelligent Recommendations, they have 90 days to claim their data before it's deleted. Within 90-days, customers can request to have their data copied to a specified business Data Lake Storage location. A copy of their data will be transferred to that location.
Step 1: Set up Data Lake Storage account
You start with setting up your Data Lake Storage account. To begin:
Sign in to your Microsoft Azure portal account.
Select Storage Accounts underneath the Azure Services bar.

Create or select the Data Lake Storage account for sharing data with your Intelligent Recommendations account.
From the Data Storage section of the left-hand navigation pane, select Containers.
Create a new container.
Note
The names of these folders and containers aren't important. In our example, we use ircontainer as the name of our container, ir_root as the name of our root folder, and ir_logs as the name of our logs folder.
Step 2: Upload the sample dataset
For this quick start guide, we've prepared a sample dataset .zip file for Adventure Works. This file contains the entire directory structure, with catalog and interactions data that you can download here.
Unzip the sample dataset folder and upload its contents into the root folder within your selected container. In our example, we named the container, ircontainer.
Next, you upload the dataset from your local files to your storage account using one of the following approaches:
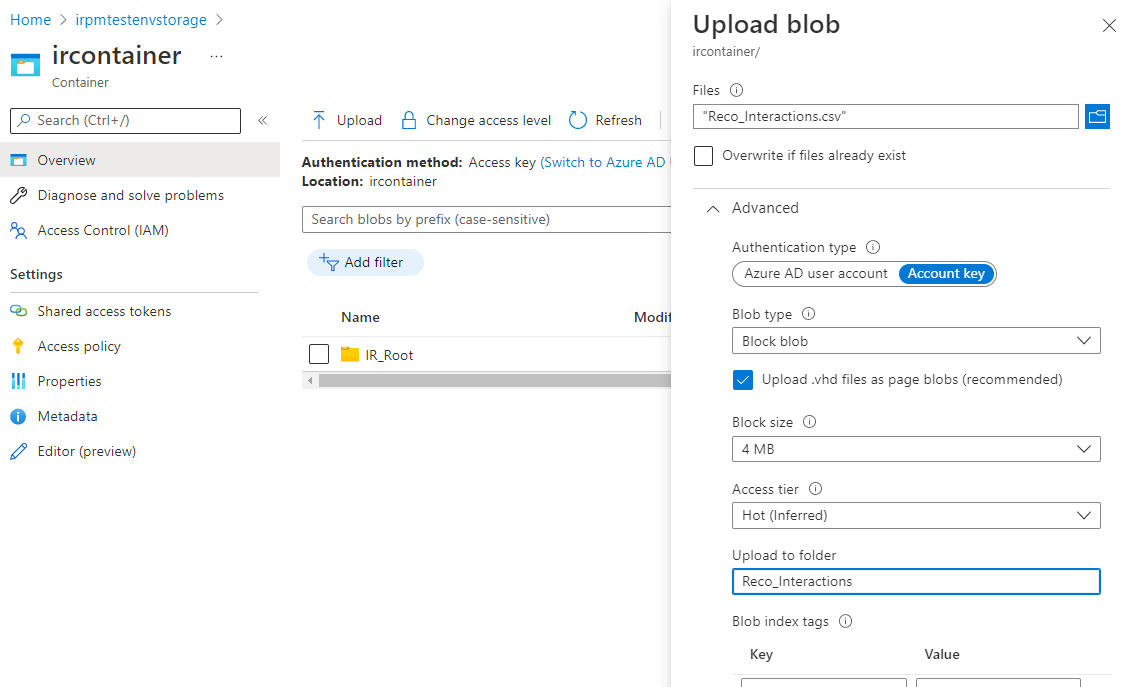
- Use Azure portal on the web: If using Azure portal on the web, specify the subfolder to upload the dataset using the Advanced drop-down menu. If you're following this step, ensure to nest the individual folders correctly. Notice that the container has two files, one for logs (ir_logs) and one for your data entities (ir_root). Both model.json file and the data entities folders (labeled with Reco_) should be nested under the ir_root folder.
- Use Microsoft Azure Storage Explorer: To use Azure Storage Explorer, see Manage your cloud storage on Azure to download the free app, and follow the instructions provided to upload the files to your storage account.
- Use Azure portal on the web: If using Azure portal on the web, specify the subfolder to upload the dataset using the Advanced drop-down menu. If you're following this step, ensure to nest the individual folders correctly. Notice that the container has two files, one for logs (ir_logs) and one for your data entities (ir_root). Both model.json file and the data entities folders (labeled with Reco_) should be nested under the ir_root folder.
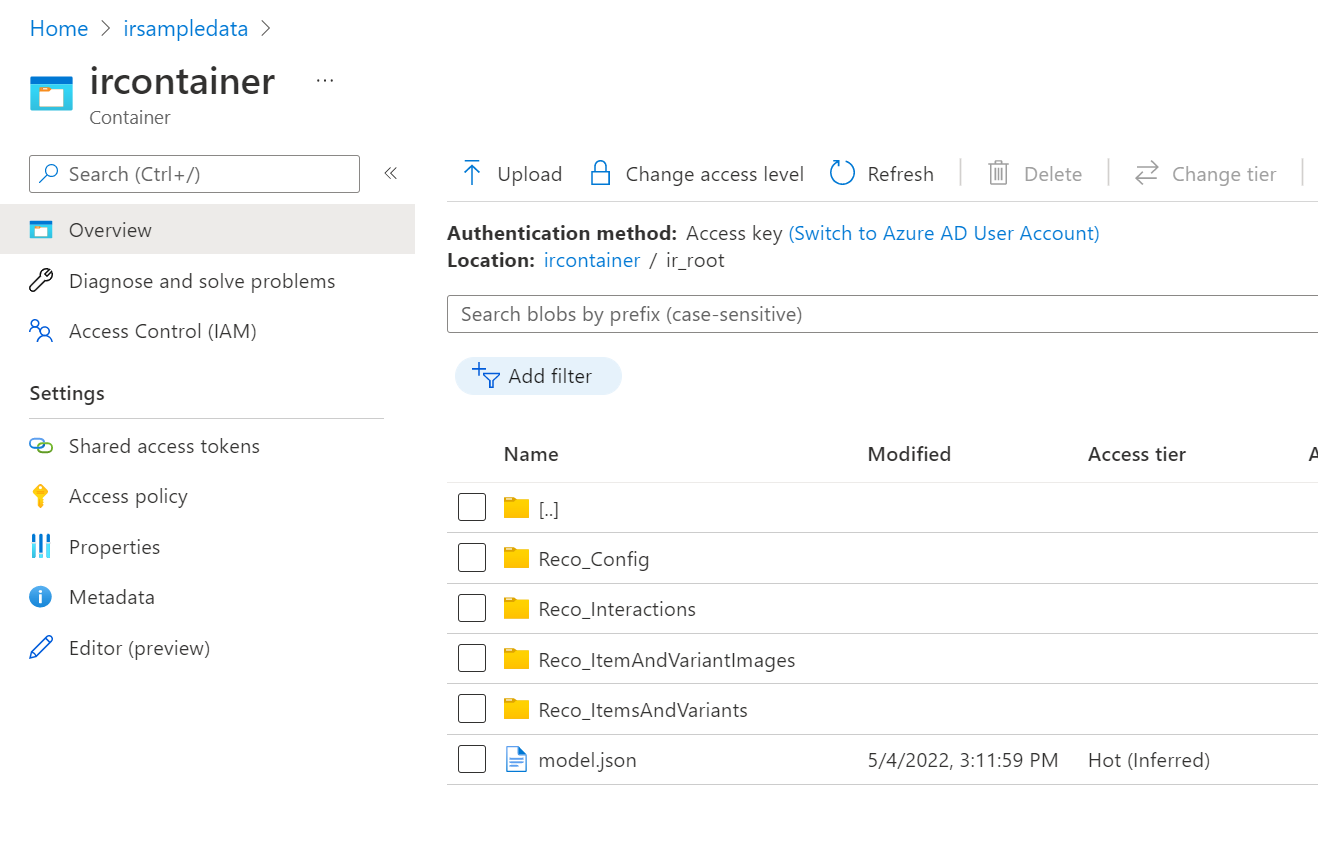
Ensure that Azure portal file structure and folder names in the ir_root folder match the downloaded sample dataset. If done correctly, the file structure for the Intelligent Recommendations ir_root folder has this structure. The image is looking into the ircontainer/ir_root folder specifically:
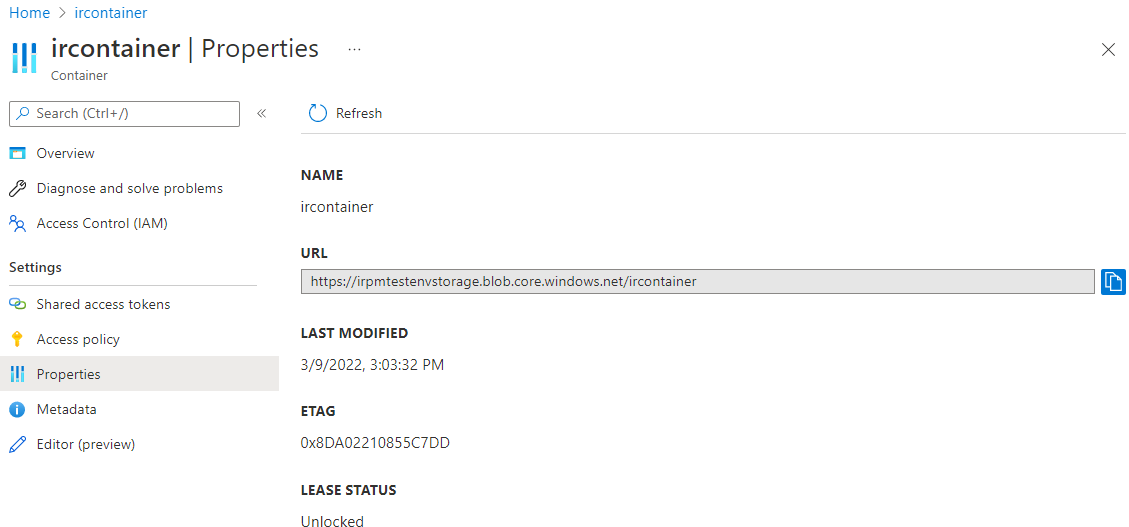
Select Properties in the left hand navigation pane, and copy the URL of the container. Copy this link because you need it to specify the connection string in an upcoming setup step.
You're now ready to complete the remaining setup steps.
Step 3: Set up error logging
Choose your container, the same one you used as the root folder for Intelligent Recommendations. In our example, the container is ircontainer, and the root folder is ir_root.
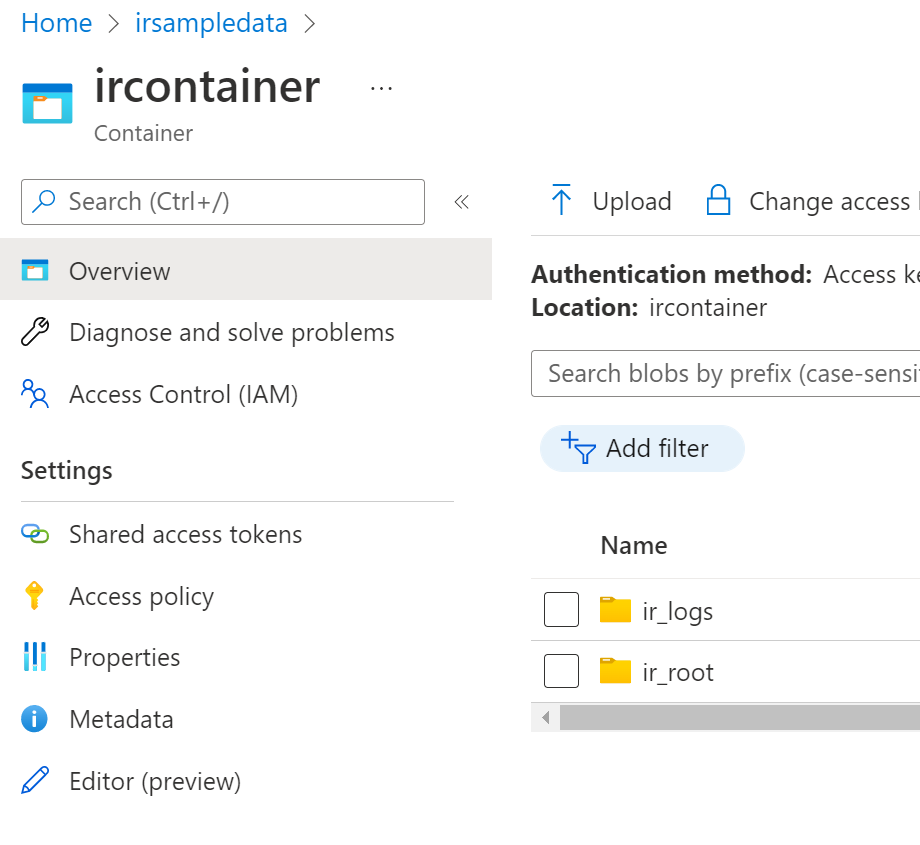
You need to create a destination folder for the logs written by Intelligent Recommendations. In this example, we created a folder called ir_logs.
Note
In case you've used the same container for sharing data with Intelligent Recommendations and for logging back data into Data Lake Storage, we highly recommend using a different folder for writing error logs to Data Lake Storage than the root folder used for sharing data with Intelligent Recommendations.
Note
For the first run, the modeling step might take up to several hours before being ready to be queried and ready to respond with results.
Step 4: Create the Intelligent Recommendations service account
Sign into Azure portal and search for Intelligent Recommendations, or go to Intelligent Recommendations Accounts.
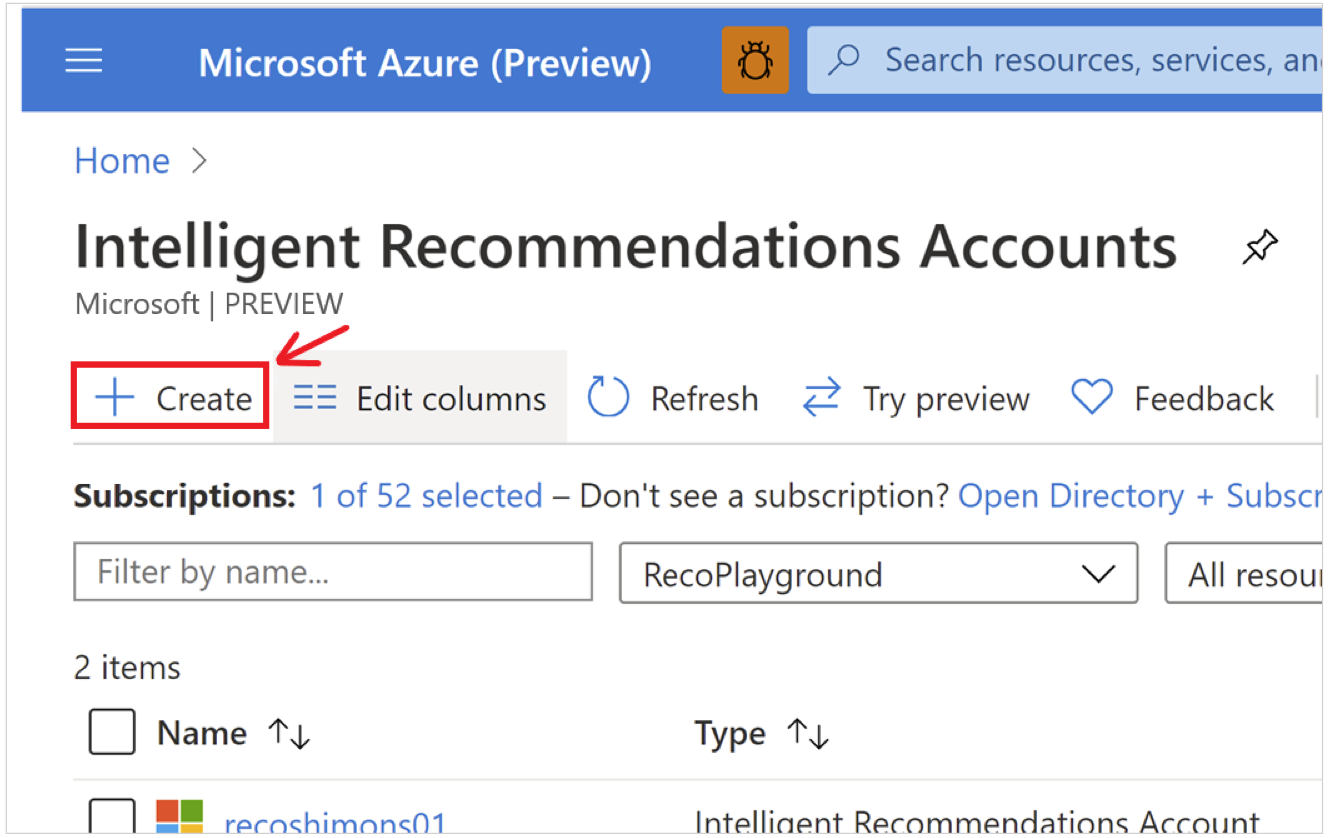
Start a new Intelligent Recommendations account by selecting Create.
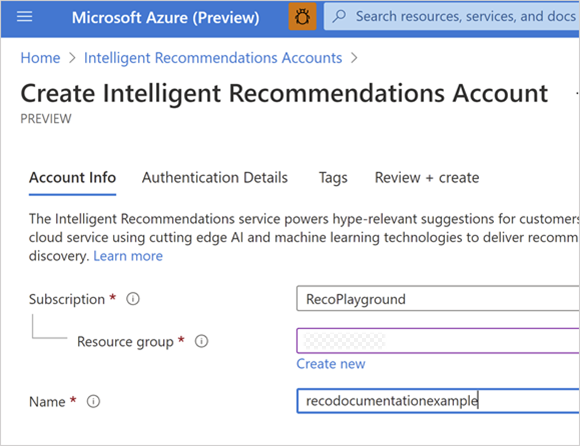
On the Account Info tab, enter values in the Subscription, Resource Group, and Name fields.
If you don't have an Azure subscription, you can create a free account here.
The Name value is important since it appears in the Intelligent Recommendations endpoint DNS name. It should be globally unique (across Azure), alphanumeric, and case insensitive.
For the Reports Connection String value, paste the URL you copied from the Data Lake Storage account container properties, and add the extension to your logs folder. This link connects your model to the logs folder to create error logs. Make sure to add the logs folder (/ir_logs) you created to the end of the URL.
Next, go to the Authentication Details tab and specify the authenticated users or apps that can view the recommendations results from a query to the service. Add at least one Microsoft Entra ID user (we suggest adding yourself for this quick start guide) or a Microsoft Entra ID service principal who is allowed to call the API:
Note
To add yourself as an authenticated user enter a row with type = User, and then enter the tenant ID and your Microsoft Entra ID user ID. The tenant ID is located on the Microsoft Entra ID home portal. You can find your user ID by searching for your user in Microsoft Entra ID and copying the ObjectID value. For more information about how to find your tenant ID, see How to find your Microsoft Entra ID tenant ID.
Review and create the Intelligent Recommendations account resource.
After deployment, select the resource group link or select the Go to Resource button to return to the Intelligent Recommendations home portal.
Step 5: Set up data lake permissions
To set up security on the container level, you add permissions to allow IR to read the input data from the IR root folder to enable model training. You also enable write permissions to allow IR to write logs to a dedicated logs folder. You can grant access to the Intelligent Recommendations service by using a system-assigned managed identity and\or a user-assigned managed identity. Microsoft recommends using a system-assigned managed identity for this quick-start guide. You can find a tutorial on how to configure with a user-assigned managed identity on the 'Set Up Data Lake Storage' page.
System assigned managed identity approach
To set up security with the system assigned managed identity:
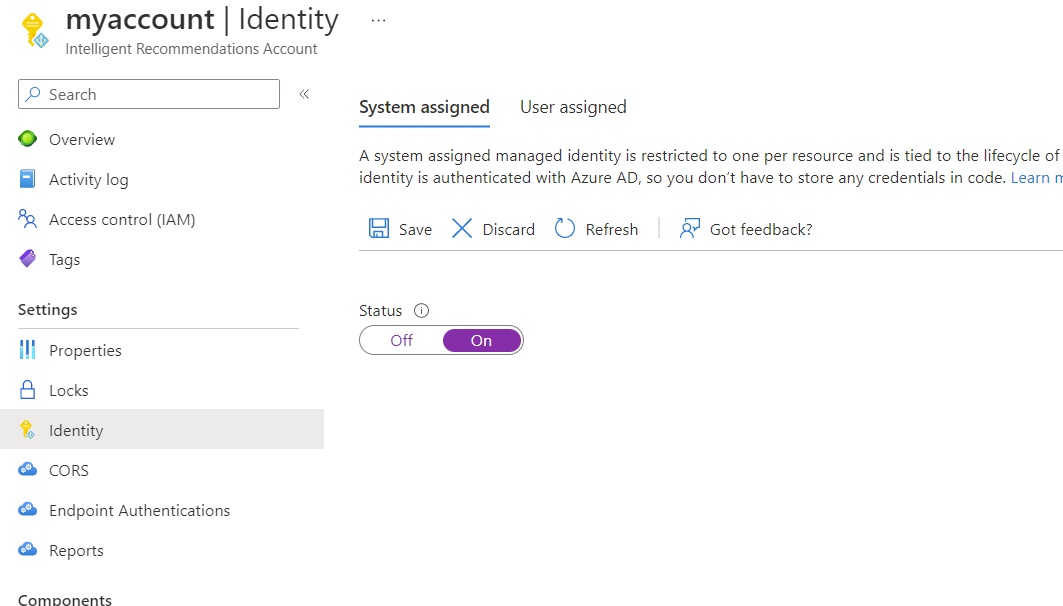
- Open your Intelligent Recommendations account.
- On the left pane, select Identity.
- Under the System assigned tab, turn Status to ON and select Save.
- Return to your storage account, select Containers in the left navigation pane, and select your ircontainer (or whatever name you have given your container).
- On the left pane, select Access Control (IAM).
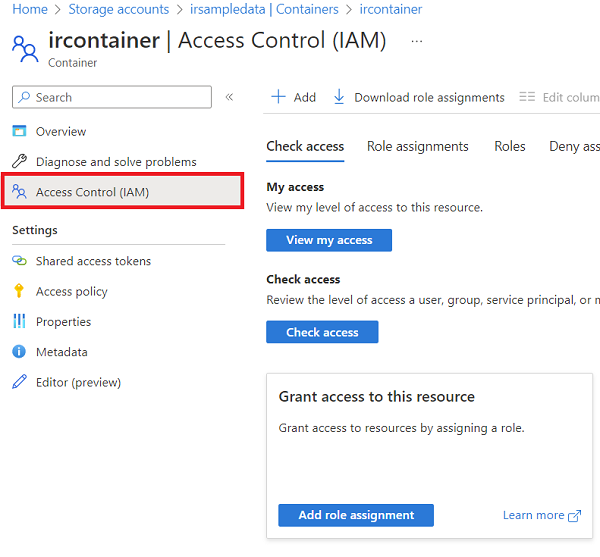
To allow the Intelligent Recommendations service to read the logs data, assign the Storage Blob Data Reader:
- Under Grant access to this resource, select Add role assignment.
- In Role, select Storage Blob Data Reader, then select next.
- On the next screen, under the Assign access to section, select Managed identity, then select + Select members.
- Under Managed identity, select Intelligent Recommendations Account category.
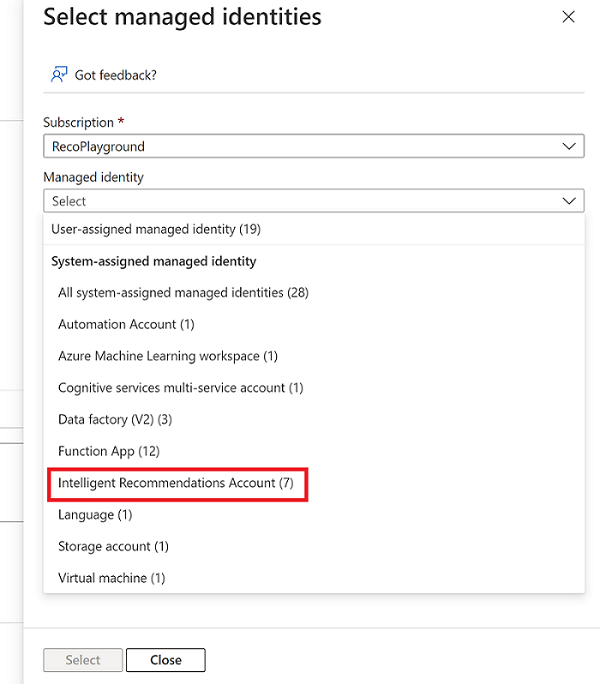
Next, you see a list of Intelligent Recommendations Accounts. Choose the relevant account with access to this storage account, then select Select.
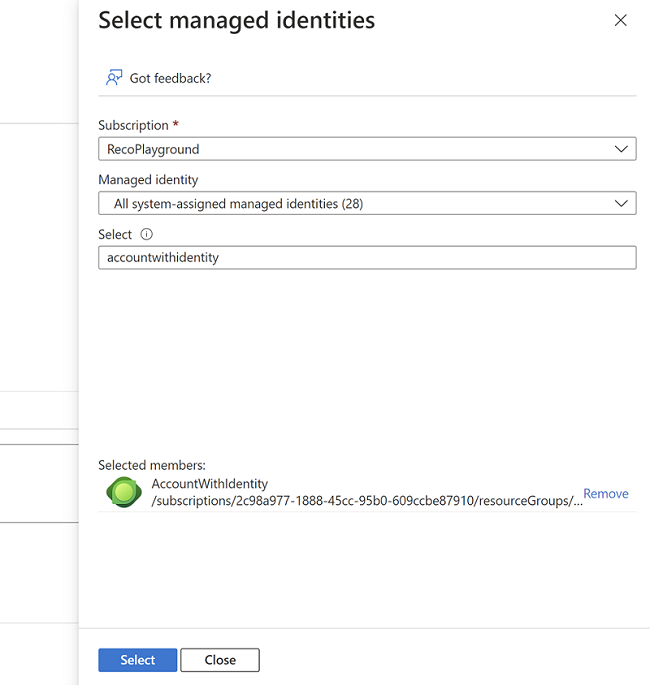
Finalize your decision by selecting the "Review + Assign" button. Repeat these steps to set up the Storage Blob Data Contributor as well.
To allow the Intelligent Recommendations service to write the logs data, you add Storage Blob Data Contributor permissions:
- Under Grant access to this resource, select Add role assignment.
- In Role, select Storage Blob Data Contributor, then select next.
- On the next screen, under the Assign access to section, select Managed identity, then select + Select members.
- Under Managed identity, select Intelligent Recommendations Account category.
- Next, you see a list of Intelligent Recommendations Accounts. Choose the relevant account with access to this storage account, then select Select.
- Finalize your decision by selecting the "Review + Assign" button. Repeat these steps to set up the Storage Blob Data Contributor as well.
Verify your role assignments
Verify that you have the correct permissions by returning to your storage account and ircontainer.
- From your ircontainer, select Access Control (IAM) from the left pane.
- Select View from the View access to this resource section.
- Search for the Intelligent Recommendations service, and verify that the service is listed in the Role assignments section with Storage Blob Data Reader and Storage Blob Data Contributor. If these roles are missing, return and re-add them using the previously outlined steps
For more information about the Data Lake Storage setup, see Create a storage account.
Step 6: Add modeling and serving resources
Returning to the account page, you now see details about the new entity resource you created. Now set up your modeling and serving components.
Add a modeling resource
You can now add modeling and service endpoint resources to your Intelligent Recommendations account to start "cooking up" and "serving" recommendations.
Select Modeling, and then select Create.
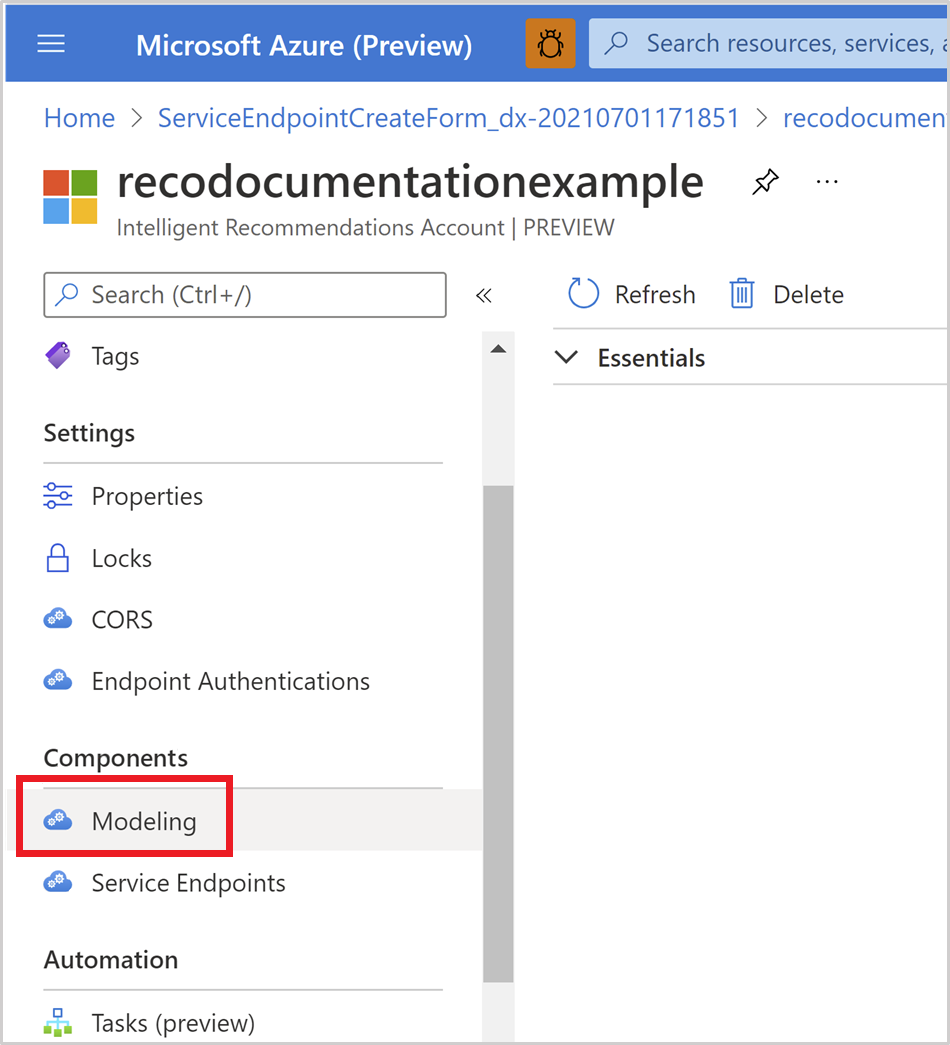
Enter values for the following properties on the modeling creation page:
- Name: Ensure that the name is unique within the Intelligent Recommendations account.
- Region: Select the region where data processing occurs. You might want to review your organization's data policy to set this field to the correct value. Modeling and service endpoints don't have to be in the same Azure region. If a specific region is listed, open a support ticket through your Azure account.
- Feature set: Select the package you want.
- Connection String: Paste the URL you copied from the Data Lake Storage account container properties, and concatenate the path to the root folder. For example, our container has a folder named 'ir_root', so we add '\ir_root' to the end of the connection string. This link connects the full Data Lake Storage to the root folder where you've saved the sample model.json file. Modeling fails if the data isn't properly arranged and shared on Data Lake Storage. Since you're using a preconfigured sample file, don't worry about the modeling resource failing. Make sure to add the root folder (/ir_root) you created to the end of the URL.
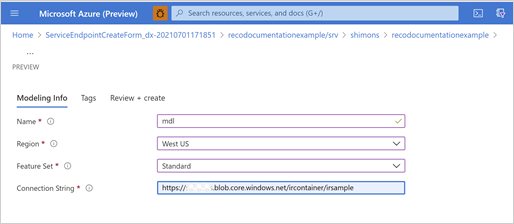
On the Review and create tab, select Create, and then wait for the deployment to complete.
Now if the data is properly formatted and shared, the "cooking" and modeling process starts. Next, the Intelligent Recommendations API starts serving your Intelligent Recommendations scenarios.
Add a Service Endpoint resource
Select your new account and locate the Components section on the left navigation pane.
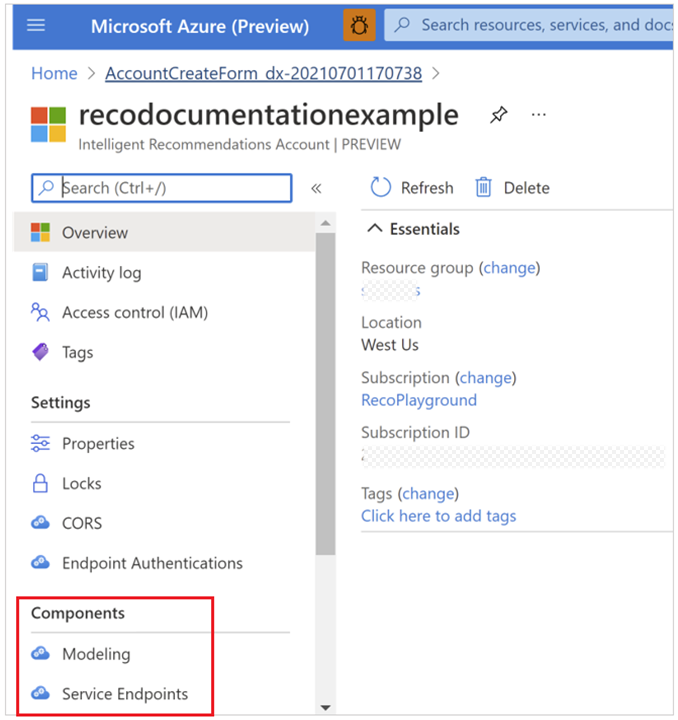
Select Service Endpoints, and then select Create.
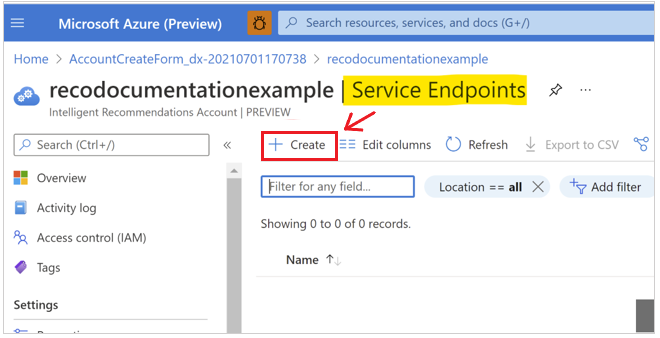
For the endpoint creation step, there are three things to configure:
- Name: Should be unique only within your Intelligent Recommendations account. This string is also a part of the service DNS name.
- Region: The Azure region where the serving is deployed. The service runs across an active-active architecture paired region for scalability and failover. If a specific region isn't listed, open a support ticket through your Azure account.
- Pre-allocated capacity: The number of requests (transactions) per second (RPS).
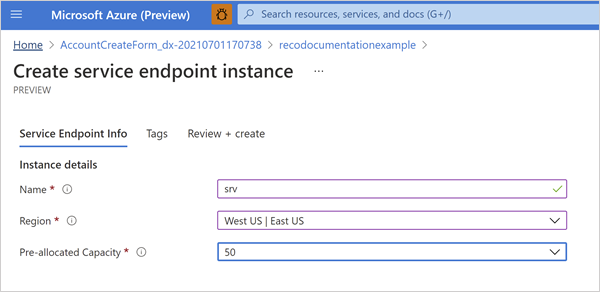
On the Review and create tab, select Create, and then wait for the deployment to complete. This process only takes a few seconds.
Return to the parent resource for this account to create the modeling resource.
Step 7: View the recommendations results
After configuring your Intelligent Recommendations account, you can look at the results. To do so, search for the serving resource you created. This URL is your new Intelligent Recommendations endpoint, to get recommendation results using the Intelligent Recommendations REST API:
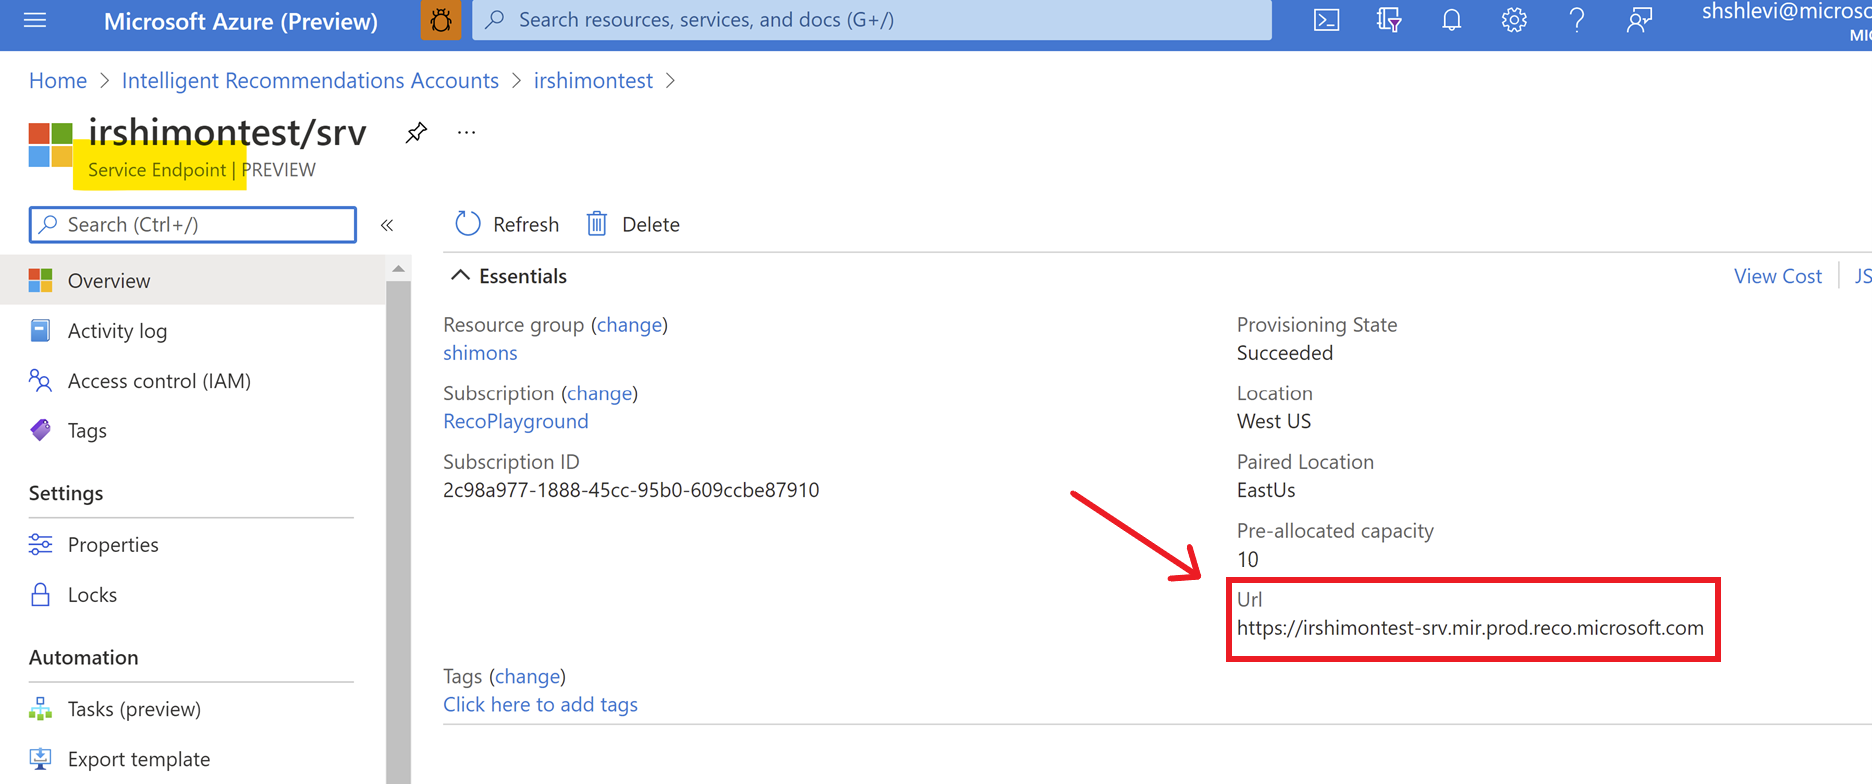
After you copy your serving endpoint URL, you can view your results in a few different ways:
Make an authenticated call with a tool of your choice, such as Insomnia, C++, or Azure Machine Learning. To learn more, see our Quick start guide: Make an authenticated API call.
Code a web widget or service to call into the Intelligent Recommendations API.
You must configure authentication to call all methods successfully. To learn more, see Quick start guide: Make an authenticated API call.
Need to troubleshoot?
Intelligent Recommendations account FAQ.
See also
Quick start guide: Make an authenticated API call Error Logs API Status Codes Deployment overview Configure Azure Data Lake Storage reports Use data contracts to share data