How does Azure Bastion work?
An Azure Bastion deployment is per virtual network or peered virtual network. It's not per subscription, account, or virtual machine (VM). After you provision an Azure Bastion service in your virtual network, the RDP or SSH experience is available to all your VMs in the same virtual network.
The following diagram shows an overview of how Azure Bastion works when connecting via the portal:

- You connect to a VM in the Azure portal: In the Azure portal, on the VM overview page, select Connect > Bastion > Use Bastion, then enter your credentials for the VM.
- Browser connects to the Azure Bastion host: The browser connects to Azure Bastion over the internet by using Transport Layer Security (TLS) and the public IP of the Azure Bastion host. Azure Gateway Manager manages portal connections to the Azure Bastion service on port 443 or 4443.
- Bastion connects to the VM by using RDP or SSH: Azure Bastion is deployed in a separate subnet called AzureBastionSubnet within the virtual network. You create the subnet when you deploy Azure Bastion. The subnet can have address spaces with a /26 subnet mask or larger. Don't deploy other Azure resources to this subnet or change the subnet name.
- Bastion streams the VM to the browser: Azure Bastion uses an HTML5-based web client that's automatically streamed to your local device. The Azure Bastion service packages the session information by using a custom protocol. The packages are transmitted through TLS.
Verify Azure Bastion works with your network security group
If you haven't deployed and configured a specific network security group for your organization, then you don't need to do anything. Azure Bastion works with the default network security group that's created with VMs.
If you have a network security group configured for your organization, verify that Azure Bastion can connect to your VMs through RDP or SSH. We recommend that you add an inbound rule that allows RDP and SSH connections from the Azure Bastion subnet IP address range to your VMs.
For Azure Bastion to work, your network security group needs to allow the following traffic:
| Direction | Allow |
|---|---|
| Inbound | RDP and SSH connections from the Azure Bastion subnet IP address range to your VM subnet. |
| Inbound | TCP access from the internet on port 443 to the Azure Bastion public IP. |
| Inbound | TCP access from Azure Gateway Manager on ports 443 or 4443. Azure Gateway Manager manages portal connections to the Azure Bastion service. |
| Outbound | TCP access from the Azure platform on port 443. This traffic is used for diagnostic logging. |
Deploy an Azure Bastion host in the Azure portal
Before you can deploy Azure Bastion, you need a virtual network. You can use an existing virtual network or deploy Azure Bastion as you create a virtual network. Create a subnet in the virtual network called AzureBastionSubnet. If you have a VM that's on the same or a peered virtual network, you complete the deployment in the Azure portal by selecting Azure Bastion when you connect to the VM.
The following two sections show you the steps involved for each of the Azure Bastion deployment options in the Azure portal. You don't need to complete any of these steps yet; you'll do that in the next exercise.
Enable Azure Bastion when you create a virtual network
If you don't already have a virtual network that you want to use for Azure Bastion, create a virtual network and enable Azure Bastion on the Security tab.
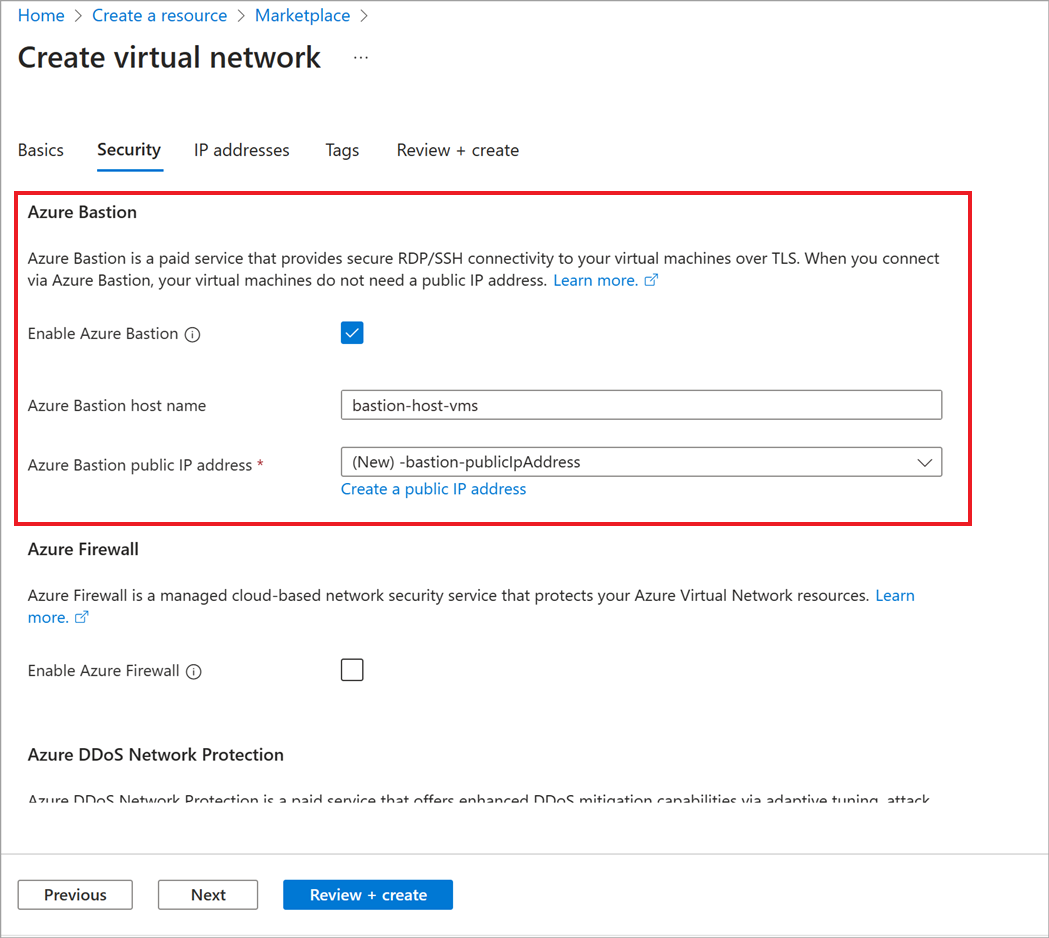
- Select Enable and enter a name for your Azure Bastion host.
- Add a subnet address with a subnet mask of /26 or larger.
- If you don't already have a public IP address that you want to use, select Create new.
- After you create the virtual network, add VMs to this virtual network, or peer this virtual network to the virtual network with your VMs.
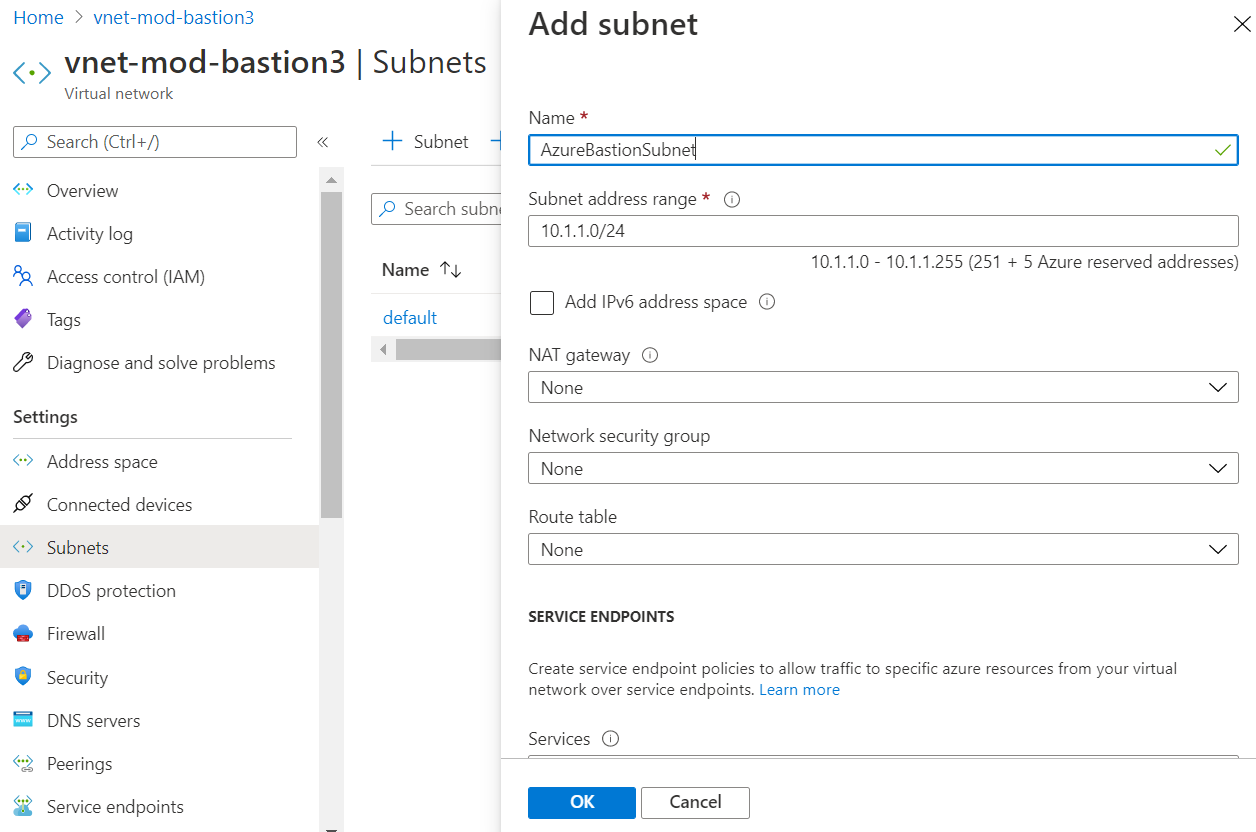
Add the subnet to an existing virtual network and provision Azure Bastion resources
On your existing virtual network, add a subnet named AzureBastionSubnet.
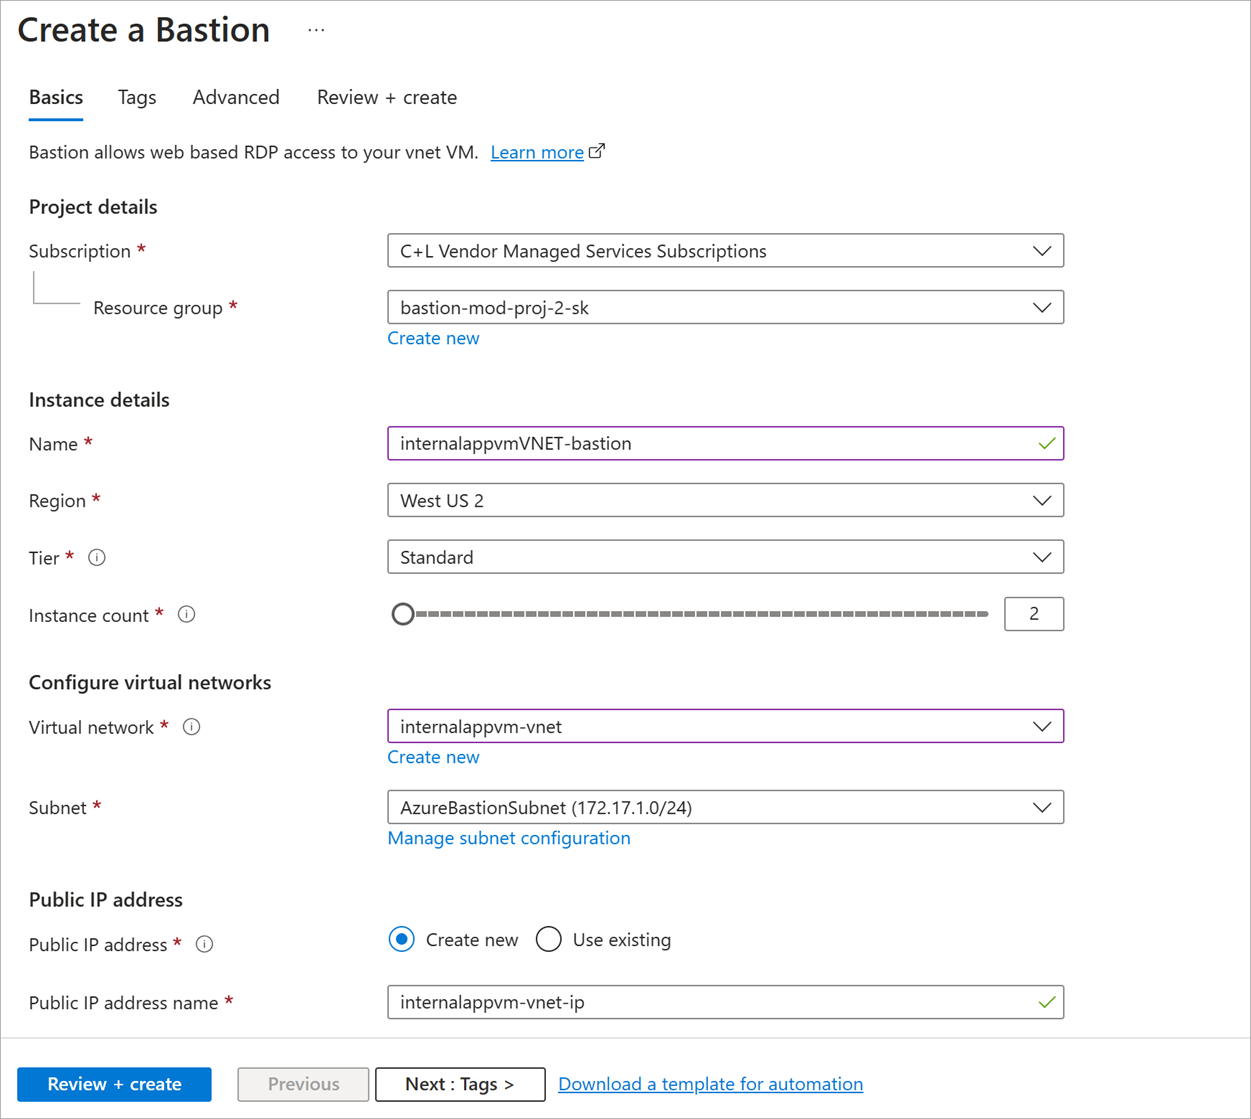
To provision Azure Bastion, in the portal on the VM, select Connect > Bastion > Configure manually. Enter a name for the Azure Bastion resource, select the subnet, create a public IP, and so on. After Azure Bastion deploys, you can connect to the VM.
Deploy Azure Bastion by using Azure PowerShell or the Azure CLI
If you want to use Azure PowerShell or the Azure CLI to deploy Azure Bastion, run commands to create the following resources:
- Subnet
- Public IP
- Azure Bastion resource
The following sections show examples that you can use to deploy Azure Bastion.
Use Azure PowerShell to deploy Azure Bastion
Create the Azure Bastion subnet by using the cmdlet
New-AzVirtualNetworkSubnetConfig, then add the subnet to your existing virtual network by usingAdd-AzVirtualNetworkSubnetConfig. For example, the following command assumes you already have a virtual network:$subnetName = "AzureBastionSubnet" $virtualNetwork = MyVirtualNetwork $addressPrefix = "10.0.2.0/24" $subnet = New-AzVirtualNetworkSubnetConfig ` -Name $subnetName ` -AddressPrefix $addressPrefix ` Add-AzVirtualNetworkSubnetConfig ` -Name $subnetName ` -VirtualNetwork $virtualNetwork ` -AddressPrefix $addressprefixCreate a public IP address for Azure Bastion. Azure Bastion uses the public IP address to allow RDP/SSH connectivity over port 443. The public IP address must be in the same region as the Azure Bastion resource.
$publicip = New-AzPublicIpAddress `
-ResourceGroupName "myBastionRG" `
-name "myPublicIP" `
-location "westus2" `
-AllocationMethod Static `
-Sku Standard
Create an Azure Bastion resource in the subnet named AzureBastionSubnet for your virtual network.
$bastion = New-AzBastion `
-ResourceGroupName "myBastionRG" `
-Name "myBastion" `
-PublicIpAddress $publicip `
-VirtualNetwork $virtualNetwork
Use the Azure CLI to deploy Azure Bastion
Create the Azure Bastion subnet:
az network vnet subnet create \
  --resource-group myBastionRG \
  --vnet-name MyVirtualNetwork \
  --name AzureBastionSubnet \
  --address-prefixes 10.0.2.0/24
Create a public IP address for Azure Bastion:
az network public-ip create \
  --resource-group MyResourceGroup \
  --name MyPublicIp \
  --sku Standard \
  --location westus2
Create an Azure Bastion resource:
az network bastion create \
  --name MyBastion \
  --public-ip-address MyPublicIp \
  --resource-group MyResourceGroup \
  --vnet-name MyVnet \
  --location westus2
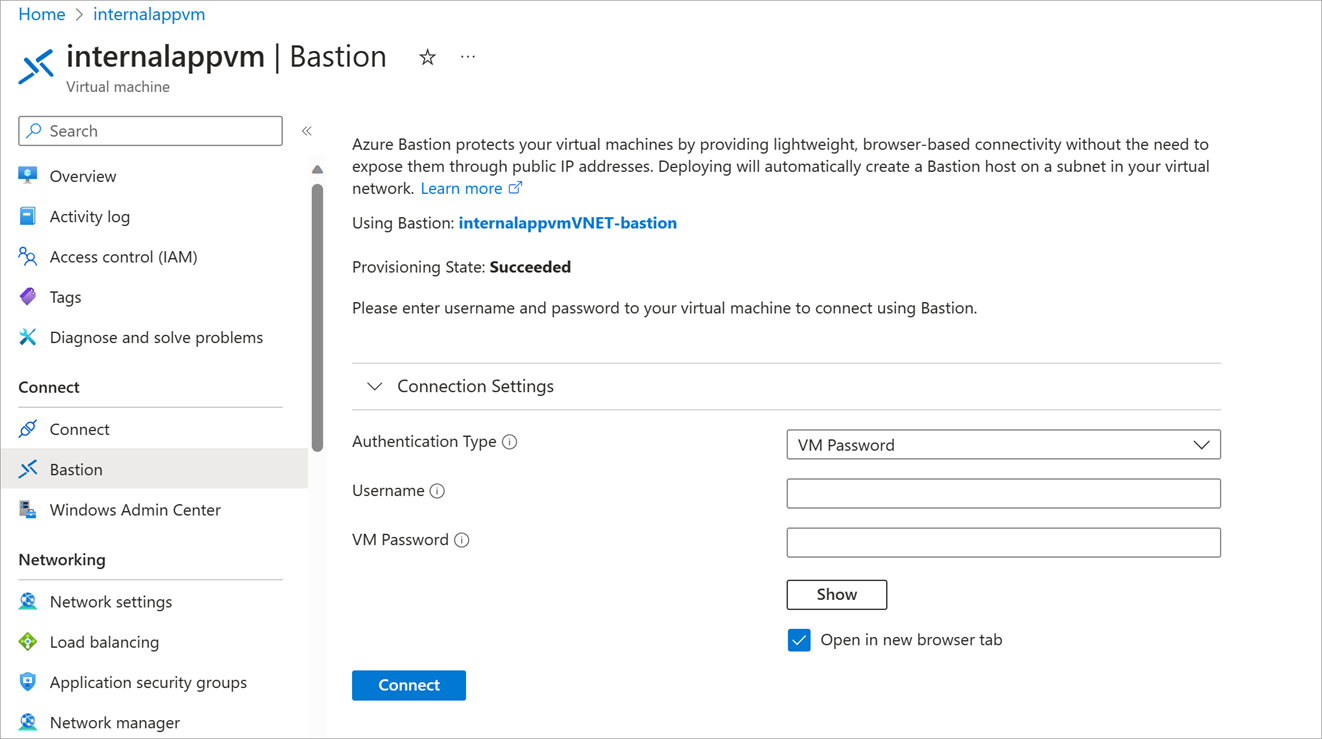
Connect to VMs by using Azure Bastion
With the resources that you need in place, you should be able to connect to the VMs on the same virtual network or peered virtual network. In the Azure portal on the VM, select Bastion and enter your credentials.
In the next unit, you'll go through the steps to deploy Azure Bastion for an existing virtual network.