Install your app on an IoT Core device
You can install your app using one of the two methods that are listed below.
Note
Installing apps using the Windows Device Portal is only for developer scenarios. Please create a provisioning package or add the app to your Windows IoT Core image for production scenarios.
Using Windows Device Portal
Note
An .appx or .appxbundle is required for Windows Device Portal. Beginning with version 17763 of the SDK and tools if the minimum target version of the app project> is 17763 or greater the tools will create an .msix or .msixbundle. To create an .appx or .appxbundle set the minimum version to a version less than 17763 or run makeappx.exe directly. It may also be possible to rename the .msix to .appx, or .msixbundle to .appxbundle.
For this method, you will need to ensure that you are connected to the internet. If you do not have access to the internet, you can also have a peer-to-peer ethernet connection between the device and a client machine that doesn't include a path to access the open internet. However, going about the latter way will install the app but will fail to launch if the app is store-signed.
To install your application on the device please do the following:
Open the Windows Device Portal for your IoT device.
In the Apps menu, install your app by selecting your app files and clicking Install.
Click Select File
Select your .appx file and click Open
Check Allow me to select framework packages
Click Next
For each item in the Dependencies folder for your .appx repeat the following
Click Choose File
Select the dependency .appx and click Open
When all of the dependencies are added click Install
Wait for the install is completed and click Done
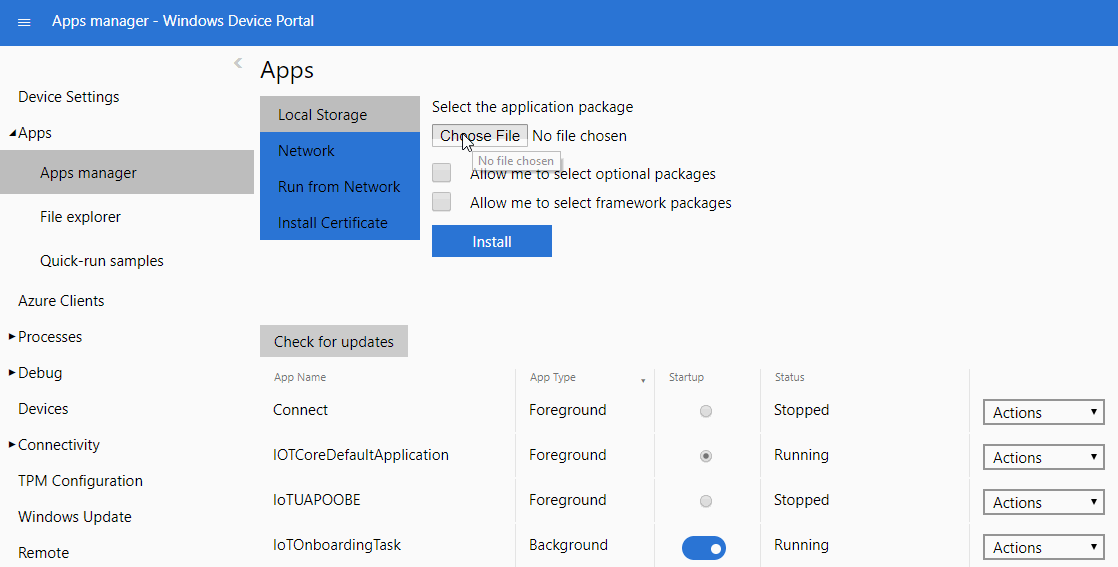
The application will now be visible on the list of applications on your device.
Using provisioning package from WCD
You can create a provisioning package with the app and install the provisioning package on the device. This method works even on devices that do not have internet connection, and is the preferred method for installing the store license file. For example, this enables factory scenarios where the device is not connected to the internet but the primary app is a store-signed UWP app.
Note
The Package Family Name (PFN) can be found in the Windows Dev Center under App Management > App Identity
Select Advanced Provisioning, Enter the project name and a description
Choose Windows 10 IoT Core for the project settings and skip the provisioning package import
On the left hand side, expand Runtime Settings and click on Universal App Install > User Context App
Enter the Package Family Name of your app and click Add
Under the newly added PFN
- add the Appx and its dependencies
- set the DeploymentOptions to "Force target application shutdown"
For Store signed apps, you will need to specify the license. Under UserContextAppLicense,
- add LicenseProductID (available as LicenseID in the license XML file)
- change the license xml extension to .ms-windows-store-license.
- select your License Product ID on the left hand side and browse your license file to assign LicenseInstall field
For non-store signed apps, you will need to add the app.cer file under Certificates > RootCertificates
Export the package
Copy the exported .ppkg file to C:\Windows\Provisioning\Packages on the IoT device using SSH or PowerShell and reboot. When the device reboots, the provisioning package is processed and the app is installed.
Add the app to the Windows IoT Core image(.ffu)
You can add the app to be part of the Windows IoT Core image itself. This is the preferred method for OEMs to install apps on their devices.
See how to add an app to your image and a sample app package.