Promote your events
Dynamics 365 provides several tools to help you promote your events, including:
Marketing emails - Create as many marketing emails as needed for your event. For more information, see Email marketing overview and Event elements.
Segments - Create a segment to find the right contacts to invite to your event. Build additional segments to send targeted communications to contacts that registered for the event and/or attended the event. For more information, see Working with segments.
Customer journeys - Set up customer journeys that send your marketing email messages to all relevant contacts, register message interactions, and react to event registrations. For more information, see Use customer journeys to create automated campaigns.
Social media posts - Create social media posts to promote your event and include a link to your event website in each post. People can use the Redirect URLs feature in Dynamics 365 Customer Insights - Journeys to create short URLs that register clicks with Dynamics 365 Customer Insights - Journeys and instantly forward contacts to your event website. For more information, see Schedule and post messages on social media.
Redirect URLs - Create a different redirect URL for each social media site, banner, or message. This feature would enable you to collect separate click results for each URL so that you can evaluate the success of each channel or initiative. For more information, see Set up redirect URLs.
For more information, see Invite contacts to your events.
By using the tools within Dynamics 365, you can automate your event communications. Start by determining what communications are needed, the cadence for those communications (two weeks before the event, day of the event, day after the event, and so on), and the audiences that will receive those communications. After you have documented the flow, you can begin building the content in Dynamics 365 Customer Insights - Journeys.
The rest of this unit provides guidance on creating event content such as:
- Event invitation email
- Confirmation email after a contact registers for the event
- Reminder emails prior to the event start date
- Event segments
- Event customer journeys
- Post-event communications
Create an invitation email
Typically, whether you are hosting an on-site event or webinar, the first communication in your event customer journey is the invitation. Dynamics 365 Customer Insights - Journeys allows you to link to your event registration page within your email so that your contacts are taken directly to the page to learn more about your event and register for it.
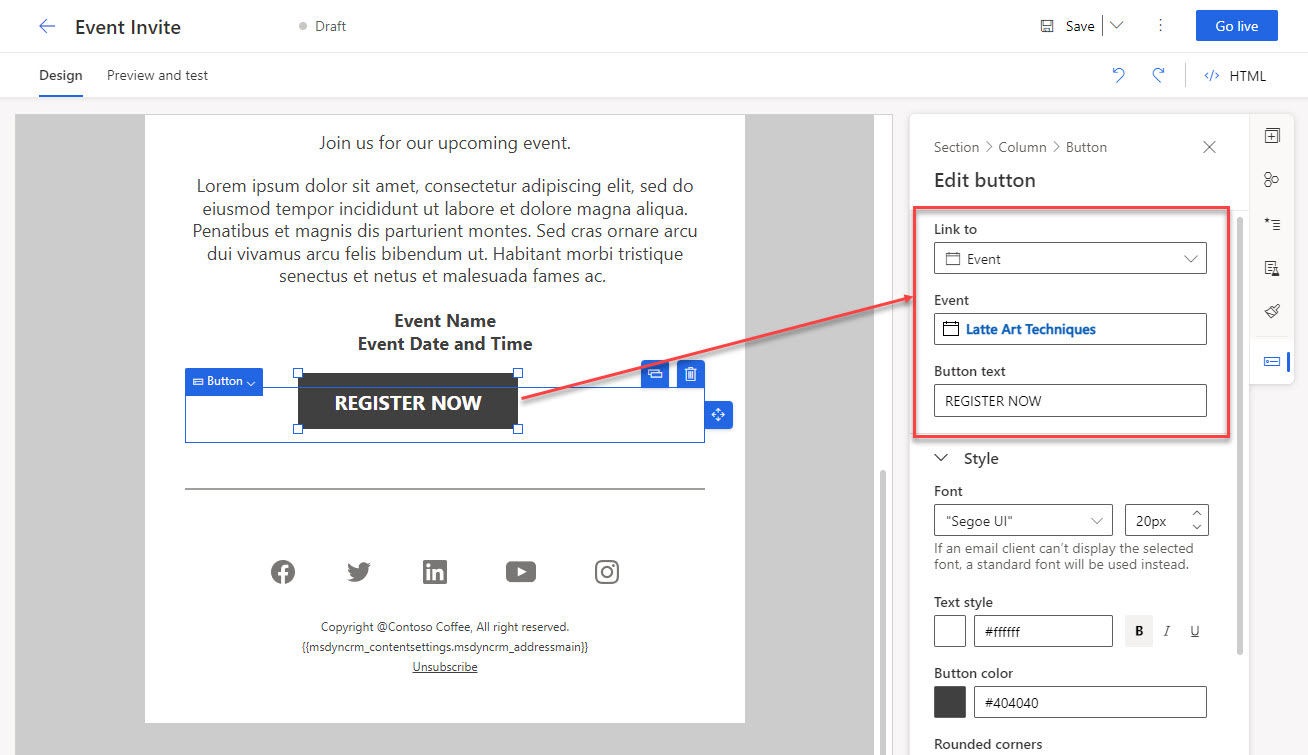
The email designer in Dynamics 365 Customer Insights - Journeys has an Events communication area of the Toolbox that assists you with creating event-related emails. When you are creating the event invite, Dynamics 365 has an element that links directly to your event website.
Complete these steps to add a link to your event website within your email:
Open the email record.
Drag a button element onto the Designer canvas of your email.
In the Link to drop-down, select Event.
In the Event drop-down, select your event.
In the Button text, add your text.
When your email is sent, it will dynamically populate your website URL so that when attendees select the button, they will be redirected to your website to register.
For more information, see Design your digital content and Marketing page, event, and survey elements.
Create a confirmation email for contacts that register for your event
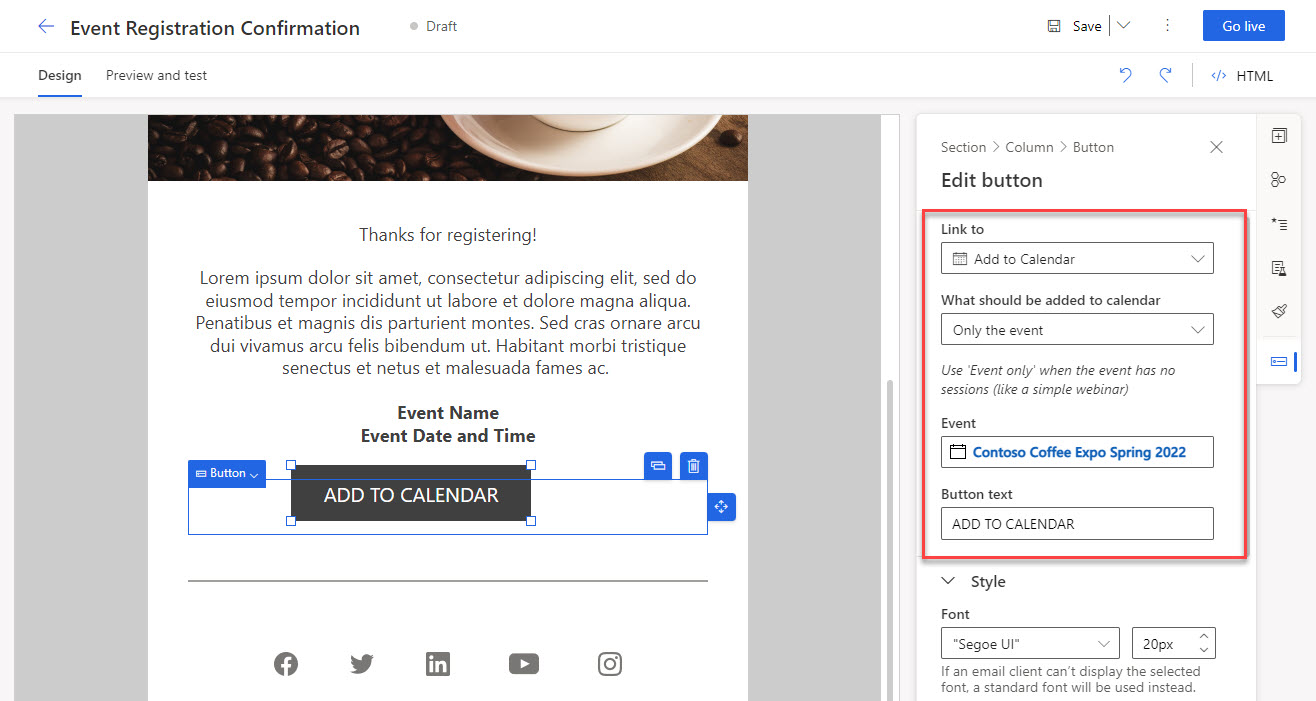
When attendees register for an event, they want a way to track not only the date of the event, but what sessions they plan to attend. The Dynamics 365 Marketing email editor includes the ability to automatically generate personalized iCalendar files to track events and sessions. Using the email editor, you can add an iCalendar file button that is personalized to the email contact. When the contact selects the button, the iCalendar file downloads, allowing the contact to add it to the calendar of their choice.
Complete these steps to add a calendar link within your email:
Open the email record.
Drag a button element onto the Designer canvas of your email.
In the Link to drop-down, select Add to Calendar.
In the What should be added to calendar field, select the information you want to include in the iCalendar file using the What should be added to calendar dropdown. The options include:
Only the event: The iCalendar file will contain only the event the contact has registered for.
Only the sessions: The file will contain only the event sessions the contact has registered for.
Both event and associated sessions: The file will contain information for the event and the sessions the contact has registered for.
In the Event drop-down, select your event.
In the Button text, add your text.
Create a reminder email for contacts that register for your event
After your attendees have registered for your event, you'll want to send them an email that confirms the registration and provides additional details about the event. Dynamics 365 Customer Insights - Journeys has design elements, including QR codes and webinar links, to assist you in creating these messages.
Add a QR code to your on-site event reminder email
Whenever a contact registers for an event, the system creates a new event registration record that identifies the contact, the event, and other details. This record also includes a registration ID that is stored as an alphanumeric code and as a machine-readable QR code.
Embedding the QR codes into a confirmation and/or day-of reminder email helps make it easier for registrants to check in by using their mobile devices at the event.
Complete these steps to add a QR code within your email:
Open the email record.
Drag a QR code element onto the Designer canvas of your email.
In the Event drop-down, select your event.
No other settings are required.
On the day of the event, event workers can quickly scan the code by using the Dynamics 365 smartphone app.
For more information see Event registration QR code elements.
Add an attendee URL link to your webinar reminder email
For webinar events, you'll want to send your attendees a confirmation email that includes an attendee URL link so that they can join the webinar. Some webinar providers send this confirmation email for you, while others might require that you send the links (or you might prefer to send the links yourself). If you choose to create the event confirmation email by using Dynamics 365 Customer Insights - Journeys, you have a few options that help you to include your webinar URL in your email.
If you're hosting your webinar by using another webinar provider, how you add the unique attendee URL within your email will depend on the integration.
If you are hosting your webinar through Microsoft Teams, the email designer allows you to add a Teams check-in element to your email. This element generates a unique attendee URL for each registrant. When the registrant selects the button within 30 minutes of the event start time, Dynamics 365 Customer Insights - Journeys will create a relevant check-in record for them. If a registrant selects the button more than 30 minutes before the event start time, a check-in record won't be created.
Complete these steps to add a join in Teams link within your email:
Open the email record.
Drag a button element onto the Designer canvas of your email.
In the Link to drop-down, select Join in Teams.
In the Type field, select whether you want the button to link to an Event or a Session.
In the next drop-down, select your event or session.
In the Button text, add your text.
Important
The Join in Teams button uses a unique URL for each registrant. Forwarding an email with a Join in Teams button retains the URL specific to the original recipient. The forwarded email won't generate a new check-in for the forwarded invite.
Tip
If an attendee selects the Join in Teams button more than 30 minutes before the event starts, the check-in won't be created. This is a hard-coded feature to prevent accidental check-ins when a recipient tests the link after they receive the email.
For more information, see Inviting registrants to attend the live event through email.
Set up segments for the event
After you create the marketing emails for your event, you'll want to determine the audiences that you want to communicate with throughout the event. Depending on your event flow, you might need a single segment or multiple segments.
The first segment in your journey will be the audience that you want to invite to the event. This segment could be a dynamic segment that uses demographic or past event data to identify contacts from your database or it could be a static segment with a specific list of invitees.
If you have multiple swim lanes within a single journey or plan on building multiple journeys for the event, you might need to create additional segments. These segments can be used to identify contacts based on actions that they take related to your event such as registration or check-ins. Dynamics 365 offers out-of-the-box segment templates that can assist you in creating these segments, such as Attended an event or Registered for event.
For more information, see Working with segments.
Set up customer journeys to implement your event
After you create and publish the marketing emails and segments that are needed for the event, you are ready to create the customer journey(s) that you will use to automate the event flow.
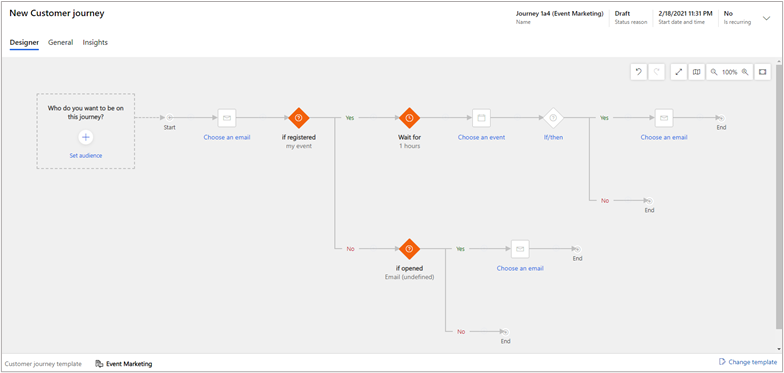
The Customer Insights - Journeys application provides an Event Marketing customer journey template to help you get started. The template provides a shell of unconfigured email tiles, if/then branches, and Wait for tiles. From this template, you can add your content and customize the flow to accommodate the emails that you plan to send and the timing for those emails.
Tip
If you want to use event registration as a trigger to send your audience through different paths in your customer journey, you will need to add your event as a dependency in your marketing email.
For more information, see Use customer journeys to create automated campaigns.
Follow up with attendees after the event
When your event has concluded, you might want to follow up with attendees to evaluate the success of your event. One way to collect feedback from your attendees is by sending them a survey.
Dynamics 365 Customer Insights - Journeys includes built-in support for adding surveys to your marketing campaigns. You can build surveys by using Microsoft Dynamics 365 Customer Voice and access them directly from marketing components, including the segment builder, the email designer, and the customer journey design. You can use surveys to make data-driven decisions and apply your findings to your marketing initiatives. You can even automate survey experiences and use data that is generated from surveys for advanced segmentation and customer profiling.
Important
You'll need your administrator to turn on the feature switch for the Dynamics 365 Customer Voice Marketing integration functionality before you are able to access it.
To collect event feedback by using a survey, follow these steps:
Create the survey. For more information, see Create a survey.
Create the marketing email. Add the Customer Voice survey element to the email and then select the survey. For more information, see Dynamics 365 Customer Voice survey links in email messages.
Create the segment. You'll want to include the contacts that have checked in for the event. Dynamics 365 Customer Insights - Journeys has two segment templates that can assist with this step: Attended an event and Attended a session. For more information, see Create and go live with a new segment.
Create a customer journey. You can make this journey part of your overarching event customer journey or you can create a separate journey for your post-event communications. For more information, see Dynamics 365 Customer Voice automation in customer journeys.
Tip
Keep in mind that when the journey is live, you won't be able to edit or add tiles to it. Consequently, everything that you plan to include in the journey must be created and must go live prior to when you send the first event communication. If you need additional time for event asset creation, consider creating a separate customer journey for your post-event communications.


