Back up Azure Managed Disks using Azure PowerShell
This article explains how to back up Azure Managed Disk using Azure PowerShell.
In this article, you'll learn how to:
Create a Backup vault
Create a backup policy
Configure a backup of an Azure Disk
Run an on-demand backup job
For information on the Azure Disk backup region availability, supported scenarios and limitations, see the support matrix.
Create a Backup vault
A Backup vault is a storage entity in Azure that holds backup data for various newer workloads that Azure Backup supports, such as Azure Database for PostgreSQL servers and Azure Disks. Backup vaults make it easy to organize your backup data, while minimizing management overhead. Backup vaults are based on the Azure Resource Manager model of Azure, which provides enhanced capabilities to help secure backup data.
Before creating a backup vault, choose the storage redundancy of the data within the vault. Then proceed to create the backup vault with that storage redundancy and the location. In this article, we will create a backup vault "TestBkpVault" in "westus" region under the resource group "testBkpVaultRG". Use the New-AzDataProtectionBackupVault command to create a backup vault.Learn more about creating a Backup vault.
$storageSetting = New-AzDataProtectionBackupVaultStorageSettingObject -Type LocallyRedundant/GeoRedundant -DataStoreType VaultStore
New-AzDataProtectionBackupVault -ResourceGroupName testBkpVaultRG -VaultName TestBkpVault -Location westus -StorageSetting $storageSetting
$TestBkpVault = Get-AzDataProtectionBackupVault -VaultName TestBkpVault
$TestBKPVault | fl
ETag                :
Id                  : /subscriptions/xxxxxxxx-xxxx-xxxx-xxxx/resourceGroups/testBkpVaultRG/providers/Microsoft.DataProtection/backupVaults/TestBkpVault
Identity            : Microsoft.Azure.PowerShell.Cmdlets.DataProtection.Models.Api20210201Preview.DppIdentityDetails
IdentityPrincipalId :
IdentityTenantId    :
IdentityType        :
Location            : westus
Name                : TestBkpVault
ProvisioningState   : Succeeded
StorageSetting      : {Microsoft.Azure.PowerShell.Cmdlets.DataProtection.Models.Api20210201Preview.StorageSetting}
SystemData          : Microsoft.Azure.PowerShell.Cmdlets.DataProtection.Models.Api20210201Preview.SystemData
Tag                 : Microsoft.Azure.PowerShell.Cmdlets.DataProtection.Models.Api20210201Preview.DppTrackedResourceTags
Type                : Microsoft.DataProtection/backupVaults
After creation of vault, let's create a backup policy to protect Azure disks.
Create a Backup policy
To understand the inner components of a backup policy for Azure disk backup, retrieve the policy template using the command Get-AzDataProtectionPolicyTemplate. This command returns a default policy template for a given datasource type. Use this policy template to create a new policy.
$policyDefn = Get-AzDataProtectionPolicyTemplate -DatasourceType AzureDisk
$policyDefn | fl


DatasourceType : {Microsoft.Compute/disks}
ObjectType     : BackupPolicy
PolicyRule     : {BackupHourly, Default}

$policyDefn.PolicyRule | fl


BackupParameter           : Microsoft.Azure.PowerShell.Cmdlets.DataProtection.Models.Api20210201Preview.AzureBackupParams
BackupParameterObjectType : AzureBackupParams
DataStoreObjectType       : DataStoreInfoBase
DataStoreType             : OperationalStore
Name                      : BackupHourly
ObjectType                : AzureBackupRule
Trigger                   : Microsoft.Azure.PowerShell.Cmdlets.DataProtection.Models.Api20210201Preview.ScheduleBasedTriggerContext
TriggerObjectType         : ScheduleBasedTriggerContext

IsDefault  : True
Lifecycle  : {Microsoft.Azure.PowerShell.Cmdlets.DataProtection.Models.Api20210201Preview.SourceLifeCycle}
Name       : Default
ObjectType : AzureRetentionRule
The policy template consists of a trigger (which decides what triggers the backup) and a lifecycle (which decides when to delete/copy/move the backup). In Azure disk backup, the default value for trigger is a scheduled hourly trigger for every 4 hours (PT4H) and to retain each backup for 7 days.
 $policyDefn.PolicyRule[0].Trigger | fl


ObjectType                    : ScheduleBasedTriggerContext
ScheduleRepeatingTimeInterval : {R/2020-04-05T13:00:00+00:00/PT4H}
TaggingCriterion              : {Default}
$policyDefn.PolicyRule[1].Lifecycle | fl


DeleteAfterDuration        : P7D
DeleteAfterObjectType      : AbsoluteDeleteOption
SourceDataStoreObjectType  : DataStoreInfoBase
SourceDataStoreType        : OperationalStore
TargetDataStoreCopySetting :
Azure Disk Backup offers multiple backups per day. If you require more frequent backups, choose the Hourly backup frequency with the ability to take backups with intervals of every 4, 6, 8 or 12 hours. The backups are scheduled based on the Time interval selected. For example, if you select Every 4 hours, then the backups are taken at approximately in the interval of every 4 hours so the backups are distributed equally across the day. If a once a day backup is sufficient, then choose the Daily backup frequency. In the daily backup frequency, you can specify the time of the day when your backups are taken. It's important to note that the time of the day indicates the backup start time and not the time when the backup completes. The time required for completing the backup operation is dependent on various factors including size of the disk, and churn rate between consecutive backups. However, Azure Disk backup is an agentless backup that uses incremental snapshots, which doesn't impact the production application performance.
Note
Although the selected vault may have the global-redundancy setting, currently Azure Disk Backup supports snapshot datastore only. All backups are stored in a resource group in your subscription and aren't copied to backup vault storage.
To know more details about policy creation, refer to the Azure Disk Backup policy document.
If you want to edit the hourly frequency or the retention period, use the Edit-AzDataProtectionPolicyTriggerClientObject and/or Edit-AzDataProtectionPolicyRetentionRuleClientObject commands. Once the policy object has all the desired values, proceed to create a new policy from the policy object using the New-AzDataProtectionBackupPolicy.
New-AzDataProtectionBackupPolicy -ResourceGroupName "testBkpVaultRG" -VaultName $TestBkpVault.Name -Name diskBkpPolicy -Policy $policyDefn

Name                   Type
----                   ----
diskBkpPolicy       Microsoft.DataProtection/backupVaults/backupPolicies

$diskBkpPol = Get-AzDataProtectionBackupPolicy -ResourceGroupName "testBkpVaultRG" -VaultName $TestBkpVault.Name -Name "diskBkpPolicy"
Configure backup
Once the vault and policy are created, there are 3 critical points that the user needs to consider to protect an Azure disk.
Key entities involved
Disk to be protected
Fetch the ARM ID of the disk to be protected. This will serve as the identifier of the disk. We will use an example of a disk named "PSTestDisk" under a resource group "diskrg" under a different subscription.
$DiskId = "/subscriptions/xxxxxxxx-xxxx-xxxx-xxxx/resourcegroups/diskrg/providers/Microsoft.Compute/disks/PSTestDisk"
Snapshot resource group
The disk snapshots are stored in a resource group within in your subscription. As a guideline, it's recommended to create a dedicated resource group as a snapshot datastore to be used by the Azure Backup service. Having a dedicated resource group allows restricting access permissions on the resource group, providing safety and ease of management of the backup data. Note the ARM ID for the resource group where you wish to place the disk snapshots
$snapshotrg = "/subscriptions/xxxxxxxx-xxxx-xxxx-xxxx/resourceGroups/snapshotrg"
Backup vault
The Backup vaults require permissions on disk and the snapshot resource group to be able to trigger snapshots and manage their lifecycle. The system-assigned managed identity of the vault is used for assigning such permissions. Use the Update-AzRecoveryServicesVault command to enable system-assigned managed identity for the recovery services vault.
Assign permissions
The user needs to assign few permissions via RBAC to vault (represented by vault MSI) and the relevant disk and/or the disk RG. These can be performed via Portal or PowerShell.
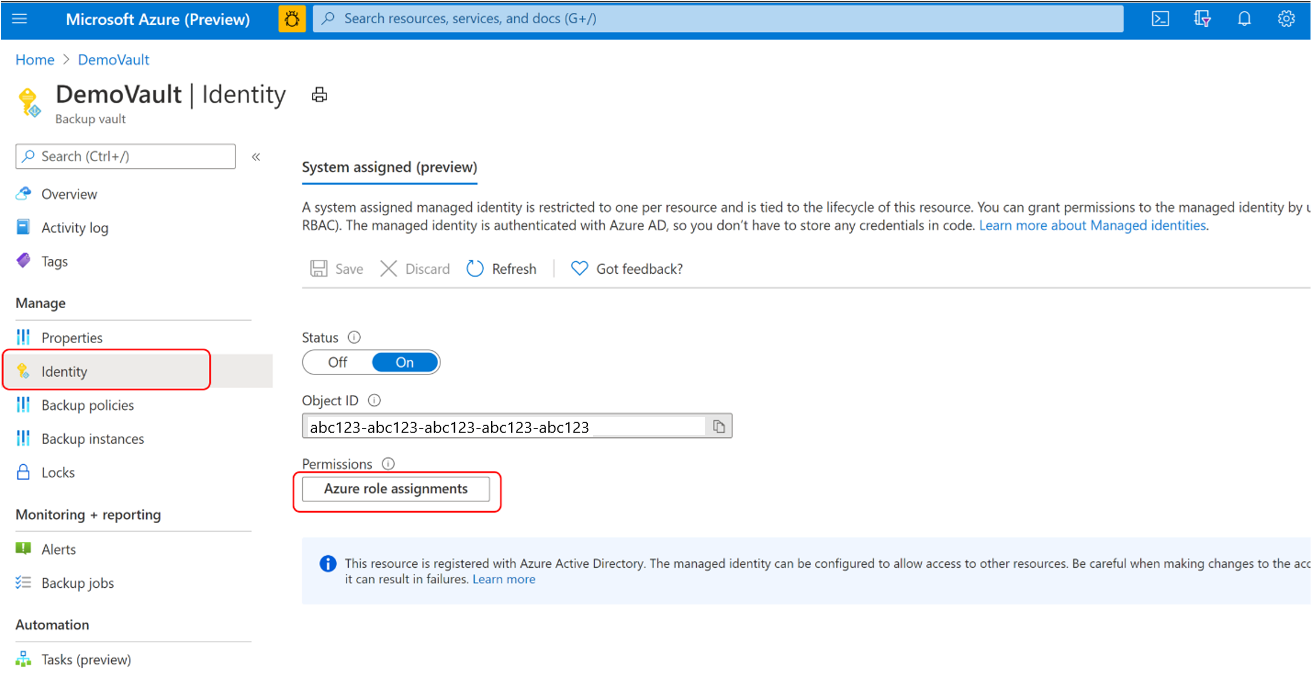
Backup vault uses managed identity to access other Azure resources. To configure backup of managed disks, Backup vault’s managed identity requires a set of permissions on the source disks and resource groups, where snapshots are created and managed.
A system-assigned managed identity is restricted to one per resource and is tied to the lifecycle of this resource. You can grant permissions to the managed identity by using Azure role-based access control (Azure RBAC). Managed identity is a service principal of a special type that may only be used with Azure resources. Learn more about managed identities.
To configure backup of managed disks, ensure the following prerequisites:
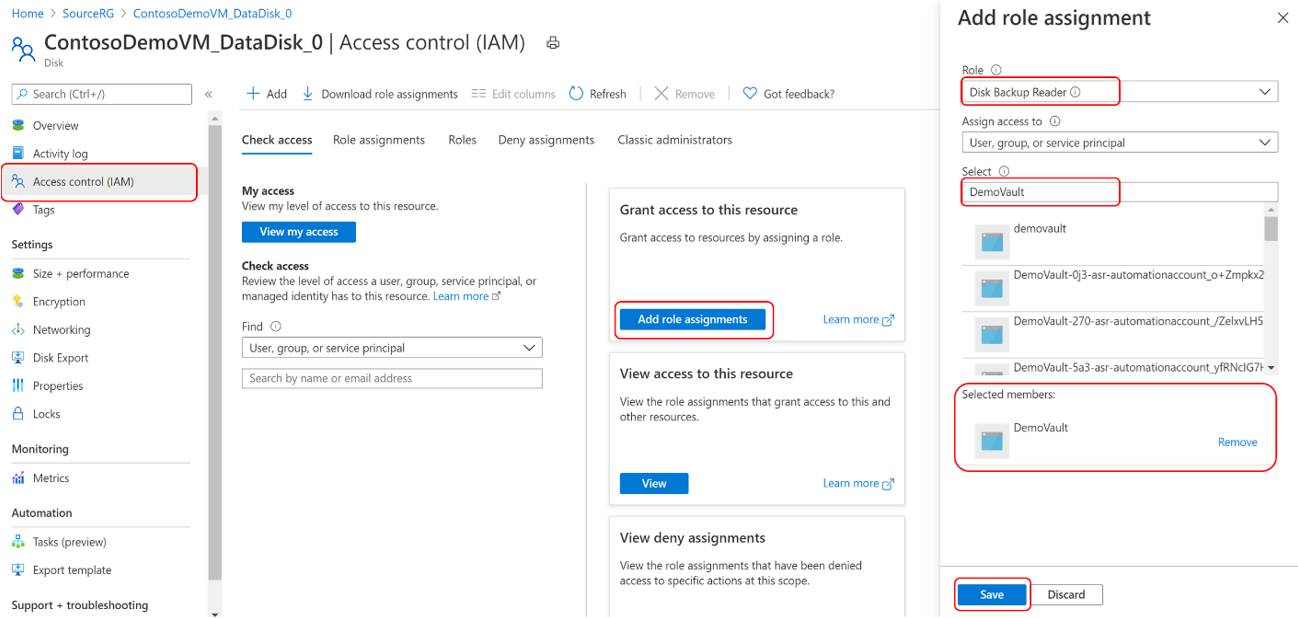
Assign the Disk Backup Reader role to Backup vault’s managed identity on the Source disk that needs to be backed up.
Go to the disk that needs to be backed up.
Go to Access control (IAM) and select Add role assignments.
In the right context pane, select Disk Backup Reader in the Role drop-down list.
Select the Backup vault’s managed identity and click Save.
Tip
Type the Backup vault name to select the vault’s managed identity.
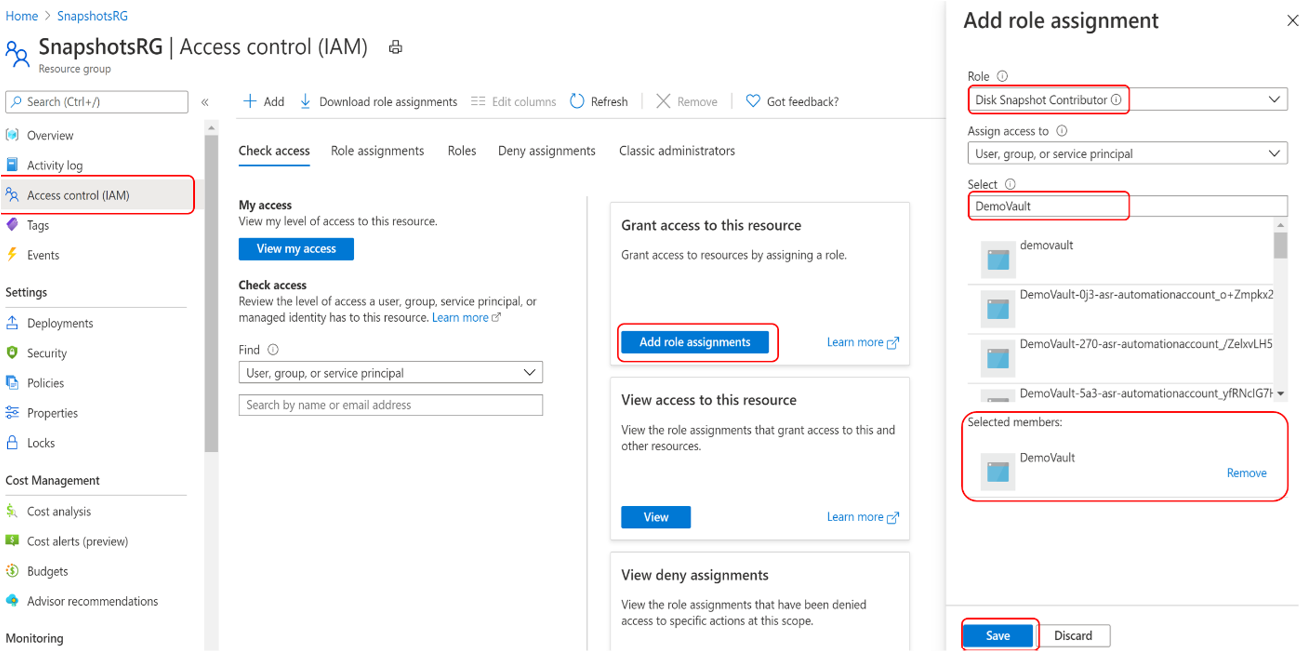
Assign the Disk Snapshot Contributor role to the Backup vault’s managed identity on the Resource group, where backups are created and managed by the Azure Backup service. The disk snapshots are stored in a resource group within your subscription. To allow Azure Backup service to create, store, and manage snapshots, you need to provide permissions to the backup vault.
Go to the Resource group. For example, the resource group is SnapshotRG, which is in the same subscription as that of the disk to be backed up.
Go to Access control (IAM) and select Add role assignments.
In the right context pane, select Disk Snapshot Contributor in the Role drop-down list.
Select the Backup vault’s managed identity and click Save.
Tip
Type the backup vault name to select the vault’s managed identity.
Verify that the backup vault's managed identity has the right set of role assignments on the source disk and resource group that serves as the snapshot datastore.
Go to Backup vault -> Identity and select Azure role assignments.
Verify that the role, resource name, and resource type are correct.
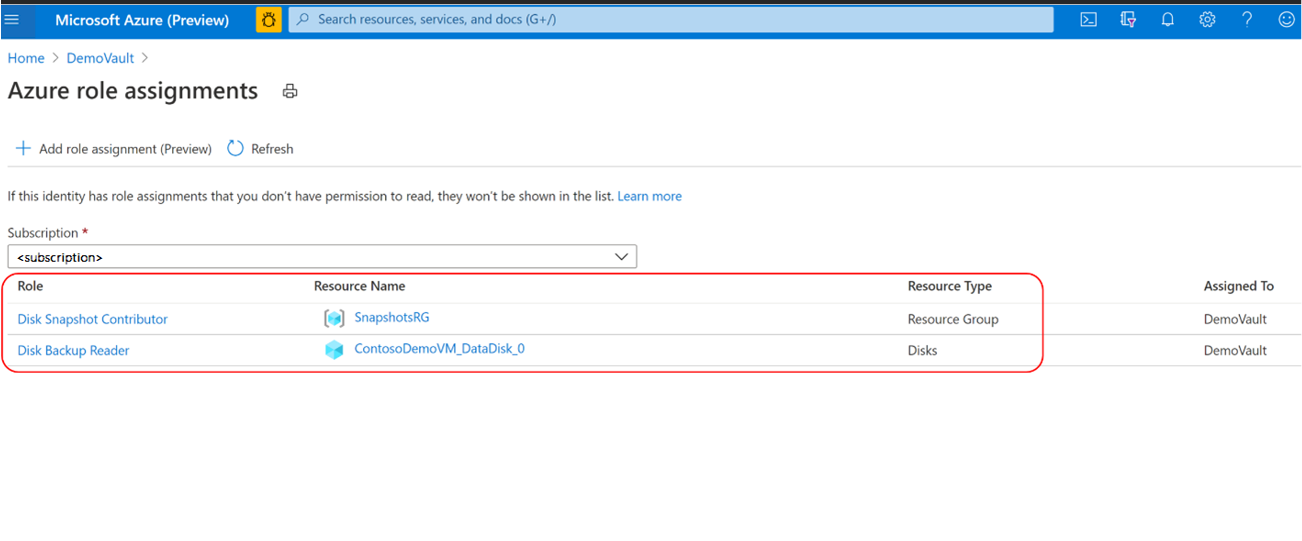


Note
While the role assignments are reflected correctly in the portal, it may take approximately 15 - 30 minutes for the permission to be applied on the backup vault’s managed identity.
Prepare the request
Once all the relevant permissions are set, the configuration of backup is performed in 2 steps. First, we prepare the relevant request by using the relevant vault, policy, disk and snapshot resource group using the Initialize-AzDataProtectionBackupInstance command. Then, we submit the request to protect the disk using the New-AzDataProtectionBackupInstance command.
$instance = Initialize-AzDataProtectionBackupInstance -DatasourceType AzureDisk -DatasourceLocation $TestBkpvault.Location -PolicyId $diskBkpPol[0].Id -DatasourceId $DiskId
$instance.Property.PolicyInfo.PolicyParameter.DataStoreParametersList[0].ResourceGroupId = $snapshotrg
New-AzDataProtectionBackupInstance -ResourceGroupName "testBkpVaultRG" -VaultName $TestBkpVault.Name -BackupInstance $instance

Name                                                       Type                                                  BackupInstanceName
----                                                       ----                                                  ------------------
diskrg-PSTestDisk-3df6ac08-9496-4839-8fb5-8b78e594f166 Microsoft.DataProtection/backupVaults/backupInstances diskrg-PSTestDisk-3df6ac08-9496-4839-8fb5-8b78e594f166
Run an on-demand backup
Fetch the relevant backup instance on which the user desires to trigger a backup using the Get-AzDataProtectionBackupInstance
$instance = Get-AzDataProtectionBackupInstance -SubscriptionId "xxxx-xxx-xxx" -ResourceGroupName "testBkpVaultRG" -VaultName $TestBkpVault.Name -Name "BackupInstanceName"
You can specify a retention rule while triggering backup. To view the retention rules in policy, navigate through the policy object for retention rules. In the below example, the rule with name 'default' is displayed and we will use that rule for the on-demand backup
$policyDefn.PolicyRule | fl


BackupParameter           : Microsoft.Azure.PowerShell.Cmdlets.DataProtection.Models.Api20210201Preview.AzureBackupParams
BackupParameterObjectType : AzureBackupParams
DataStoreObjectType       : DataStoreInfoBase
DataStoreType             : OperationalStore
Name                      : BackupHourly
ObjectType                : AzureBackupRule
Trigger                   : Microsoft.Azure.PowerShell.Cmdlets.DataProtection.Models.Api20210201Preview.ScheduleBasedTriggerContext
TriggerObjectType         : ScheduleBasedTriggerContext

IsDefault  : True
Lifecycle  : {Microsoft.Azure.PowerShell.Cmdlets.DataProtection.Models.Api20210201Preview.SourceLifeCycle}
Name       : Default
ObjectType : AzureRetentionRule
Trigger an on-demand backup using the Backup-AzDataProtectionBackupInstanceAdhoc command.
$AllInstances = Get-AzDataProtectionBackupInstance -ResourceGroupName "testBkpVaultRG" -VaultName $TestBkpVault.Name
Backup-AzDataProtectionBackupInstanceAdhoc -BackupInstanceName $AllInstances[0].Name -ResourceGroupName "testBkpVaultRG" -VaultName $TestBkpVault.Name -BackupRuleOptionRuleName "Default"
Tracking jobs
Track all the jobs using the Get-AzDataProtectionJob command. You can list all jobs and fetch a particular job detail.
You can also use Az.ResourceGraph to track all jobs across all backup vaults. Use the Search-AzDataProtectionJobInAzGraph command to get the relevant job which can be across any backup vault.
$job = Search-AzDataProtectionJobInAzGraph -Subscription $sub -ResourceGroupName "testBkpVaultRG" -Vault $TestBkpVault.Name -DatasourceType AzureDisk -Operation OnDemandBackup
Next steps
Feedback
Coming soon: Throughout 2024 we will be phasing out GitHub Issues as the feedback mechanism for content and replacing it with a new feedback system. For more information see: https://aka.ms/ContentUserFeedback.
Submit and view feedback for