Set up OIDC authentication in SharePoint Server with Microsoft Entra ID
APPLIES TO:  2013 2016 2019
  Subscription Edition SharePoint in Microsoft 365
Prerequisites
When you configure OpenID Connect (OIDC) with Microsoft Entra ID, you need the following resources:
A SharePoint Server Subscription Edition (SPSE) farm
Microsoft Entra Global Administrator role of the M365 tenant
This article uses the following example values for Microsoft Entra OIDC setup:
| Value | Link |
|---|---|
| SharePoint site Uniform Resource Locator (URL) | https://spsites.contoso.local/ |
| OIDC site URL | https://sts.windows.net/<tenantid>/ |
| Microsoft Entra OIDC authentication endpoint | https://login.microsoftonline.com/<tenantid>/oauth2/authorize |
| Microsoft Entra OIDC RegisteredIssuerName URL | https://sts.windows.net/<tenantid>/ |
| Microsoft Entra OIDC SignoutURL | https://login.microsoftonline.com/<tenantid>/oauth2/logout |
| Identity claim type | http://schemas.xmlsoap.org/ws/2005/05/identity/claims/emailaddress |
| Windows site collection administrator | contoso\yvand |
| Email value of the federated site collection administrator | yvand@contoso.local |
Step 1: Setup identity provider
Perform the following steps to set up OIDC with Microsoft Entra ID:
Browse to the Entra ID admin portal, and sign in with an account with the Global Administrator role.
Under Applications, select App Registrations.
Select New Registration.
Go to the Register an application page
https://portal.azure.com/#blade/Microsoft_AAD_IAM/ActiveDirectoryMenuBlade/RegisteredApps.Under the Redirect URI section, choose "Web" as the Platform, and enter your SharePoint Server web application URL, for example:
https://spsites.contoso.local/and select Register.
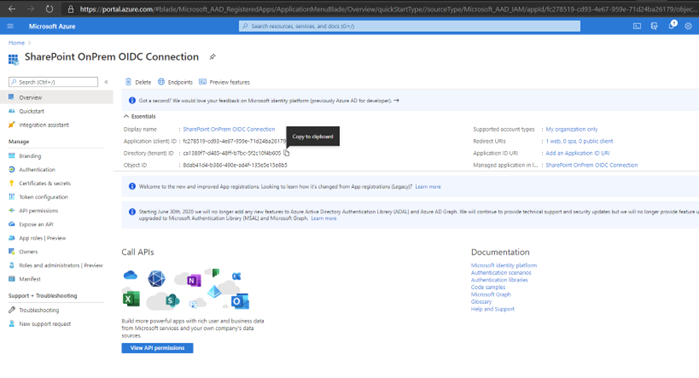
Save the Directory (tenant) ID value, as the tenant ID is used in subsequent steps. Also save the Application (client) ID, which we use as DefaultClientIdentifier in the SharePoint setup.
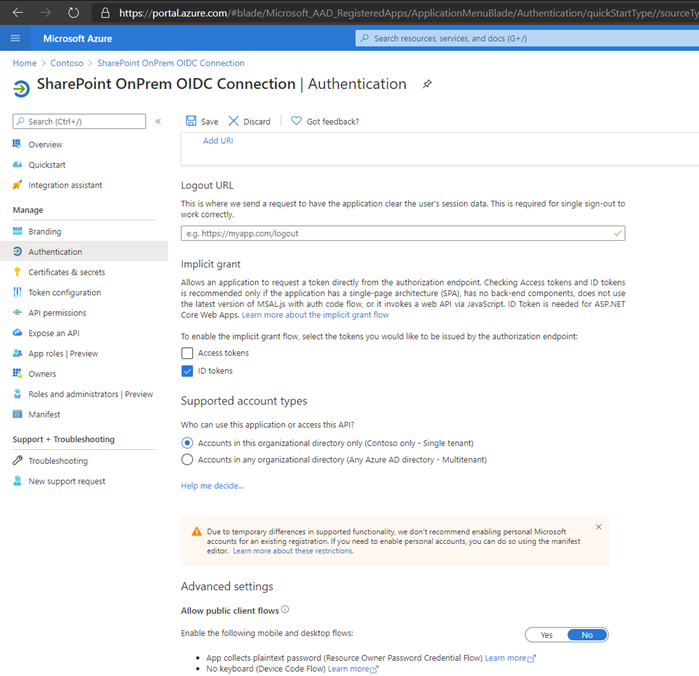
After you register the application, go to the Authentication tab, select the ID tokens check box, and select Save.
Go to the API permissions tab and select Add a Permission. Choose Microsoft Graph, then Delegated permissions. Select the add email and profile permissions, and select Add permissions.

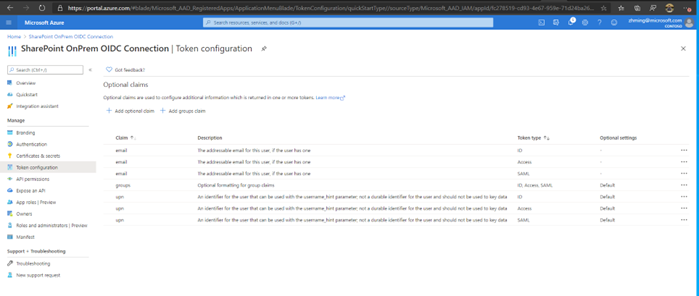
Go to the Token configuration tab and select Add optional claim. For each token type (ID, Access, SAML), add email, and upn claims.
Also on the Token configuration tab, select Add groups claim. Security Groups is the most common, but the group types you select depends on which types of groups you want to use to give access to the SharePoint web application. For more information, see Configure groups optional claims and Configure group claims for applications by using Microsoft Entra ID.
Go to the Manifest tab, and manually change replyUrlsWithType from
https://spsites.contoso.local/tohttps://spsites.contoso.local/*. Then select Save.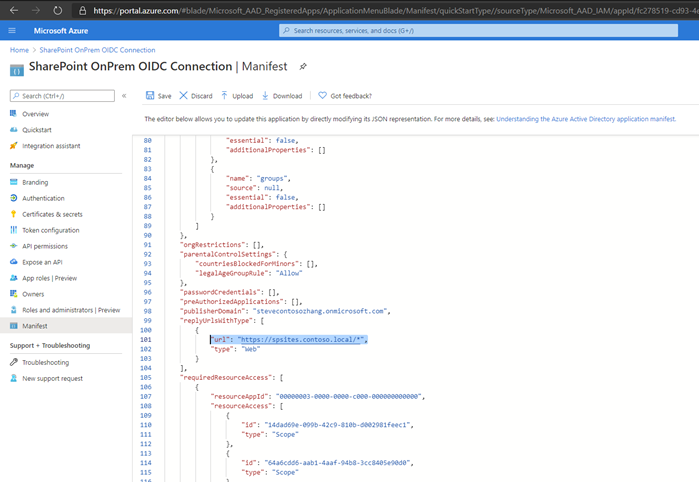
Step 2: Change SharePoint farm properties
In this step, you need to modify the SharePoint Server farm properties based on the version of your SharePoint Server farm.
- For more information on configuring SharePoint farm properties for SharePoint Server Subscription Edition Version 24H1, see Configure SPSE Version 24H1 or higher version.
- For more information on configuring SharePoint farm properties for SharePoint Server Subscription Edition Version preceding 24H1, see Configure SPSE prior to Version 24H1.
Configure SharePoint Server Subscription Edition Version 24H1 or higher versions
Starting with SharePoint Server Subscription Edition Version 24H1 (March 2024), you can configure SharePoint Server farm properties by employing SharePoint Certificate Management to manage the nonce cookie certificate. The nonce cookie certificate is part of the infrastructure to ensure OIDC authentication tokens are secure. Run the following script to configure:
Note
Start the SharePoint Management Shell as a farm administrator to run the following script. Read the instructions mentioned in the following PowerShell script carefully. You will need to enter your own environment-specific values in certain places.
# Set up farm properties to work with OIDC

# Create the Nonce certificate
$cert = New-SelfSignedCertificate -CertStoreLocation Cert:\LocalMachine\My -Provider 'Microsoft Enhanced RSA and AES Cryptographic Provider' -Subject "CN=SharePoint Cookie Cert"

# Import certificate to Certificate Management
$certPath = <path to save the exported cert>
$certPassword = ConvertTo-SecureString -String <password> -Force -AsPlainText
Export-PfxCertificate -Cert $cert -FilePath $certPath -Password $certPassword
$nonceCert = Import-SPCertificate -Path $certPath -Password $certPassword -Store "EndEntity" -Exportable:$true

# Update farm property
$farm = Get-SPFarm
$farm.UpdateNonceCertificate($nonceCert,$true)
Configure SharePoint Server Subscription Edition prior to Version 24H1
Prior to the 24H1 (March 2024) update, the nonce cookie certificate must be managed manually. This includes manually installing it on each server in the farm and setting permissions on the private key. The following PowerShell script can be used to accomplish that.
Note
Start the SharePoint Management Shell as a farm administrator to run the following script. Read the instructions mentioned in the following PowerShell script carefully. You will need to enter your own environment-specific values in certain places.
# Set up farm properties to work with OIDC
$cert = New-SelfSignedCertificate -CertStoreLocation Cert:\LocalMachine\My -Provider 'Microsoft Enhanced RSA and AES Cryptographic Provider' -Subject "CN=SharePoint Cookie Cert"
$rsaCert = [System.Security.Cryptography.X509Certificates.RSACertificateExtensions]::GetRSAPrivateKey($cert)
$fileName = $rsaCert.key.UniqueName

# If you have multiple SharePoint servers in the farm, you need to export the certificate by Export-PfxCertificate and import the certificate to all other SharePoint servers in the farm by Import-PfxCertificate.

# After the certificate is successfully imported to SharePoint Server, we will need to grant access permission to the certificate's private key.

$path = "$env:ALLUSERSPROFILE\Microsoft\Crypto\RSA\MachineKeys\$fileName"
$permissions = Get-Acl -Path $path

# Replace the <web application pool account> with the real application pool account of your web application
$access_rule = New-Object System.Security.AccessControl.FileSystemAccessRule(<Web application pool account>, 'Read', 'None', 'None', 'Allow')
$permissions.AddAccessRule($access_rule)
Set-Acl -Path $path -AclObject $permissions

# Then update farm properties
$farm = Get-SPFarm
$farm.Properties['SP-NonceCookieCertificateThumbprint']=$cert.Thumbprint
$farm.Properties['SP-NonceCookieHMACSecretKey']='seed'
$farm.Update()
Important
The nonce cookie certificate, with private key, must be installed on all SharePoint servers in the farm. Also, permission to the private key must be given to the web application pool service account on each server. Failure to complete this step will result OIDC authentication failures. It's recommended to use the PowerShell example above to set permission on the private key file to ensure it's done correctly.
Step 3: Configure SharePoint to trust the identity provider
In this step, you create a SPTrustedTokenIssuer that stores the configuration that SharePoint needs to trust Microsoft Entra OIDC as the OIDC provider.
You can configure SharePoint to trust the identity provider in either of the following ways:
- Configure SharePoint to trust Microsoft Entra ID as the OIDC provider by using the metadata endpoint.
- By using the metadata endpoint, several parameters you need are automatically retrieved from the metadata endpoint.
- Configure SharePoint to trust Microsoft Entra ID as the OIDC provider manually.
Note
Follow either the manual configuration steps or the metadata endpoint steps, but not both.
Using the metadata endpoint is recommended because it simplifies the process.
Configure SharePoint to trust Microsoft Entra OIDC by using metadata endpoint
SharePoint Server Subscription Edition now supports using the OIDC metadata discovery capability when creating the Trusted Identity Token Issuer.
In Microsoft Entra ID, there are two versions of OIDC discovery endpoints:
- V1.0:
https://login.microsoftonline.com/<TenantID>/.well-known/openid-configuration - V2.0:
https://login.microsoftonline.com/<TenantID>/v2.0/.well-known/openid-configuration
Important
Currently, SharePoint Server only supports the v1.0 metadata endpoint when used to create the Trusted Identity Token Issuer. The example PowerShell script below uses the V1.0 endpoint.
When you use the metadata endpoint provided by the OIDC identity provider, some of the configuration is retrieved from the OIDC provider metadata endpoint directly, including:
- Certificate
- Issuer
- Authorization Endpoint
- SignoutURL
This can simplify the configuration of the OIDC token issuer.
With the following PowerShell example, we can use metadata endpoint from Microsoft Entra ID to configure SharePoint to trust Microsoft Entra OIDC.
Note
Read the instructions mentioned in the following PowerShell script carefully. You will need to enter your own environment-specific values in certain places. For example, replace <tenantid> with your own Directory (tenant) ID.
# Define claim types
# In this example, we're using Email Address as the Identity claim.
$emailClaimMap = New-SPClaimTypeMapping -IncomingClaimType "http://schemas.xmlsoap.org/ws/2005/05/identity/claims/emailaddress" -IncomingClaimTypeDisplayName "Email" -SameAsIncoming

# Set the AAD metadata endpoint URL. Please replace <TenantID> with the value saved in step #3 in the Entra ID setup section
$metadataendpointurl = "https://login.microsoftonline.com/<TenantID>/.well-known/openid-configuration"

# Please replace <Application (Client) ID> with the value saved in step #3 in the Entra ID setup section
$clientIdentifier = "<Application (Client)ID>"

# Create a new SPTrustedIdentityTokenIssuer in SharePoint
New-SPTrustedIdentityTokenIssuer -Name "contoso.local" -Description "contoso.local" -ClaimsMappings $emailClaimMap -IdentifierClaim $emailClaimMap.InputClaimType -DefaultClientIdentifier $clientIdentifier -MetadataEndPoint $metadataendpointurl -Scope "openid profile"
| Parameter | Description |
|---|---|
| Name | Gives a name to the new token issuer. |
| Description | Gives a description to the new token issuer. |
| ImportTrustCertificate | A certificate that is used to validate id_token from OIDC identifier. |
| ClaimsMappings | A SPClaimTypeMapping object, which is used to identify which claim in the id_token is regarded as identifier in SharePoint. |
| IdentifierClaim | Specifies the type of identifier. |
| DefaultClientIdentifier | Specifies the client_id of SharePoint server, which is assigned by OIDC identity provider. This is validated against aud claim in id_token. |
| MetadataEndPoint | Specifies the well-known metadata endpoint from OIDC identity provider, which can be used to retrieve latest certificate, issuer, authorization endpoint, and sign out endpoint. |
Configure SharePoint to trust Microsoft Entra ID as the OIDC provider manually
When configuring manually, several additional parameters must be specified. You can retrieve the values from the OIDC discovery endpoint.
In Microsoft Entra ID, there are two versions of OIDC authentication endpoints. Therefore, there are two versions of OIDC discovery endpoints respectively:
- V1.0:
https://login.microsoftonline.com/<TenantID>/.well-known/openid-configuration - V2.0:
https://login.microsoftonline.com/<TenantID>/v2.0/.well-known/openid-configuration
Replace TenantID with the Directory (tenant) ID saved in Step 1: Setup identity provider and connect to the endpoint through your browser. Then, save the following information:
| Value | Link |
|---|---|
| authorization_endpoint | https://login.microsoftonline.com/<tenantid>/oauth2/authorize |
| end_session_endpoint | https://login.microsoftonline.com/<tenantid>/oauth2/logout |
| issuer | https://sts.windows.net/<tenantid>/ |
| jwks_uri | https://login.microsoftonline.com/common/discovery/keys |
Open jwks_uri (https://login.microsoftonline.com/common/discovery/keys) and save all the x5c certificate strings for later use in SharePoint setup.

Start the SharePoint Management Shell as a farm administrator, and after entering the values you obtained above, run the following script to create the Trusted identity Token Issuer:
Note
Read the instructions mentioned in the following PowerShell script carefully. You will need to enter your own environment-specific values in certain places. For example, replace <tenantid> with your own Directory (tenant) ID.
# Define claim types
# In this example, we're using Email Address as the identity claim.
$emailClaimMap = New-SPClaimTypeMapping -IncomingClaimType "http://schemas.xmlsoap.org/ws/2005/05/identity/claims/emailaddress" -IncomingClaimTypeDisplayName "Email" -SameAsIncoming

# Public key of the AAD OIDC signing certificate. Please replace <x5c cert string> with the encoded cert string which you get from x5c certificate string of the keys of jwks_uri from Step #1
$encodedCertStrs = @()
$encodedCertStrs += <x5c cert string 1>
$encodedCertStrs += <x5c cert string 2>
...
$certificates = @()
foreach ($encodedCertStr in $encodedCertStrs) {
     $certificates += New-Object System.Security.Cryptography.X509Certificates.X509Certificate2 @(,[System.Convert]::FromBase64String($encodedCertStr))
}

# Set the AAD OIDC URL where users are redirected to authenticate. Please replace <tenantid> accordingly
$authendpointurl = "https://login.microsoftonline.com/<tenantid>/oauth2/authorize"
$registeredissuernameurl = "https://sts.windows.net/<tenantid>/"
$signouturl = "https://login.microsoftonline.com/<tenantid>/oauth2/logout"

# Please replace <Application (Client) ID> with the value saved in step #3 in AAD setup section
$clientIdentifier = "<Application (Client)ID>"

# Create a new SPTrustedIdentityTokenIssuer in SharePoint
New-SPTrustedIdentityTokenIssuer -Name "contoso.local" -Description "contoso.local" -ImportTrustCertificate $certificates -ClaimsMappings emailClaimMap -IdentifierClaim $emailClaimMap.InputClaimType -RegisteredIssuerName $registeredissuernameurl -AuthorizationEndPointUri $authendpointurl -SignOutUrl $signouturl -DefaultClientIdentifier $clientIdentifier -Scope "openid profile"
Here, New-SPTrustedIdentityTokenIssuer PowerShell cmdlet is extended to support OIDC by using the following parameters:
| Parameter | Description |
|---|---|
| Name | Gives a name to the new token issuer. |
| Description | Gives a description to the new token issuer. |
| ImportTrustCertificate | Imports a list of X509 Certificates, which is used to validate id_token from OIDC identifier. If the OIDC identity provider (IDP) uses more than one certificate to digital sign the id_token, import these certificates and SharePoint validates id_token by matching the digital signature generated by using these certificates. |
| ClaimsMappings | A SPClaimTypeMapping object, which is used to identify which claim in the id_token is regarded as identifier in SharePoint. |
| IdentifierClaim | Specifies the type of identifier. |
| RegisteredIssuerName | Specifies the issuer identifier, which issues the id_token. It's used to validate the id_token. |
| AuthorizationEndPointUrl | Specifies the authorization endpoint of the OIDC identity provider. |
| SignoutUrl | Specifies the sign out endpoint of the OIDC identity provider. |
| DefaultClientIdentifier | Specifies the client_id of SharePoint server, which is assigned by OIDC identity provider. This is validated against aud claim in id_token. |
| ResponseTypesSupported | Specifies the response type of IDP, which is accepted by this token issuer. It can accept two strings: id_token and code id_token. If this parameter isn't provided, it uses code id_token as default. |
Step 4: Configure the SharePoint web application
In this step, you configure a web application in SharePoint to be federated with the Microsoft Entra OIDC, using the SPTrustedIdentityTokenIssuer created in the previous step.
Important
- The default zone of the SharePoint web application must have Windows authentication enabled. This is required for the Search crawler.
- The SharePoint URL that will use Microsoft Entra OIDC federation must be configured with Hypertext Transfer Protocol Secure (HTTPS).
You can complete this configuration either by:
- Creating a new web application and using both Windows and Microsoft Entra OIDC authentication in the default zone.
- Extending an existing web application to set Microsoft Entra OIDC authentication on a new zone.
To create a new web application, do the following:
Start the SharePoint Management Shell and run the following script to create a new
SPAuthenticationProvider:# This script creates a trusted authentication provider for OIDC $sptrust = Get-SPTrustedIdentityTokenIssuer "contoso.local" $trustedAp = New-SPAuthenticationProvider -TrustedIdentityTokenIssuer $sptrustFollow Create a web application in SharePoint Server to create a new web application enabling HTTPS/Secure Sockets Layer (SSL) named SharePoint - OIDC on contoso.local.
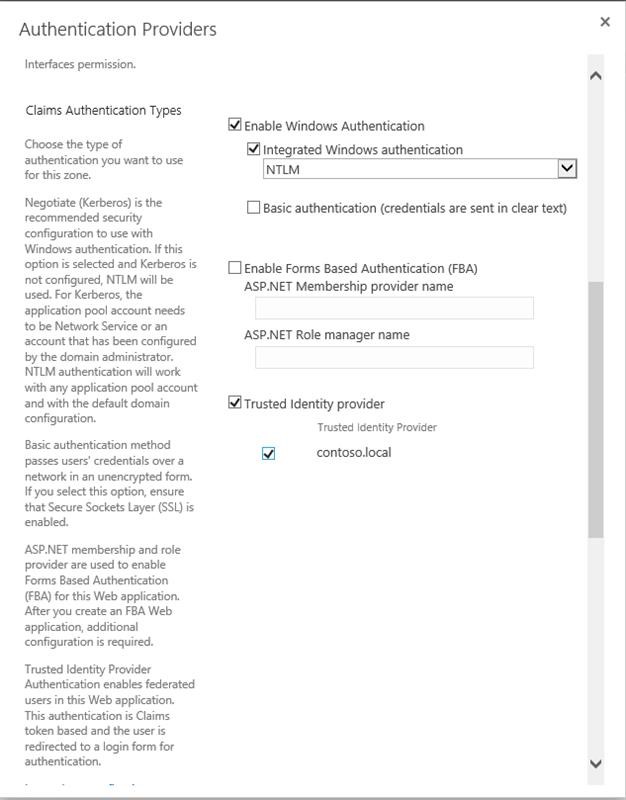
Open the SharePoint Central Administration site.
Select the web application you created, choose "Authentication Providers" in the Ribbon, click the link for the Default zone, and pick contoso.local as Trusted Identity Provider.
In the SharePoint Central Administration site, navigate to System Settings > Configure Alternate Access Mappings > Alternate Access Mapping Collection.
Filter the display with the new web application and confirm that you see the following information:

To extend an existing web application and configure it to use the "contoso.local" trusted provider, do the following:
- Start the SharePoint Management Shell and run PowerShell to extend the web application. The following example extends the web application to the Intranet zone and configures the zone to use the "Contoso.local" trusted provider for authentication.
Note
For this to work, you must have a valid certificate named 'SharePoint OIDC Site' imported to the farm. See SSL certificate management operations for more information.
# Get the trusted provider
$sptrust = Get-SPTrustedIdentityTokenIssuer "Contoso.local"
$ap = New-SPAuthenticationProvider -TrustedIdentityTokenIssuer $sptrust
# Get the web app
$wa = Get-SPWebApplication http://spsites
# Extend the web app to the "Intranet" zone using trusted provider (OIDC) auth and a SharePoint managed certificate called "SharePoint OIDC Site"
New-SPWebApplicationExtension -Identity $wa -Name "spsites" -port 443 -HostHeader 'spsites.contoso.local'-AuthenticationProvider $ap -SecureSocketsLayer -UseServerNameIndication -Certificate 'SharePoint OIDC Site' -Zone 'Intranet' -URL 'https://spsites.contoso.local'
In the SharePoint Central Administration site, navigate to System Settings > Configure Alternate Access Mappings > Alternate Access Mapping Collection.
Filter the display with the web application that was extended and confirm that you see the following information:

Step 5: Ensure the web application is configured with SSL certificate
Since OIDC 1.0 authentication can only work with HTTPS protocol, a certificate must be set on the corresponding web application. If not already configured, perform the following steps to set the certificate:
Generate the site certificate:
Note
You may skip this step if you have already generated the certificate.
Open the SharePoint PowerShell console.
Run the following script to generate a self-signed certificate and add it to the SharePoint farm:
New-SPCertificate -FriendlyName "Contoso SharePoint (2021)" -KeySize 2048 -CommonName spsites.contoso.local -AlternativeNames extranet.contoso.local, onedrive.contoso.local -OrganizationalUnit "Contoso IT Department" -Organization "Contoso" -Locality "Redmond" -State "Washington" -Country "US" -Exportable -HashAlgorithm SHA256 -Path "\\server\fileshare\Contoso SharePoint 2021 Certificate Signing Request.txt"
Move-SPCertificate -Identity "Contoso SharePoint (2021)" -NewStore EndEntity
Important
Self-signed certificates are suitable only for test purposes. In production environments, we strongly recommend that you use certificates issued by a certificate authority instead.
Set the certificate:
You can use the following PowerShell cmdlet to assign the certificate to the web application:
Set-SPWebApplication -Identity https://spsites.contoso.local -Zone Default -SecureSocketsLayer -Certificate "Contoso SharePoint (2021)"
Step 6: Create the site collection
In this step, you create a team site collection with two administrators: One as a Windows administrator and one as a federated (Microsoft Entra ID) administrator.
Open the SharePoint Central Administration site.
Navigate to Application Management > Create site collections > Create site collections.
Type a title, URL, and select the template Team Site.
In the Primary Site Collection Administrator section, select the
 (book) icon to open the People Picker dialog.
In the People Picker dialog, type the Windows administrator account, for example yvand.
Filter the list on the left by selecting Organizations. Following is a sample output:

Go to the account and select OK.
In the Secondary Site Collection Administrator section, select the book icon to open the People Picker dialog.
In the People Picker dialog, type the exact email value of the Microsoft Entra administrator account, for example yvand@contoso.local.
Filter the list on the left by selecting contoso.local. Following is a sample output:
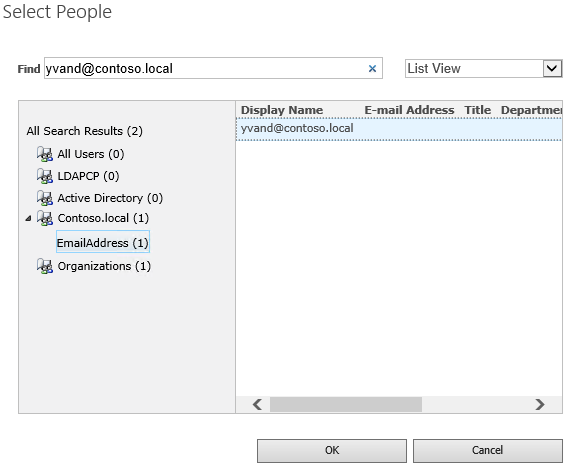
Go to the account and select OK to close the People Picker dialog.
Select OK again to create the site collection.
Once the site collection is created, you should be able to sign-in using either the Windows or the federated site collection administrator account.
Step 7: Set up People Picker
In OIDC authentication, the People Picker doesn't validate the input, which can lead to misspellings or users accidentally selecting the wrong claim type. This can be addressed either by using a Custom Claims Provider, or by using the new UPA-backed claim provider included in SharePoint Server Subscription Edition. To configure a UPA-backed claim provider, see Enhanced People Picker for modern authentication