Step-By-Step: Creating a custom UNIX provider for System Center 2012 R2 Configuration Manager
When managing UNIX servers with System Center 2012 R2 Configuration Manager, the ability to configure collections, maintenance windows, and client settings are enabled to help management of said servers. Although the Configuration Manager client for UNIX does not have a user interface, you can force the client to manually poll for client policy. Niel Orcutt, Senior Software Development Engineer, has recently provided further insight as to creating a custom UNIX provider for System Center 2012 R2 Configuration Manager. This Step-By-Step is a derivative of that article which details the process for setting up a development environment for creating and deploying a custom provider for AIX, HP-UX and Solaris (UNIX) clients for System Center 2012 Configuration Manager Service Pack 1.
Configuration Manager providers are developed using the open-source Open Management Infrastructure (OMI) development environment (https://collaboration.opengroup.org/omi). Code sample provided utilize the OMI software to illustrate this process.
The tasks that need to be done to develop and deploy a new provider are:
Note: The same process can be used to develop custom providers for System Center 2012 Operations Manager R2 clients for UNIX computers.
Step 1: Installing and configuring the OMI development environment
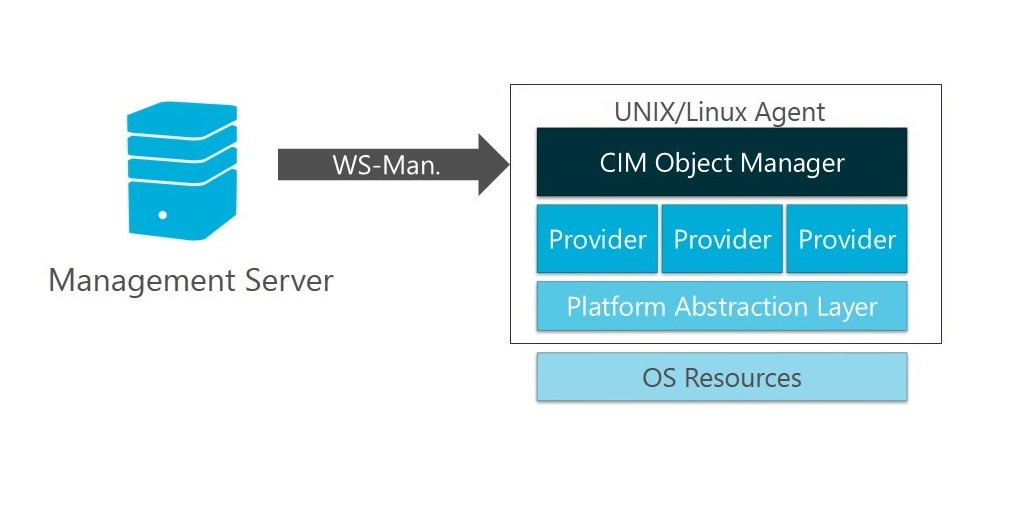
Custom providers for Configuration Manager UNIX clients are developed using the open source OMI environment.
Development Machine Configuration. The UNIX computer used to develop OMI providers must have its native software development environment (compiler, linker, make program and runtime libraries) installed. In addition, it should have the GNU make package, the OpenSSL developer package and the gunzip utility program installed.
Getting the OMI Development Environment. The version of OMI needed for developing Configuration Manager providers is 1.0.6. This can be downloaded by going to the Open Group website at:
https://collaboration.opengroup.org/omi/documents.php?action=show&dcat=&gdid=28185
Selecting the download link "omi-1.0.6-tar.gz" at the bottom of the page.
Select a directory on the UNIX computer under which OMI will be installed. Go to the directory and use the following commands to extract the OMI sources to a subdirectory named omi-1.0.6 in that directory:
gunzip <path>/omi-1.0.6.tar
tar xf <path>/omi-1.0.6.tar
Patching OMI. If you are using a UNIX computer, a patch must be applied to the OMI 1.0.6 files to be able to use OMI. The patch changes some of the source files for OMI to compile and run under UNIX. It also sets the permissions on the UNIX files in OMI and changes the Windows line endings in many of the files to UNIX line endings. For development on Linux, the patches are not necessary.
To patch OMI, obtain the following file from https://gallery.technet.microsoft.com/OMI-106-Patches-for-UNIX-e8996fae:
omi-1.0.6-patches.tar.gz
Uncompress the omi-1.0.6-patches.tar.gz file using gunzip. Change to the omi-1.0.6 directory that was created when the OMI archive was extracted and extract the resulting omi-1.0.6-patches. tar file there. After extraction, there should be a new subdirectory named omi-patches in the omi-1.0.6 directory.
From the omi-1.0.6 directory, run the following command to make the modifications necessary to OMI for use on UNIX:
omi-patches/patch-omi
Building OMI. Once OMI is installed and patched, from the omi-1.0.6 directory, execute the following command to configure the OMI build environment for your specific UNIX computer:
./configure --prefix="`pwd`/output"
Next execute the command make
On UNIX computers, this uses the UNIX make to run GNU make (gmake) to build each project. You may not invoke the GNU make (gmake) program directly here as the top-level make requires the UNIX make program.
This produces the OMI components needed to build providers. These components will be in the output/bin directory under the omi-1.0.6 directory.
Setting up the OMI Tools. The OMI tools omicli and omireg are shipped with the Configuration Manager client for UNIX and are installed in its directory. These tools need no further setup. The omigen tool is built by the make command described above. It must be set up from the developer build of OMI that was just built.
Set up of omigen can be done by setting the LD_LIBRARY_PATH environment variable in the shell that will be used to run omigen (or the SHLIB_PATH variable on HP-UX PA-RISC computers that use HP-UX 11.23). Execute these commands to set the variable:
LD_LIBRARY_PATH=$LD_LIBRARY_PATH:/opt/microsoft/omi/lib
export LD_LIBRARY_PATH
Note: If the Configuration Manager client was installed to a directory other than /opt/microsoft (the default), you will have to change the /opt/microsoft in the command lines to use the correct path name.If you are using the OMI tools in a System Center 2012 Operations Manager R2 environment the setup process is slightly different. This is described in the README.TXT file that is included in the OMI patch downloaded from the link above.
Step 2: Creating and Compiling the Provider
Creating the source directory. Create the source directory for the new provider. In this example, I create it under the omi-1.0.6 directory that OMI was installed in. I named it FrogProvider, because I will be using the Frog sample provided.
Defining the Provider MOF file. The structure of the information gathered and sent by the provider is defined in a text file in MOF format. The MOF file describes the fields in a class, somewhat similar to a class definition in the C++ programming language.
This example utilizes the Frog Provider that OMI 1.0.6 provides. The following MOF file was created in the FrogProvider subdirectory:
#pragma namespace("\\\\.\\root\\cimv2")
[Description("Some information about frogs")]
class XYZ_Frog
{
[Key] string Name; // the name of a frog
uint32 Weight; // the weight of a frog
string Color; // the color of a frog
};The #pragma line is ignored by OMI but is used by the Windows mofcomp program described later in this article.
In this project, this file is named schema.mof.The following GNUmakefile is to be created in the FrogProvider directory:
TOP = ..
include $(TOP)/config.mak
CXXSHLIBRARY = Frog
SOURCES = \
module.cpp \
XYZ_Frog_Class_Provider.cpp \
stubs.cpp \
schema.c
INCLUDES = $(TOP) $(TOP)/common
ifeq ($(OS),LINUX)
CXXFLAGS = -fno-exceptions -fno-enforce-eh-specs -fno-rtti
endif
ifeq ($(OS),AIX)
CXXFLAGS = -blibpath:/usr/lib:/lib
endif
LIBRARIES = micxx io base
include $(TOP)/mak/rules.mak
##==========================================================================
##
## gen -- rule to regenerate provider sources.
##
##==========================================================================
gen:
LD_LIBRARY_PATH=$(TOP)/output/lib export LD_LIBRARY_PATH ;
$(TOP)/output/bin/omigen -C $(TOP)/share/omischema/CIM_Schema.mof
-A --cpp schema.mof XYZ_Frog
Note: The last three lines above are a single line in the GNUmakefile.
The make variable TOP refers to the location of the OMI install, which in my case is the omi-1.0.6 directory. The “-C $(TOP)/share/omischema/CIM_Schema.mof” refers to the location of the CIM base classes used by omigen.
Generating the provider source files. From the FrogProvider directory, type:
gmake gen
This invoked the omigen program which read the schema.mof file created earlier. Omigen created files called schema.c, stubs.cpp, module.cpp, module.h, X_Frog_Class_Provider.cpp, X_Frog_Class_Provider.h, and X_Frog.h in the FrogProvider directory.
The files created by omigen are all used as-is except for the X_Frog_Class_Provider.cpp file. This file must be edited to contain the code that gathers the information for the provider and posts it to OMI.
In the X_Frog_Class_Provider.cpp file, I replaced the single line (the Post of MI_RESULT_NOT_SUPPORTED) in the EnumerateInstances method with the lines in that same method from the file doc/omi/samples/frog/XYZ_Frog_Class_Provider.cpp in the directory where OMI was installed.
This adds two instances of Frog to the provider that are populated with data and posted to OMI.
Load, Unload, and EnumerateInstances are the only methods that are used by the Configuration Manger client. If you will be developing System Center 2012 Operations Manager R2 providers, the GetInstance method must also be defined to match a specific instance name and return only the instance(s) whose names match the give name. Operations Manager providers also require support for the keysOnly parameter in the EnumerateInstances method, which is not used by the Configuration Manager client.
Compiling the provider. After modifying the XYZ_Frog_Class_Provider.cpp, type the following to create the provider file:
gmake
After gmake had completed, the provider runtime was placed in the output/lib directory under the omi-1.0.6 directory in a file named libFrog.so. This file would have been named libFrog.sl if the client were an HP-UX PA-RISC computer.
Step 3: Installing the New Provider on the Client
- The Configuration Manager install directories and processes are only modifiable from the root account. Once the Frog class provider is built, log in to the computer as root and change directores to the omi-1.0.6 directory. I then copied the new provider to the Configuration Manager installation directory using this command:
cp ../output/lib/libFrog.so /opt/microsoft/omi/lib
- Register it with the Configuration Manager client using these commands:
/opt/microsoft/omi/bin/omiserver –s
/opt/microsoft/omi/bin/omireg –n root/cimv2 /opt/microsoft/omi/lib/libFrog.so
/opt/microsoft/omi/bin/omiserver &
These commands stop the omiserver daemon, register the Frog provider binary, and restart the daemon.
- Next log out from the root account and log into the admin account again. Test the provider on the client using this command:
/opt/microsoft/omi/bin/omicli ei root/cimv2 XYZ_Frog
Which should produce the following output:
instance of XYZ_Frog
{
[Key] Name=Fred
Weight=55
Color=Green
}
instance of XYZ_Frog
{
[Key] Name=Sam
Weight=65
Color=Blue
}
Step 4: Registering the Provider with the Configuration Manager Server
- To configure the Configuration Manager site server to collect frog data as part of hardware inventory from UNIX clients, copy the schema.mof file created for the provider to the Configuration Manager site server.
- On the server, open a command prompt window as Administrator and change to the directory where the schema.mof file had been copied.
- Type the following:
mofcomp schema.mof
- Open the Configuration Manager console application and click on the Administration workspace near the bottom left side of the window.
- In the navigation pane, click on Client Settings
- Right-click on the Default Client Setting object in the details pane and selected Properties.
- In the Default Settings screen, click on Hardware Inventory and then clicked Set Classes.
- From the bottom of the Hardware Inventory Classes screen, select Add and then in the Add Hardware Inventory Class screen.
- Click Connect to connect to the root/cimv2 namespace on that computer.
- In the Connect to Windows Management Instrumentationscreen, click Connect.
- Next, in the Add Hardware Inventory Class screen , from the list of class names, select the XYZ_Frog class and then clicked Edit.
- In the Class qualifiers screen, enter a friendly name for the Display name, and clicked OK.
- In the Hardware Inventory Classes screen, from the list of inventory classes, locate the Frog item and make sure that the box next to it is selected.
- Expand the Frog item and make sure that all the boxes next to the property field names are checked.
- Click on OK to close the window, and then click OK to close the Default Settings windowand save the configuration changes .
The next time the Configuration Manger server received an inventory from my UNIX client, you are now able to view the Frog information when before the Resource Explorer was used to view details about the client computer.
Note: There are two different items called namespaces in the CIM environment:
1. An identifier for the place where data about a class and its objects is stored. In Configuration Manager this is usually root/cimv2.
2. The part of a class name before the first underscore character. In the case of the XYZ_Frog class, this would be XYZ. The first character in a class name must be alphabetic. Some CIM tools require that all class names begin a namespace name followed by an underscore and that the character after the underscore also be alphabetic. You may need to follow this convention in naming your custom classes.
Note that this posting is provided "AS IS" with no warranties and confers no rights.