How to integrate Silverlight Webpart with Sharepoint 2010
What brings Silverlight and SharePoint together?
- Users are expecting rich, compelling interfaces
Silverlight is a perfect technology to create Web 2.0 applications in SharePoint
- Limit page post backs
Silverlight applications do their processing on the client, eliminating page post backs.
- Silverlight applications offload processing to the client
Processing on the client reduces the load on the SharePoint server farm.
- Silverlight isolates processing on the client
- Separation of design and code
You can use the MVVM pattern to separate the presentation from the processing later. This makes it easy to change the look and feel of Silverlight applications.
- Common .NET development techniques
Silverlight applications are based on the .NET framework which makes it easy for .NET developers to create them. The client object model may be used to access SharePoint resources from a Silverlight application.
- Overcome Sandbox limitations
Silverlight applications may be used to overcome sandboxed limitations such as the ability to call an external service, or use parts of the .NET framework which are not permitted to run in a sandboxed solution.
- Ease of deployment
Silverlight applications are very easy to deploy. Anyone with the ability to upload a document to a document library can deploy a Silverlight application to a SharePoint site. Additionally, the Silverlight Web Part makes it very easy to place Silverlight applications on SharePoint web pages.
Let’s see a simple project that helps us to understand how to use Silverlight along-with SharePoint.
A Silverlight application can be hosted inside a SharePoint site and it is called as a Silverlight WebPart.
Prerequisites:-
Microsoft SharePoint Foundation 2010
Here are some steps to upload a Silverlight XAP to the SharePoint site:-
1) In Visual Studio 2010, Go to File menu -> New -> Project -> under Installed Templates -> select Visual C# -> under SharePoint section-> 2010 -> select EMPTY SHAREPOINT PROJECT.
2) For example,in this case , lets name our SharePoint project as “SharePointSilverlightProjectBlog” .
3) Then you will be asked for the URL of your SharePoint site. Enter the URL and Select the “Deploy as sandboxed solution” option in the dialog and click Finish.

4) Hence, you can see the project created as in the Solution explorer of Visual Studio 2010

5) Since our goal is to integrate Silverlight within SharePoint , lets add a Silverlight application without a website hosting it. Let’s name our Silverlight application/project as “SilverlightWebpart”. Then our solution looks as following :-

6) Let’s add the following code to “MainPage.xaml” file in the Silverlight project :-
<UserControl x:Class="SilverlightWebpart.MainPage"
xmlns="schemas.microsoft.com/winfx/2006/xaml/presentation"
xmlns:x="schemas.microsoft.com/winfx/2006/xaml"
xmlns:d="schemas.microsoft.com/expression/blend/2008"
xmlns:mc="schemas.openxmlformats.org/markup-compatibility/2006"
mc:Ignorable="d"
d:DesignHeight="300" d:DesignWidth="400">
<Grid x:Name="LayoutRoot" Background="White">
<Button Name="btnClk" Height="20" Width="50" Content="Click !!" Click="btnClk_Click"></Button>
</Grid>
</UserControl>
7) Also add the following code to “MainPage.xaml.cs” file :-
using System;
using System.Collections.Generic;
using System.Linq;
using System.Net;
using System.Windows;
using System.Windows.Controls;
using System.Windows.Documents;
using System.Windows.Input;
using System.Windows.Media;
using System.Windows.Media.Animation;
using System.Windows.Shapes;
namespace SilverlightWebpart
{
public partial class MainPage : UserControl
{
public MainPage()
{
InitializeComponent();
}
private void btnClk_Click(object sender, RoutedEventArgs e)
{
MessageBox.Show("Hello from Silverlight within SharePoint !!");
}
}
}
8) Lets just SAVE ALL for now (and not Build).
9) Now, Add a Module to the SharePoint site. Right click the “SharePointSilverlightProjectBlog” SharePoint project and go to ADD NEW ITEM and in the dialog Select “Module ” under installed templates for SharePoint -> 2010 .
10) Name the Module as “DemoModule”.

11) After we add the Module it would contain two files under it by default:-
a) Elements.xml
b) Sample.txt
12) It’s ok if you delete the Sample.txt file.
13) Again lets do SAVE ALL .
14) Let’s jump to our Silverlight project “SilverlightWebpart” and right click it in the solution explorer window and select Properties.
15) Go to the “Build Events” tab and click the “Edit Post-build…” button and enter the following line in the dialog that appears :-
copy “$(TargetDir)SilverlightWebpart.xap” “$(SolutionDir)SharePointSilverlightProjectBlog\DemoModule"

16) Click OK and Save it.
17) Adding the above content in the post-build events ensures that the visual studio adds the latest build of the XAP file generated from the “SilverlightWebpart” application to the “DemoModule” section of the “SharePointSilverlightProjectBlog” project.
18) So now if we build the Silverlight project, we would find the “SilverlightWebpart.xap” file under the “DemoModule”.
19) Make sure the XAP file is included in the Module as following :-

20) Now lets build the entire solution and then try to deploy the “SharePointSilverlightProjectBlog” project to the SharePoint site.
21) To achieve this, right-click the “SharePointSilverlightProjectBlog” project and click “Deploy”
22) Now the “SharePointSilverlightProjectBlog” project is deployed in the SharePoint site.
23) Let’s open the SharePoint site in the browser and select “Page

24) Select Edit.

25) Having done that Select “Insert” tab and click “Web Part” .

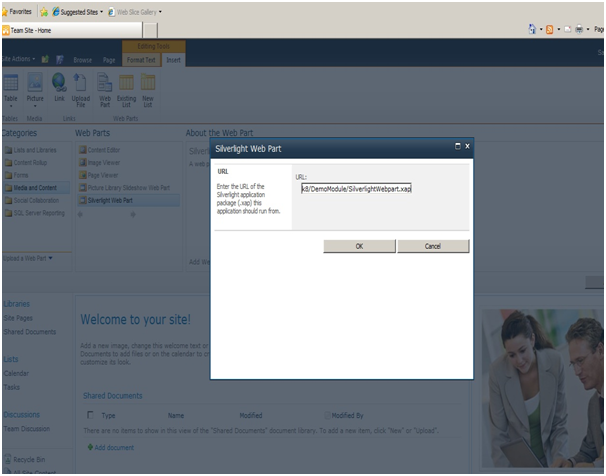
26) In “Categories”, select “Media and content” and correspondingly in “Web Parts” column, Select “Silverlight Web Part” Having Selected the “Silverlight Web Part” , click on “Add” button that appears on the right side.

27) After clicking add, a small pop-up will appear asking for the URL of the Silverligth content(.xap) file. Enter the URL in the following format as :0
MySharePointSite/DemoModule/SilverlightWebpart.xap
28) Then click OK and then you can see you Silverlight web part appear in the SharePoint site as :

29) As you cans ee the blue border is the boundary of the Silverlight web part and the Silverlight application has a button in it. When you click the button, it acts like a normal Silverlight application and responds to the user interaction and a Message Box is popped, for which we wrote code in “MainPage.xaml.cs”.
