Building tylerbutler.com, Part 3: Customizing Content Query Styles
Part 1 :: Part 2 :: Part 3 :: Part 4 :: Part 5 :: Part 6
This is part 3 of an ongoing series of posts about my experience building a custom site on top of Office SharePoint Server 2007. If you haven't yet read parts 1 and 2, I'd strongly suggest starting there.
In my last post, I discussed creating page layouts and their backing content types, and customizing the Content Query (CQWP) web part to roll up individual posts into a summary page. In this post, I'll cover customizing the XSL styles to get my rollup pages looking exactly how I wanted them.
Creating Custom XSL Transforms
The CQWP's I added to my custom page layout were configured to grab the right data, but of course they didn't render the content quite like I wanted them to. In order to get things looking right, I had to edit the XSLT that was being applied to the items, thus changing how they got rendered out.
I didn't want to mess with the XSL files that come with the product, so I made a copy of the ItemStyle.xsl file in Style Library/XSL Style Sheets called TBStyles.xsl. I removed most of the item styles from this file and added a new one called PostRollup.
In order to get the starting markup, I once again copied some HTML source from my old site and pasted it into the XSL. Then I removed the actual data from the copied code and replaced it with the XSL variables. Here's a snippet of what it looks like:
  <div id="story-block"><br>    <div class="story-header"><br>        <span class="story-date"><br>            <img src="{$SiteUrl}/SiteCollectionImages/dot-white.gif" height="20" width="1" alt=""/><br>            <xsl:value-of select="$FormattedDate" /><br>        </span><br>    </div><br>    <div class="story-body"><br>        <div class="story-image"><br>            <xsl:value-of select="$StoryImage" disable-output-escaping="yes"/><br>        </div><br>        <div class="story-text"><br>            <div><br>                <a href="{@LinkUrl}"><br>                    <span class="storytitle"><br>                        <xsl:value-of select="@Title"/>
                     </span><br>                </a><br>                <br/><br>                <span class="storyinfo"><br>                    Contributed by: <xsl:value-of select="@PostAuthor"/><br>                </span><br>                <br/><br>            </div> <br>            <div class="storycontent"> <br>                <b><xsl:value-of select="@Comments"/></b> <br>            </div> <br>        </div><br>    </div>
     <div class="story-footer"> <br>        <a href="{@LinkUrl}">read this post</a><br>    </div><br></div>
All of this is pretty straightforward XSL, but there are a couple of things I'd like to point out. First of all, as I mentioned earlier, in order to output category images on my post page layout, I was using a SharePoint control to output the subweb's associated image. However, inside the XSL I couldn't use this same control to grab the appropriate image. I fiddled around with a couple of ideas, but I settled on creating a variable in the XSL itself that used a bunch of xsl:if statements to determine what image to output.
This admittedly has some drawbacks from a maintenance perspective. For example, if I change the image associated with a category, I could either replace the image in the Site Collection Images library, in which case nothing would need to be updated, because I'm referencing the image by URL in the XSL, and that would remain the same. If, however, I upload a new image to the site and want that image to be the image for a category, I'll have to change my XSL logic, which is a bit annoying. Alas, this is the system I have for now, and I just plan to replace the images in the library if I want to change the category images.
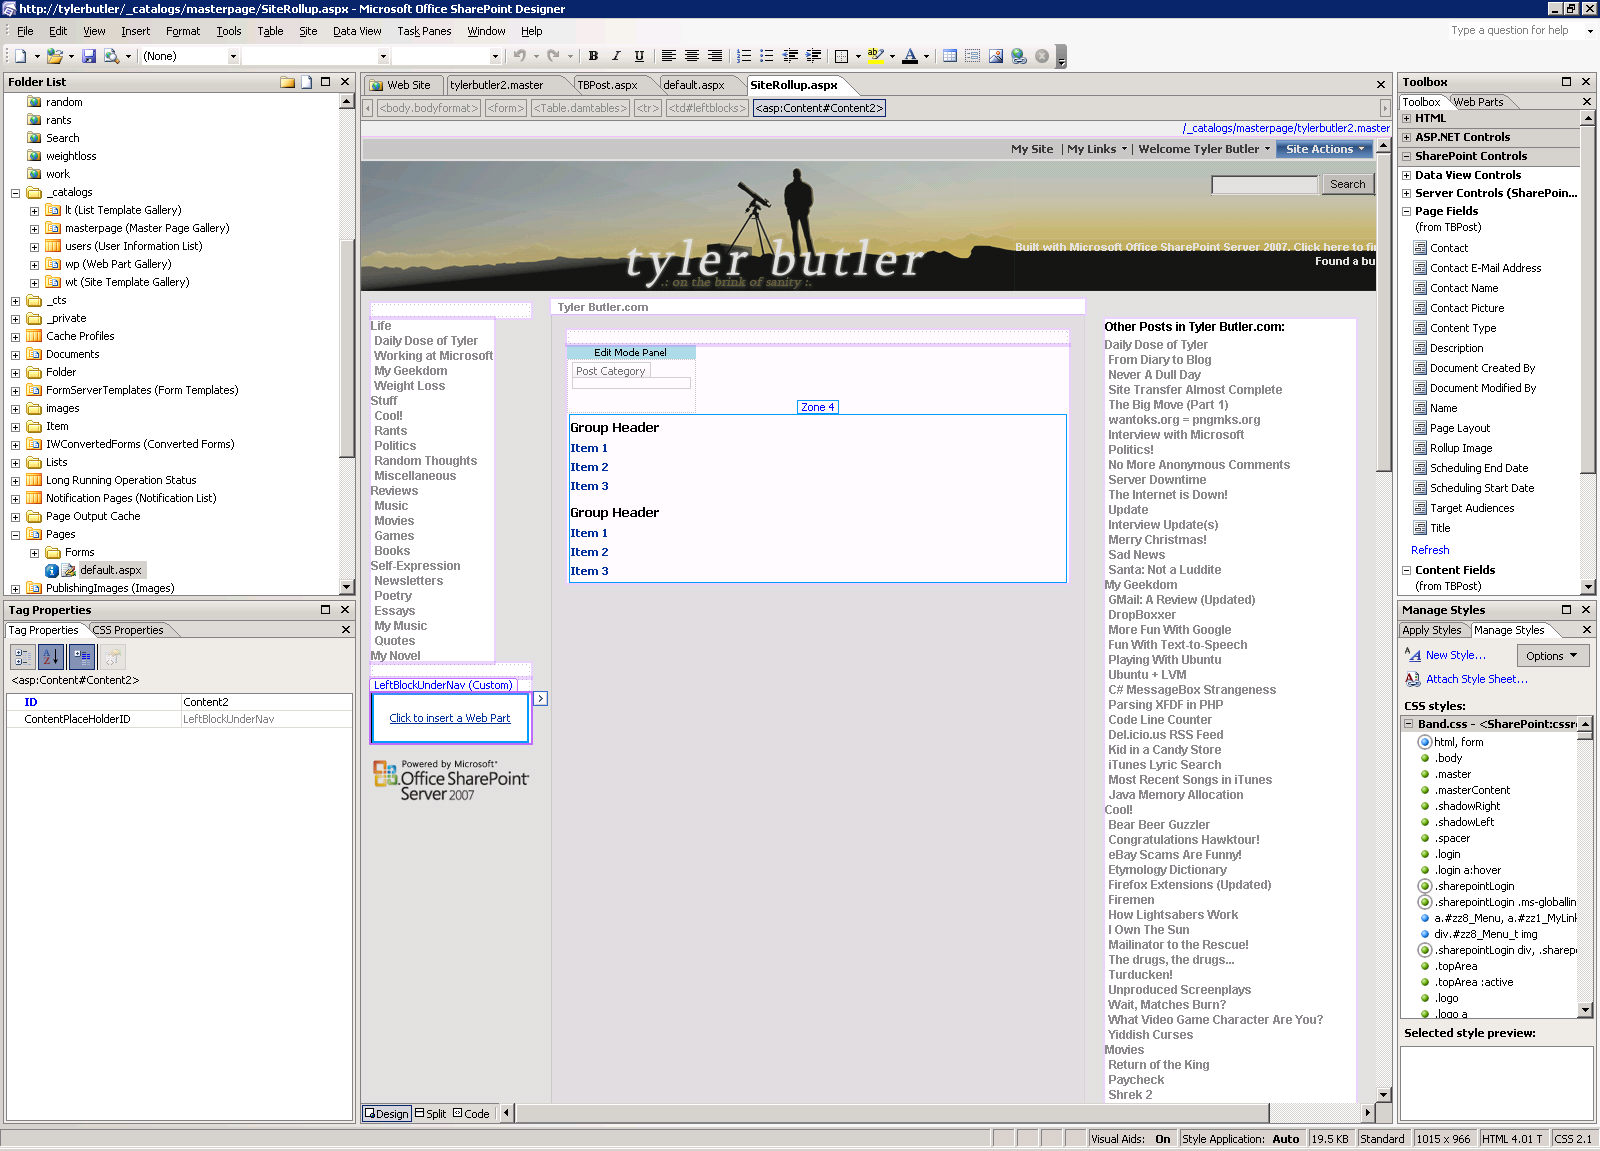
The rollup page layout in SharePoint Designer
Custom Date Formatting
Another thing I wanted to do was output the date and time the post was created in a much nicer format. On my old site, dates appeared like this:
Sunday, May 28 2006 @ 08:22 PM Pacific Daylight Time
However, by default, DateTime fields are output like this in the XSL:
5/28/2006 8:22 PM
This was obviously not what I wanted, but I also didn't want to try and do any very complex date time processing in the XSL. Luckily, the Data Form web part has a way to do this that I can piggyback on. Rather than go into the details, I'll point you to the reference I used to figure it out:
https://www.microsoft.com/belux/msdn/nl/community/columns/stevenvandecraen/contentquerywebpart.mspx
I followed the information there and things worked beautifully! Using the standard .NET date format string dddd, MMMM d yyyy @ h:mm tt, I was able to output my post times like this:
Sunday, May 28 2006 @ 8:22 PM
Pretty cool, eh? And easy, too!
The other XSL style I added was for the featured story rollups. I wanted these to be basically the same as the other rollup style, but have a couple of different CSS classes applied so they looked slightly different. In order to do this, I just copied my PostRollup style to another style called FeaturedPostRollup, and changed some of the emitted markup to use the different CSS classes, and I was done with my custom XSL.
The final thing to do was point my CQWP web parts at my custom XSL file, and select which item styles to use. In order to do this, I set the ItemStyleXSL property to point to my custom XSL file in the Style Library, and set the ItemStyle property to be either PostRollup or FeaturedPostRollup.
Creating the Rollup Pages
Now that I had the custom XSL styles done, and the custom layout with the CQWP's were done, I went about creating the actual rollup pages using my layout. This was where I realized there was an unfortunate negative side to my design.
The basic problem stems from the fact that unlike navigation, the CQWP does not know where in the site hierarchy it is. In other words, there's no way for me to configure a CQWP within a page layout to behave differently based on where a page using that layout is created. In my case, I want to create a rollup page in the Music subweb, for example, and I want it to automatically start rolling up only pages below that subweb. There's simply no way to do this – using CQWP alone. One potential option is to create another custom server control that is aware of where it is, and have that control set properties on the CQWP at page load time. However, I wanted to try and avoid writing that server control.
I ended up just leaving the CQWP's in the page layout with every customization, and when I created a new rollup page, I just edited the properties of the CQWP's on that page to point to the right URL, ensuring it would roll up only the pages I wanted to. There is still an issue, because the web parts are inside a zone in the page layout. This means that if I edit the web part properties in the layout itself, these edits do not affect the web parts for pages that already exist. This means that if I want to change a property on my rollup page CQWP's, I'll have to edit every single one. It's not a big deal for now, but moving forward I may invest some time writing the "CQWP property writer" control, so that I can just drop that onto my page layout and set the properties for all the CQWP web parts on a page from one single location.
Anyway, once I had my page layout, creating the actual roll up pages was extremely simple. I just went to each subweb, clicked Site Actions --> Create Page, selected the PostRollup page layout, customized the CQWP's a bit for the specific subweb, then saved the page. Of course, I wanted my new page to be the welcome page for the subweb, so I also went to Site Settings --> Welcome page and changed that as well.
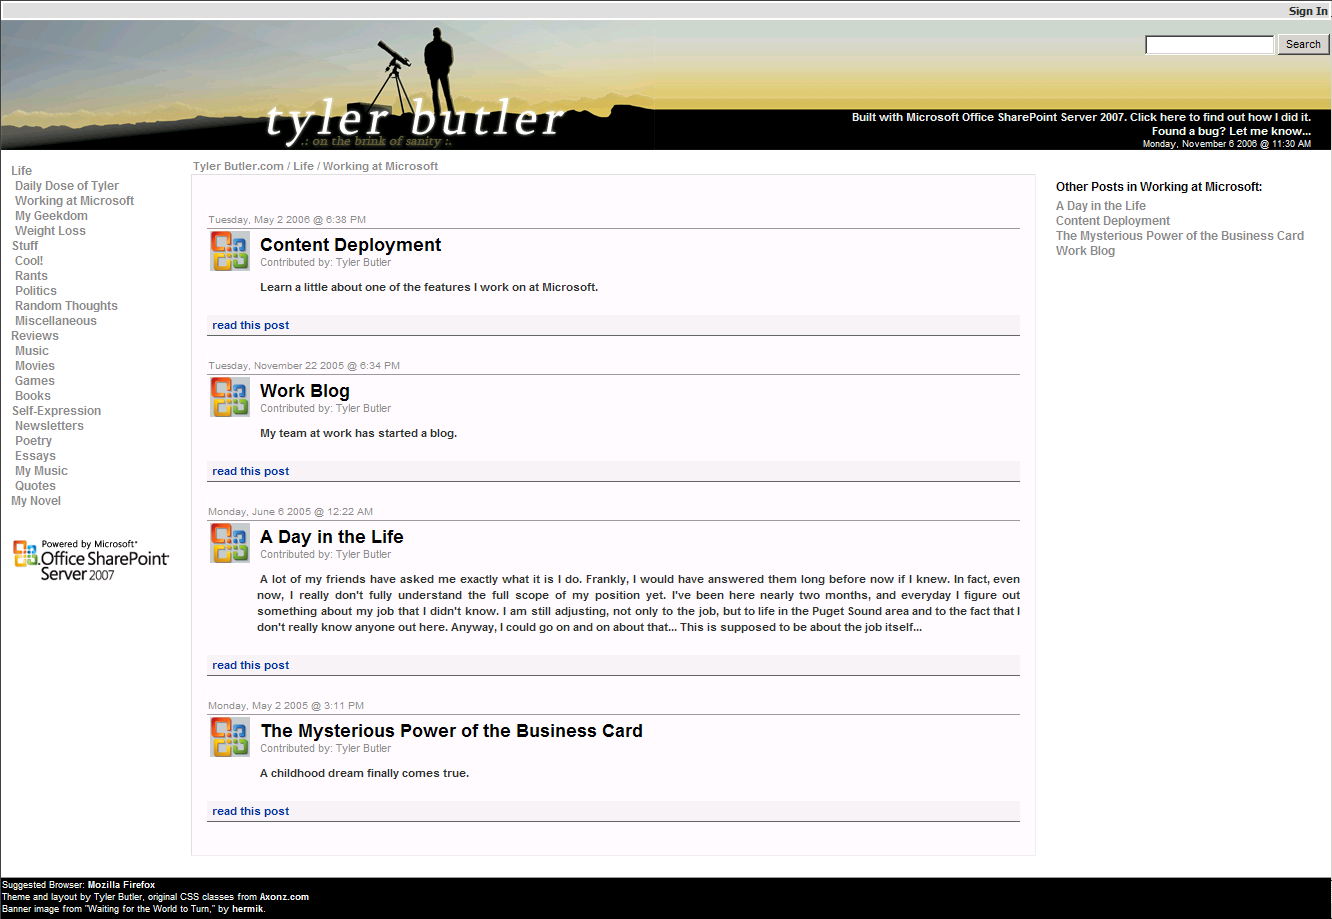
The rollup page as rendered in the browser
My site was coming together, but I still had a couple of things left to do. First, I needed to figure out my main home page, which I wanted to look slightly different that my other category rollup pages. Also, I needed to get all of the posts from my old site into my new site. But I've covered a lot with this post, so I'll leave that for the next post. Until next time...