SharePoint 2010 Enable Forms Based Auth for an existing Web application
Enable Forms authentication for an existing SharePoint 2010 Web application
Convert web application from Classic Authentication to Claims authentication using the following PowerShell commands. The user running these commands should be a securityadmin on SQL server instance, db_owner on all databases that are to be updated and a local Administrator on the server on which you are running the Windows PowerShell cmdlets.
$webApp = Get-SPWebApplication "https://sharepoint.pink.com/"
$webApp.UseClaimsAuthentication = $True;
$webApp.Update()
Do an IISRESET after this.
Run the following PowerShell script to perform user migration.
$webApp.Migrate($true);
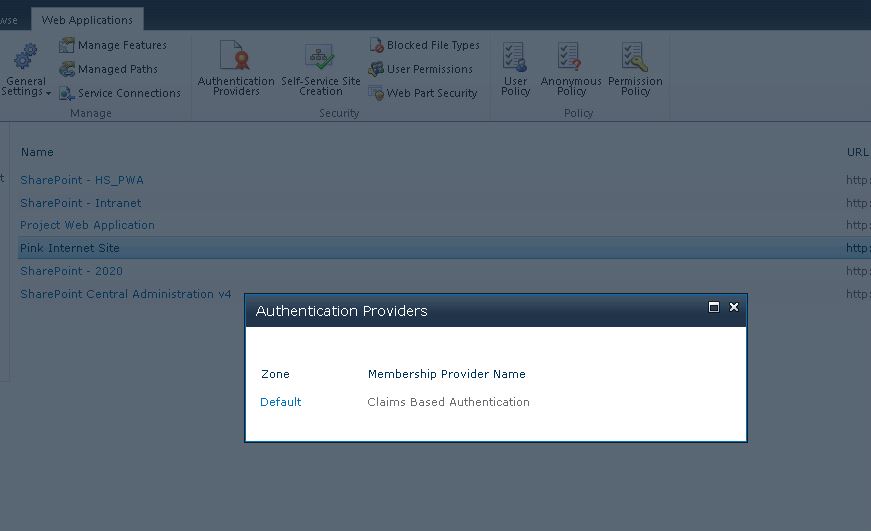
Once this is completed, go back to Central Administration -> Web Applications. Select the converted Web Application and click on Authentication Providers.
You will see that the Authentication Membership Provider Name would have changed to Claims Based Authentication.
Use the following article as reference to set up Forms Based Authentication for SharePoint 2010 https://msdn.microsoft.com/en-us/library/office/gg252020(v=office.14).aspx
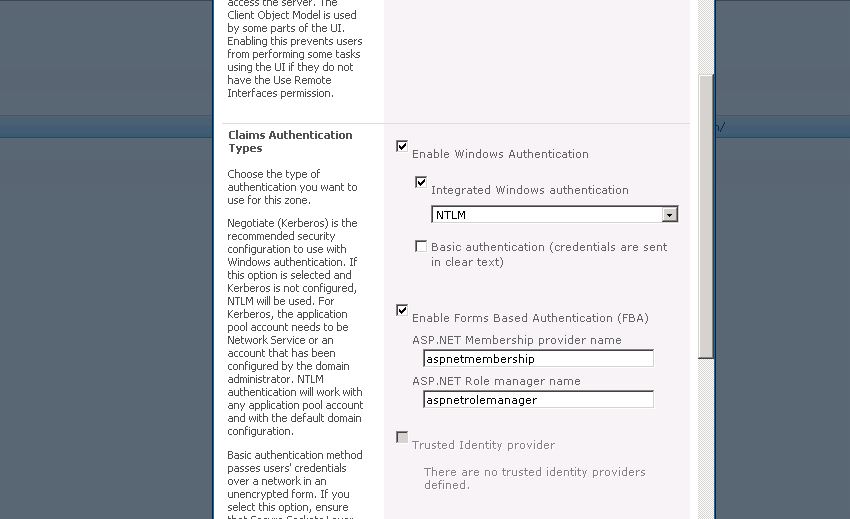
On Central Administration go to Manage Web Applications -> Select the Web Application and go to Authentication Providers. Choose the default zone, and browse down to the Claims Based Authentication section.
Here select the 'Enable Forms Based Authentication (FBA)', as shown in screenshot. Add a name for the ASP.NET Membership provider and ASP.NET Role manager (this will be used later), and click OK.
Now we need to prepare the Microsoft SQL Server database for the ASP.NET membership and role providers.
The Microsoft SQL Server membership provider stores user information in a SQL Server database. You can create your SQL Server user store manually by running Aspnet_regsql.exe from the command line. Otherwise you can use the ASP.NET Configuration tool which you can find under the Website menu in Microsoft Visual Studio.
Start SQL Server Management Studio to connect to the SQL instance used by SharePoint, and create a new Database called aspnetdb as shown in the screenshot.
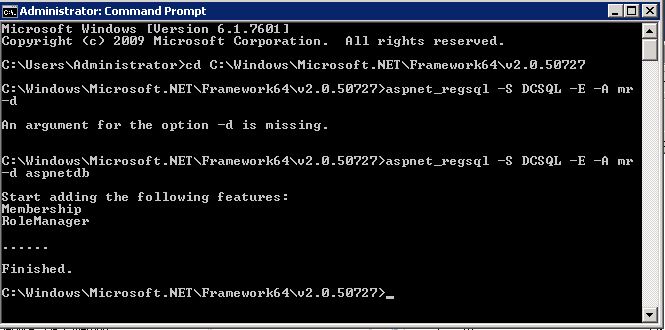
Use aspnet_regsql.exe to create the membership database. Open a Command Prompt window. Run the following command-line command to change directories to the Microsoft .NET Framework 2.0 directory.

cd C:\Windows\Microsoft.NET\Framework64\v2.0.50727
Then run the following command as shown in screenshot
aspnet_regsql -S DEMO2010A -E -A mr –d aspnetdb_claim
-S Specifies the server. In this example, the server is local.
-E Specifies that Windows authentication should be used to connect to SQL Server.
-A mr Specifies that the membership and role feature should be added.
-d Specifies the database name.
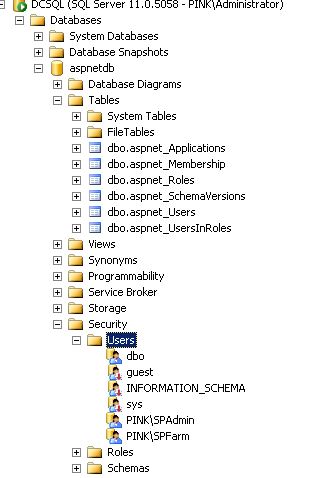
This creates all the tables and Stored Procedures required for ASP.NET Membership and role provider. Verify that this has been created.
Grant database access to your web application AppPool account.
Now there are three web.config files that you must modify:
Central Administration: To allow picking for site collections.
Security Token Service: To allow sign in, and for issuing tokens.
FBA Web Application: To allow picking on the local web application.
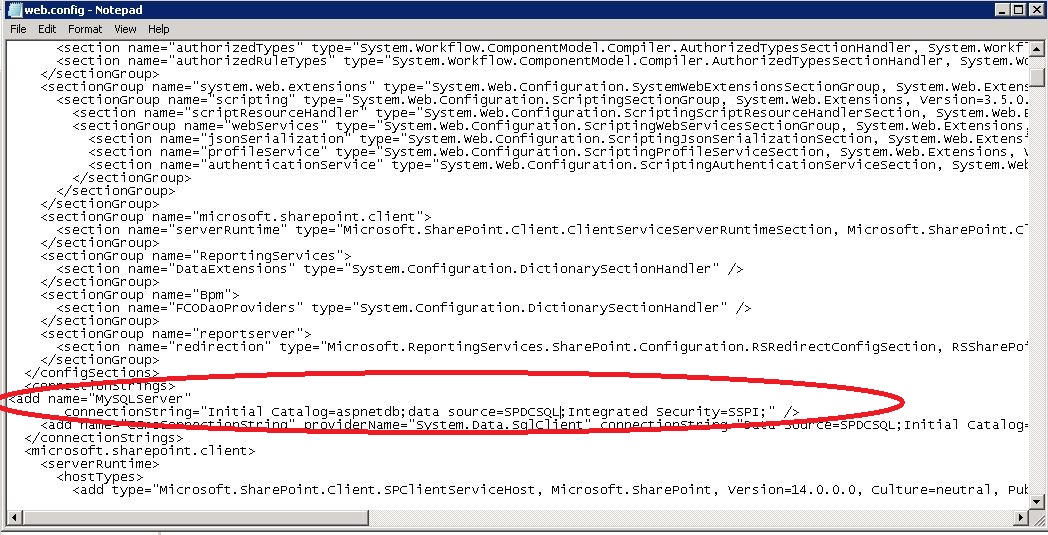
In the web.config file for the FBA web application, add the following connection string after the closing </configSections> tag.
<connectionStrings>
<add name="MySQLServer"
connectionString="Initial Catalog=aspnetdb;data source=SPDCSQL;Integrated Security=SSPI;" />
</connectionStrings>
as shown in the screenshot.
Repeat the same step for the web.config file under Central Administration website and the SecurityTokenServiceApplication website.
The SecurityTokenServiceApplication website is located under the SharePoint Web Services website.
Back at the FBA Web Application open the web.config file again and make the following changes:
Add the following code under the provider tag under membership
<add name="aspnetmembership" connectionStringName="MySQLServer" applicationName="MyAppName" type="System.Web.Security.SqlMembershipProvider, System.Web, Version=2.0.0.0, Culture=neutral, PublicKeyToken=b03f5f7f11d50a3a" />
and the following code under the provider tag under role manager
<add name="aspnetrolemanager" type="System.Web.Security.SqlRoleProvider, System.Web, Version=2.0.0.0, Culture=neutral, PublicKeyToken=b03f5f7f11d50a3a" connectionStringName="MyLocalSQLServer" applicationName="MyAppName" />
Do the same for the the web.config file under Central Administration website and the SecurityTokenServiceApplication website.
To add users and roles to the membership and role provider database execute the follwing command on aspnetdb database:
declare @now datetime
set @now= GETDATE()
exec aspnet_Membership_CreateUser 'MyAppName','admin1','pass@word1',
'','admin1@contoso.com','','',1,@now,@now,0,0,null
Run the following query to add the user admin1 to the Admin role:
EXEC aspnet_Roles_CreateRole 'MyAppName', 'Admin'
EXEC aspnet_UsersInRoles_AddUsersToRoles 'MyAppName', 'admin1', 'Admin', 8
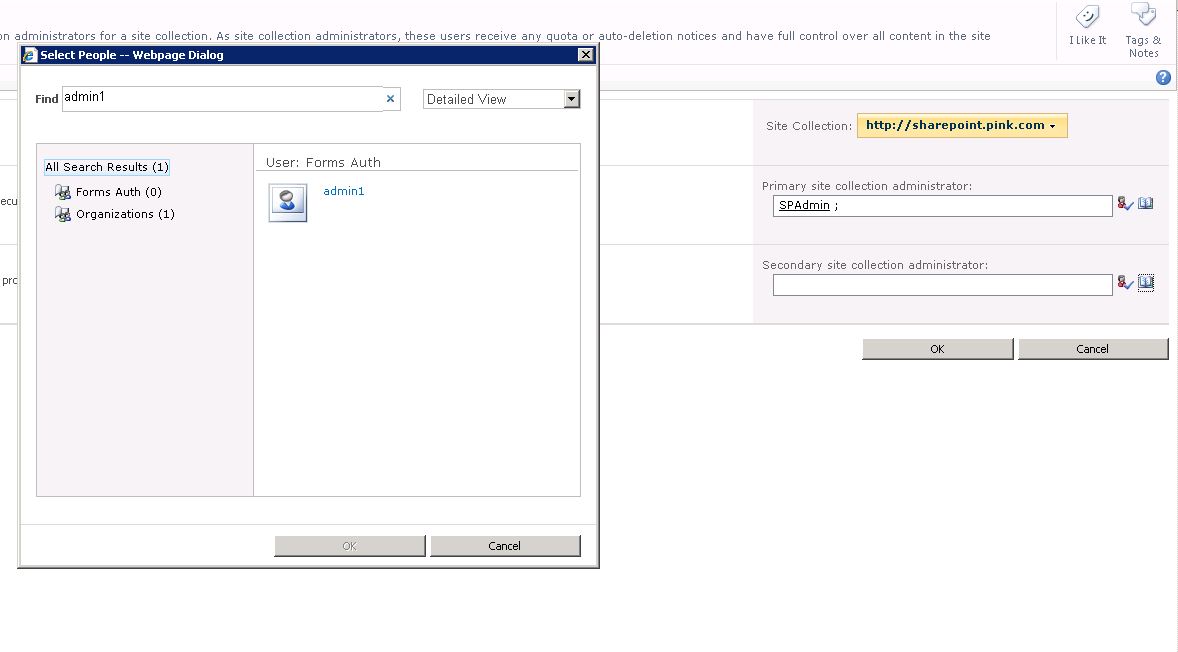
Now go to Central Administration and Under Application Management select Change site collection administrators. Select a site collection under the FBA web application.
For second Site collection Administrator click on the user lookup button and Select Forms Auth. Type admin1 and search. Select the user as shown in screenshot.
Once the Forms Auth user has been added as a Site collection Administrator, navigate to the Site Collection. You will see a dropdown to choose the Authentication type.
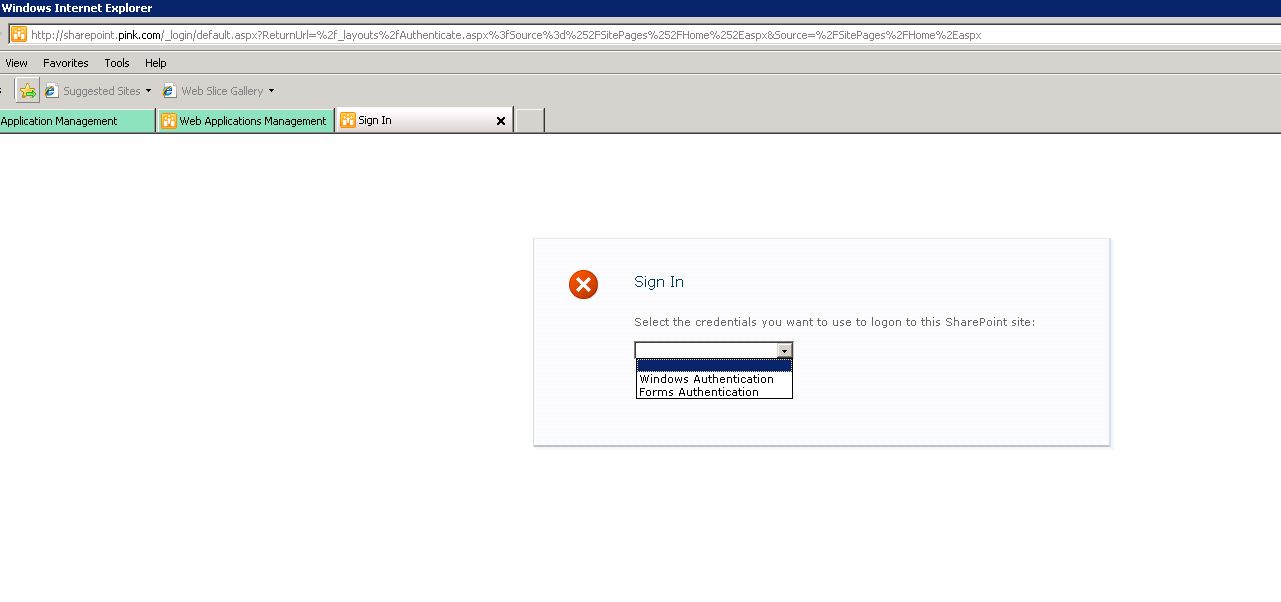
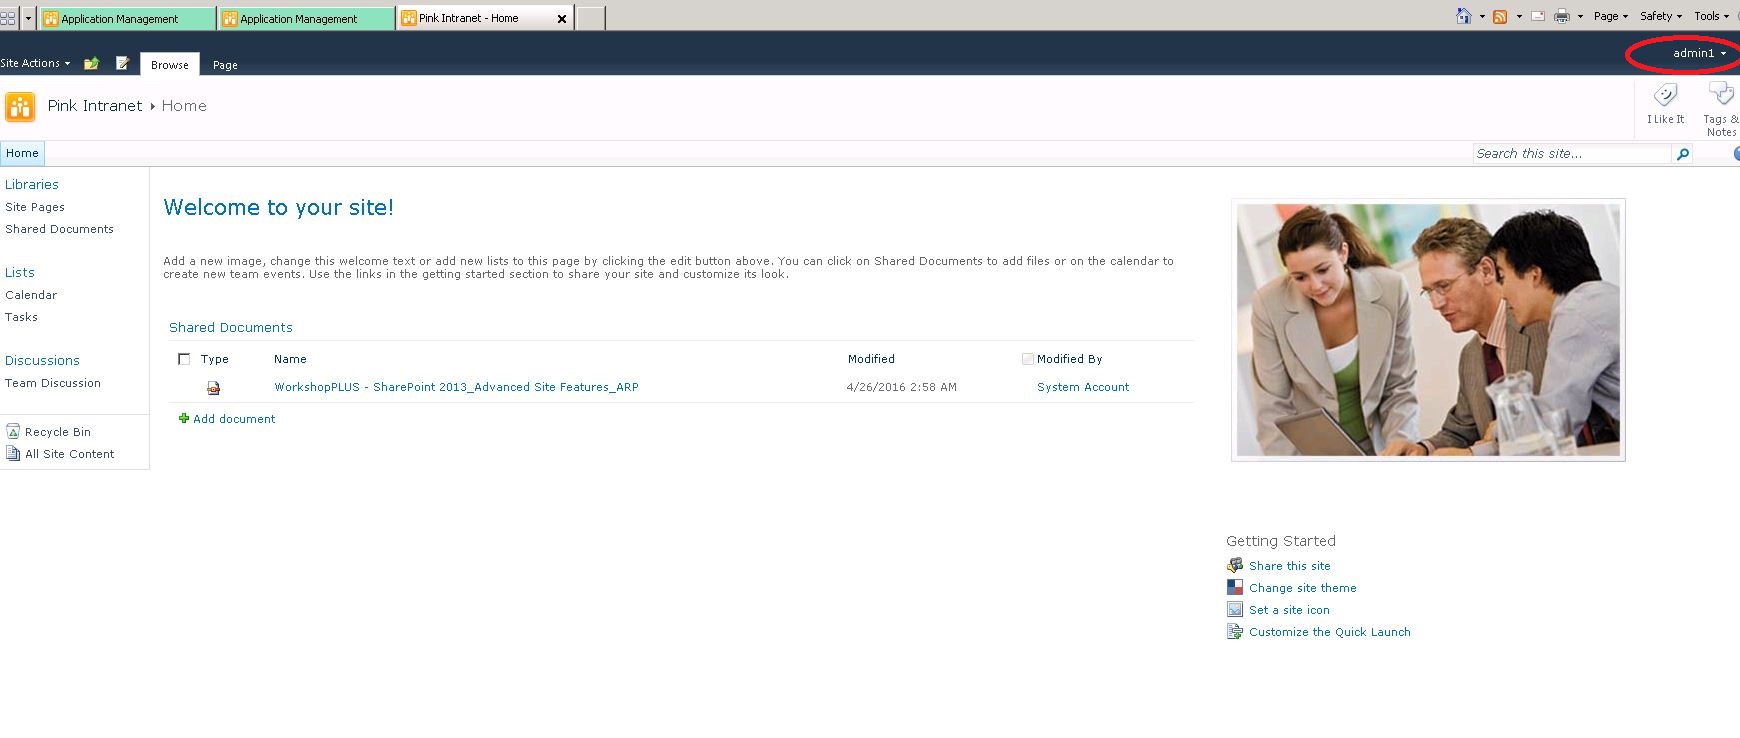
Choose Forms Auth and trype the admin1 username and password. You will now be logged in using this account.
You can add more FBA members and roles using the following SQL script:
declare @now datetime
set @now= GETDATE()
exec aspnet_Membership_CreateUser 'MyAppName','bob','pass@word1',
'','bob@contoso.com','','',1,@now,@now,0,0,null
exec aspnet_Membership_CreateUser 'MyAppName','mary','pass@word1',
'','mary@contoso.com','','',1,@now,@now,0,0,null
exec aspnet_Membership_CreateUser 'MyAppName','jack','pass@word1',
'','jack@contoso.com','','',1,@now,@now,0,0,null
EXEC aspnet_Roles_CreateRole 'MyAppName', 'Employee'
EXEC aspnet_Roles_CreateRole 'MyAppName', 'TeamManager'
EXEC aspnet_Roles_CreateRole 'MyAppName', 'CEO'
EXEC aspnet_UsersInRoles_AddUsersToRoles 'MyAppName', 'bob', 'Employee', 8
EXEC aspnet_UsersInRoles_AddUsersToRoles 'MyAppName', 'mary', 'TeamManager', 8
EXEC aspnet_UsersInRoles_AddUsersToRoles 'MyAppName', 'jack', 'CEO', 8
EXEC aspnet_UsersInRoles_AddUsersToRoles 'MyAppName', 'jack', 'Admin', 8
These members/roles will have to be granted permission to the site collection manually.