Domain Joining Servers to Azure AD Domain Services (Office 365 Tenant)
Office 365 offers 2 well known options for logging onto your workstation using your Office 365 credentials. These options are Workplace Join and Azure AD Join. Workplace join is mostly used for devices such as Windows Phone, IOS or Andriod devices while Azure AD Join is used more for Windows 10 Workstations. These options are great for workstations and devices, but what about your servers. Supposed you don’t want to manage domain controllers within your Azure Subscription but would like a common logon account across all of your Servers. Azure AD Domain Services allows you to Domain-Join Windows Servers by provisioning a set of restricted Domain Controllers and exposing IP’s on a defined Azure Virtual Network allowing machines on that Virtual Network to Domain Join your Office 365 Tenant. Many admins don’t realize that Office 365 sits on an Azure AD Domain. In this blog I will walk you through:
- Enabling Azure AD Domain Services for your Office 365 Tenant
- Provisioning and Domain Joining 2 Azure VM’s running Windows Server 2012 R2
We will start by accessing our Office 365 Tenant’s Azure backend. In order to do this we will need to add an Azure Subscription to our Office 365 account. Following the steps below, lets log into our Office 365 Subscription and Add and Azure Subscription to it:
1. Navigate to https://portal.office365.com and login with your Office 365 Admin Account.
2. Once logged in navigate to https://portal.azure.com.
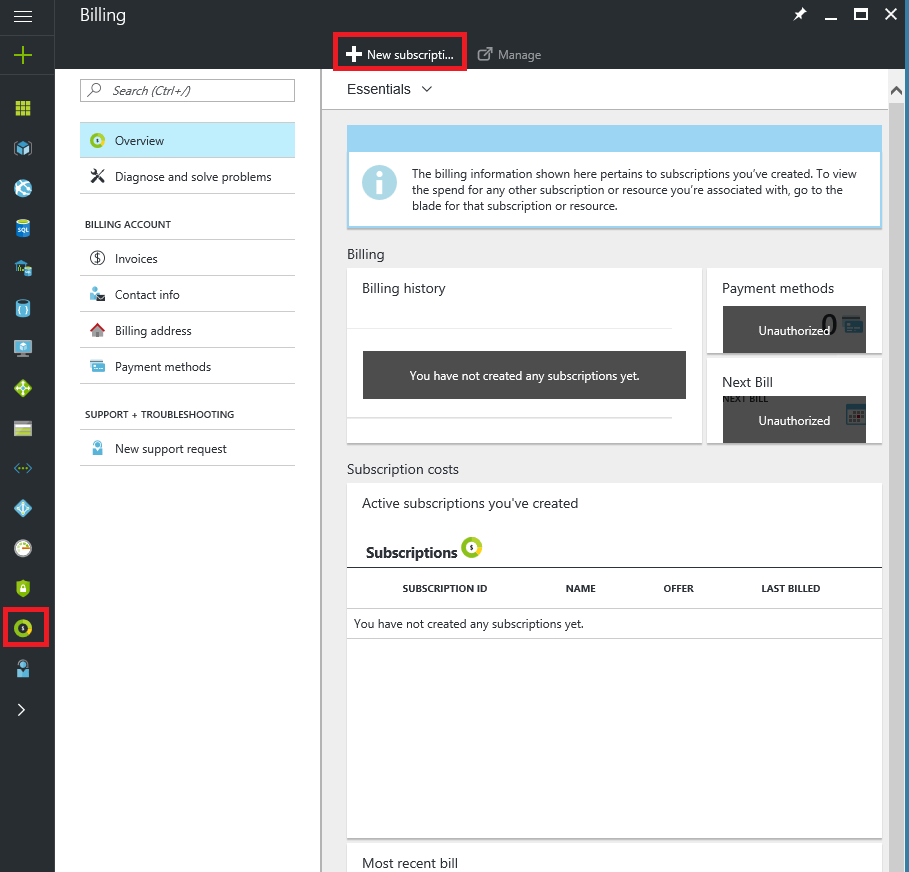
3. At the Azure Portal screen click on the Billing icon on the left-side of the screen then click New subscription.
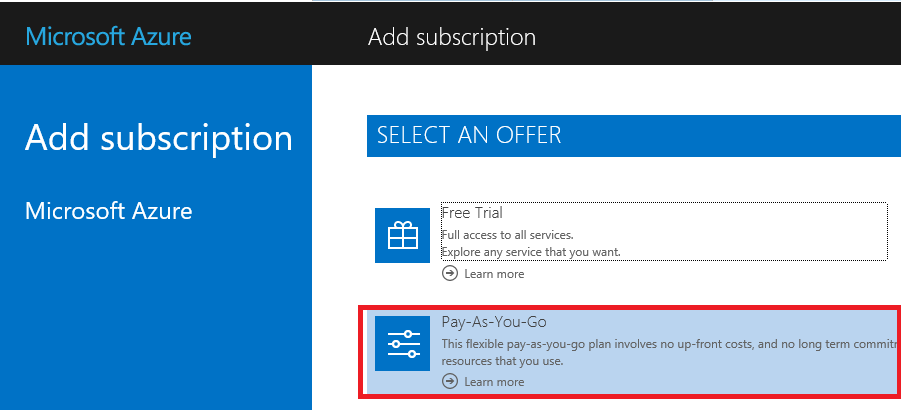
4. At the Add subscription screen click on Pay-As-You-Go.
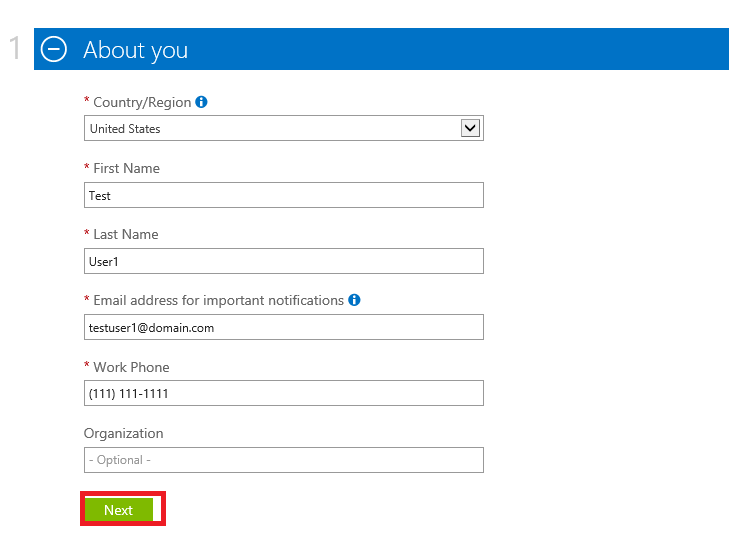
5. At the About you enter your information as shown below:
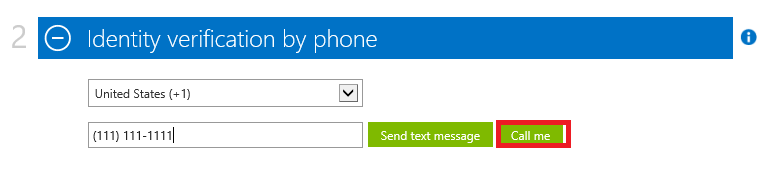
6. At the Identity verification by phoneenter phone number and click Call me as shown below:
7. Once you receive the call listen for the 6-Digit Code and then enter it as shown below and click on Verify code as shown below:

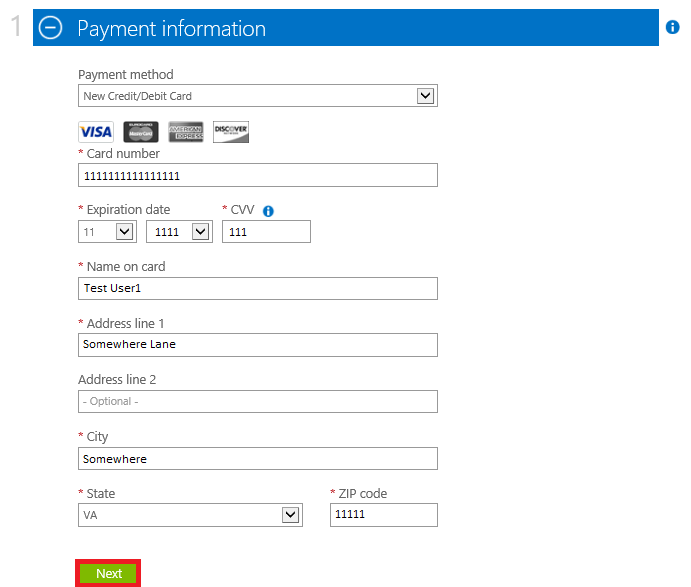
8. At the Payment information screen enter your Credit Card information as shown below then click Next.
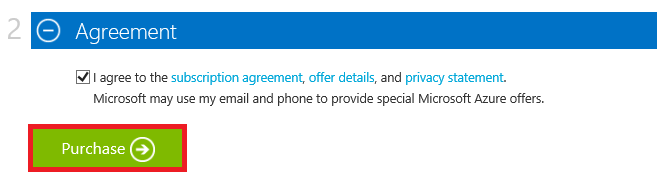
9. At the Agreement screen select I agree then click Purchase.
 asdf
asdf
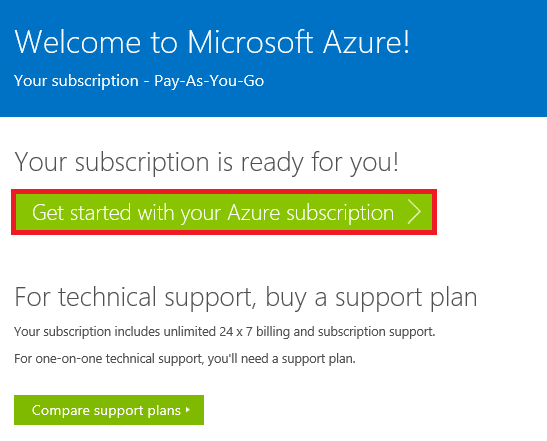
10. At the Welcome to Microsoft Azure screen click on Get Started with your Azure subscription.
Now that we have Added an Azure Subscription to our Office 365 account, we will need enable Azure AD Domain Services in order to join our Server to our Azure AD Domain (Office 365 Tenant). Azure AD Domain Services is currently only available using the Classic Azure Portal, however we would like to use the New Azure Portal to build out our VM's. In order to make this happen we will be using a Azure Networking feature called VNet Peering. VNet peering allows you to link not only Azure Networks using the same Deployment Models, but also between different Deployment Models (Resource Manager or Classic) as long as they are deployed in the same Region (Ex: East US, West US, etc.) VNet peering will allow us to enable Azure AD Domain Services under the Classic Portal which will be linked by VNets to our New Azure Portal where our Servers will be deployed. Follow the steps below to create and peer our Networks as well as Enable Azure AD Domain Services:
1. Navigate to https://manage.windowsazure.com.
2. In the Left-Pane click on NETWORKS then click on CREATE A VIRTUAL NETWORK
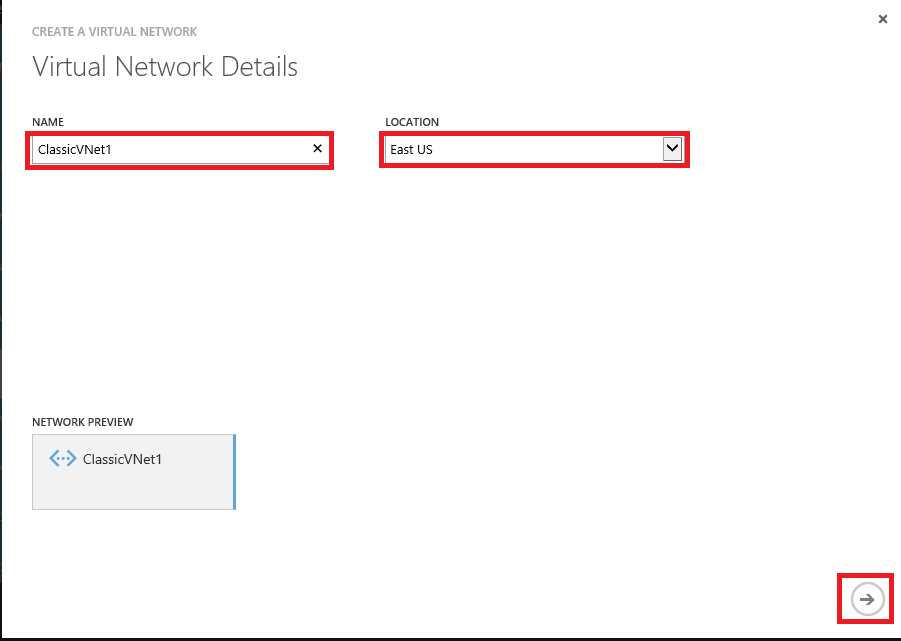
3. At the Virtual Network Details screen enter ClassicVNet1 for the Name, select East US for the Location then click Next.
!!!Note: You can select any location that supports Azure AD Domain Services with the Classic Portal as long as you use the same location when creating the Virtual Network within the New Portal in the following steps.
4. AT the DNS Servers and VPN Connectivity screen click Next.
5. At the Virtual Network Address Spaces screen enter the following then click Complete:
- STARTING IP: 10.5.0.0
- CIDR (ADDRESS COUNT): /16 (65536)

Now that we have created our Classic Deployment Model VNet, we can enable our Azure AD Domain Services and link it to this VNet following the steps below:
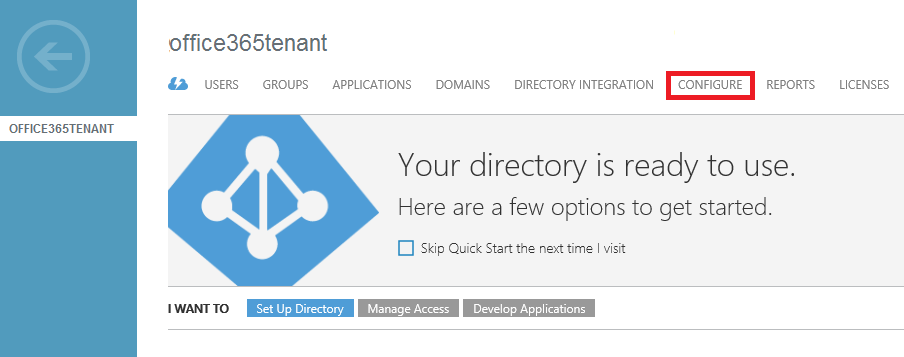
1. In the Left-Pane click on ACTIVE DIRECTORY then click on your Office 365 Tenant Name as shown below:

2. At the Tenant screen click on CONFIGURE.
3. On the CONFIGURE screen scroll down to domain services and click Yes for the ENABLE DOMAIN SERVICES FOR THIS DIRECTORY and make sure your Office 365 Tenant Name and ClassicVNet1 are selected then click Save.
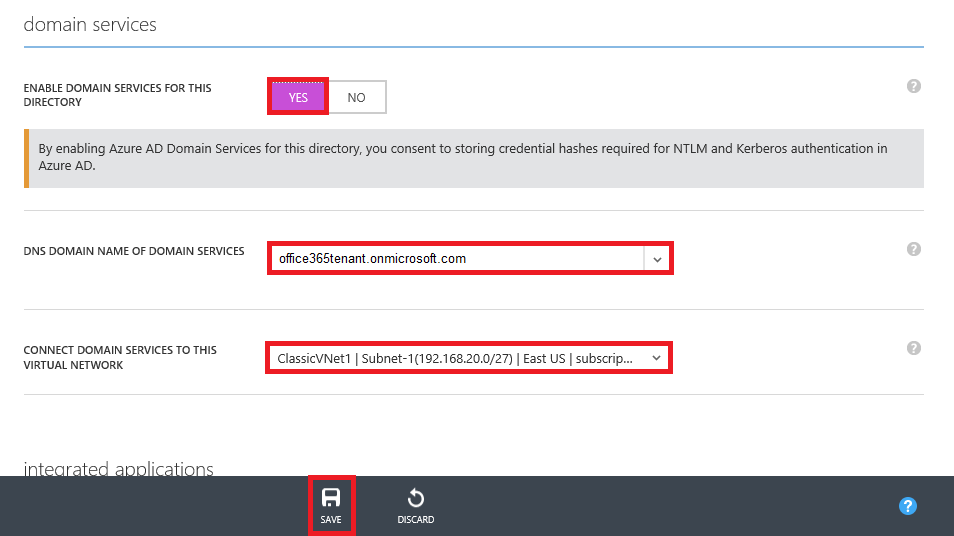
4. Once setup is complete click OK.

5. Under domain services make a note of the IP(s) created for Azure AD Domain Services.

Now that we have Azure AD Domain Services enabled we will need to Enable NTLM and Kerberos credential hash generation before we can Join our VM using our Azure AD Credentials. Follow the steps below to Enable NTLM and Kerberos credential hash generation for your Azure AD Credentials:
1. Navigate to https://myapps.microsoft.com
2. In the Top-Right Corner click on your account and select Profile.
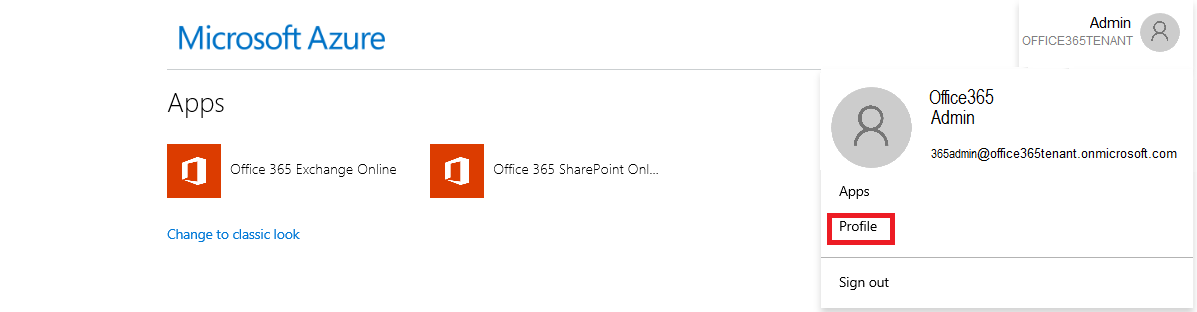
3. Under Manage Account click on Change password.
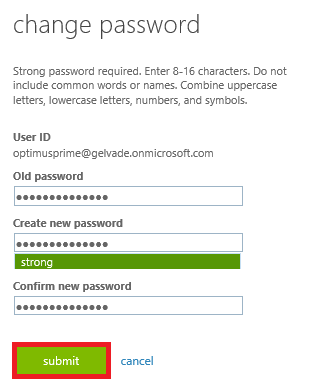
4. At the Change password screen enter you Old and New Password then click Submit.
head over to the New Azure Portal to create our Virtual Network within the Resource Manager Deployment Model which will be used to allow our Azure VM to communicate with Azure AD Domain Services. Follow the steps below to create and link this Virtual Network:
1. Navigate to https://portal.azure.com
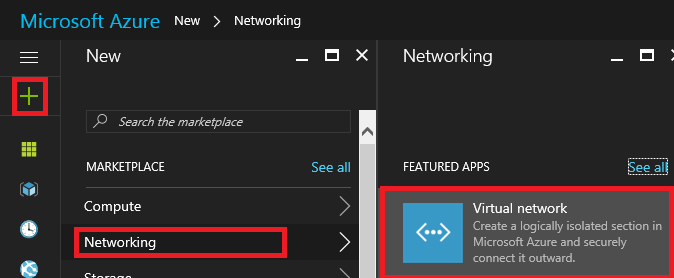
2. In the Left-Pane click + | Networking | Virtual network.
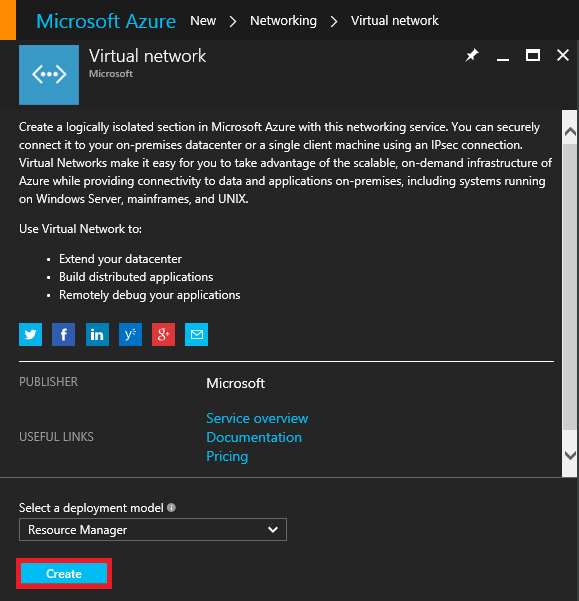
2. At the Virtual network screen click Create.
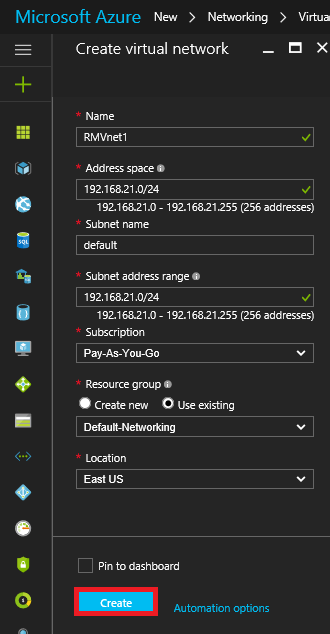
3. At the Create virtual network screen enter the details shown below then click Create.
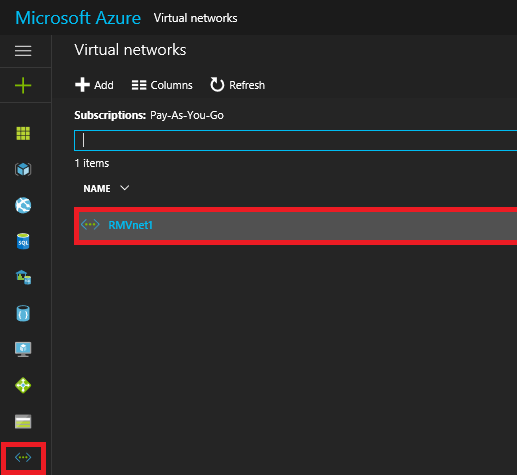
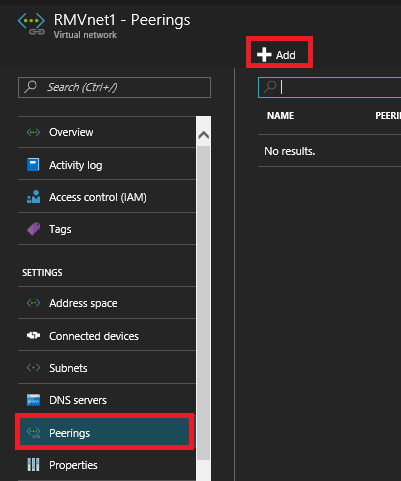
4. In the Left-Pane click on Virtual Networks then in the Right-Pane click on RMVNet1.
5. Under RMVnet1 click on Peerings then click Add.
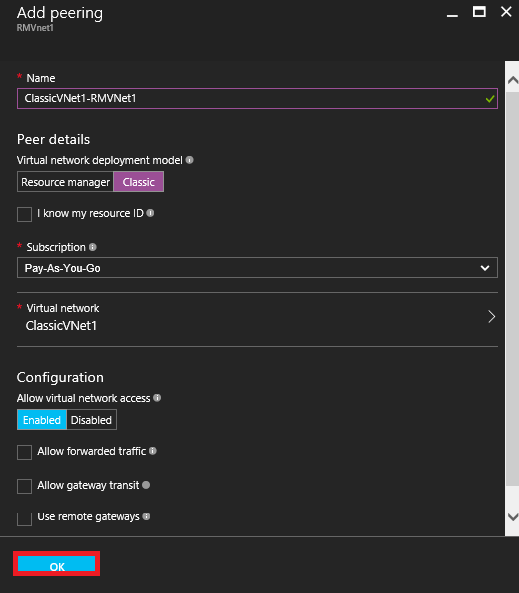
6. At the Add peering screen enter the information as shown below then click OK.
7. Confirm that the Peering Status shows as Connected.

Azure VM’s get their DNS Servers defined in two possible ways. The first which is the default is via DHCP. The second and the option we will be using is by a Custom IP (Virtual Network or Network Interface). Since all of our VM’s will share the same Virtual Network, it makes more sense to create the DNS Server at this level. Follow the steps below to define the Azure AD Domain Services IP (192.168.20.4 as notated in the above steps) as the RMVNet1 Virtual Network’s DNS Server.
1. In the Left-Pane click on Resource Groups then select Default-Networking. 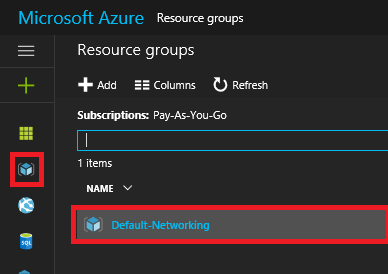
2. Under the Default-NetworkingResource Group click on the RMVNet1Virtual Network . 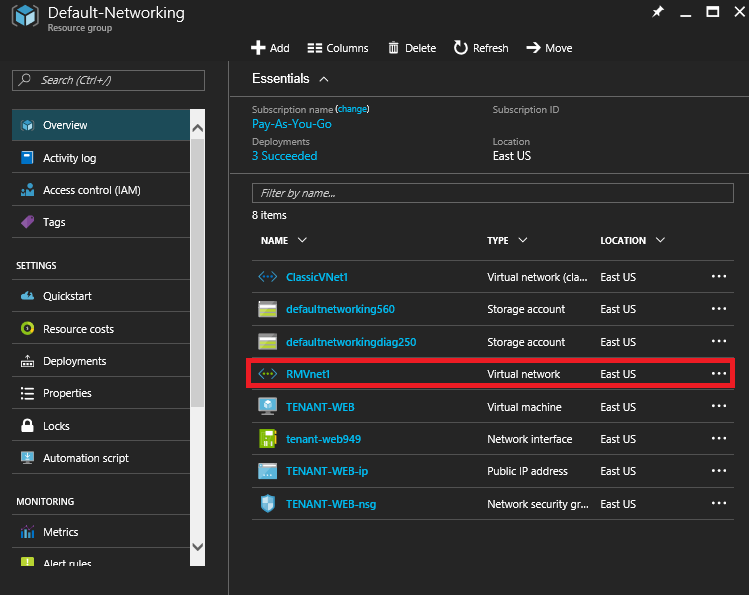
3. Under the RMVNet1 Virtual Network click on DNS servers.
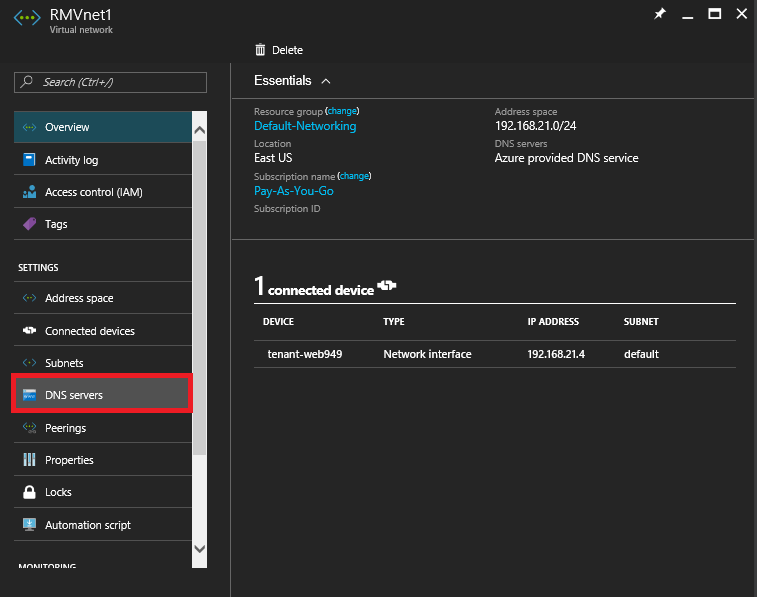
4. At the RMVNet1 – DNS servers screen select Custom, enter 192.168.20.4 then click Save.
Now that we have connected our Virtual Networks we will be creating our Azure VM. Follow the steps below to create an Azure VM:
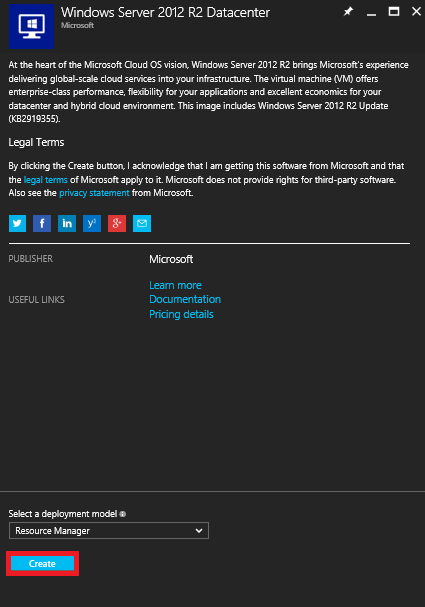
1. In the Left-Pane click + | Compute | Windows Server 2012 R2 Datacenter. 
2. At the Windows Server 2012 R2 Datacenter screen click Create.
3. At the Basics screen enter the following then click OK.
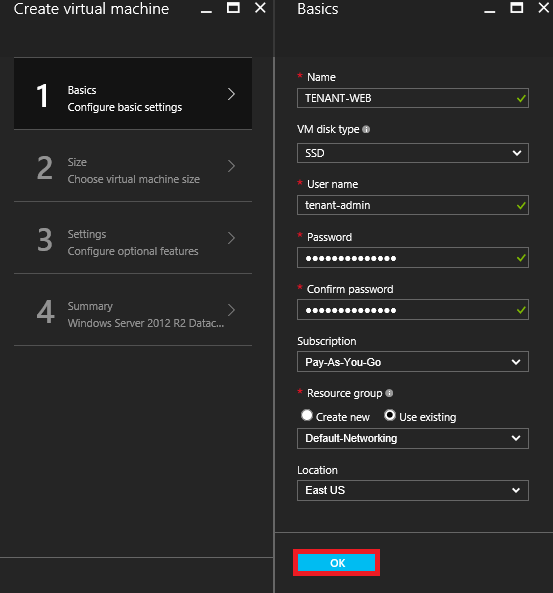
***Note: The virtual machine name will need to be unique for your lab since it’s a hostname within eastus.cloudapp.azure.com. So KHL-DC is no longer available.
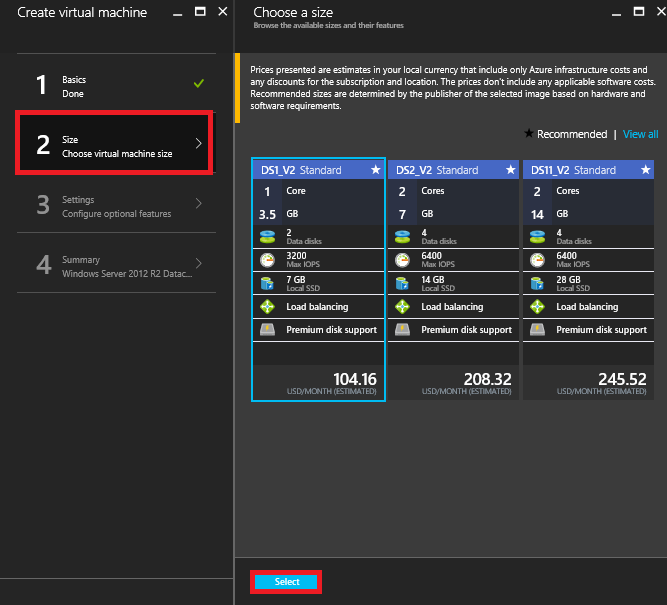
4. At the Choose a size screen select DS1_V2 Standard VM (Best Bang for Buck) then click Select.
6. At the Settings screen accept the defaults then click OK.
7. At the Summary screen review your settings then click OK.
Now we will need to connect to our Azure VM (TENANT-WEB) via remote desktop. To do this follow the steps below:
1. In the Left-Pane click on Resource Groups then select Default-Networking.
2. Under the Default-NetworkingResource Group click on the TENANT-WEB .
3. Under TENANT-WEB click on Connect.

4. At the pop-up click Open.
5. At the Remote Desktop Connection pop-up click Connect.
6. At the Windows Security screen enter your credentials.
7. At the Untrusted Certificate pop-up click Yes.
8. Once logged in right-click on the Windows Logo and click on System.
9. Under Computer name, domain and workgroup settings click on Change settings.
10. At the pop-up screen click on Change.
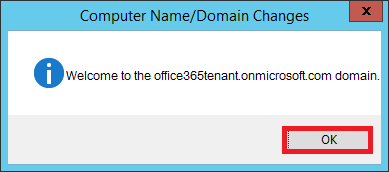
11. Under Member of select Domain: then enter office365tenant.onmicrosoft .com and click OK.
12. At the Computer Name/Domain Changes pop-up enter your Domain Admin and Password in the following format then click OK:
office365tenant\Office365-admin
13. At the Computer Name/Domain Changes pop-up click OK, OK, then Close.
14. Click Restart Now.
Once the server has restarted we will re-connect using our local server credentials initially. This is because by default only Local Administrators are authorized to log on via Remote Desktop. Use the steps below to add your Azure AD credentials (OFFICE365TENANT\Office365-admin) as a Local Administrator or TENANT-WEB:
1. Once logged onto TENANT-WEB with our Tenant-Admin local account right-click on the Windows Logo and select Computer Management.
2. In the Left-Pane expand System Tools | Local Users and Groups then select Groups.
3. In the Right-Pane double-click Administrators.
4. At the Administrators Properties window click Add then enter Office365-Admin and click OK.
5. At the Windows Security pop-up enter you Azure AD Credentials then click OK, OK.
6. Log off of TENANT-WEB.
Now that we have added our Azure Ad Credentials as a Local Administrator of our Server we should be authorized to connect via Remote Desktop using these credentials. Once logged in to the server with our Azure AD Credentials we have successfully confirmed our Azure AD Domain Services are working. To take it one step further, lets take a look at our Active Directory Structure. In order to do this we will need to load our RSAT (Remote Server Administration Tools) using the steps below:
1. From the taskbar click on Server Manager.
2. Under the Configure this local server section click on Add roles and features.
3. At the Before you begin screen click Next.
4. At the Select installation type screen click Next.
5. At the Select destination server screen click Next.
6. At the Select server roles screen click Next.
7. At the Select features screen select Remote Server Administration Toolsthen at the Add Roles and Features Wizard pop-up click on Add Features
8. Expand Remote Server Administration Tools | Role Administration Tools and select DNS Server Tools then Next.
9. At the Web Server Role (IIS) screen click Next.
10. At the Select role services screen click Next.
11. At the Confirmation screen click Install.
12. When setup is complete click on Close.
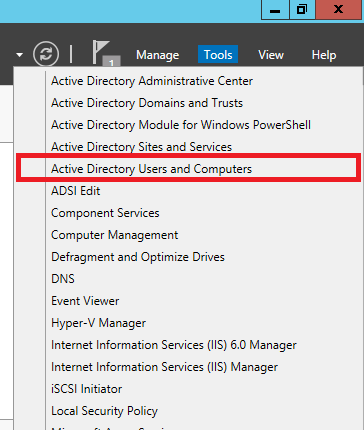
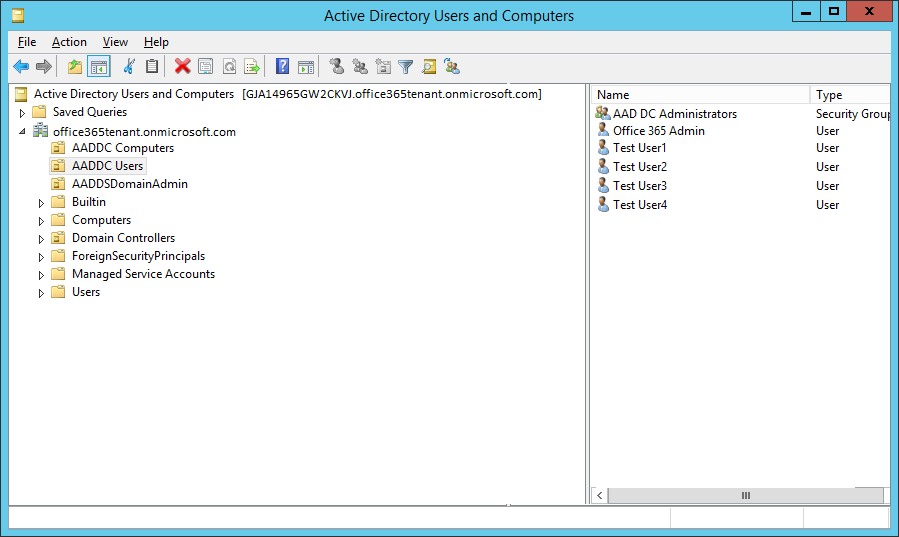
Let's launch Active Directory Users and Computers to take a look at our newly created credentials. Within Server Manager in the Top-Right corner click on Toolsthen select Active Directory Users and Computers.
As you can see below we are now looking at our Azure Active Directory instance within the traditional Active Directory User and Computers (ADUC) Toolset:
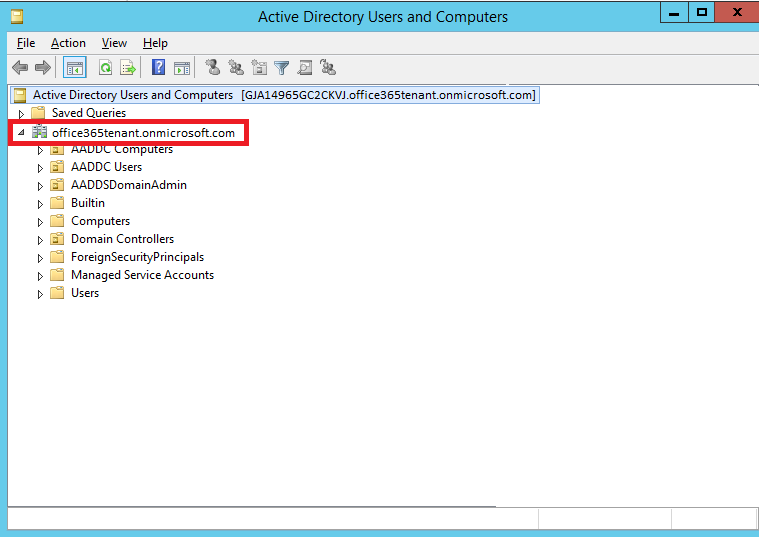
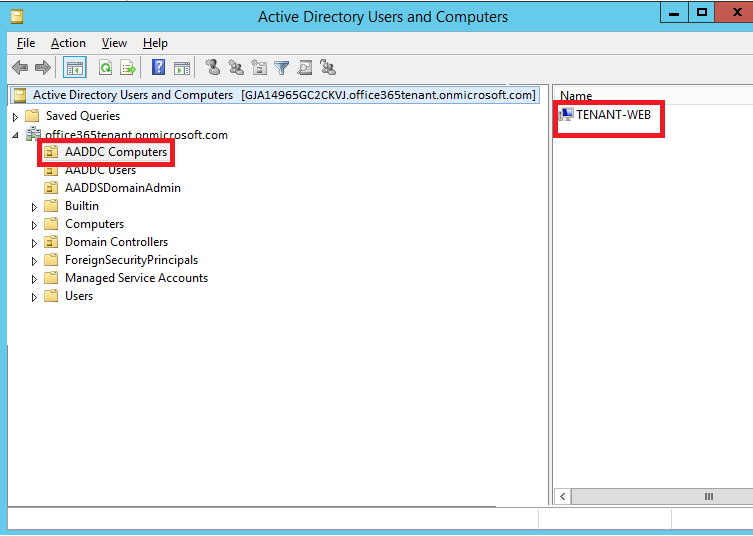
The two Organizational Units that we are concerned with are the AADDC Computers and AADDC Users. AADDC Computers will contain any Azure AD Domain Services Joined Servers/Workstations. As shown below we should see our test VM TENANT-WEB that was joined earlier in the article:
AADDC Users actually contains all of your Office 365 accounts as shown below:
This completes this article now that we have successfully proven that we can Domain-Join our Azure IAAS VM to our Office 365 Tenant in addition to gaining Administrative Access via ADUC to our Azure AD which our Office 365 Subscription rides on. Hopefully you enjoyed this article.
-Elliott