MFDub
Summary
MFDub is a simple linear video editor built on Media Foundation, modeled after the free video editor VirtualDub. MFDub can open any file format that can be resolved by the MF source resolver, display frames of video from the file, apply a series of video or audio effects implemented as MF transforms, and then save the file with effects applied to the ASF (WMV, WMA) file format or the MPEG4 file format. For example, one might open up a WMV file with blurry video using MFDub, apply the unsharp mask transform to create a video with a sharper image, and then save the output video to an MPEG4 file.
Technologies Demonstrated
MFDub combines many different MF components together to create a useful application. Some of the components used include:
- IMFSourceReader – used to obtain raw video frames for display when the user is examining the video, and to read frames when MFDub is writing a new output file.
- IMFMediaSession – used to play the video normally so the user can preview what the video will actually look like in a media player.
- IMFSinkWriter – used to write the output file when the user is done editing.
- IMFTransform – video and audio effects are implemented as MF transforms. MFDub communicates with transforms directly to process video effects.
Setup
MFVE.exe is the main application. Just double click the MFVE.exe file to run it. MFVEUTIL.dll contains the video and audio effects that make MFVE.exe useful. MFDub would be pretty boring without any effects! Make sure to register MFVEUTIL.dll before using MFDub, by opening up an elevated command prompt window, navigating to the directory containing MFDub, and entering the command ‘regsvr32 MFVEUTIL.dll’. You can create an elevated command prompt window by going to the Start Menu, selecting All Programs, selecting Accessories, right clicking on ‘Command Prompt’ and selecting ‘Run as Administrator’.
How to Use MF Dub
When you start MFDub, the only thing you can do at first is open a file. Click on the Open button on the toolbar, and find a video file to work with. By default, MF supports .asf, .wmv, .mp4, .m4v, and some .avi files. MFDub should then look something like this:

Now let’s apply some video effects. Once you click the ‘Video MFTs’ button, a dialog box is displayed with a list of transforms. (You did register MFVEUTIL.dll as noted under setup, right?) You can click on the name of each transform to get a short description about what it does. I am going to go with the edge finder since it applies an obvious effect to the video:
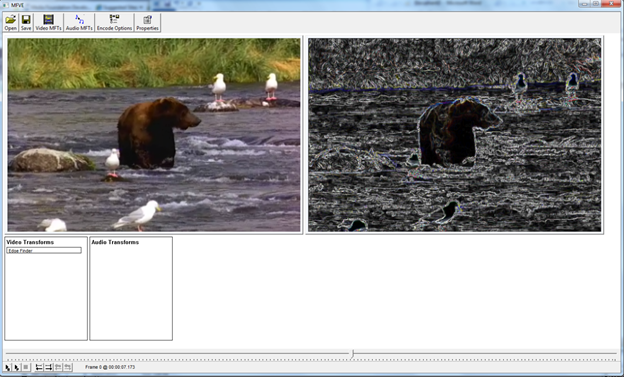
Notice how the box labeled ‘edge finder’ has appeared in my list of transforms. If you do not like the effect, you can click and drag the box outside the transform list and drop it – MFDub will get rid of the transform. You can also add more than one transform at a time, if you like. Using the ‘unsharp mask’ transform with a gamma value of 3 really sharpens up the edges. You can switch the order of the transforms by clicking and dragging the transform box to where you would like it to be in the transform list. The order of the transforms can greatly affect the output video.
Since I really like transforms, I am just going to apply them all except for the resize and crop transform. Since I applied an audio transform, I used the play button to play the preview of the edited video to hear that I set the volume compression level to a reasonable value. Here’s what MFDub looks like right before I save the video:
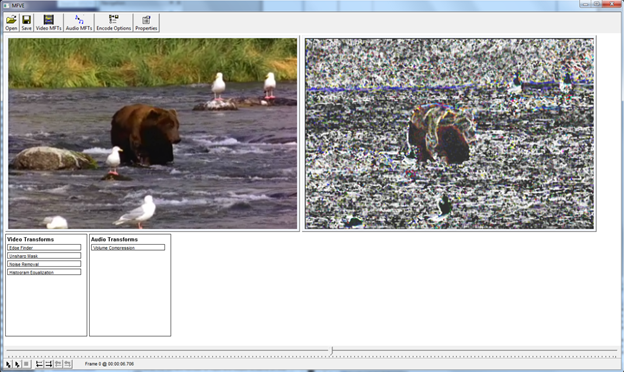
I do not know exactly what I would do with such an output video. Maybe I could sell it as piece of cubist art. Anyway, the final step is to save the output video to a file. Click the save dialog and enter a file name for the output video. MFDub will automatically determine the file format for the output video based upon the extension. For example, a .wmv file will be an ASF format file, and an .mp4 file will be an MPEG4 format file. Since my input file was a .wmv, I will make the output file a .mp4 for a change. Once you click save, you will be informed of the encoding progress at the bottom of the window. Once encoding is complete, you can play back your video in any media player that supports the file format you selected. Here is my output video playing back in Windows Media Player:

Design Choices
MFDub brings a bunch of different MF components for different purposes. Part of the core functionality of MFDub is the ability to display individual video frames as the user seeks around the video using the track bar control. The source reader provides a simple and lightweight way for grabbing video frames from a media file. Then these video frames can be processed manually through a series of transforms. The media session does not easily allow for grabbing individual frames at a time, and also does not easily allow insertion and removal for transforms.
Playing the video presents a different set of problems. The source reader does not handle things like audio/video synchronization, and any rendering has to be done manually. The media session handles playing video very well, and hides many of the complexities of playback from the application. This made it a good choice for handling the preview playback.
For writing the output video, MFDub uses the sink writer. The sink writer presents an easy way to write raw video frames to a file. The transcode API provides a more configurable way of writing a new output file, but since MFDub already had the manual transform processing and did not require the extra customizability, the sink writer was used instead.
Interesting Code
- Transformapplier.cpp shows how an application can use an IMFTransform independently of any other MF components to process audio and video data.
- Mediatranscoder.cpp combines the source reader and the sink writer into a component that can be used to transcode an input file into an output file.
- Topologybuilder.cpp demonstrates how an application might build a topology for use in the MF media session.
- Sampleprovider.cpp uses the source reader to create a simple component for reading video frames.
In the dll directory, you can find the source code to all of the transforms that come with MFDub by default. MFDub uses a set of base classes for transforms to implement all of the common functionality, leaving just the data processing to be implemented for the actual transform object.
Limitations
Dragging the tracker around to seek around the video can be slow. MFDub uses a rather naïve implementation for grabbing samples from the source file. With some cleverness and creativity, the performance of ‘scrubbing’ the video using the tracker could be improved.
MFDub only has several transforms. Without more transforms, it is not terribly useful for video editing. Thankfully, the base classes make it pretty easy to create your own transforms!
Downloading the Sample
You can download MFDub from https://code.msdn.microsoft.com/Project/Download/FileDownload.aspx?ProjectName=mfblog&DownloadId=9371.
Follow the instructions at https://code.msdn.microsoft.com/mfblog for tips and instructions to build the sample.
This posting is provided "AS IS" with no warranties and confers no rights.