Devops on Windows with Jenkins and Azure Resource Manager
Contents
- Summary
- Technologies discussed
- Key Concepts
- Requirements and Constraints
- Existing Infrastructure
- How it works
- For Production
- Wrapping up
Summary
This blog post outlines a devops process that automates deploying a somewhat legacy .NET Web API to Microsoft Azure. We'll use Jenkins, a build automation tool, to kick off the automation and we'll see all the steps involved. This post outlines practices for dev/test scenarios but at the end I've included some thoughts for using this in production. To follow along, some existing Azure experience and an existing Azure subscription is necessary.
The sample code for this post can be found on Github here: https://github.com/michaelsrichter/PasswordBot
Desired Results
By following the directions below, you should be able to use the code and assets in the Github sample repository to deploy a simple Web API that generates passwords. This is part of a larger project to create a Password Bot.
To get an idea of what we're building. Suppose we configure our build with a Resource Group Name of "blogbot." And when we do our build in Jenkins, it's build #16. The build should create the following infrastructure in Azure:
[caption id="attachment_105" align="alignnone" width="854"]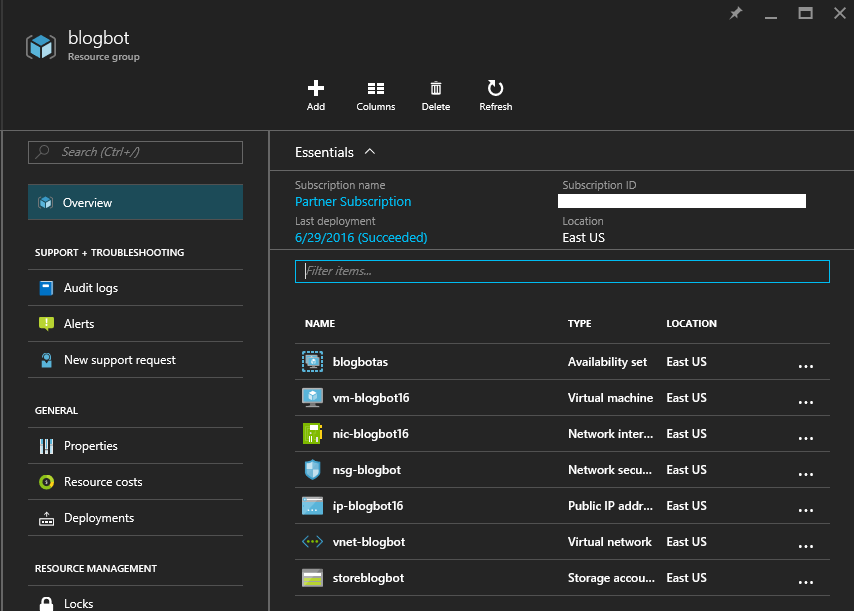 Bot Resource Group[/caption]
The build also installs the Web API on the VM and it's exposed via an endpoint, like this example:
[caption id="attachment_85" align="alignnone" width="592"]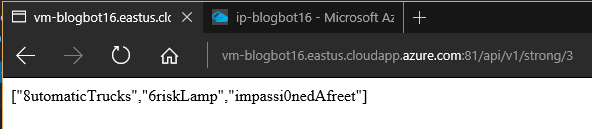 PasswordBot REST Request[/caption]
Technologies discussed
- Jenkins + Build Automation
- Powershell
- Azure Service Principal
- Azure Storage SAS Tokens
- Azure Resource Manager Template
- Azure Custom Script Extension
Key Concepts
- Build Automation
- Configuration Management
- Immutable Infrastructure
Requirements and Constraints
These are the requirements and constraints that influenced the design of this solution:
- MSI - The Web API build outputs an MSI file and that is what we need to get deployed to Azure. Ideally you'd be able to use git or WebDeploy or other cloud ready technologies for deploying to Azure. This example shows how you can automate deploying to Azure even when you have a constraint like MSI.
- VMs - The solution cannot use Platform-as-as-Service, it must be run on Windows VMs.
- Build Automation - the Web API must be deployed with automation, as part of a new or existing build automation process.
- Jenkins - The prescribed build automation tool.
- .NET 4.6.1 - The Web API needs to run on this version of the .NET framework.
- Non-standard Port - The Web API must use a non-standard http port, so not 80 and 443. This is sometimes a requirement in dev/test when resources are shared.
- No Custom Images - The VM must use the latest, patched version of Windows from the Azure catalog. Crafting a custom image with pre-loaded dependencies is not an option.
Existing Infrastructure
These requirements already need to be provisioned to get this example working:
- Azure Subscription
- Jenkins instance installed and configured
- Azure Storage account that can hold build artifacts
How it works
Jenkins
First, install the Powershell plugin for Jenkins. Here's a blog post with more info.
The build server(s) will need Azure Powershell installed to execute these commands.
The build server(s) will need the Azure service principal certificate installed. See below when I discuss the CertificateThumbprint parameter.
Either create a new build automation project in Jenkins or use an existing one. Add a new post build action that uses the Powershell plugin. In the Powershell plugin command window, enter the following text:
 $cmd = "C:\path\to\deploy.ps1"
$arg = @()
$arg += ("-buildNumber", $ENV:BUILD_NUMBER)
$arg += ("-CertificateThumbprint", "YOURCERTTHUMBPRINT")
$arg += ("-ApplicationId", "YOUR-APP-ID-GUID")
$arg += ("-TenantId", "YOUR-AAD-TENANT-GUID")
$arg += ("-sourceFile", "'C:\path\to\PasswordBot API.msi'")
$arg += ("-templateFilePath", "C:\path\to\template.json")
$arg += ("-subscriptionId", "YOUR-SUBSCRIPTION-ID-GUID")
$arg += ("-resourceGroupName", "resourcegroupname")
$arg += ("-resourceGroupLocation", "eastus")
$arg += ("-storageAccountKey", "YOURSTORAGEACCOUNTKEY")
$arg += ("-storageAccountName", "yourstorageaccount")
$arg += ("-artifactContainerName", "artifacts")
$arg += ("-configurationScriptFile", "C:\path\to\ConfigurationScript.ps1")
iex  "$cmd $arg" -Verbose
This is all the Powershell Jenkins needs to build a parameters object and pass it into the deploy.ps1 script. Make sure you update the path to your actual deploy.ps1 file. It's in the Devops folder if you synced the sample code from Github. You will need to insert your values into the parameters.
- buildNumber: Use Jenkins' environment variable so that each deployment # is incremented (this will also be used to label the Azure resources).
- CertificateThumbprint: You will need to create a service principal so that Azure resources can be deployed with automation. Please see this documentation for creating a service principal with a certificate in Azure. You will need to be an administrator of the Azure subscription and a global admin of the default Azure Active Directory tenant for that subscription. A certificate is generated when you create a service principal. The certificate needs to be stored on the build server and in the Azure AD application. Make sure you create the service principal with owner permissions. You can share the certificate with other build serves or dev machines. You will need to generate a private key to do this. Be careful where you store the certificate and the private key. Anyone who has this combination has "owner" rights to your Azure subscription! You can always delete the Azure AD application service principal if your credentials become compromised.
- ApplicationId: The GUID ID for the Azure AD Application associated with your service principal.
- TenantId: The GUID ID for the Azure AD Tenant associated with your service principal.
- sourceFile: The path to the MSI file you want to deploy. A sample MSI is provided in the Devops folder from the Github sample. This MSI file will install the PasswordBot Web API application, it will also create a new Website in IIS on port 81.
- templateFilePath: The path to the JSON template that defines the Azure resources we are going to deploy. This is also in the Devops folder in the Github sample.
- subscriptionId: The GUID ID for your Azure Subscription.
- resourceGroupName: The resource group that all the Azure resources will deployed within. You can choose any name you want within the guidelines.
- resourceGroupLocation: The Azure region that your resources are deployed to.
- storageAccountKey: A limitation of this example requires a pre-existing standard Azure storage account. Put the storage account key here.
- storageAccountName: the name of the pre-existing storage account.
- artifactContainerName: The name of the container in the pre-existing storage account where the build artifacts will be stored and accessed from the deploy script and eventually the VM.
- configurationScriptFile: The path to the file that will configure the VM and install the MSI. This can be found in the Devops folder in the Github sample.
That's it for Jenkins.
Deploy File - deploy.ps1
This file is central to the entire process. It will deploy all our resources to Azure. We pass in all the parameters above. Here are some of the important items to point out.
- Line 31: Add-AzureRmAccount. This logs you into the Azure subscription for the Powershell session with the service principal credentials.
- Line 55: This uploads the Configuration file to Azure storage
- Line 65: We get a URL to the Configuration file that has a SAS token, which gives temporary (2 hour) permissions to read this file. We will pass this into the template so that once the Azure VM is provisioned, it can run this Configuration script.
- Line 72: This time we are uploading the MSI File to Azure storage.
- Line 79: Now we get the URL to the MSI file with the SAS token. This is the MSI the configuration file will install on the VM.
- Line 84: We define the parameters for the Azure Resource Manager template. These could also be pushed back up into the parameters for the deploy file itself if we wanted to be able to control these items at the Jenkins level. You'll notice that we use the buildNumber and the Resource Group Name to dynamically name the different Azure resources we are creating.
- Line 106: We are looking to see if a Resource Group with the same name already exists. If it doesn't, we create it.
- Line 123: This is where the magic happens. We deploy our Azure Resource Manager template with the parameters we defined at line 84. See the Template File section below to understand what happens inside the template file.
- Line 126: Our configuration requires the Windows VM to restart.
Template File - template.json
This is a simple Azure Resource Manager (ARM) template file that has 2 sections:
- parameters
- resources
The parameters section contains fields that map to the parameters we passed in from the deploy file.
The resources section contains the following items:
- availabilitySets: Defines the availability set that the Azure VMs will live in. VMs in an availability set are deployed in separate fault and upgrade domains so that they aren't all taken down at the same time due to scheduled maintenace or unscheduled outages. If you've ever heard of splitting up travel executives on separate planes, it's the same idea.
- virtualMachines: The attributes for the Azure VM we are creating. Notice a couple of important things:
- dependsOn. Before the VM can be created, it has dependencies on other resources. It needs the availability set that it will be placed in, it needs the storage account that will hold it's virtual disk(s), and it needs the NIC card that it will use to connect to networks. The Azure Resource Manager uses these dependencies to figure out what resources to build first and, if possible, which resources can be built in parallel.
- resources. The VM resource has its own resources section. In this case we are defining a Custom Script Extension. The custom script extension pulls down the Configuration script and the MSI file onto the provisioned VM and executes the configuration script.
- imageReference. You can see we are deploying the latest patched version of Windows Server 2012 R2. This is important to understand for configuration management. We are not building custom images with our app baked in. We are building plain vanilla Windows VMs and automating all the configuration of the VMs including installing our app on it.
- Count. We are only deploying 1 VM here. If we choose to, it is simple to deploy many VMs at the same time with this template.
- networkInterfaces: The NIC card for our VM
- networkSecurityGroups: The Network Security Group that defines what traffic is permitted through to subnet where the VM is located.
- publicIPAddresses. We create a public IP address so the VM is available over the internet. Notice dnsSettings/domainNameLabel, we can use that to reach our VM with a domain name.
- virtualNetworks: We create an Azure Virtual Network with a subnet that will host our VM.
That is all we need to create our resources in Azure. There is a lot of information about ARM templates and a github repo with hundreds of examples.
Configuration Script File - ConfigurationScript.ps1
Once our VM has been provisioned, the template will execute the custom script extension which will call our configuration script. This file is at the heart of configuration management and immutable infrastructure. We started with a vanilla version of Windows Server and now we are going to configure it for our needs. Once our app is deployed to the VM, the VM shouldn't be changed further. Any iterative development or new release of the app in production should require starting with a fresh new (and patched) OS. Let's look at what this script does:
- Line 1, takes the MSI file as a parameter. When the Custom Script Extension calls this configuration script it passes in the MSI as parameter. Both the ConfigurationScript.ps1 and MSI are downloaded to the VM by the template after it provisions the VM.
- Line 15, installs IIS - we need this to serve the Web API inside of the MSI.
- Line 27, our API is 32 bit, but the Windows Server is 64 bit. So we need to set this so that IIS can serve our API.
- Line 32, we open port 81 for bot API - the MSI will install a new Website in IIS on port 81.
- Line 36, we install the MSI file.
- Line 42, the required .NET Framework is downloaded and installed.
This configuration uses powershell. There's an opportunity here to use a more modern framework, like Powershell Desired State Configuration (DSC) or 3rd party tools like Chef or Puppet; both have full support on Azure.
Build
With everything in place, you can kick of a build in Jenkins. The entire setup takes about 12 minutes. When your'e done, if there aren't any errors, you should be able to hit your public ip address or domain name appended with :81/api/v1/simple and start seeing sample passwords.
For Production
We can use this devops process for pushing code into production. Here are some things to think about:
- The ARM template can be updated to publish multiple VMs or to VM Scale Sets.
- A load balancer can be added to send requests to all VMs
- The VM(s) can be further locked down by shutting down unneeded ports.
- Add server diagnostics for the VMs for monitoring in production.
- An NSG rule is created for RDPing into the VMs. This can be removed when immutable infrastructure is used in production.
- Use a Windows Server Core Image for faster/lighter weight deployment.
- If your app is I/O intensive, use a VM with disks hosted on Azure Premium Storage.
- If your app is RAM intensive, use a VM size with more RAM.
- Re-deploy every month to get a patched Windows Environment.
Wrapping Up
This blog post explained how to build a Devops process for deploying a Web API to Azure. The Devops process uses automation even when the application isn't necessarily designed for automation. In this case our API is delivered as an MSI file. Using Azure Resource Manager Templates and powershell, we can automate the deployment of this app. This example can be adjusted for your own applications and it can be used as a starting point for deploying production applications.