Porting an OpenGL ES2 app to Windows 8 Store App
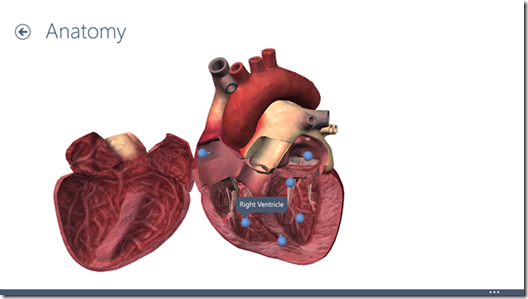
(Screenshot of 3D anatomy taken from Heart Decide Windows 8.1 Store app)
This technical blog post assumes the reader is familiar with creating an OpenGL ES2 app on any platform, and the fundamentals of Windows 8/8.1 Store Apps.
Context - There are various techniques/ways to deliver great 2D/3D experiences, and DirectX is the preferred approach for building modern store apps for Windows 8/8.1. Starting with DirectX would be suitable for organizations involved in initiating new apps for Windows 8/8.1, but some smaller organizations unfamiliar with DirectX may find it overwhelming and may instead prefer an easier approach to leverage their OpenGL ES2 investments.
Situation & Approach
Orca Health is a mobile healthcare company and had an urgency to address their customer’s needs for Windows 8 versions of their OpenGL ES2 assets. This blog post outlines the approach taken by Orca Health, and may inspire you to do the same to deliver 3D apps based on your existing investments in OpenGL ES2. Customers like Orca Health that invested heavily in OpenGL ES2 will be pleased hear that a broader open-source community is working hard to make it easier to build and run modern UI apps on the Windows 8 platform without applying a rip-replace strategy.
Orca Health’s 3D engine consisted of large amounts of custom code written in Objective C and OpenGL ES2. WinRT runtime, the engine powering Modern UI based Windows 8 apps, can only run DirectX natively, so the amount of time to recreate all of the OpenGL code in DirectX was daunting. Project ANGLE (Almost Native Graphics Layer Engine) came to the rescue; Project ANGLE is supported by the open-source community, and able to translate WebGL and OpenGL ES2 calls directly to DirectX. Project ANGLE allowed Orca Health to port their apps in a fraction of the time (compared to rewriting the apps from scratch) for the Windows 8/8.1 platform, lowered the porting costs and made it feasible for them to maintain the same code-base for multiple platforms.
Details of the Technical Approach
This blog-post outlines one of the approaches with a finished sample , but the expectation is that you (reader) will do your own home-work/research to pick the most optimal approach in delivering 3D based apps.
Orca’s 3D engine built in Objective-C included support for interacting with the 3D models. Interactions include rotation, zoom, pan, layers, labels, animations, and some custom controls. The first step for Orca Health was to convert their engine to C++ so that it could run on Windows. Part of that process included leveraging an API that abstracted the platform specific details away, such as how mouse and touch input manipulates the 3D model. Orca Health’s 3D engine also used the PowerVR SDK, which includes cross platform utilities for loading and displaying models with OpenGL.
Orca Health has shared a basic sample Visual Studio 2013 project of a WinRT app that uses OpenGL to do 3D rendering, with the aim that it can jumpstart your efforts. You can download basic sample from here and leverage it for your learning purposes. Following steps (listed below) were taken to create the sample and are included here to help you (reader) understand the process.
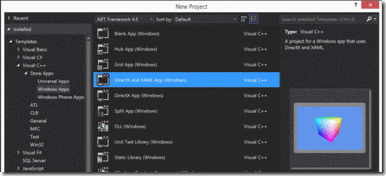
First, create a project in a new solution based on the Visual C++ template for the Windows DirectX and XAML app.
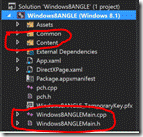
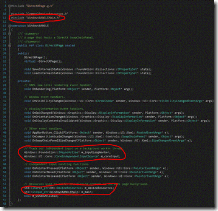
Next, make various modifications to the template, removing the template code that deals with DirectX. Remove items highlighted in red in the screenshots below, and anything that references them.
The template starts with the root XAML element as a SwapChainPanel in DirectXPage.xaml. However, team was able to get the ANGLE code to work correctly with a different XAML element; SwapChainBackgroundPanel. SwapChainBackgroundPanel imposes that it must be the root XAML element of the entire app.
Next, modify the InitializeComponent method in DirectXPage.cpp. The sample project breaks up the initialization into separate functions. InitWindows() sets up callback functions when window properties change, such as width and height, so that rendering code can react. It also adds a handler that allows the app to add its own commands to the standard Windows 8’s app settings screen. InitInteractions() sets up mouse and touch input handling functions that are used to rotate and zoom the 3D model. InitOpenGL() creates a window that OpenGL can render to.
InitRendering() initializes the 3D engine and sets up a callback function to render the OpenGL frames. To successfully initialize an OpenGL window and render to it, you need to add all the necessary code from ANGLE and PowerVR to the solution.
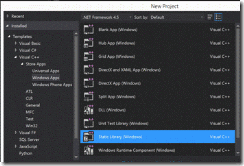
Add a new project for the app’s OpenGL engine to the solution as a Visual C++ Windows App Static Library project.
In the example project, it is named Example3dEngine, and includes ANGLE and PowerVR code for convenience. You can follow directions from ANGLE and PowerVR to get the latest versions. Orca Health’s team organized it into the folders named “include”, “Libraries”, “src”, and then copied them into the folder containing the Example3dEngine.
Next, add the following existing projects to the solution:
1. src\compiler\translator_hlsl_winrt_2013.vcproj
2. src\compiler\translator_common_winrt_2013.vcproj
3. src\compiler\preprocessor\preprocessor_winrt_2013.vcproj
4. src\libGLESv2\libGLESv2_winrt_2013.vcproj
5. src\libEGL\libEGL_winrt_2013.vcproj
6. include\gle2_book\Common\esUtil_winrt_2013.vcproj
7. Libraries\PowerVR\Build\OGLES2Tools.vcproj
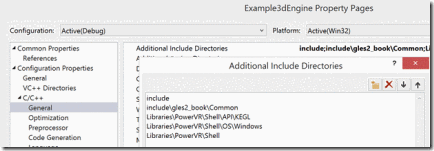
Now edit the project settings for the Additional Include Directories.
And the Preprocessor
Now edit settings for the app project, and add the following references:
And Additional Include Directories:
And Linker Input Additional Dependencies
Make sure to enter the correct path for the different configurations and platforms your app supports. At this point, the necessary ANGLE and PowerVR code is included into the solution. The next step is to hook it up and start rendering OpenGL.
In the main app project, we added the class called Engine. It serves as the layer between the DirectXPage and the Example3dEngine, initializing OpenGL and handling render calls. DirectXPage needs to include esUtil.h and its OnRendering function to look like this:
Now, back in the 3D Engine project, we need to add some PowerVR cross platform utility code before we can render. Add the following files to the project:
1. PVRShell.h, .cpp
2. PVRShellAPI.h, .cpp
3. PVRShellOS.h, .cpp
4. PVRShellImpl.h
5. WindowsPVRShell.h, .cpp
For the .cpp files, make sure to turn off precompiled headers.
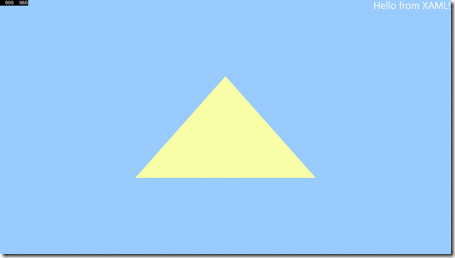
Finally, we are ready to add some actual OpenGL code! In the file named Example3dEngine.cpp, we added code that demonstrates a very simple OpenGL application. It creates a fragment and vertex shader, vertices for a triangle, and renders them to the screen. Now you can run the app and see the triangle on screen. Success!
It’s great to get a 3D based triangle on screen, but it would be much more interesting to interact with it. Look at the section in DirectXPage.cpp that deals with interactions. It shows the basics of interpreting mouse and touch events, and forwards the movements to the 3D engine. The 3D engine then converts those movements into changes in the projection-view-model matrix, which is used by the vertex shader to determine the triangle’s position on screen. It uses some helpful utility functions from the PowerVR SDK, such as matrix and quaternion types, and functions to convert and multiply them. See Example3dEngine.cpp for details on how this is accomplished. With all of the interaction code in place, you can now use the mouse or touch to rotate and zoom on the triangle. The sample project also lets you reset the scene to the original position at any time with a simple double click or tap.
At this point, the WinRT app has been written entirely in C++. Orca initially wanted to use C# to build the app, only including the C++ 3D engine where necessary. However, because of the requirements of the SwapChainBackgroundPanel, it had to be built as a C++ Windows Store App.
The team still wanted to leverage C# as much as possible because of its convenience and support. They were able to accomplish that by adding C# Windows Runtime Component and C# Class Library projects to the solution. The sample project demonstrates this with the ExampleCSharpComponent that is included in the solution. It contains a XAML page and a SettingsFlyout that show some ways that you can integrate C# into the OpenGL WinRT app.
The example Visual Studio project is meant to demonstrate OpenGL rendering in WinRT, but should not be used as a basis for an app. Interested parties should download the latest versions of ANGLE and PowerVR and follow their respective instructions.
Future Plans
Orca Health is eager to integrate a version of ANGLE that supports the SwapChainPanel, which would result in better app architecture. They initially targeted the WinRT platform (Windows 8.1), but remain very interested in making their apps universal, adding Windows Phone and Xbox as the target platform as well.
Conclusion
Project ANGLE made it easier for Orca Health to successfully publish two apps Heart Decide and “Orca MD” in two-month (one month for each app) timeframe to the Windows 8.1 Store. Thanks to the Project ANGLE community. We hope Orca Health’s work will encourage you to deliver great Windows 8/8.1 apps of your own too.
Regards,
Microsoft Public Sector DX Team.






![clip_image002[3] clip_image002[3]](https://msdntnarchive.blob.core.windows.net/media/MSDNBlogsFS/prod.evol.blogs.msdn.com/CommunityServer.Blogs.Components.WeblogFiles/00/00/00/51/78/metablogapi/6557.clip_image0023_thumb_2CBF70FC.gif)


