Implementing a Windows 7 SteadyState by utilizing differencing VHDs files and the “Boot from VHD” feature
Update (07/July/2011): This solution is now deprecated. To get a vastly-improved Windows 7 SteadyState solution please visit this page: https://blogs.technet.com/b/panosm/archive/2011/07/07/windows-7-steadystate-solution-simplified.aspx
Windows SteadyState was a tool that allowed administrators to revert a workstation running XP or Vista to a previously stored state every time it reboots, or on administrator’s request. This feature was extremely useful in scenarios where workstation consistency at the OS and application level is required and the User State (user profile, user files, application settings) is not stored locally. Typical implementations of Windows SteadyState were workstation installations at schools, libraries or internet cafes. However, a recent trend that has been steadily increasing on the enterprise space is the need to deploy stable, rarely-updated machines that maintain their consistency across user sessions (boots) while improving manageability by utilizing Application Virtualization technologies as well as Group Policy. The end result is an Enterprise Workstation that is consistent, requires minimum management and costs less to maintain. You can find more info about Windows SteadyState at Wikipedia: https://en.wikipedia.org/wiki/Windows_SteadyState.
Windows SteadyState is now discontinued. The last supported operating system was Windows Vista and the version released for that OS (version 2.5) is incompatible with Windows 7. In it’s place Microsoft has released guidance on how to achieve a “SteadyState-like” functionality by using Group Policy (to restrict the level of changes that can be made to the OS by the end user) and MDT 2010 (to revert to a well-known initial condition). You can find more info here: https://technet.microsoft.com/en-us/library/gg176676(WS.10).aspx. Unfortunately using MDT 2010 to restore the OS to a well known initial state is sometimes not practical and can be time consuming.
A proposed alternative is the use of the a new Windows 7 feature called “Boot from VHD” or “Native VHD Boot”. This feature allows the usage of a VHD file (Virtual Hard Disk) to run the operating system instead of using a hard disk partition. It should not be confused with virtualization technologies like Hyper-V or Virtual PC. This feature does not use a hypervisor or virtual hardware. You should think of it as running your C: partition on a VHD file instead of a real hard disk partition. You can find more info about this feature here: https://technet.microsoft.com/en-us/library/dd440865(WS.10).aspx.
What is interesting about this feature is that it can work with a differencing VHD file. What is a differencing VHD file? A differencing VHD file is linked on a regular VHD file (called parent VHD) and only stores modified blocks of data in relation to its parent VHD. The result is that we can easily roll back changes by simply resetting this differencing VHD to its initial (empty) condition. This is a technique that is commonly used in Lab deployments where several virtual machines use differencing VHDs in order to test scenarios and then rollback changes. We can also use differencing disks to achieve the same result in a physical Windows 7 installation.
In this blog post we are going to describe a “step-by-step” guide on how to use this technique. In a second blog post we will describe how to automate the installation by using MDT 2010 so that we can leverage this capability at the enterprise level.
Step 1: Creating a WinPE ISO
WinPE is the Windows Preinstallation Environment used during the installation of Windows. It is also used for common maintenance tasks or for troubleshooting broken installations. It is included in Windows Automated Installation Kit for Windows 7 (Download). We will install and use WinPE in order to manage the differencing VHD of the Operating System either by discarding changes (to revert to our initial Steady State) or by committing the changes (by merging the differencing VHD to its parent VHD).
Download and install WAIK for Windows 7 (Link) on an existing Windows 7 or Windows Server 2008 R2 installation.
As Administrator run: Start –> All Programs –> Windows AIK –> Deployment Tools Command Prompt.
On the command prompt run the following commands:
copype.cmd x86 c:\winpe_x86
copy c:\winpe_x86\winpe.wim c:\winpe_x86\ISO\sources\boot.wim
copy "c:\program files\Windows AIK\Tools\x86\ImageX.exe" c:\winpe_x86\iso\
copy c:\windows\system32\bcdedit.exe c:\winpe_x86\iso\
oscdimg.exe –bC:\winpe_x86\iso\boot\etfsboot.com –u2 –h -m -lWINPE C:\winpe_x86\iso\ C:\WINPE.iso(Note: Replace x86 with x64 if you are looking to install the x64 version of Windows 7)
Store the resulting WINPE.iso file. We will use it to install WinPE on our workstation later.
Step 2: Creating the VHD files
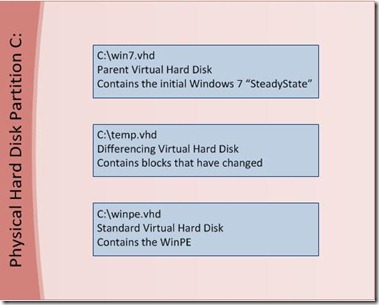
On Step 2 we are going to use the diskpart command line utility to format the physical hard disk and create 3 VHD files:
- c:\win7.vhd: The parent VHD file which will contain our “Steady State”.
- c:\temp.vhd: The differencing VHD file which will be used to store the changes.
- c:\winpe.vhd: The VHD file which will host WinPE.
The command below will create a parent VHD file of approximately 30 GB size and of type “expandable” (meaning that it will start from zero size and expand up to the 30 GB limit). Feel free to change the size according to your specifications. You can also use a type “fixed” vhd file which will pre-allocate the whole size of the VHD (by creating a big VHD file of the maximum size you specify). Using a “fixed” VHD file will give you a small performance improvement vs. using an “expandable” one. The last step will create a copy of the differencing VHD which we will use to quick revert our VHD to an initial “empty” state.
On the target workstation boot from your Windows 7 media.
On the Setup Screen click SHIFT-F10 to open the command prompt.
On the command prompt run the following commands:
diskpart
select disk 0
clean
create partition primary
select partition 1
active
format fs=ntfs quick
assign letter=C
create vdisk file=”c:\win7.vhd” maximum=30000 type=expandable
create vdisk file=”c:\temp.vhd” parent=”c:\win7.vhd”
create vdisk file=”c:\winpe.vhd” maximum=2000 type=expandable
select vdisk file=”c:\win7.vhd”
attach vdisk
exit
copy c:\temp.vhd c:\temp.vhd.orig
Step 3: Installing Windows 7 on the parent VHD file
The next step is to use the win7.vhd file we created, to install Windows 7:
Close the command prompt and return to the Windows 7 setup. Click “Next” and proceed with the installation by selecting “Install Now”.
Select “Custom (Advanced)” installation.
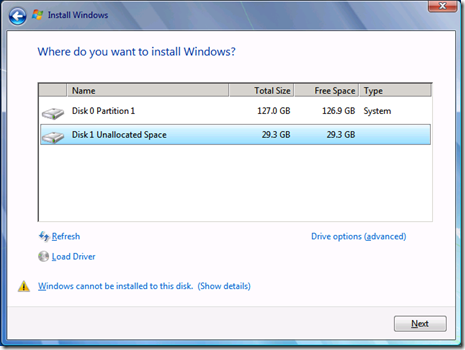
Select the VHD file to install Windows 7 (you will notice which one it is by its size, in comparison to the physical hard disk).
Ignore the error “Windows cannot be installed to this disk.” and proceed with the setup by clicking “Next”.
Complete the OS setup and logon to your new Windows 7 installation.
Step 4: Installing WinPE on the winpe.vhd file
On your new Windows 7 installation perform the following to install WinPE on the winpe.vhd file.
Open the Command Prompt as Administrator.
Run the command:
bcdedit –copy {current} /d “Windows 7 AVHD”
This command will return a GUID in the form of {94bb083f-1f8f-11e0-8b9f-a1bc155f31e3}. Make a note of this GUID as you will use it in the commands that follow and also during Step 5. This is the GUID for the differencing VHD.
Run the commands:
bcdedit –set GUID device vhd=[D:]\temp.vhd
bcdedit –set GUID osdevice vhd=[D:]\temp.vhd
Replace GUID with the one that you got from the bcdedit –copy command previously.
Replace D: with the drive where your temp.vhd is located (if it is not on D:). Do not omit the brackets!Run the following commands to format winpe.vhd and install WinPE in it:
diskpart
select vdisk file=”d:\winpe.vhd”
attach vdisk
clean
create partition primary
format fs=ntfs quick
assign letter p
exit
Insert the WINPE.iso you created on Step 1. Let’s say that you inserted it on E: (replace accordingly below – if different).
Run the commands:
e:\imagex /apply e:\sources\boot.wim 1 p:
xcopy e:\boot\*.* /e /f p:\boot\
copy e:\bootmgr p:
bcdedit -create /d "WinPE" -application osloader
The last command will return a GUID in the form of {94bb083f-1f8f-11e0-8b9f-a1bc155f31e3}. Make a note of this GUID as you will use it in the commands that follow. This is the GUID for WinPE.
Run the commands:
bcdedit -set GUID device vhd=[D:]\winpe.vhd
bcdedit -set GUID osdevice vhd=[D:]\winpe.vhd
bcdedit -set GUID path \windows\system32\boot\winload.exe
bcdedit –set GUID systemroot \windows
bcdedit -set GUID winpe yes
bcdedit -set GUID nx OptIn
bcdedit -set GUID detecthal yes
bcdedit -displayorder GUID –addlast
bcdedit -timeout 0
Replace GUID with the one that you got from the bcdedit –create command.
Replace D: with the drive where your winpe.vhd is located (if it is not on D:). Do not omit the brackets!
Step 5: Create the scripts to automate discarding and committing changes
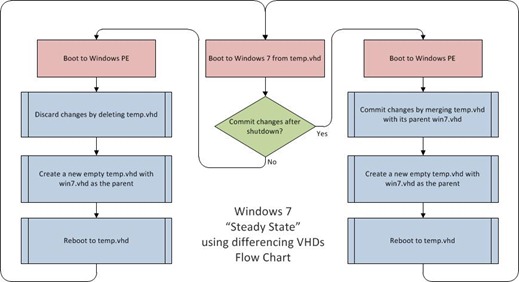
We have created all the necessary VHD files. In the next step we need to provide the logic behind “discarding” and “committing” changes we have made in each session. As previously explained this is done by either resetting or merging the differencing VHD file temp.vhd. This procedure is done by booting into WinPE (through winpe.vhd which we created in Step 4), doing the change, and then rebooting to the differencing VHD. There are two options that we will configure:
- Discard the changes and revert to the “SteadyState”: This is done by simply rebooting or shutting down and restart the machine. We will place a script running during the shutdown which will configure an autorun script for WinPE to delete temp.vhd, replace it with a blank one and then change the default booting partition to the (now empty) differencing VHD (temp.vhd).
- Commit the changes permanently: This is done by running a script located in c:\windows\system32 called Commit.Bat. This script configures an autorun script for WinPE to merge temp.vhd with win7.vhd, create a new empty temp.vhd differencing disk and then change the default booting partition to the (now empty) differencing VHD (temp.vhd).
Additionally we will also configure a startup command to change the default booting partition to WinPE (winpe.vhd).
Here are the detailed steps on how to configure this:
First of we need two things: The 2 GUIDs we used during Step 4, the differencing VHD GUID and the WinPE GUID. We are going to use those to define the default booting partition (this is how bcdedit works).
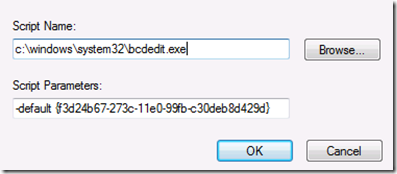
Run: gpedit.msc to open to Local Group Policy Editor. Go to: Local Computer Policy –> Computer Configuration –> Windows Settings –> Scripts (Startup/Shutdown). Double-Click “Startup” to open the “Startup Properties” window and click “Add”. Enter the following:
Script Name: c:\windows\system32\bcdedit.exe
Script Parameters: –default GUIDReplace GUID above with the WinPE GUID you noted in Step 4. Click “OK” and close Local Group Policy Editor.
Verify that winpe.vhd is still mounted as Drive P:. If this is not the case then use diskpart (or diskmgmt.msc) to attach it.
Go to: P:\windows\system32 and run:
notepad winpeshl.ini
Add the following lines inside winpeshl.ini:
[LaunchApps]
%SYSTEMROOT%\system32\winpe.batThis file will autorun winpe.bat during WinPE boot. After completion WinPE will automatically reboot the computer. Save the file and close Notepad.
Again from: P:\windows\system32 run:
notepad discard.bat
Add the following lines inside discard.bat:
copy /y c:\temp.vhd.orig c:\temp.vhd
bcdedit –default GUID
Where GUID is the differencing VHD GUID you noted in Step 4. Save the file and close Notepad.
Again from: P:\windows\system32 run:
notepad commit.bat
Add the following lines inside commit.bat:
echo select vdisk file=c:\temp.vhd > vhdmerge.s
echo merge vdisk depth=1 >> vhdmerge.s
diskpart –s vhdmerge.s
copy /y c:\temp.vhd.orig c:\temp.vhd
bcdedit –default GUID
copy /y discard.bat winpe.bat
Where GUID is the differencing VHD GUID you noted in Step 4. Save the file and close Notepad.
Again from: P:\windows\system32\ run:
copy discard.bat winpe.bat
Create a new bat file on c:\windows\system32 called commit.bat. In it add the following lines:
echo select vdisk file=D:\winpe.vhd > winpe.s
echo attach vdisk >> winpe.s
diskpart –s winpe.s
ping 127.0.0.1
copy /y p:\windows\system32\commit.bat p:\windows\system32\winpe.bat
Where D: is the drive where your VHD is stored. Save the file.
From the command prompt execute the following command:
bcdedit –default GUID
Where GUID is the WinPE GUID you noted in Step 4.
That’s it! You can proceed to configure Windows 7 exactly the way you want to appear in your initial “SteadyState” (even Windows Activation will work between sessions). Each time you restart WinPE will run and discard all the changes by resetting the differencing VHD and then reboot to Windows 7.
If you want to commit the changes you have made then you need to run: c:\windows\system32\commit.bat (of course as a local administrator!) and the changes will stay as WinPE will merge the differencing VHD to its parent after the first reboot.
Below is a flow chart detailing the procedure:
In a next blog post I will outline how you can automate this procedure by using MDT 2010 (Microsoft Deployment Toolkit) and AutoIT scripts.
Feel free to provide feedback on ways to improve this implementation either by contacting me or by commenting below.
Thanks,
Panos Macheras
Infrastructure Consultant


