SSIS 2012 EzAPI - First Real Package (History Archive)
This is the second in a series of Blog posts which will cover basic to advanced stages of SSIS package generation via EzAPI. In this post I will extend the project from the first Blog in the series and this time the packages will actually transfers data from one server to another.
Project Description
Often there is a need to move data from an application database to an archive database and if it was as simple as copying the entire table, it would be no problem and the wizard would provide what you need. But as the tables get larger, the idea of copying the entire table would present far too much load and delays on the source application database. So in this example we will create an SSIS project which copies data from the source database to the archive database based on a key column based on the max key value found in the archive database so only new records added since the prior run are added.
(While this code will be close to complete there are some things which require additional consideration prior to using this code in a true production environment.)
Prerequisites
This blog assumes you followed and completed the first blog in this series "SSIS 2012 EzAPI - Basic Intro". If you have not completed that post you may have trouble following this post since this post assumes you are starting with the project as it is left in the prior post.
Database Setup
In order to use the code in this blog you will need to create a table called TablesToArchive where we will get the list of tables to build into the SSIS packages and what the key column for each table will be. Scripts to create these examples can be found in the "Database and Table create scripts.sql" file included in the Zip for this blog.
New C# Code
In the last blog we just added all the code to the "Main" function, but since we will actually make real SSIS packages this time we will add new functions to make sure we code that is correct and readable. But we have a problem...In order to get only new data from the source database we need to look at the destination database to find the max prior key that we loaded. In order to do this, we need to use an ExecSQL task in SSIS and return the results to a variable so it can be used in a "Data Flow" task to filter the selected data. But the EzAPI code does not have the functions needed to return results from an ExecSQL task so we are going to need to add that first.
On line 608 of "EzExecutables.cs" you need to add the following code so you can include result set bindings when dealing with EzExecSQL tasks.
publicIDTSResultBindings ResultSetBindings
{
get { return (host.InnerObject asExecuteSQLTask).ResultSetBindings;}
}
And on Line 690 of the same file.
publicbool UseProjectReference
{
get { return (bool)host.Properties["UseProjectReference"].GetValue(host); }
set { host.Properties["UseProjectReference"].SetValue(host, value); }
}
Finally on line 1023 of "EzComponents.cs" you need to add the following code so you can use a variable as a source sql string for an OLEDBSource in a Dataflow task.
publicstring SqlCommandVar
{
get { return (string)m_meta.CustomPropertyCollection["SqlCommand"].Value; }
set
{
if (AccessMode != AccessMode.AM_SQLCOMMAND && AccessMode != AccessMode.AM_SQLCOMMAND_VARIABLE)
m_comp.SetComponentProperty("AccessMode", AccessMode.AM_SQLCOMMAND_VARIABLE.GetHashCode());
m_comp.SetComponentProperty("SqlCommandVariable", value); ReinitializeMetaData();
}
}
Actual Console Project code
Next are the code changes required for the Console Project so we can create SSIS projects via EzAPI.
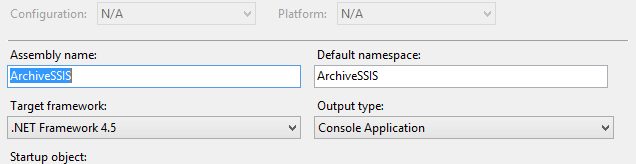
First, since I am starting with the project code from the first blog post I wanted to change a few things to make sure we don't keep building a project with the name "FirstEzAPISSISPackage.Exe" so I needed to right click on the Project and change a few names in the project properties menu.
Next for some of the code we are adding you will need to make sure you add a reference to "Microsoft.SqlServer.SQLTask". This is done just like the step from the first Blog when we added the other references.
 using System;
 using System.Collections.Generic;
 using System.Linq;
 using System.Text;
 using System.Threading.Tasks;

 using Microsoft.SqlServer.Dts;
 using Microsoft.SqlServer.SSIS.EzAPI;


 namespace ArchiveEzAPIPackage
 {
 class ArchiveSSIS
 {
 static void Main(string[] args)
 {

 //Unlike in 2008R2 and earlier we start with a Project in SSIS now
 EzProject myEzAPIProject = new EzProject();

 //With EzAPI YOU ALWAYS WANT TO NAME EVERYTHING (if not you get a GUID for the name)
 myEzAPIProject.Name = "ArchiveDataProject";

 //now lets create a package which can be used to run all the other packages as one start point
 EzPackage MasterPackage = new EzPackage();

 //Dont forget to name the master package...
 MasterPackage.Name = "Archive Data Master Package";

 //Hard coding the source and Archive DB connections for now. This should be a parameter in a true package
 string SourceConnString = "Data Source=.\\SQL2k12;Initial Catalog=DemoSource;Provider=SQLNCLI11.1;Integrated Security=SSPI;Auto Translate=False;";
 string ArchiveConnString = "Data Source=.\\SQL2k12;Initial Catalog=DemoArchive;Provider=SQLNCLI11.1;Integrated Security=SSPI;Auto Translate=False;";


 //Create the connection and command to get the list of tables and loop through them
 string ListSourceConnString = "Data Source=.\\sql2k12;Initial Catalog=dba;Integrated Security=True;";
 string query = "SELECT [TableName], [KeyColumn], [KeyType] FROM [dbo].[TablesToArchive]";
 System.Data.SqlClient.SqlConnection conn = new System.Data.SqlClient.SqlConnection(ListSourceConnString);
 System.Data.SqlClient.SqlCommand cmd = new System.Data.SqlClient.SqlCommand(query, conn);

 //Open the connection
 conn.Open();

 //create data adapter
 System.Data.SqlClient.SqlDataReader dr = cmd.ExecuteReader();

 //Loop through all the rows
 while (dr.Read())
 {
 //get the columns of data from the source list
 string TableName = dr["TableName"].ToString();
 string KeyColumn = dr["KeyColumn"].ToString();
 string KeyType = dr["KeyType"].ToString();

 //get a package reference with the archive package
 EzPackage ArchivePackage = CreateTransferPackage(TableName, KeyColumn, KeyType, SourceConnString, ArchiveConnString);

 //add that archive package to the Project
 myEzAPIProject.AddPackage(ArchivePackage);

 //now that the archive package is part of the project we need the master package to have an exec package task for it
 EzExecPackage exPack = new EzExecPackage(MasterPackage);
 exPack.PackageName = TableName.Replace("[", "").Replace("]", "").Replace(".", "").ToString() + ".dtsx";
 exPack.UseProjectReference = true;
 exPack.Name = TableName.Replace("[", "").Replace("]", "").Replace(".", "").ToString();

 }

 //Close the connection
 conn.Close();


 //Finally add your master package to the project
 myEzAPIProject.AddPackage(MasterPackage);

 //When you save the Project it saves the entire project in a single ISPAC file
 myEzAPIProject.SaveTo("c:\\SSIS\\ArchiveDataSSISProject.ispac");

 }

 static EzPackage CreateTransferPackage(string _tblName, string _KeyColumn, string _KeyColumnType, string _SourceConnString, string _ArchiveConnString)
 {
 EzPackage CTP = new EzPackage();

 //create a name for the package but in case
 // any "[" "]" "." characters are in the table name replace them
 // with an empty string.
 string SafeTableName = _tblName.Replace("[", "").Replace("]", "").Replace(".", "").ToString();
 CTP.Name = SafeTableName;


 //Add a connection to access the Source Database
 EzSqlOleDbCM srcConn = Activator.CreateInstance(typeof(EzSqlOleDbCM), new object[] { CTP }) as EzSqlOleDbCM;
 srcConn.ConnectionString = _SourceConnString;
 srcConn.Name = "SourceDB";

 //Add a connection to access the Archive Database
 EzSqlOleDbCM ArchiveConn = Activator.CreateInstance(typeof(EzSqlOleDbCM), new object[] { CTP }) as EzSqlOleDbCM;
 ArchiveConn.ConnectionString = _ArchiveConnString;
 ArchiveConn.Name = "ArchiveDB";

 //Based on the Type of Column the Key is create a Variable of that Type so it can store the max Key from the Archive
 if (_KeyColumnType.ToUpper() == "DATETIME")
 {
 CTP.Variables.Add("_MaxKey", false, "User", "1900-01-01 00:00:00:000");
 }
 else //we are only supporting Datetime and Int so far but this can easily be extended
 {
 CTP.Variables.Add("_MaxKey", false, "User", 0);
 }

 EzExecSqlTask GetMaxVal = new EzExecSqlTask(CTP);
 GetMaxVal.Connection = ArchiveConn;
 //make the string based on the KeyField Value from the Config Table because a few of the tables call RecoveryKey something else...
 //Note that this process does not support a composite key, only when a single key exists in a single column with this work without error or manual update

 if (_KeyColumnType.ToUpper() == "DATETIME")
 {
 GetMaxVal.SqlStatementSource = "Select convert(varchar, convert(datetime, isnull(Max(" + _KeyColumn + "), '1/1/1900 00:00:00:000')), 121) as recKey from " + _tblName;
 }
 else
 {
 GetMaxVal.SqlStatementSource = "Select isnull(Max(" + _KeyColumn + "), -1) as recKey from " + _tblName;
 }

 //Dont forget to name the ExecSQL task
 GetMaxVal.Name = "Get Max Key Value";

 //get the max recoveryKey value
 GetMaxVal.ResultSetType = Microsoft.SqlServer.Dts.Tasks.ExecuteSQLTask.ResultSetType.ResultSetType_SingleRow;
 GetMaxVal.ResultSetBindings.Add();
 Microsoft.SqlServer.Dts.Tasks.ExecuteSQLTask.IDTSResultBinding resBin = GetMaxVal.ResultSetBindings.GetBinding(0);
 resBin.DtsVariableName = "User::_MaxKey";
 resBin.ResultName = "recKey";

 //Create a variable which will be the source of the DataFlow task
 Microsoft.SqlServer.Dts.Runtime.Variable sqlStr = CTP.Variables.Add("_SourceSQL", false, "User", "select * from " + _tblName + " with (nolock) where " + _KeyColumn + " >= 0 ORDER BY " + _KeyColumn);
 sqlStr.EvaluateAsExpression = true;
 if (_KeyColumnType.ToUpper() == "DATETIME")
 {
 sqlStr.Expression = "\"select * from " + _tblName + " with (nolock) where " + _KeyColumn + " > convert(datetime, '\" + (DT_WSTR, 50) @[User::_MaxKey] + \"') ORDER BY " + _KeyColumn + " \"";
 }
 else
 {
 sqlStr.Expression = "\"select * from " + _tblName + " with (nolock) where " + _KeyColumn + " > \" + (DT_WSTR, 30) @[User::_MaxKey] + \" ORDER BY " + _KeyColumn + " \"";
 }

 //Create the dataflow task
 EzDataFlow dataFlow = new EzDataFlow(CTP);
 dataFlow.Name = "Move New Records";

 //Connect the dataflow task to the execSQL task
 dataFlow.AttachTo(GetMaxVal);

 //Create an OLEDbSource Connection which will use the Variable with max key
 EzOleDbSource source = Activator.CreateInstance(typeof(EzOleDbSource), new object[] { dataFlow }) as EzOleDbSource;
 source.Connection = srcConn;

 source.SqlCommandVar = "User::_SourceSQL";
 source.Name = "Source Data for " + SafeTableName;

 EzOleDbDestination dest = Activator.CreateInstance(typeof(EzOleDbDestination), new object[] { dataFlow }) as EzOleDbDestination;
 dest.Connection = ArchiveConn;
 dest.Table = _tblName;
 dest.AccessMode = AccessMode.AM_OPENROWSET_FASTLOAD;
 dest.FastLoadMaxInsertCommitSize = 10000;
 dest.FastLoadOptions = "ROWS_PER_BATCH = 10000";
 dest.Name = "Dest for " + SafeTableName;


 //Connect the source and Dest in the DataFlow task
 dest.AttachTo(source);


 //Return the Package to be added to the Project
 return CTP;
 }
 }
 }
Don't worry, since there is a lot more code this time around, I am going to also include a Zip file with all the code samples zipped up to make life a little easier.
Testing and Results
Once again when you build this project you will end up with an EXE file you need to run to get the IsPac project file but once you do, assuming you used the examples I built for this package you should have a project file that has 3 different packages in it. Since this is a more advanced package which may be worth taking a look at I am going to walk though how to get this ispac file in SSDT.
Step 1 is to Open Visual Studio
(I am sorry for switching versions here but I had 2010 installed before 2012 was released so my 2012 SSIS packages are edited in 2010 which will be almost identical to 2012 and should be easy to jump back and forth).
Select New Project then open the SSIS Project Type menu (Note this is not the SSIS option on the main Business Intelligence menu. You need to open it and select Integration Services to get the option we need).
On the Integration Services menu you have 2 options (the import option is not on the main BI screen).

Again you need to select the Import option.
Once you select the import option you will get a menu much like what you see if you were going to deploy an ISPAC file. Select the ispac file created when you run the EXE file created by building the package then select next.

Finally if there is no problem you will have a screen that confirms your import of the package into a new project.
Here is an example of the solution you will see if you used the scripts from this demo.
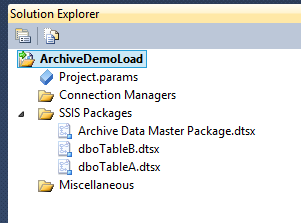
Finally, if you check any of the Archive table packages you will see identical layouts and the "Master" package a list of ExecPackage tasks for each archive package created by this process. Here is an example of one of each type
(Master is on top and one of the archive packages on the bottom).
