The Windows Azure Pack VM Role – Part 2 Concept
This is part 2 from the blog series written by MVP Marc van Eijk (@_marcvaneijk).
After successfully deploying a gallery item, which was downloaded from the custom feed in the Web Platform Installer, the first thing you probably did was install the VM Role Authoring Tool to open that gallery item. At least, that is what I did. Just to look at some VM Role examples created by Microsoft and work my way from there. Now this is probably when things get a bit more complex. There are quite a few options in the VM Role Authoring Tool and it is not really clear what all these options mean, how they work and how they relate to each another.
To provide us with some help, Stephen Baron created a couple of videos to explain the workings of the VM Role and Charles Joy posted them in a VM Role Authoring Tool How Tovideos playlist. These recordings really helped. I was now able to make adjustments to the gallery item without breaking it. To be honest, I just edited some existing values in downloaded gallery items into something else. I still didn’t understand the meaning of all those options, fields and values. The more I worked with the VM Role, the more questions seemed to arise. To provide some answers to these questions we will start with the main concept.
Concept
The VM Role consists of two packages. The Resource Definition Package is imported in Windows Azure Pack. This package is required. The other package is called the Resource Extension Package and is imported in System Center Virtual Machine Manager. The Resource Extension Package is only required if you want install applications on top of the Operating System. Each package is a compressed file that contains multiple files, just like a .zip file.
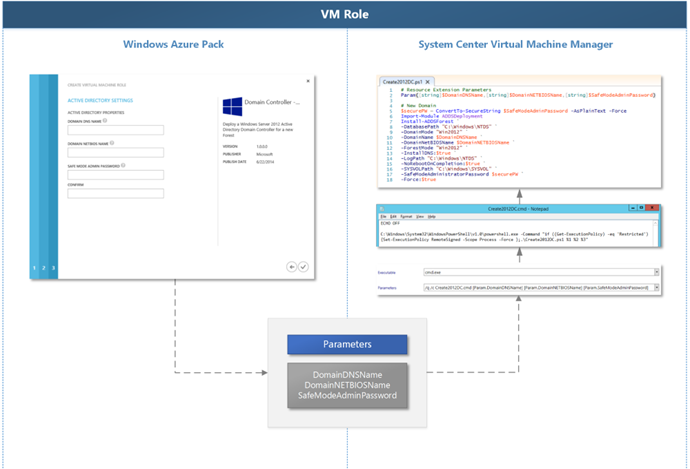
To get an idea of some of the possibilities with the VM Role, you might think of a PowerShell script. A PowerShell script can be very complex. The variables are placed on the top of the script so we only need to edit that section, without having to bother with the complexity of the rest of the script. The VM Role takes this to the next level, allowing you to capture those variables with easy to understand questions for a tenant in Windows Azure Pack.
The tenant submits these values through the VM Role wizard. The values are passed from the Resource Definition (Windows Azure Pack) to the Resource Extension (System Center Virtual Machine Manager), where they can be used as values for variables. For example in that PowerShell script.
Resource definition
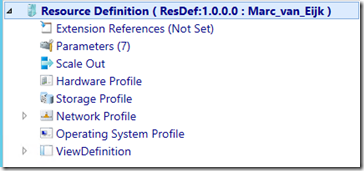
The resource definition allows you to configure the VM Role settings that are used in Windows Azure Pack. When a tenant selects a VM Role from the gallery in Windows Azure Pack, he is presented with a wizard. All the requirements, options, tabs, values and language variations displayed in the wizard are defined in the view definition, which is part of the resource definition. The main purpose of the wizard is to capture values into parameters. These values can be prepopulated, hard-coded or entered by the tenant. When the wizard is completed and the tenant submits the request, the captured parameters are passed from the resource definition to the resource extension.
Resource extension
After the request is submitted by the tenant in Windows Azure Pack, the resource extension comes into play. The resource extension leverages the service template engine in System Center Virtual Machine Manager. One or more virtual machine instances are installed with the specified Operating System and the configured application logic is executed. The VM Role provides many options to configure application logic. Before looking at these options it is essential to understand the installation procedure.
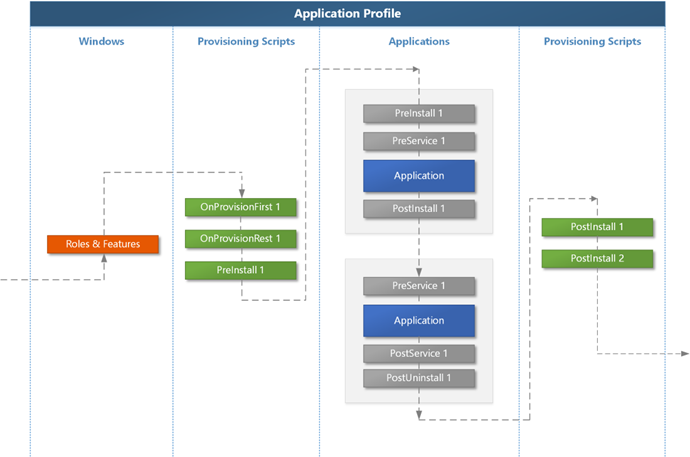
The resource extension contains one application profile. All application logic is configured within that application profile. Specified Windows Server roles and features will be installed first. The rest of the installation steps and installation order can be completely defined by yourself.
It is possible to attach a script to the application profile. These scripts are called provisioning scripts and are executed before or after all individual applications are installed and are useful for prepare or cleanup actions that apply to all applications. A script to format and label additional data disks in the virtual machine is an example of a pre-install provision script. Deleting the folder with the application logic at the end of the deployment process is an example of a post-install provision script. Provisioning scripts have a green color in the Application Profile image.
For the individual applications, there are three application types that you can add to the application profile. The applications are referenced in blue in the Application Profile image.
- Web Application
- SQL DAC
- Script Application
Besides the three applications you can also add a SQL Profile to the complete a sysprepped SQL installation. The SQL Profile is also referenced in blue in the Application Profile image.
- SQL Profile
Based on the application type, depending actions can be attached. The depending actions are referenced in grey in the Application Profile image. The following depending actions are available.
- Script Command
- SQL Script
- SQL Deployment
Depending actions and Provisioning Scripts can be configured with a Script Type. A Script Type defines when a script is executed. The following Script Types are available.
- PreInstall
- PostInstall
- PreService
- PostService
- PreUninstall
- PostUninstall
- OnProvisionFirst
- OnProvisionRest
- OnDeleteRest
- OnDeleteLast
Each Script Type is triggered by a different action and can only be applied at a certain level (application profile level or application level).
All these options provides even more choices. I have performed a lot of test deployments to figure out what script and script type can be referenced where and how many times. The upcoming blog on the Resource Extension will describe that in more detail. The following table shows the application types, possible depending actions and the limits for each type.
- Web Application (one or more)
- Script Command (one or more)
- SQL DAC (one or more)
- SQL Script (one or more)
- Script Command (one or more)
- SQL Profile (only one)
- SQL Deployment (one or more)
- Script Application (only one)
- Script Command (one or more)
VM Role Authoring Tool
The VM Role Authoring Tool can be downloaded from CodePlex. It is a stable tool that creates consistent valid packages for the VM Role. Please note that since the tool is from CodePlex there is no official support from Microsoft for this tool. After downloading the VM Role Authoring Tool you can extract the files and open the tool from the extracted files with VmroleAuthor.exe.
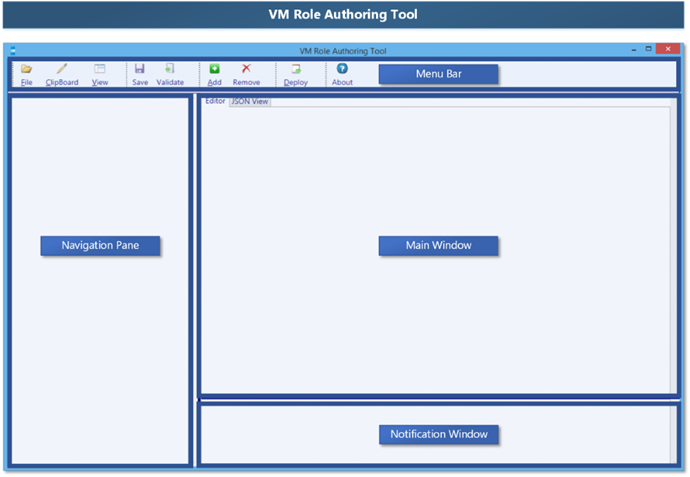
The VM Role Authoring Tool has the following areas.
Menu Bar
The Menu Bar provides multiple menu items with dropdowns. The selections in the menus are context sensitive. You are only able to choose actions valid to the selected item in the Navigation Pane. If the menu item is not valid, it is greyed out.
- File: Allows you to create new VM Role files and packages, open and save existing packages.
- Clipboard: Shortcuts to clipboard actions
- View: A package consists of multiple files. When a package is opened in the VM Role Authoring Tool a working directory is created that contains the extracted files from the package. The View Directory option opens the working directory folder directly.
- Save: Save the selected package or file.
- Validate: The VM Role Authoring Tool provides error checking. When you select this menu item all the packages and files that are open in the VM Role Authoring Tool are validated. Errors and warning are displayed in the Notification Area.
- Add: Allows you to add items to a package or file.
- Remove: Remove an item from a file or package. It also allows you to remove a complete file or package from the tool.
- Deploy: This menu item was introduced in version 1.1 of the VM Role Authoring Tool and allows you to deploy a resource extension to Microsoft Azure.
- About: Version
Navigation Pane
The Navigation Pane in the VM Role Authoring Tool displays the content of one or more files and/or packages. You can create new files and packages from the Menu Bar, import existing items from the Menu Bar and even open existing items by dragging and dropping them directly in the Navigation Pane.
Main Window
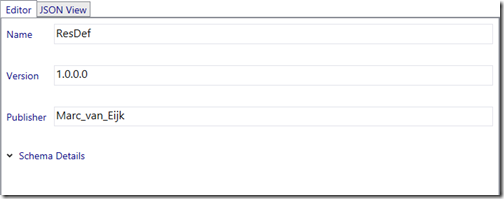
The Main Window displays the details of the entry that is selected in the Navigation Pane. The Main Window has two tabs. The editor tab displays an abstraction view of the JSON language that is used by the VM Role. This abstracted view provides fields with validation and related field names.
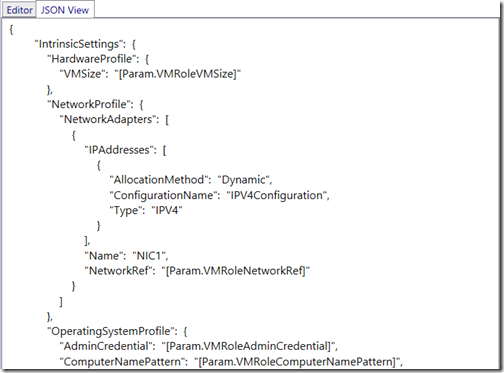
The JSON View tab show the actual JSON language that reflect the values specified in the Editor View.
I have had a couple of cases where the validation resulted in errors that I did not understand. A quick peek at the JSON View helped in these situations.
Notification Window
The VM Role packages consists of many values and dependences between these values. The creators of the VM Role Authoring Tool provided a validation option that will verify the values and notify when errors or warning exists. The errors and warnings are presented in the Notification Windows as hyperlinks.
These hyperlink will take you to the related value in the Main Window.
Before you start
The VM Role Authoring Tool is an offline tool. It does not have an undo option. Before creating a new package in the VM Role Authoring Tool it is a good idea to create a folder structure for working with packages. A simple folder structure will save you from a lot of grief when an accidental removal or change can’t be undone. This folder structure can also contain folders with the application logic used within the resource extension.
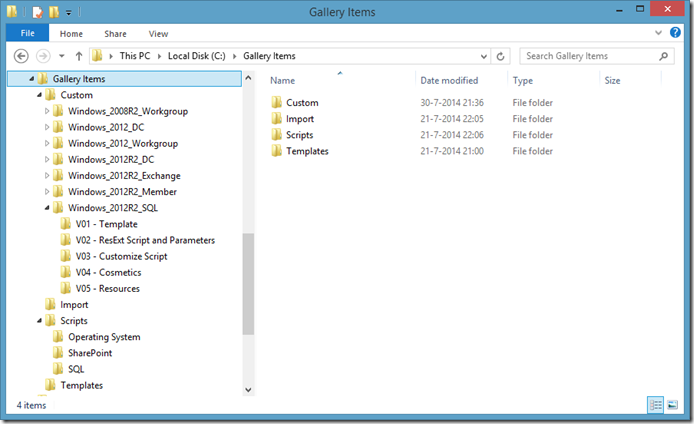
Throughout my experiences with the VM Role Authoring Tool the following folder structure works for me.
- Import: Importing the packages into Windows Azure Pack or Virtual Machine Manager locks the files (also after the import). When a package is ready for import I copy it from the custom folder to the import folder. The import folder contains the latest versions of all VM Roles that were imported.
- Templates: All the gallery items created by Microsoft downloaded from the custom feed in the Web Platform Installer are placed in this folder. I use these items for reference.
- Custom: This folder contains a folder for each VM Role that I’m working on.
- VM Role name: Think of a good naming convention for your VM Roles and create a folder according to this naming convention for each VM Role that you are working on
- vXX - Description: Before edits are made to a VM Role, a copy of this folder is placed on the same level with a incremented version number and a short description of the type of edits made. It is also recommended to create a naming convention for your VM Role files. For instance: Organization_OS_App_Version
- VM Role name: Think of a good naming convention for your VM Roles and create a folder according to this naming convention for each VM Role that you are working on
- Script: Create a folder for each type of application logic, containing the scripts for that application logic. The best way to organize the folders is by defining a modular structure where the application logic within a folder can run separately or combined with other application logic from another folder. For example a folder with the scripts that apply to the Operating System and a folder with scripts that apply to a specific application.
The following image is a screenshot of the folder structure.
This is by no means the way your folders must be organized. You can create a structure that works for you.
In the next part of this blog series, we will create a new resource definition and discuss the details.
