Creating Master-Detail views with Web Part connections using Flickr Services as a Data Source
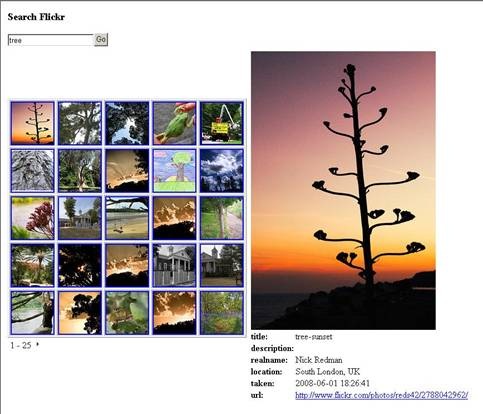
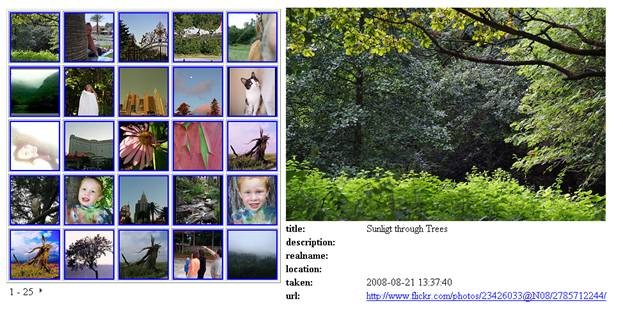
Hi everyone, Allan Smith here. I’m a Software Development Engineer in Test on the SharePoint Designer Data team. I have a great example of using a server-side script data source to create Master-Detail views using the DataFormWebPart. My finished example is show in this screen shot:
I will use Flickr services as my data source in this example thus there are a few pre-requisites before we can get started. Flickr requires an API key in order to use their service but this is easy to setup by visiting their site at https://www.flickr.com/services/api/. I also recommend reading through their API methods to see what is available via this service.
For this example I have decided to use the flickr.photos.search and flickr.photos.getInfo methods. The Flickr site also has documentation on the different types of request/response formats they offer. We will be using the REST format. The documentation shows how your request string should be formatted which we will be using when we create our data source in SharePoint Designer.
The overall approach I use to create this example is as follows:
1. Create a Data Source that retrieves data from flickr.photos.search.
2. Build a view that is a grid 5x5. This is the master view.
3. Create a Data Source that retrieves data for a specific photo.
4. Build a view that displays the larger photo with details below it. This is the details view.
5. Add a textbox and button to search for a specific tag.
Create the Flickr Search Data Source:
1. Open the Data Source Library
(If the taskpane is not visible, go to the Task Pane menu and select Data Source Library)
2. Expand Server-side Scripts and click on the ‘Connect to a script or RSS Feed… ’ link.
*Note: Server-side script is an odd name for historical reasons, but it is used when you specify a URL with parameters for a request and expect XML in the response.
3. A Data Source Properties window will open.
a. Select the General tab and name your Data Source. i.e. Flickr Search
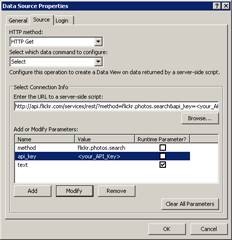
b. Select the Source tab and enter the URL for the REST request with the parameters required by flickr.photos.search.
I am using the following URL where my default search text is ‘tree’:
https://api.flickr.com/services/rest/?method=flickr.photos.search&api_key=<your_API_Key>&text=tree
c. You will need to modify the method and api_key parameters so that they are not Runtime Parameters.
*Note: The runtime parameters option specifies whether a parameter can be modified at runtime or if it is static. Since we do not want to change the method or API key we will uncheck the Runtime Parameter box for these parameters.
Create the Master view
For my example I am using an html table to layout my views but you can use any method of your choosing.
1. Drag the Flickr Search Data Source onto the design surface.
2. Click the OOUI (On-object User Interface) toggle and select ‘Change Layout… ’
3. Select the ‘two-column repeating form with border’ layout and click OK.
4. Select the data inside one of the grid cells and delete it. In this example we will not use the default fields given to us by the data source.
5. Insert an html image tag by going to the Insert menu, selecting HTML controls and clicking on Image.
You need to set the image ‘src’ attribute to the Flickr specific format here: URL’s documentation
I have formatted my URL to be:
https://farm{@farm}.static.flickr.com/{@server}/{@id}_{@secret}_s.jpg
*Note: The {@name} format represents an XML node in the returned data that gets inserted at runtime.
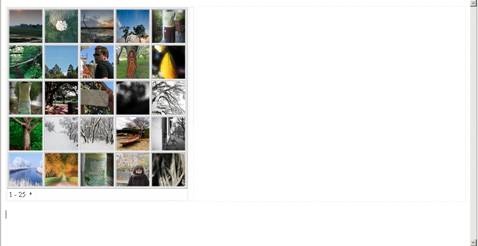
6. In the xsl below this img you will notice two lines that have “mod 2” in them. This is the code that specifies how many columns should be in your grid. I have changed this to be “mod 5” so we will have 5 columns in this example.
7. Select the OOUI again and set the paging to 25 so that we get a nice 5x5 grid.
*Note: You may want to remove the width attributes and styling for the view too so you get a better fitting grid for the images as shown below.
Create the Flickr getInfo Data Source:
Similar steps to creating the Flickr Search Data Source but with a few differences. The first and most obvious difference is that the request URL is different since we will be using the flickr.photos.getInfo method. This URL also requires different parameters and since these parameters will drive what data gets returned from Flickr, we need to set them with some default values so that SharePoint Designer knows what schema to expect.
To get these default values do the following:
1. Select the Search Flickr Data Source and click Show Data
2. From the Data Source Details task pane, copy down the id field value and the secret field value for one of the items.
Now you can create the data source
1. Create another Server-side script Data Source.
2. Select the Source tab and enter the URL for the REST request with the parameters required by flickr.photos.getInfo.
3. I am using the following URL
https://api.flickr.com/services/rest/?method=flickr.photos.getInfo\&api\_key=\<your_API_Key>&secret=&photo_id=
4. Set the default values for secret and photo_id.
Create the Details View
1. Select the Flickr getInfo Data Source and click on Show Data
2. Select the fields that you want and click Insert Selected Field as… Single Item View
I selected title, description, realname, location, taken and url.
3. The next step is to create a webpart connection from the master view to the details view.
4. Click the first image in the master view and select the OOUI for the DataFormWebPart.
5. Select Web Part Connections…
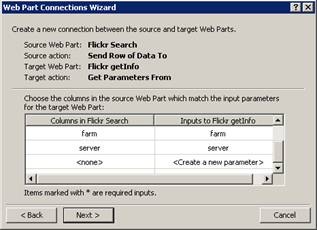
6. Setup the web part connection with the following settings:
a. Send Row of Data To (Next>)
b. Connect to a Web Part on this Page (Next>)
c. Target Web Part – Flickr getInfo
Target action – Get Parameters From (Next>)
d. secret – secret
id – photo_id
farm – farm (You will have to create this new parameter)
server – server (You will have to create this new parameter
e. Create a hyperlink on - img
7. In the Details view add the following markup to add a larger version of the select image.
<tr>
<td colspan="2">
<img src="https://farm{$farm}.static.flickr.com/{$server}/{$photo_id}_{$secret}.jpg" />
</td>
</tr>
* Note this is similar to the URL above except for the ‘$’ character replacing the ‘@’ character. This is because the parameters will be passed in at runtime by the webpart connection and not retrieved from the datasource.
8. Select the URL field value and click on the OOUI for it. Select Format as Hyperlink.
Adding search capability
1. Above the views as another row and cell into the table.
2. Open the Web Parts Gallery
3. Drag over a Form Web Part into the new row and cell.
4. Right-click the web part and select ‘Web Part Connections… ’
5. Create a web part connection from the form web part to the master view using the input as the text parameter
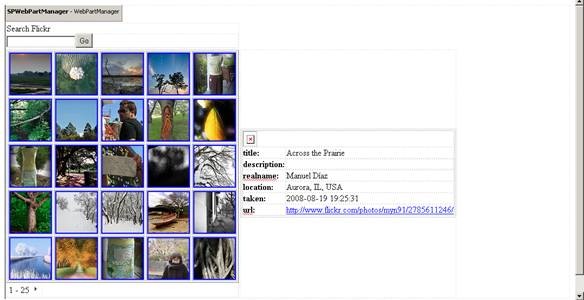
*Unfortunately the larger image doesn’t show up at design time because of the runtime parameters.
thanks,
Allan Smith