SharePoint Conference - Building a SharePoint Designer Mashup (Part Deux)

Hi everyone. For those of you who have been waiting on Part 2 of this blog, I am truly sorry. A valuable lesson that I've learned is - Don't break a blog article into multiple parts :) With that said, let's get right to it.
For those of you who need a refresher on Part 1 (and who can blame you), please go here.
Today, I will walk through the 2 remaining things that I demo'd at the SharePoint Conference.
- Building an advanced view with an ASP.NET calendar control and a data view
- Adding an MSN Weather RSS feed
I will be working off the same site and scenario that I used from Part 1, which is to build a SharePoint site to manage my golf course and golf shop business.
Demo #1 - Building an advanced view with an ASP.NET calendar control and a data view.
For the golf site that we are building, it would be great to create a view that allows us to easily check the scheduled tee times for our golf course based on a selected day. We have a standard Calendar list that already tracks all the scheduled tee times. (If you are following along for the first time, you can just add some sample items to a regular Calendar list)
Here are the steps:
- Create a new blank page in SharePoint Designer
- Attach default.master master page to the new page.
- Format->Master Page->Attach Master Page
- Select the default master page.
- In design view, select the PlaceHolderMain content region.
- Click on the OOUI button (arrow button that shows up when you select the region) and click "Create Custom Content"
- Inside the content region, insert an ASP.NET calendar control
- Bring up the Toolbox task pane
- Drag and drop the "Calendar" control, from the ASP.NET Controls section, into the design surface.
- Below the asp.net control, insert a data view of the Calendar list.
- Task Panes -> Data Source Library
- From the Data Source Library task pane, drop and drop the Calendar list into the page.
- Click the OOUI button in the data view to bring up the Common Data View Tasks menu.
- (optional) You can pick "Edit Columns" to modify the columns to display. (In my demo, I picked the Title and the Start Time.)
So far, you have inserted an asp.net Calendar control and a data view showing list data from the Calendar list. Next, we will create a parameter in the data view that will take in a value passed in by the ASP.NET Calendar control.
- Click the OOUI button of the data view and select Parameters.
- Click New Parameter.
- Give the parameter a name (ie. CalControl)
- Set Parameter Source to Control.
- Set Control ID to the ID of the Calendar asp.net control. By default, the ID is Calendar1.
- Hit OK
Now that you have the parameter set up, you want to add a filter to the data view in order to filter the scheduled tee times based on the date that a user selects from the ASP.NET Calendar control.
- Click the OOUI button of the data view and select Filter
- Check the Add XSLT Filtering checkbox and then click the Edit button.
- This will bring up the XPath Expression Builder dialog. Enter the following XPath expression:
- [ddwrt:FormatDate(string(@EventDate), 1033, 1) = ddwrt:FormatDate(string($CalControl), 1033, 1)]
- Hit OK.
For basic filtering, you generally do not need to write a custom XPath expression. The reason why we have to do it here is because the default date format returned by the ASP.Net Calendar control happens to be slightly different than the date format of the date/time field in the data view. Therefore, basic filtering won't return the right results. XPath expression gives you a more robust way to filter your data. In the expression above, we first formatted both date/time values to be of the same format before we made the comparison. If you are interested to learn more about filtering and formatting date values in a data view, please check out this earlier post.
Important note: In this example, the XSL filtering will be done at the presentation layer and not the data source layer. This can reduce performance of the data view, especially if there is large set of list data..
After setting the filter, there is one more step remaining. This is an advanced step that you can brag to your co-workers about :) When setting the parameter in the data view for the ASP.NET Calendar control, you may notice that we never had specify a property for the control that we selected. That's because we will automatically use the default property of whatever control you selected. This works out well in most scenarios. However, there are cases, like this one, where the default property of the control is actually not what we want to use. If that's the case, you can make an advance modification in the code to specify exactly what property you want. Let me show you how:
- Switch to Code View
- Do a search for 'CalControl' to locate the <ParameterBinding> tag for the CalControl parameter we set in the data view.
- For the Location value in the <ParameterBinding> tag, make the following change:
- Location="Control(Calendar1 , SelectedDate)"
- Note - SelectedDate is the property of the ASP.NET Calendar control for the date that a user selects.
- Now save the page.
- Browse to it.
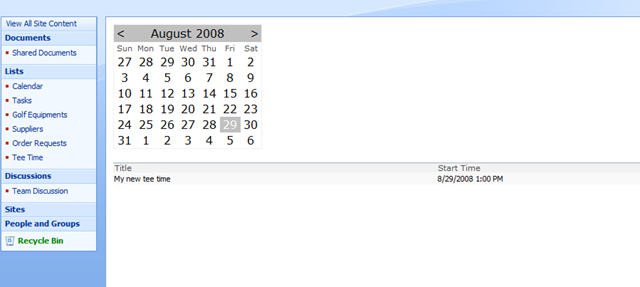
Congratulations! You have just created a rich view that leverages an ASP.NET control and the data view to help you better manage the scheduled tee times for your golf course. The page should look something like this:
Demo #2 - Adding an MSN Weather RSS feed
For those of you who golf, you know how important of a role the weather plays into all this. For the page we just built, we're going to take it one step further and add an MSN Weather RSS feed to display weather for the upcoming week.
Here are the steps:
- Visit https://weather.msn.com/ on your favorite browser.
- Enter the zip code (ie. 98121)
- Click on the RSS feed button

- Copy the URL of the RSS feed (ie. https://weather.msn.com/RSS.aspx?wealocations=wc:USWA0395&weadegreetype=F)
- Open up a page in SharePoint Designer (we can just use the page that we worked on in the previous demo)
- Bring up the Data Source Library (Task Panes -> Data Source Library)
- Expand the Server-side Scripts section.
- Click on Connect to a script or RSS Feed link.
- Paste the URL above in the Enter URL to a server-side script text box.
- Hit OK.

You have just created a data source to the MSN Weather RSS Feed. You should see RSS.aspx on weather.msn.com in the Data Source Library task pane.
- Drag and drop the new RSS Feed data source into the page
- Click on the OOUI button of the newly inserted data view
- Select Edit Columns.
- Remove all columns except for description.
- Back in design view, select one of the xsl values of the description field.
- Click on the OOUI button of the xsl:value to bring up the Common xsl:value-of Tasks menu.
- For the Format as: dropdown, change it from Text to Rich Text.
- Hit Yes to confirm. (Because this data is coming from MSN, we can trust it)
- Save and browse the page.
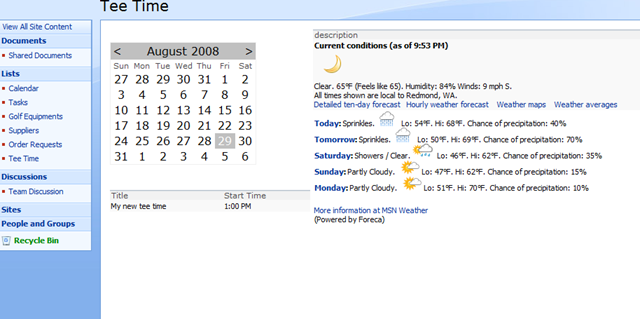
With just a few simple steps, you have now added an RSS Feed that displays the weather for the upcoming week in Seattle. Your page should look something like this:
I hope you guys find this blog post useful. Until next time! Cheers.
Greg