Changing the UI in a Multi-Threaded WPF Application
About
This whitepaper is based on the various ways in which a thread can access the user interface in a multithreaded WPF application.
Although the example provided in this document is very simple, it is designed to give a foundation of the concepts of what is a core topic for anyone aspiring to be a WPF developer.
Intended Audience
This white paper is intended for people with an intermediary understanding of WPF. They should have knowledge of XAML and the basic ways in which the code behind communicates with the user interface. The reader should also have firm knowledge of threads and understand the difference between synchronous and asynchronous calls.
Why is this topic important?
The WPF architecture is designed to have the entire user interface of a window running on a single thread, the reason for this is simple. The single thread design increases simplicity and removes any complications that can occur when threads access the user interface across a multithreaded environment and finally performance is increased because thread affinity avoids locking, which would normally in a multithreaded environment increase overheads.
All user interface objects have thread affinity, which means that it belongs to the particular thread and that other threads don’t have direct access to it. It is therefore vital that you are able to jump onto (if needs be) the user interface thread and make the changes efficiently without blocking it from other processes.
This whitepaper will show you the various implementations to achieve this.
The Example
The example used in this whitepaper ‘spoofs’ a WPF application that is loading a large image progressively from a web service. It does this by calling a web service specifying the resolution it requires (Low, Medium and High). The web service returns the image which is then deserialized at the client side and finally displayed on screen. A progress bar and text box showing how many seconds each process takes is also displayed.
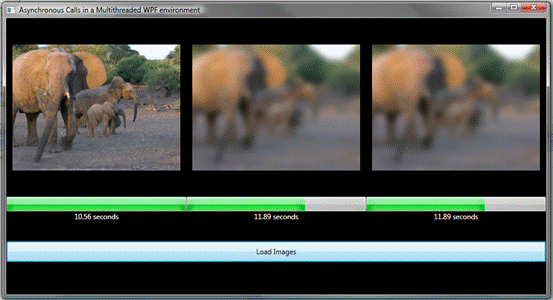
Left to right: Asynchronous call, Synchronous call, and BackgroundWorker
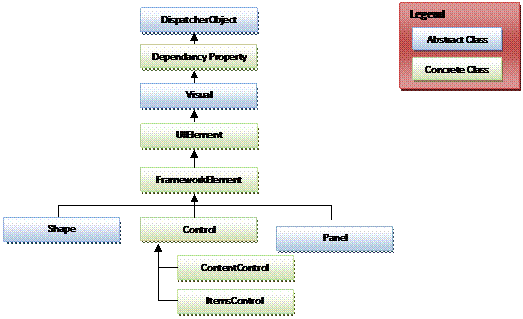
The DispatcherObject
In the previous section I wrote that all of the user interface objects have thread affinity, but what about the types that do not belong to the user interface, how can you tell which objects have thread affinity and which ones do not? The answer lies within looking at the base class, those that derived from the DispatcherObject class have the thread affinity requirement.
 |
If an object is derived from the DispatcherObject you need to work out if you are currently on the right thread, to do this the DispatcherObject has two methods, CheckAccess() and VerifyAccess().
CheckAccess is a method that returns a Boolean to let you know if you are on the right thread
VerifyAccess will throw an exception if you are not on the right thread; this is probably used more if it is critical that your code is on the UI thread.
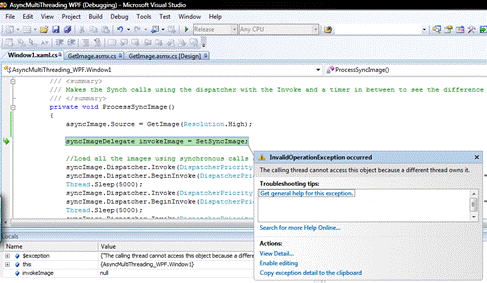
WPF itself uses VerifyAccess if you are trying to access an object on the wrong thread, hence why you get an exception. The Image below shows me calling out of the UI Thread :
asyncImage.Source = GetImage(Resolution.High);
WPF object frequently call the VerifyAccess() to protect themselves from being executed on the wrong thread. They do not call VerifyAccess() in every operation otherwise this would cause a massive performance overhead.
Technorati Tags: WPF,Silverlight,BackgroundWorker,Dispatcher,DispatcherTimer,Asynchronous,Synchronous
A problem with calling VerifyAccess everytime that you want to make a UI change is that once your application has many threads running then you should avoid directly accessing these objects as it could cause locking. To ensure that you can make updates to the user interfaces on the UI thread from various threads you should use the dispatcher to jump onto the user interface thread.
The Dispatcher
Every thread that creates a user interface object needs a Dispatcher object, the Dispatcher owns the thread, which in effect runs a loop that dispatches input messages to the appropriate handlers. As well as handling the input it also ensures that we are put on the right thread to make the changes to the user interface.
Obtaining the Dispatcher
All the objects that have thread affinity have the base class of DispatcherObject, this class has a property Dispatcher which will return the Dispatcher object for the thread that the object belongs to.
To access the dispatcher for the current thread you can call the Dispatcher.CurrentDispatcher static property.
Getting onto the Right Thread with a Dispatcher
Any changes to the user interface needs to be made on the user interface thread. To ensure you jump onto this thread the Dispatcher object provides you with methods that allow you to invoke your code on the thread to make the changes.
To run your code you need to call the Invoke() or BeginInvoke() methods which accept any delegate and an optional list of parameters. Both methods invoke the delegate’s target on the dispatcher’s thread however the difference is that the Invoke() method is synchronous and the BeginInvoke() method is asynchronous.
An example of the BeginInvoke() method is shown below (Calling the web service to return an image to display on the user interface):
private delegate void syncImageDelegate(Resolution resolution);
private void ProcessAsyncImage()
{
asyncImageDelegate invokeImage = SetAsyncImage;
asyncImage.Dispatcher.BeginInvoke(DispatcherPriority.Normal, invokeImage, Resolution.Low);
}
private void SetAsyncImage(Resolution resolution)
{
asyncImage.Source = GetImage(resolution);
}
You can see from the code above that:
- A Delegate is created call syncImageDelegate,
- the method ProcessAsyncImage() is called (not shown in code snippet)
- This then firstly creates an invokeImage which is a variable of type asynchImageDelegate
- invokeImage is assigned the method SetAsyncImage method.
- asyncImage (image object in xaml) has a dispatcher which is then told to asynchronously invoke the delegate. The first parameter is the Priority (Normal in this case). The second parameter is the delegate, and the final parameter is the parameters to pass to the method.
- The SetAsyncImage method is called which is now running on the UI Thread, allowing the Image source to be set.
DispatchTimer
A common task that is needed is timer feature which is used to trigger of code on an interval basis. When you need to make changes to the UI on a common interval the best way to do this is to use the DispatchTimer object.
The DispatchTimer object as the name suggest is a Dispatcher with a timer feature on it. It will allow you to set an interval, and create an event handler everytime the interval happens.
The only main difference between DispatchTimer and theTimer class is the DipatchTimer class ensures that the code is ran on the UI Thread.
/// <summary>
/// the event handler for when the load image button is clicked to start all the threads off
/// </summary>
/// <param name="sender">load button</param>
/// <param name="e">RoutedEventArgs from the button</param>
private void Button_Click(object sender, RoutedEventArgs e)
{
//Timer Setup
dispatcherTimer = new DispatcherTimer(DispatcherPriority.Normal);
dispatcherTimer.Interval = TimeSpan.FromSeconds(0.1);
dispatcherTimer.Tick += new EventHandler(dispatcherTimer_Tick);
start = DateTime.Now; ;
//Starts the downloading of the images
dispatcherTimer.Start();
}
/// <summary>
/// An event handler that is called when the interval is met to update the time of each timer text
/// </summary>
/// <param name="sender">DispatcherTimer</param>
/// <param name="e">EventArgs</param>
void dispatcherTimer_Tick(object sender, EventArgs e)
{
if (asyncProgress.Value != 100)
{
asyncTime.Text = DateTime.Now.Subtract(start).TotalSeconds.ToString("#0.00") + " seconds";
}
if (syncProgress.Value != 100)
{
syncTime.Text = DateTime.Now.Subtract(start).TotalSeconds.ToString("#0.00") + " seconds";
}
if (bwProgress.Value != 100)
{
bwTime.Text = DateTime.Now.Subtract(start).TotalSeconds.ToString("#0.00") + " seconds";
}
}
Here you can see that when the button is clicked it creates the DispatchTimer which updates the UI so you can see how long each method is taking to load. Just as you would do with the Timer you set the properties for the Interval which requires a TimeSpan and also set an event for Tick.
The BackgroundWorker
As seen in the previous sections you can create plenty of Threads and just start them off however this ‘no frills’ version can pose possible dangers of locking on shared resources or even blocking on the UI Thread. The safest way is from existing .net 2.0 technology, a component called the BackgroundWorker found in the System.ComponentModel namespace ensures that time consuming threads are not taking up valuable processor time. It also uses the dispatcher object in the background and is the fool proof way of writing a multi-threaded application. It uses an event based model to avoid marshalling issues.
The BackgroundWorker has several useful event handlers:
- DoWork
- ProgressChanged
- RunWorkerComplete
The DoWork is the code that is to be executed, maybe a calculation or business logic. Note that you would not do UI changes here. The code reports the progress, sets a backgroundResolution variable to what the next call should ask for, and also assigns a property called e.Result.
The DoWorkEventArgs has two important properties called Argument and Result. When you assign these properties they are transferable to the RunWorkerCompleted method as well. In this case we are saying that the e.Result is new resolution that the background should ask for next.
/// <summary>
/// Called when the background worker has to do work
/// </summary>
/// <param name="sender">BackgroundWorker</param>
/// <param name="e">DoWorkEventArgs</param>
void backgroundWorker_DoWork(object sender, DoWorkEventArgs e)
{
//Thread has been put to sleep to slow the call down so that you can see the difference in speed
Thread.Sleep(5000);
switch (backgroundResolution)
{
case Resolution.Low:
backgroundWorker.ReportProgress(66);
backgroundResolution = Resolution.Medium;
e.Result = Resolution.Medium;
break;
case Resolution.Medium:
backgroundWorker.ReportProgress(100);
backgroundResolution = Resolution.High;
e.Result = Resolution.High;
break;
default:
backgroundWorker.ReportProgress(33);
backgroundResolution = Resolution.Low;
e.Result = Resolution.Low;
break;
}
}
The ProgressChanged event allows you to make changes to UI to give updates on the progress of the execution, this method is only called if the backgroundWorker has explicity had it’s ReportProgress method called, we make this call in the DoWork method which updates the progress bar.
/// <summary>
/// Called when the ReportProgress method is called on the BackgroundWorker, this executes on the UI Thread
/// </summary>
/// <param name="sender">BackgroundWorker</param>
/// <param name="e">ProgressChangedEventArgs</param>
void backgroundWorker_ProgressChanged(object sender, ProgressChangedEventArgs e)
{
bwProgress.Value = e.ProgressPercentage;
}
The RunWorkerComplete event is called when the work has been completed, this method runs on the UI thread and is advisable that all the UI changes are made here. The code assigns the image to the bwImage(Image Object in XAML) it also checks the result from the DoWork to check if a call has to be made, if the high resolution image is loaded then there is no need to make the call.
/// <summary>
/// When the background worker is complete the image is updated by deserializing the image object
/// </summary>
/// <param name="sender">BackgroundWorker</param>
/// <param name="e">RunWorkerCompletedEventArgs</param>
void backgroundWorker_RunWorkerCompleted(object sender, RunWorkerCompletedEventArgs e)
{
bwImage.Source = GetImage((Resolution)e.Result);
if ((Resolution)e.Result != Resolution.High)
{
backgroundWorker.RunWorkerAsync();
}
}
The BackgroundWorker also supports event cancellation so that whilst in the middle of a process it can be cancelled, once cancelled the RunWorkerComplete is called with the argument e.Cancelled equalling true.
Results
When the application is ran it is clear to see that the Asynchronous calls were quicker because the Thread does not wait for the current process to finish before it starts the next process.
In Second place is the Synchronous call because a process can not execute until the prior process has finished executing, this can potentially lead to blocking up a thread having a dominio effect on the overall process.
Finally in last place is the BackgroundWorker, the reason for this is pretty simple, it’s because the ThreadPrority is set lower on the BackgroundWorker by default so it will run with less processor time.
All methods had their threads put to sleep so that the updates could be seen.