Implementing Adapter Outbound Message Exchange Handler
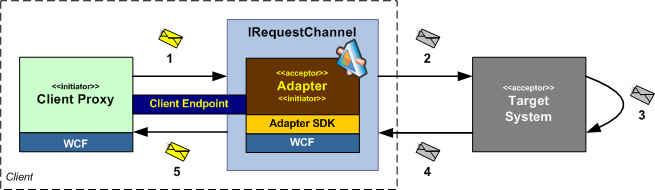
Scenario: Client executes a single synchronous outbound call in the target system using the adapter
Content
1) Adapter Developer Perspective: Implement execute() method in adapter implementation of IOutboundHandler
2) Adapter Consumer Perspective: Test Adapter Outbound Handler functionality
a. Using WCF Channel Programming
b. Using Add Adapter Service Reference Visual Studio Plug-In
c. Using Consume Adapter Service BizTalk Project Add-In
Each adapter implementation of outbound handler is going to be unique depending on the type of the target system it is implementing. Follow the standard .NET programming best practices to create code that uses best practices and design patterns. This class is responsible for the majority of the implementation of an adapter. The code snippets in this post use the standard .NET classes to process the Xml messages. In a future post, I will talk about how "Metadata Driven Adapter Data Reader / Writer" functionality provided by the Adapter SDK can be used by the Adapter Developer to process input/output WCF messages.
1) Implement execute() method in Adapter implementation of IOutboundHandler
The IOutboundHandler has one key method called
public Message Execute(Message message, TimeSpan timeout);
where,
message |
Incoming WCF message. If the request message is larger that the maximum message size allowed by the binding being used, a QuotaExceededException is thrown. The maximum message size is set by the MaxReceivedMessageSize property. The default value is 65536 bytes. |
timeout |
Time interval within which this operation should be completed. Notes to Adapter Developers: The operation should throw a TimeoutException if the specified timeout is exceeded before the operation is completed. |
This method reads a WCF message and converts it to the target system request message format. It is responsible to return the correlated WCF message response within a specified interval of time. Here is a rudimentary sample implementation of execute() method using the Hello World example. In this sample, the implementation is being provided for method with signature: string SayHelloWorld(string aName); Remember the metadata for this operation is defined using implementations of Metadata Browse Handler and Metadata Resolver Handler.
#region IOutboundHandler Members
public Message Execute(Message message, TimeSpan timeout)
{
OperationMetadata om = this.MetadataLookup.GetOperationDefinitionFromInputMessageAction(message.Headers.Action, timeout);
if (om == null)
{
throw new AdapterException("Invalid operation " + message.Headers.Action);
}
switch (message.Headers.Action)
{
case "Hello/SayHelloWorld":
string outputValue = String.Empty;
// Input Message Format
// <SayHelloWorld><aName>{text}</aName></SayHelloWorld>
using (XmlDictionaryReader inputReader = message.GetReaderAtBodyContents())
{
// Read <Name>
inputReader.MoveToContent();
inputReader.ReadStartElement("SayHelloWorld");
inputReader.MoveToContent();
string inputValue = inputReader.ReadElementString("aName");
inputReader.MoveToContent();
inputReader.ReadEndElement();
for (int count = 0; count < this.Connection.ConnectionFactory.Adapter.Count; count++)
{
outputValue += (inputValue) + " says 'Hello World!'\n";
if (count < this.Connection.ConnectionFactory.Adapter.Count - 1)
{
outputValue += " ";
}
}
}
StringBuilder outputString = new StringBuilder();
XmlWriterSettings settings = new XmlWriterSettings();
settings.OmitXmlDeclaration = true;
// Create response message
XmlWriter replywriter = XmlWriter.Create(outputString, settings);
replywriter.WriteStartElement("SayHelloWorldResponse", HelloWorldAdapter.SERVICENAMESPACE);
replywriter.WriteElementString("SayHelloWorldResult", outputValue);
replywriter.WriteEndElement();
replywriter.Close();
// Write a trace entry
HelloWorldAdapterUtilities.Trace.Trace(TraceEventType.Verbose, "HelloWorldAdapterOutboundHandler::Execute", outputValue);
XmlReader replyReader = XmlReader.Create(new StringReader(outputString.ToString()));
// Output Message Format
// <SayHelloWorldResponse><SayHelloWorldResult>{Name}</SayHelloWorldResult></SayHelloWorldResponse>
// create output message
return Message.CreateMessage(MessageVersion.Default, om.OutputMessageAction, replyReader);
default: throw new AdapterException("Invalid Operation");
}
}
#endregion IOutboundHandler Members
Note the use of OperationMetadata in the above example. The instance of the operation metadata for the incoming operation can be obtained by using MetadataLookup property. When creating the response message (i.e. return Message.CreateMessage(…)), use OutputMessageAction property of Operation Metadata to get the result action for the response message.
Here is the sample implementation for execute() method in the DLL adapter. As you can see, the implementation can vary for each adapter.
public Message Execute(Message message, TimeSpan timeout)
{
// Retrieve metadata based on the request WCF Message action.
// Since we are in the context of the IOutputHandler, we retrieve
// the operation metadata based on the Output Message Action.
MyExistingLibraryOperationMetadata operationMetadata =
(MyExistingLibraryOperationMetadata)this.MetadataLookup.GetOperationDefinitionFromInputMessageAction(message.Headers.Action, timeout);
if (operationMetadata == null)
{
throw new AdapterException("Invalid Operation");
}
// parse input message
Dictionary<string, object> parmValues = new Dictionary<string, object>();
this.Parse(message.GetReaderAtBodyContents(), operationMetadata, true, out parmValues);
// invoke the method
Dictionary<string, object> outParmValues = null;
Object returnObject = this.ProcessMessage(operationMetadata, parmValues, out outParmValues);
// build result
return this.GenerateMessage(message, operationMetadata, returnObject, outParmValues, true);
}
Here is a code snippet of one of the functions - ProcessMessage used by the execute() function. In this sample implementation, this function uses the .NET reflection API methods to invoke the function on the DLL.
/// <summary>
/// Invoke the operation on the target information system.
/// </summary>
/// <param name="operationMetadata"></param>
/// <param name="parameterValues"></param>
/// <param name="outParameters"></param>
/// <returns></returns>
internal object ProcessMessage(MyExistingLibraryOperationMetadata operationMetadata,
Dictionary<string, object> parameterValues,
out Dictionary<string, object> outParameters)
{
Type type = operationMetadata.Type;
MethodInfo methodInfo = operationMetadata.MethodInfo;
List<object> values = new List<object>();
foreach (object parmValue in parameterValues.Values)
{
values.Add(parmValue);
}
// create an instance of the object
object anObject = Activator.CreateInstance(type);
try
{
object result = type.InvokeMember(methodInfo.Name, BindingFlags.Default | BindingFlags.InvokeMethod, null, anObject, values.ToArray());
outParameters = new Dictionary<string, object>();
outParameters.Add(result.ToString(), result);
return result;
}
catch (MissingMethodException e)
{
throw new AdapterException("Mismatch between what's supplied in input and what the operation is expecting. " + e.Message);
}
}
2) Test Adapter Outbound Handler functionality
a. Using WCF Channel Programming
This method shows how Adapter’s Outbound Handler functionality can be called using WCF channel programming.
public class Program
{
static void Main(string[] args)
{
// instantiate the binding
HelloWorldAdapterBinding binding = new HelloWorldAdapterBinding();
// set the custom binding property
binding.Count = 4;
binding.OverrideWsdlBuilder = true;
// Create EndpointAddress
EndpointAddress address = new EndpointAddress("hello://");
// create channel factory using channel shape IRequestChannel
IChannelFactory<IRequestChannel> requestChannelFactory = binding.BuildChannelFactory<IRequestChannel>();
// open channel factory
requestChannelFactory.Open();
// create channel
IRequestChannel requestChannel = requestChannelFactory.CreateChannel(address);
// open channel
requestChannel.Open();
// create WCF request message
Message requestMessage = CreateSayHelloWorldRequestMessage();
// Send the WCF request message and receive the WCF response message.
Message responseMessage = requestChannel.Request(requestMessage);
// Display the response message content
XmlReader responseReader = responseMessage.GetReaderAtBodyContents();
Console.WriteLine(responseReader.ReadOuterXml());
Console.WriteLine();
Console.WriteLine(responseReader.ReadString());
Console.WriteLine();
// close channel
requestChannel.Close();
// close channel factory
requestChannelFactory.Close();
}
/// <summary>
/// Create WCF Request Message
/// </summary>
/// <returns>WCF Request Message</returns>
private static Message CreateSayHelloWorldRequestMessage()
{
// Create WCF Request Message
// Create and send the request message as the channel is now ready for the
// request/response message exchange. Construct a simple XML document that will
// contain a name passed in from the command argument.
String input = "<SayHelloWorld><Name>" + "John" + "</Name></SayHelloWorld>";
// set action string
Message requestMessage = Message.CreateMessage(MessageVersion.Default
, "Hello/SayHelloWorld"
, XmlReader.Create(new System.IO.StringReader(input)));
return requestMessage;
}
}
Here is the expected output, when this console program is run.
<SayHelloWorldResponse xmlns="hello://Microsoft.WCF.Samples.Adapters"><SayHelloW
orldResult>John says 'Hello World!'
John says 'Hello World!'
John says 'Hello World!'
John says 'Hello World!'
</SayHelloWorldResult></SayHelloWorldResponse>
Press any key to continue . . .
b. Using Add Adapter Service Reference Visual Studio Plug-In
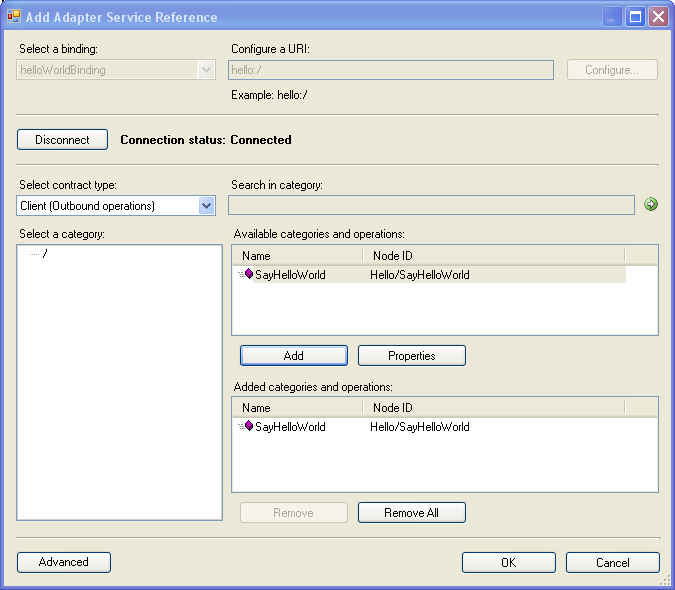
Right-click on a VS Project (Console Application, Windows Application, Web Application, Class Library, etc.) and select “Add Adapter Service Reference…”. This will bring up the Add Adapter Service Reference UI. Once the adapter binding is registered with the WCF configuration system, the adapter binding will show up in the Select a binding drop down box. Select your adapter binding, enter Connection Uri and click on Connect. If the connection is successful, you should be able to see the browse results in left-hand tree pane labeled as Select a category.
Select the operation and click on OK. This should generate a proxy in the project from where Add Adapter Service Reference Visual Studio Plug-In was invoked along with the app.config.
Generated app.config
<?xml version="1.0" encoding="utf-8"?>
<configuration xmlns="https://schemas.microsoft.com/.NetConfiguration/v2.0">
<system.serviceModel>
<bindings>
<helloWorldBinding>
<binding name="HelloWorldAdapterBinding" closeTimeout="00:01:00"
openTimeout="00:01:00" receiveTimeout="00:10:00" sendTimeout="00:01:00"
count="3" />
</helloWorldBinding>
</bindings>
<client>
<endpoint address="hello:/" binding="helloWorldBinding" bindingConfiguration="HelloWorldAdapterBinding"
contract="HelloWorld" name="HelloWorldAdapterBinding_HelloWorld" />
</client>
</system.serviceModel>
</configuration>
Generated proxy file
[System.CodeDom.Compiler.GeneratedCodeAttribute("System.ServiceModel", "3.0.0.0")]
[System.ServiceModel.ServiceContractAttribute(Namespace="hello://Microsoft.WCF.Samples.Adapters", ConfigurationName="HelloWorld")]
public interface HelloWorld {
[System.ServiceModel.OperationContractAttribute(Action="Hello/SayHelloWorld", ReplyAction="Hello/SayHelloWorld/response")]
string SayHelloWorld(string aName);
}
[System.Diagnostics.DebuggerStepThroughAttribute()]
[System.CodeDom.Compiler.GeneratedCodeAttribute("System.ServiceModel", "3.0.0.0")]
public partial class HelloWorldClient : System.ServiceModel.ClientBase<HelloWorld>, HelloWorld {
public HelloWorldClient() {
}
public HelloWorldClient(string endpointConfigurationName) :
base(endpointConfigurationName) {
}
public HelloWorldClient(string endpointConfigurationName, string remoteAddress) :
base(endpointConfigurationName, remoteAddress) {
}
public HelloWorldClient(string endpointConfigurationName, System.ServiceModel.EndpointAddress remoteAddress) :
base(endpointConfigurationName, remoteAddress) {
}
public HelloWorldClient(System.ServiceModel.Channels.Binding binding, System.ServiceModel.EndpointAddress remoteAddress) :
base(binding, remoteAddress) {
}
public string SayHelloWorld(string aName) {
return base.Channel.SayHelloWorld(aName);
}
}
Using generated proxy in a sample console application
From adapter consumer, using a proxy is way simpler than accessing the adapter using the channel client as shown in the previous example.
class Program
{
static void Main(string[] args)
{
HelloWorldClient proxy = new HelloWorldClient("HelloWorldAdapterBinding_HelloWorld");
Console.WriteLine(proxy.SayHelloWorld("John"));
}
}
Here is the expected output, when this console program is run.
John says 'Hello World!'
John says 'Hello World!'
John says 'Hello World!'
Press any key to continue . . .
c. Using Consume Adapter Service BizTalk Project Add-In
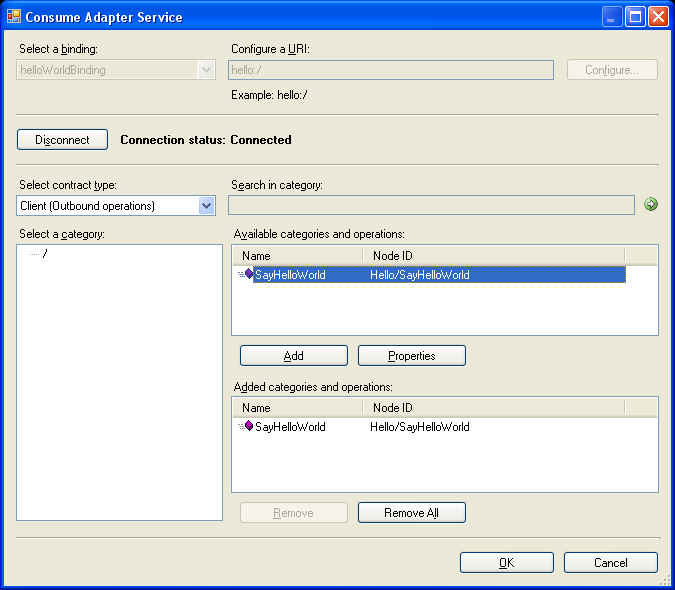
Create a BizTalk Project in Visual Studio for experiencing Consume Adapter Service BizTalk Project Add-In. Right-click on this project, select “Add Generated Items > Consume Adapter Service …”. This will bring up the Consume Adapter Service UI. This UI has same browse behavior as the Add Adapter Service Reference UI with the exception that click on OK after selecting operations generates Schemas instead of a .NET proxy. In addition to the schema files, a port configuration XML file will be generated, which can be imported in the BizTalk Administration Console to configure a BizTalk Send Port.
Generated Schema File
<xs:schema xmlns:tns="hello://Microsoft.WCF.Samples.Adapters" xmlns:b="https://schemas.microsoft.com/BizTalk/2003" elementFormDefault="qualified" targetNamespace="hello://Microsoft.WCF.Samples.Adapters" version="1.0" xmlns:xs="https://www.w3.org/2001/XMLSchema">
<xs:element name="SayHelloWorld">
<xs:annotation>
<xs:documentation>
<doc:action xmlns:doc="https://schemas.microsoft.com/servicemodel/adapters/metadata/documentation">Hello/SayHelloWorld</doc:action>
</xs:documentation>
</xs:annotation>
<xs:complexType>
<xs:sequence>
<xs:element minOccurs="1" maxOccurs="1" name="aName" nillable="true" type="xs:string">
<xs:annotation>
<xs:documentation>Hello World is said by this name.</xs:documentation>
</xs:annotation>
</xs:element>
</xs:sequence>
</xs:complexType>
</xs:element>
<xs:element name="SayHelloWorldResponse">
<xs:annotation>
<xs:documentation>
<doc:action xmlns:doc="https://schemas.microsoft.com/servicemodel/adapters/metadata/documentation">Hello/SayHelloWorld/response</doc:action>
</xs:documentation>
</xs:annotation>
<xs:complexType>
<xs:sequence>
<xs:element minOccurs="1" maxOccurs="1" name="SayHelloWorldResult" nillable="true" type="xs:string" />
</xs:sequence>
</xs:complexType>
</xs:element>
</xs:schema>
Once the schema files are generated, these schemas can be used within the BizTalk Orchestration. The logical Send Port(s) and/or Receive Port(s) can be defined using the standard BizTalk port creation mechanism. The generated port configuration file can be imported into the BizTalk Administration Console to configure the physical ports with BizTalk WCF Adapter configuration information.