Windows Event Forwarding to a workgroup Collector Server
Using Windows Event Forwarding (aka Windows Event Collection) events can be forwarded from various nodes to a central collector server. Having logs centrally makes it simpler to analyze the logs, additionally any uninteresting entries can be filtered out by configuring the appropriate event filters. To prevent tampering on the collected logs the events can be forwarded to a dedicated, non-domain joined machine. This guide is about how to setup such a configuration.
This guide documents a step by step approach to achieve the above configuration and is intended as an initial lab or learning exercise. The document may be used as a template to configure Event Forwarding inside your organization, in which case changes to the template to reflect those differences are required. I recommend you test these steps prior to implementing in a production environment.
To enable Windows Event Forwarding to forward events to a centralized non-domain joined collector server the following steps must be completed.
- Configure an Enterprise PKI configuration.
- Create specific certificate templates.
- Issue a certificate for the collector server.
- Configure the collector server.
- Finally, configure the policy to enable event forwarding.
Prerequisites
The article assumes the following components and services are present and operating without issue before starting the Windows Event Forwarding configuration.
- A Microsoft Active Directory Server running Windows 2012 or later.
- A Domain Joined Server for hosting the Enterprise PKI CA Server running Windows 2012 R2 or later.
- A standalone Windows 2012 R2 or later server for the Event collector.
- Network connectivity between all the systems.
- DNS name resolution is working and all systems have valid records in the DNS domain zone.
Please Note: If the systems are not running Windows 2012\Windows 8 or later the private key permissions can’t be configured to give access to ‘Network Service’ which is required for the setup to complete successfully. In this case, you’ll need to adjust the client compatibility setting to match the OS level in the certificate template and manually assign the Private Key rights to the Network Service Account after issuance of the Certificate in this configuration.
The Lab
This lab uses the following systems:
Windows Server with Directory Services installed
IP: 10.0.0.190
Name: vm3.contoso.local
Domain: contoso.local
Domain Joined Windows Server
IP: 10.0.0.191
Name: vm4.contoso.local
Domain: contoso.local
Standalone Windows Server
IP: 10.0.0.192
Name: vm5.contoso.local
Workgroup: Workgroup
Enterprise PKI Configuration
The Enterprise CA installation and configuration listed is a bare minimum and is not intended as a reference guide for implementing a secure PKI implementation. Items such as Backup, Recovery, Hardening the CA, Hardware Key Protection (HSM) and PKI hierarchy are therefore not included in this document. After configuration validate that the PKI environment and CRL publication is working properly.
Installation of Active Directory Certificate Services (ADCS) (VM4)
- Log in onto VM4 as an Enterprise Administrator
- Launch PowerShell as Elevated user.
- Install the ADCS and IIS binaries using PowerShell:
Add-WindowsFeature Adcs-Cert-Authority,Web-Server,Web-Mgmt-Console,RSAT-ADCS
- Configure the ADCS role using PowerShell:
Install-AdcsCertificationAuthority -CACommonName "Contoso-Enterprise-CA" -CADistinguishedNameSuffix "O=Contoso" -CAType EnterpriseRootCA -CryptoProviderName "RSA#Microsoft Software Key Storage Provider" -HashAlgorithmName SHA256 -KeyLength 4096 -ValidityPeriod years -ValidityPeriodUnits 20
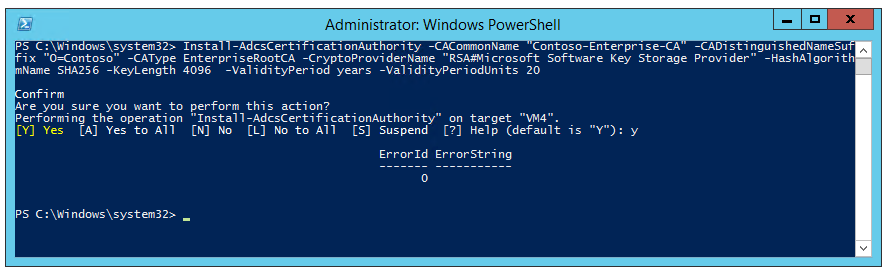
- The configuration should complete without error:
- Configure the CRL (Certificate Revocation Information) for the CA from the PowerShell console:
certutil -setreg CA\CRLPublicationURLs "1:c:\inetpub\wwwroot\pki\%3%8%9.crl\n65:C:\Windows\system32\CertSrv\CertEnroll\%3%8%9.crl\n2:https://%1/PKI/%3%8%9.crl"
- Create the folder on the webserver where the CRLs are published from the PowerShell console:
New-Item -ItemType Directory C:\inetpub\wwwroot\PKI
- Restart the Certificate Services to complete the configuration from the PowerShell console:
Restart-Service CertSvc
- Wait a few seconds for the CA service to be started, next generate a CRL by running from the PowerShell console:
Certutil -crl
- Validate the configuration of the CA by running pkiview.msc
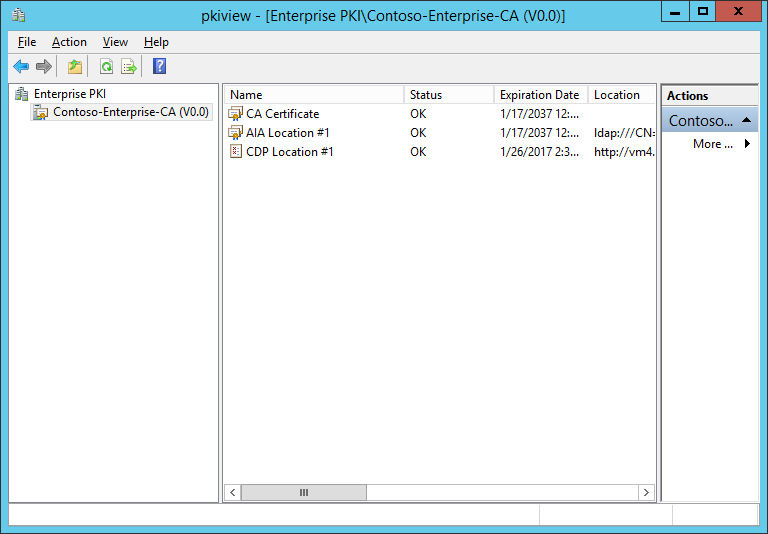
- Make sure all items have an ‘OK’ status. Close all open PowerShell and PKIview Windows.
Certificate Templates
To enable certificate based authentication between the clients in the Domain and the Collector server certificates need to be issued to all relevant endpoints. This chapter creates and publishes the templates that are used to request and issue these certificates.
Creation of the templates (VM4)
- Log in onto VM4 as an Enterprise Administrator
- Start certtmpl.msc
Computer Template
This template and related settings are used for configuration of event forwarding for servers and workstations.
- In the Certificate Template Console, select ‘Computer’, right click and select Duplicate.
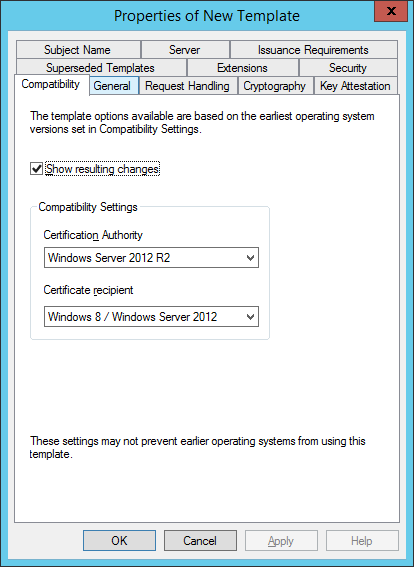
- On the compatibility tab, select for Certification Authority – ‘Windows Server 2012 R2’ and for Certificate recipient – ‘Windows 8 / Server 2012’
- On the Request Handling of the Template enable additional service account access to the private key.
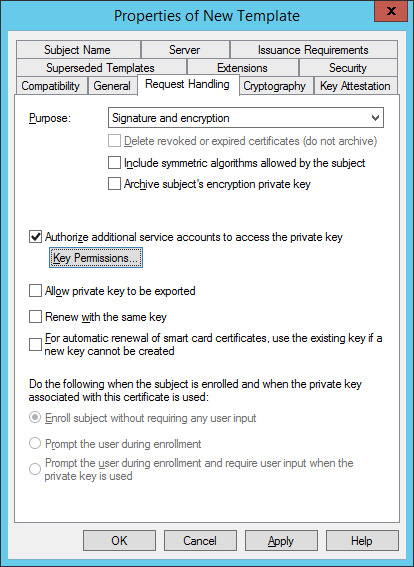
- Click the ‘Key Permissions’ button and add ‘Network Service’ with Read Permissions.
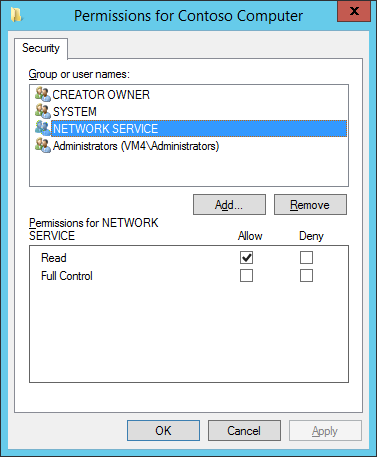
- On the General tab, provide the name ‘Contoso Computer’

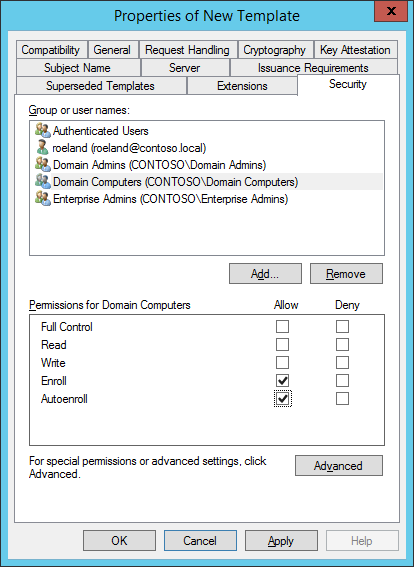
- On the Security Tab, select ‘Autoenroll’ for ‘Domain Computers’
- Leave all other tabs unchanged.
- Click OK to Close.
Domain Controller Authentication Template
This template and related settings are required for Domain Controller event forwarding.
- In the Certificate Template Console, select ‘Domain Controller Authentication’, right click and select Duplicate.
- On the compatibility tab, select for Certification Authority – ‘Windows Server 2012 R2’ and for Certificate recipient – ‘Windows 8 / Server 2012’
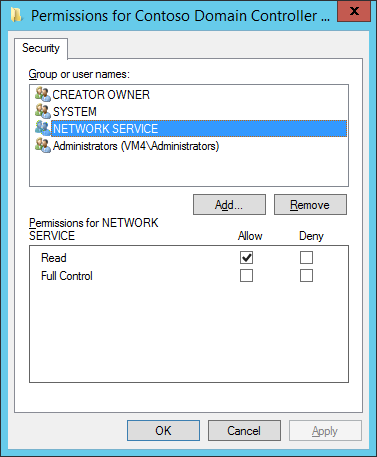
- On the Request Handling of the Template enable additional service account access to the private key.
- Click the ‘Key Permissions’ button and add ‘Network Service’ with Read Permissions.
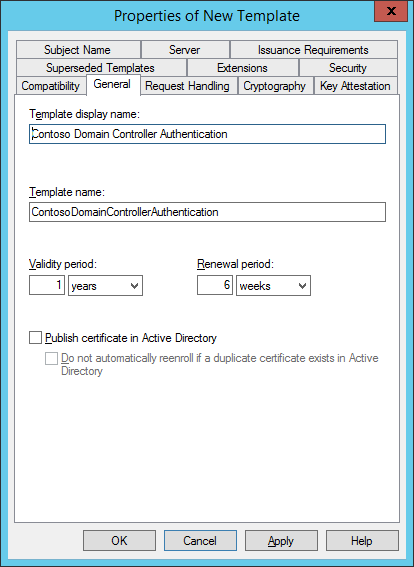
- On the General tab, provide the name ‘Contoso Domain Controller Authentication’
- Leave all other tabs unchanged.
- Click OK to Close.
WebServer Template
- In the Certificate Template Console, select ‘Web Server’, right click and select Duplicate.
- On the compatibility tab, select for Certification Authority – ‘Windows Server 2012 R2’ and for Certificate recipient – ‘Windows 7 / Server 2008 R2’
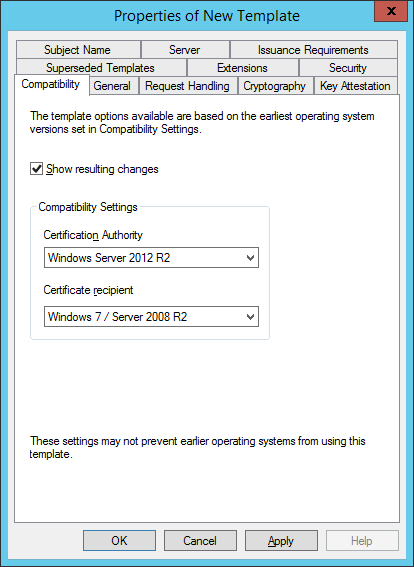
- On the General tab, provide the name ‘Contoso Web Server’

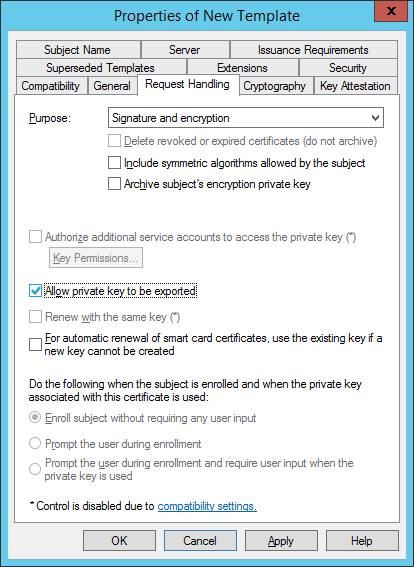
- On the Request Handling tab, select ‘Allow private key to be exported’
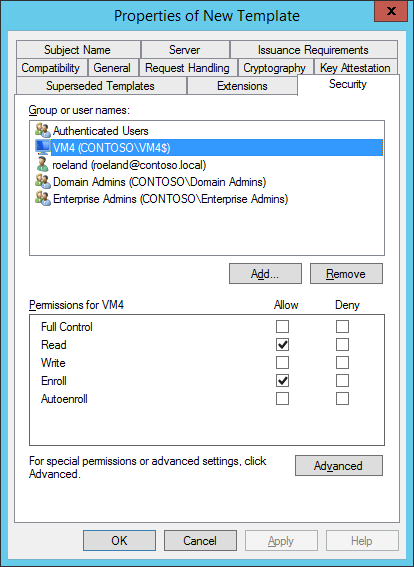
- On the security tab, add the CA server’s computer account. And enable the ‘Enroll’ permission.
When adding the Computer account make sure to select ‘Computers’ for the ‘Object Types’, otherwise the computer will not be found.
- Leave all other tabs unchanged.
- Click OK to Close.
- Close the ‘Certificate Templates Console’
Template Publication
- Launch PowerShell as Elevated user.
- Add the Templates created in the previous step to the CA by running:
 Add-CATemplate -Name "ContosoWebServer"

Add-CATemplate -Name "ContosoComputer"

Add-CATemplate -Name "ContosoDomainControllerAuthentication"
Adjust the template names when different names have been selected by the previous steps
- Remove unused templates:
 Remove-CATemplate -Name "DomainController" -force

Remove-CATemplate -Name "DomainControllerAuthentication" -force

Remove-CATemplate -Name "KerberosAuthentication" -force

Remove-CATemplate -Name "DirectoryEmailReplication" -force
- Close the PowerShell Console.
Certificate Preparation
To secure the communication on the Windows Event Forwarding Collector, a certificate is needed. Because the machine is not member of the Domain requesting a certificate is, in this occasion, done on the CA itself.
Creation of the Collector Certificate (VM4)
- Log in onto VM4 as an Enterprise Administrator
- Start certlm.msc
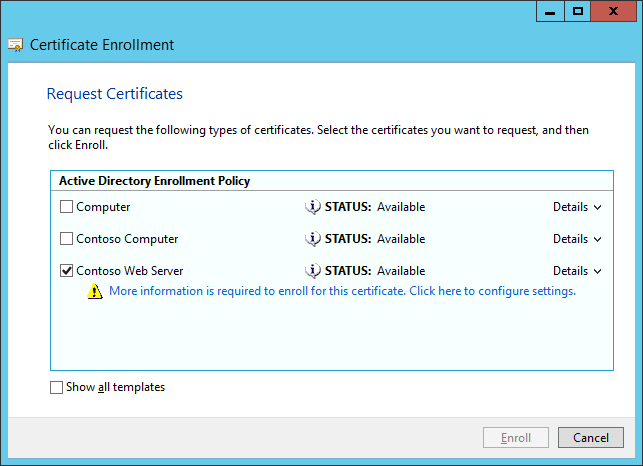
- Right click on the ‘Personal’ node and select ‘All tasks’, ‘Request new Certificate’
- Click next until the list with available Certificates is shown.
- Tick the checkbox in front of ‘Contoso Web Server’ and Click the blue hyperlink.
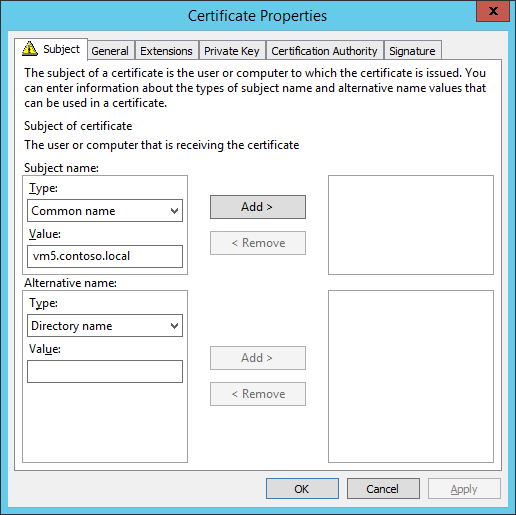
- Set the subject name type to be ‘Common name’, and the value is the FQDN of the Windows Event Forwarding Collector server. In this case vm5.contoso.local. Click Add and close the dialog by clicking OK.
- On The Certificate Enrollment dialog, click Enroll and Finish.
- Browse to the node: Personal\Certificates
- Right Click on the entry ‘vm5.contoso.local’ and select ‘All tasks’, ‘Export…’
- Click Next
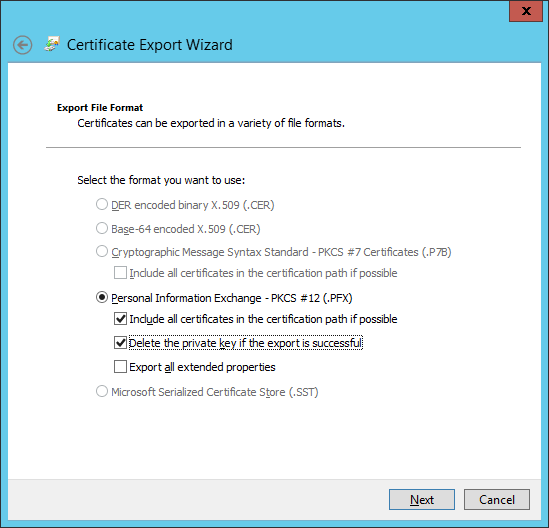
- On the Export Private Key dialog, select ‘Yes, export the private key’ and click Next
- On the Export File Format dialog, also select the option ‘Delete the private key if the export is successful’ and click Next
- On the security page, provide (and remember) a password to protect the file. Click Next.
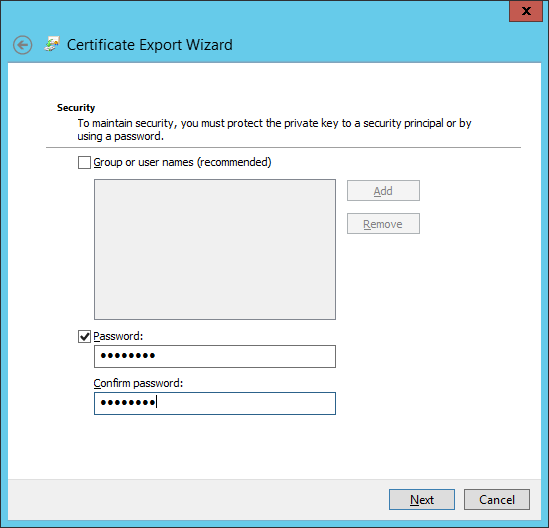
- Provide the filename ‘vm5.contoso.local.pfx’ and save the certificate and key to removable media, it will be needed on VM5 later on.
- After successful completion of the export, delete the ‘vm5.contoso.local‘-entry from the certlm console. - Do not delete other certificates!
Configuration of the Collector Server
The collector server needs to be configured to allow remote clients to push event logs. The certificate is added, PKI trust is established and firewall ports are opened.
Importing the certificates (VM5)
- Log in onto VM5 as an Administrator.
- Copy the ‘vm5.contoso.local.pfx’ file from the removable media to the administrator’s desktop on VM5.
- Launch PowerShell as Elevated user.
- Run the following script from the PowerShell console:
 function import(){

#Import the Certificate and Private Key

$CC = Import-PfxCertificate -FilePath "C:\Users\Administrator\Desktop\vm5.contoso.local.pfx" -CertStoreLocation cert:\LocalMachine\My -Password (Read-Host "Enter PFX password" -AsSecureString )


#Get CA Certificate and move to Trusted Root Authorities

$CA = (Get-ChildItem -Path Cert:\LocalMachine\Ca | Where-Object {$_.Subject -match "Contoso"}).Thumbprint

move-item -Path Cert:\LocalMachine\Ca\$CA Cert:\LocalMachine\Root


#Grant the Network Service Access to the private Key

$KP = "$($env:ProgramData)\Microsoft\Crypto\RSA\MachineKeys\$($CC.PrivateKey.CspKeyContainerInfo.UniqueKeyContainerName)"

$acl = Get-ACL $KP

$acl.AddAccessRule((New-Object -TypeName System.Security.AccessControl.FileSystemAccessRule -ArgumentList "NetworkService","Read,FullControl","Allow"))

Set-Acl -Path $KP -AclObject $acl

}


$ErrorActionPreference = "Stop"

import
- Keep the PowerShell Console open.
Configuring the subscription listener (VM5)
- Run the following command from the PowerShell console to enable and Configure WinRM:
winrm qc –q
- Run the following commands from the PowerShell console to enable and Configure Windows Event Collection:
 #Configure WEC

wecutil qc /q

#Enable Certificate based authentication

cmd /c 'winrm set winrm/config/service/auth @{Certificate="true"}'

#Configure HTTPS transport binding

cmd /c 'winrm create winrm/config/Listener?Address=*+Transport=HTTPS @{Hostname="vm5.contoso.local"}'

#Delete HTTP binding

cmd /c 'winrm delete winrm/config/Listener?Address=*+Transport=HTTP'
- Run the following command from the PowerShell console to allow inbound HTTPS traffic on port 5986:
netsh advfirewall firewall add rule name="Windows Event Forwarding and HTTPS Remote Management" protocol=TCP dir=in localport=5986 action=allow
- Close the PowerShell Console.
Creating a source based subscription listener (VM5)
- Launch the Event Viewer.
- Right Click ‘Subscriptions’ and click ‘Create Subscription…’.
- Type the subscript name and set the Subscription type to be ‘Source computer initiated’.
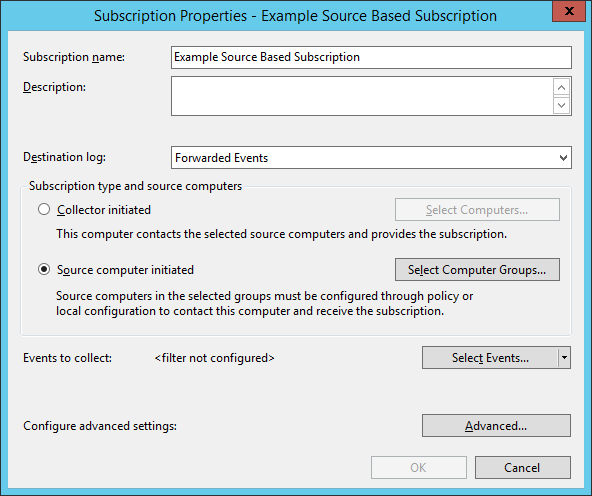
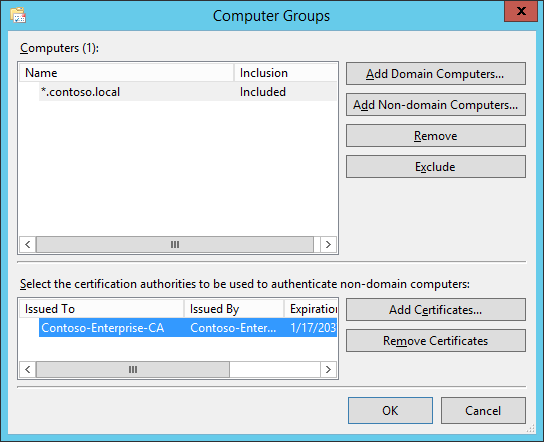
- Click the ‘Select Computer Groups’ button. Click the ‘Add Non-domain Computers’ button and provide the DNS name of the Forest with a wildcard. In this case *.contoso.local.
- Click the ‘Add Certificates button’ and select the CA Certificate ‘Contoso-Enterprise-CA’. Click OK to close the dialog.
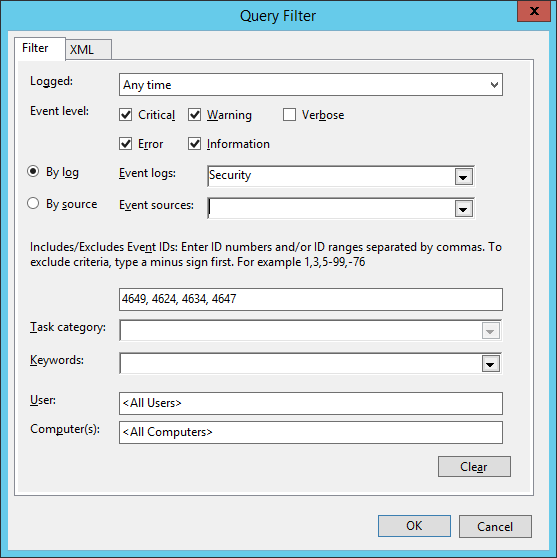
- Click the ‘Select Events’ button. Provided the Filter for the Events needed to be forwarded to the Collector server.
In this case we have selected a number of Security Event log records. Click OK to close the dialog.
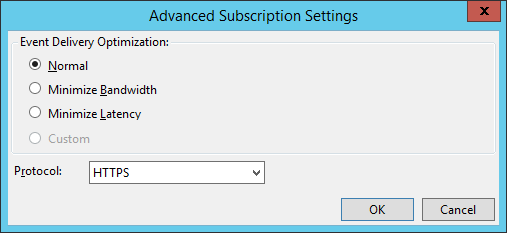
- Click the Advanced button and set the protocol to HTTPS. Click OK to close the dialog.
- Close the Subscription Properties dialog by clicking OK.
Configuring the Clients
To enable submission of the Events to the collector a GPO will be created to enable the computer to Enroll for a certificate, update group membership and configure the Event Forwarding.
Getting the Thumbprint for the issuing CA certificate (VM3)
The Thumbprint of the CA certificate is needed throughout the configuration of the Event Forwarding. This a property of the CA Certificate.
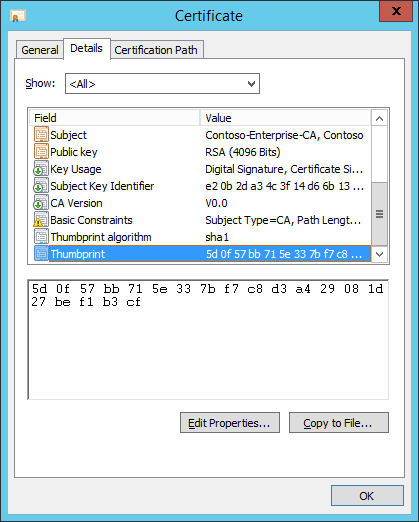
This field can be copied from the CA certificate or retrieved from Active Directory using a simple script.
- Log in onto VM3
- Launch PowerShell
- Run the following script from the PowerShell console:
 $DC = ([adsi]"LDAP://rootDSE").InvokeGet('rootDomainNamingContext')

$ES = [adsi]"LDAP://CN=Enrollment Services,CN=Public Key Services,cn=Services,cn=Configuration,$DC"

foreach($ca in $ES.Children) { $c = [System.Security.Cryptography.X509Certificates.X509Certificate2]($ca).cACertificate[0] "$($c.Subject): $($c.Thumbprint)" }
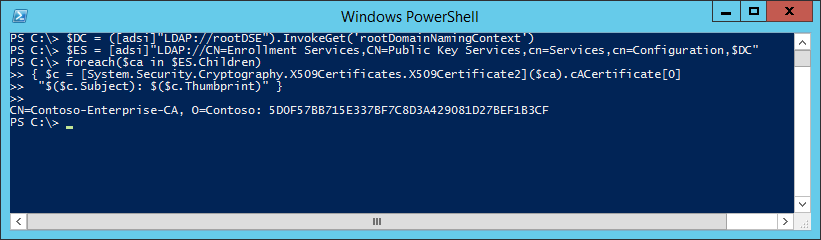
- Save the Thumbprint for later use, in this case the Thumbprint is: 5D0F57BB715E337BF7C8D3A429081D27BEF1B3CF. When creating the Group Policy, this value is needed.
- Close the PowerShell Console.
Preparing Domain Controller for Event Forwarding
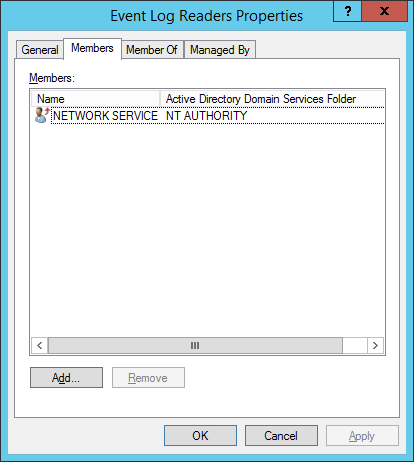
- To enable Domain Controllers to forward events the ‘Network Service’ account must be member of the Active Directory Build-in group ‘Event Log Readers’.
In Active Directory add the ‘Network Service’ account to the ‘Event Log Readers’ Group. Each DC must be rebooted to apply this new membership.
Creating the Group Policy
- On VM3 open GPMC.MSC.
- Create a new Group Policy Object and name it ‘Windows Event Collection (VM5)’.
- After the creation right click on the policy and click ‘Edit’.
- Browse to Computer Configuration, Policies, Windows Settings, Security Settings, System Services.
- Open the ‘Windows Remote Management’ entry. Select ‘Define this policy setting’ and set the service mode to ‘Automatic’. Click OK.

- Browse to Computer Configuration, Policies, Windows Settings, Security Settings, Public Key Policies/Certificate Services Client - Auto-Enrollment Settings.
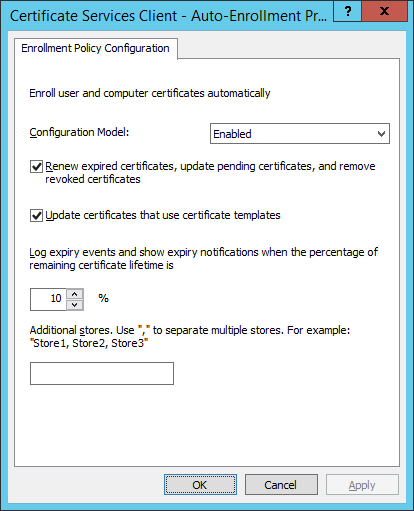
- Open the ‘Certificate Services Client – Auto-Enrollment’. Set the Configuration model to: ‘Enabled’ and tick the ‘Renew’ and ‘Update’ checkbox. Click OK.
- Browse to Computer Configuration, Policies, Windows Settings, Administrative Templates, Windows Components, Event Forwarding.
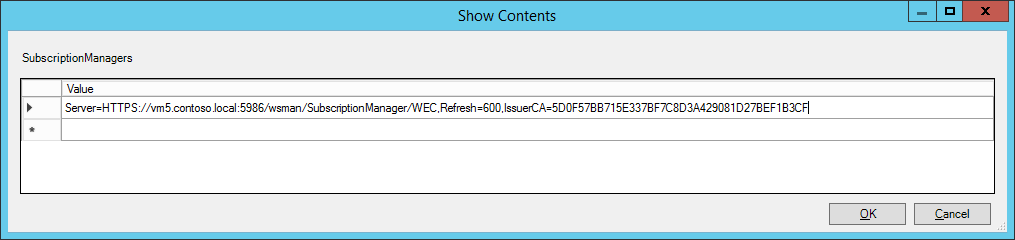
- Open the item ‘Configure target Subscription Manager’ and set the Policy to ‘Enabled’.
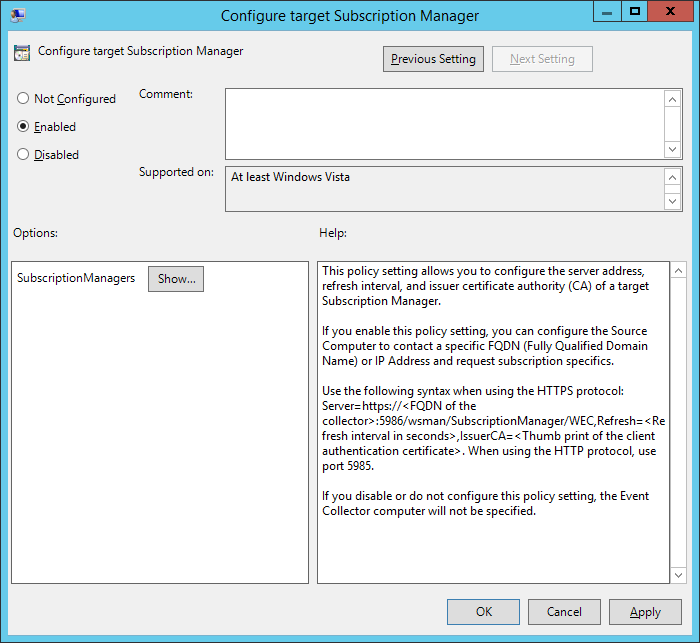
- Click the ‘Show…’ button. Add the line ‘Server=HTTPS:// <SERVERFQDN> :5986/wsman/SubscriptionManager/WEC,Refresh= <RefreshSeconds> ,IssuerCA= <CA-Cert-Thumbprint>’, in this Lab the setting is ‘Server=HTTPS://vm5.contoso.local:5986/wsman/SubscriptionManager/WEC,Refresh=600,IssuerCA=5D0F57BB715E337BF7C8D3A429081D27BEF1B3CF’ – The thumbprint was retrieved in the first step of the paragraph.
Click OK to close the dialog.
- Browse to Computer Configuration, Preferences, Control Panel Settings, Local Users and Groups.
- Right click, and click ‘New, Local Group’
- For the group name, select ‘Event Log Reader (built-in)’ form the list.
- Click ‘Add…’ to add the user ‘Network Service’ by typing the name in the ‘Name’ field.
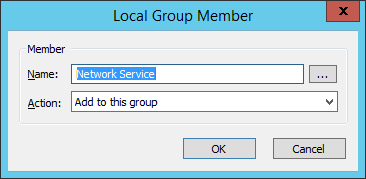
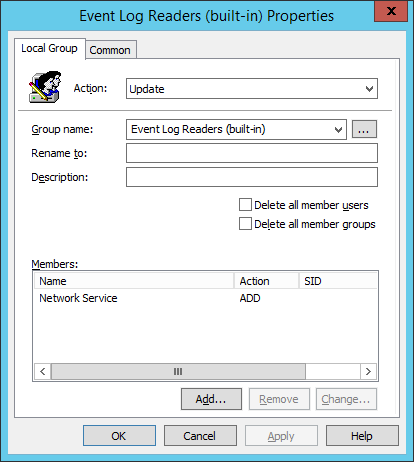
- Close all dialogs by clicking OK.
Apply the Policy
- After completion of the steps link the policy to the OUs where the Computer Objects in AD reside.

- For group memberships to be updated correctly the systems must be rebooted. A gpupdate /force will not suffice.
Troubleshooting
The Windows Event Forwarding Plugin writes log information to ‘Applications and Services logs, Microsoft, Windows, Eventlog-ForwardingPlugin’ on each client.
To apply configuration changes, restart the ‘Windows Remote Management’ Service.
These are the most common errors that might occur:
- Error: The WinRM client cannot process the request. The Enhanced Key Usage (EKU) field of the certificate is not set to ‘Client Authentication’. Retry the request with a certificate that has the correct EKU.
Solution: WinRM cannot find a usable certificate. Make sure a certificate is issued from the CA that was specified in the IssuerCA= setting and is using the correct template.
- Error: The forwarder is having a problem communicating with subscription manager at address <server>. Error code is 2150858882 and Error Message is .
Solution: There are no certificates available on the client machine. Ensure auto enrollment configuration is correct. Force an enrollment by running ‘certutil –pulse’ from a admin console.
- Error: WS-Management cannot process the request. The operation failed because of an HTTP error. The HTTP error (12186) is: The client certificate credentials were not recognized.
Solution: Make sure ‘Network Service’ has permissions to read the private key. Assign permissions using Certlm.msc, by selecting the certificate and selecting ‘All tasks, Manage private keys…’ from the context menu.
- Error: The subscription Example Source Based Subscription cannot be created. The error code is 5004.
Solution: ‘Network Service’ is not member of the ‘Event Log Reader’ group on the local PC. Update the membership and reboot the system.
- Error: The WinRM client cannot process the request. The destination computer (<server>) returned an ‘access denied’ error. Specify one of the authentication mechanisms supported by the server. If Kerberos mechanism is used, verify that the client computer and the destination computer are joined to a domain. Possible authentication mechanisms reported by server: Negotiate ClientCerts
Solution: Make sure the CA certificate trust is configured properly on the Collector server. Ensure that the CRL revocation data is reachable from the Collector Server.